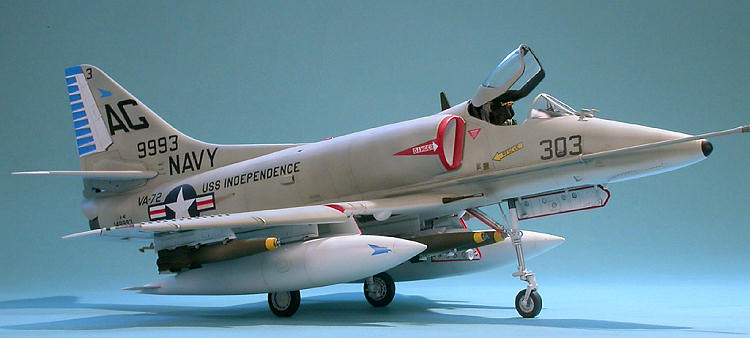
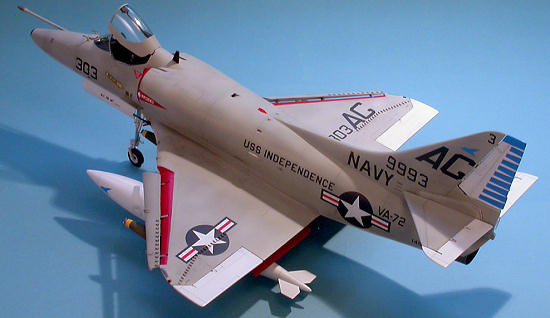
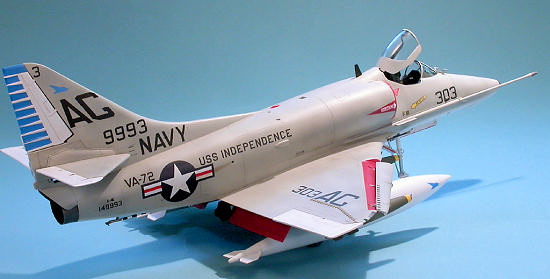
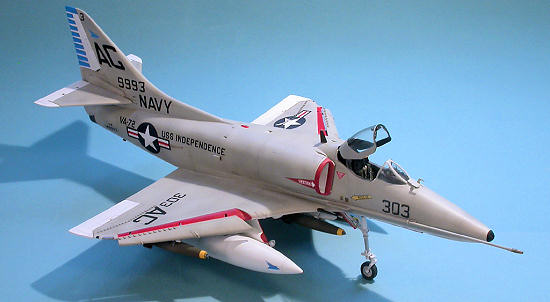
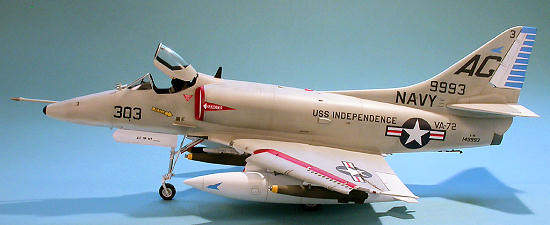
Trumpeter 1/32 A-4E Skyhawk
|
KIT #: |
02266 |
|
PRICE: |
118.95 SRP |
|
DECALS: |
Three options |
|
REVIEWER: |
Lee Kolosna |
|
NOTES: |
AMS Resin intakes, ejection seat, cockpit detail, nose
wheel. True Details main wheels. |
It’s somewhat hard to believe that the diminutive Douglas A-4 Skyhawk series
began life as a nuclear bomber, but that is exactly what its primary design
objective was when it was accepted for production in 1952. Douglas
Aircraft designer Ed Heinemann insisted on creating an airplane with the
smallest possible carrier footprint with the least amount of weight to get
the job done. With
an almost fanatical approach to avoiding unneeded structure and therefore
weight, the delta-winged attack plane sported spindly landing gear to allow
for clearance of the Mark 7 nuclear bomb. Powered
by a Wright license-built version of the Armstrong Siddeley Sapphire engine,
the bantam airplane evolved through the late 1950s and early 1960s into a
more traditional
 attack weapon as the nuclear mission conveyed to the much
larger A3D Skywarrior. After
the Department of Defense naming restructuring in September 1962, the A4D
became the A-4, with the A-4C deploying to the fleet in large numbers. The
A-4E variant saw a new and more powerful J52 engine supplied by Pratt &
Whitney, two additional under-wing hard points, a longer nose to house a
navigation computer and other related electronics, and redesigned air
intakes. Later Es were fitted with a humpback on the spine to
provide more space for additional electronics.
attack weapon as the nuclear mission conveyed to the much
larger A3D Skywarrior. After
the Department of Defense naming restructuring in September 1962, the A4D
became the A-4, with the A-4C deploying to the fleet in large numbers. The
A-4E variant saw a new and more powerful J52 engine supplied by Pratt &
Whitney, two additional under-wing hard points, a longer nose to house a
navigation computer and other related electronics, and redesigned air
intakes. Later Es were fitted with a humpback on the spine to
provide more space for additional electronics.
A-4s saw continuous service in Vietnam with the Navy and Marines right from
the start of the conflict. They
bore the brunt of the Navy’s air-to-ground mission for many years before
being phased out in favor of the Vought A-7 Corsair II. The
Navy’s Blue Angels flight demonstration team converted to A-4Fs in the 1974
season and flew them for eleven years. The Marines flew their
A-4Es and Fs up until they were replaced in the mid 1980s by the AV-8B
Harrier. The A-4M
was a Marines-only variant that served up until 1990. Two-seat
TA-4F and J aircraft were used as advanced flight trainers for future Naval
Aviators as well as in a Forward Air Controller role. Foreign
operators of the Skyhawk include Argentina, Australia, Israel, Brazil,
Singapore, New Zealand, Indonesia, and Malaysia. A
total of 2,960 Skyhawks were produced over a remarkable 27 year production
run.
The Skyhawk was a joy to fly and quite nimble with its flight
characteristics mimicking the MiG 17 quite well. Use
as an adversary began in the 1970s at Top Gun at NAS Miramar. “Jester
is dead, yee-haw!” Even
today, A-4s are used by private firms on contract to the US Navy and Air
Force for combat flight simulation exercises. Not
bad for a small, subsonic, nuclear-armed attack airplane, eh?
As with all Trumpeter kits, a careful inspection of the model is required to
determine what they did right and what needs to be corrected in regards to
accuracy. There is a bunch of stuff included in the box of 470
styrene, photo-etch, and rubber pieces that includes parts for the A-4M kit. You
get a complete J52 engine, which of course is mostly invisible after gluing
the fuselage together. There
are various open avionics bays that have some amount of detail provided (all
could stand sprucing up with wire bundles and small bits), open 20mm cannon
bays, and open engine access hatches. The
good news is that overall shape of the
 model is good, including the main
canopy shape – always a Trumpeter weak point. You
get eight sprues filled with ordnance that includes the maddening assortment
of bombs and missiles that either weren’t used on the A-4, or are so poorly
shaped that they are unusable. But
there are a few items that can be salvaged. Decals are for two
early (and plain) A-4Es and a later Adversary aircraft from VF-43.
model is good, including the main
canopy shape – always a Trumpeter weak point. You
get eight sprues filled with ordnance that includes the maddening assortment
of bombs and missiles that either weren’t used on the A-4, or are so poorly
shaped that they are unusable. But
there are a few items that can be salvaged. Decals are for two
early (and plain) A-4Es and a later Adversary aircraft from VF-43.
The really, really great news is that Trumpeter’s Mad Riveter was evidently
on holiday when this kit was designed, so we see nice recessed panel lines
and only a minimum of divots meant to replicate access panel fasteners. There
are no long lines of divots depicting flush rivets like seen on the F-105,
F-100, or P-47 kits. It
looks very Hasegawa-like, and that is a good thing.
There are a
fair number of accuracy issues to contend with, almost too many to mention. I
will hit the highlights as my research has unveiled, with a big thanks to
Thierry Laurent’s tweaks listing from Large
Scale Planes.
Overall shape. It is
pretty good, actually. There
are lumps and bumps and antennae that are included in the kit that were used
at various times in the Skyhawk’s long career with the Navy, so a good
reference is needed to help when deciding what gets put on where.
Air intakes. The
kit pieces are somewhat thin in the walls and the opening is not as blended
to the boundary layer plate as on the real aircraft. AMS
Resin provides a drop-in replacement of the kit pieces that makes for a nice
if somewhat subtle improvement. Note that the trapezoidal
reinforcing plate on the side of the intake was introduced late in the A-4Es
service life.
Slat wells. Repeating
the mistake of Hasegawa, the leading edge slat wells on the kit are
recessed, whereas in reality there are no wells – the slats sit on top of
the wing itself. This
can be fixed by sawing out the wells and reattaching them to mate even with
the wing top.
Landing gear. Also
repeating Hasegawa’s 1/48 scale design, the nose wheel and tire are molded
integrally with the landing gear strut. In
a 1/32 scale kit, this is simply unacceptable. AMS
Resin and True Details provide resin wheel replacements, but you will need
to cut the kit piece apart carefully to extract the nose wheel and then
reshape the fork. The
main wheel struts are a little too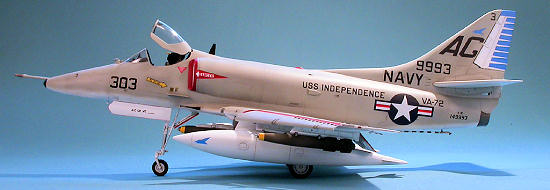 long and should be reduced in length 1 to
3 mm.
long and should be reduced in length 1 to
3 mm.
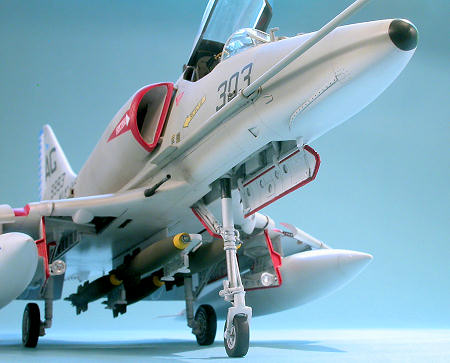
Windscreen. The
A-4E had an oval windscreen, whereas Trumpeter squares up the bottom frame. In
all honesty, this one is a lot of trouble to fix for a small amount of
reward as the bottom of the windscreen is blocked from view by the de-icing
and rain-removal vent. I found the vent to be a bit too tall
and sanded it down to half its thickness.
Aft avionics bay. Trumpeter
gives you the camel hump seen on all A-4Fs that were eventually fitted to
later A-4Es. None
of the kit decals options use this hump, but it’s nice to have for use with
some aftermarket decal schemes.
Refueling probe. You
only get the straight probe, not the cranked one seen on later Skyhawks and
most Aggressor aircraft. AMS
Resin offers a replacement.
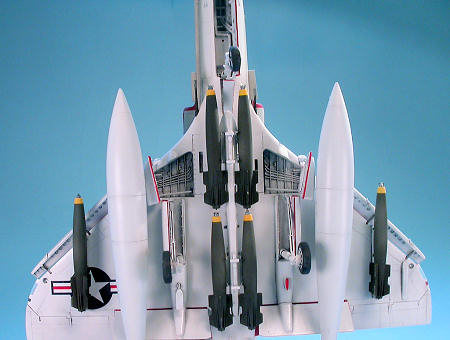
Ordnance. Oh boy –
I could write a few paragraphs on this subject, but I will try to be brief. The
two 300 gallon fuel tanks are just fine. There
is no 400 gallon centerline tank provided, which is a shame because A-4Es
used this quite often as period photographs show. The
AGM-12 Bullpup missiles are fine. The
AGM-45 Shrikes are slightly misshapen but can be used in a pinch, although
there is no launcher provided. I
have seen some photos of them mounted directly to the wing pylons, at least
in the early deployments of the A-4E. The Mk 82 Snakeye 500 pound bombs are
simplistic in detail but are usable. These
and the smaller 250 pound Mk 81 variants appear to be the most common weapon
seen hung under A-4s during the Vietnam years. The
Mk 82 LDGP “slick” bombs are the same anemic pieces first seen on the A-10
kit a decade ago and are hopelessly too skinny. The
Mk 117 bombs are bad, too – the shape of the fins is all wrong and besides
this weapon was used by the Air Force almost exclusively (to be fair, you
see them occasionally mounted to shore-based Marine A-4Es now and then) and
shouldn’t really be in this kit at all. The
AGM-65 Mavericks are for A-4Ms only and can’t be used on an A-4E. The
GBU-8 TV-guided bomb was not used on the A-4E, either. The
AGM-62 Walleyes are okay for use on mid-war period A-4Es. Finally,
the TER and MER bomb racks are much too skinny and could stand replacing if
you load your Skyhawk up with bombs. I
had an extra MER leftover from a Tamiya F-4C kit. The
ordnance load-out guide on the back of the instruction sheet is ludicrously
incorrect and should be ignored.
Cockpit. Detail is
so-so. Photo-etch
harnesses are provided for the ejection seat. Trumpeter doesn’t
provide a throttle. The
instrument panel has issues – the radar screen is much too small in relation
to the other dials. Trumpeter
gives you a decal to use over the raised plastic detail. I
used the AMS Resin ejection seat which also provides a throttle and a much
more detailed control stick and side panels. There
is no control stick console for the AGM-12 Bullpups if you use them on your
model.
 Antennae. The
AN/ALQ-126 ECM system started showing up in 1965. You
see them as “ice cream cone” receivers under the nose and tail and these are
included in the kit, but Trumpeter forgot to give you the ones seen under
the fuselage just in front of both landing gear bays. If
you use the kit decal options, this system was not present on any of those
aircraft at the time depicted, so leave them off. The
same is true for the small bump underneath the nose. There
were a number of changes to the antennae seen on the rear of the tail over
the years, in different combinations. The
kit instructions appear to provide an A-4M configuration. The
best recommendation is to find a photo of an A-4E during the period you wish
to depict and use that as your guide. Also,
the position of the pitot tubes on the nose is different than indicated in
the instructions. The
two devices should flank either side of the de-icing vent, very close to the
windscreen.
Antennae. The
AN/ALQ-126 ECM system started showing up in 1965. You
see them as “ice cream cone” receivers under the nose and tail and these are
included in the kit, but Trumpeter forgot to give you the ones seen under
the fuselage just in front of both landing gear bays. If
you use the kit decal options, this system was not present on any of those
aircraft at the time depicted, so leave them off. The
same is true for the small bump underneath the nose. There
were a number of changes to the antennae seen on the rear of the tail over
the years, in different combinations. The
kit instructions appear to provide an A-4M configuration. The
best recommendation is to find a photo of an A-4E during the period you wish
to depict and use that as your guide. Also,
the position of the pitot tubes on the nose is different than indicated in
the instructions. The
two devices should flank either side of the de-icing vent, very close to the
windscreen.
Decals. The VA-72
and VA-212 Scooters are from 1964 and the markings are okay with the
exception of the US national insignia (another infuriating Trumpeter mistake
seen over and over again in their kit decals), which have red bars that are
much too thick and are therefore unusable. The
Insignia Blue is a shade too light as well. The
VF-43 Adversary markings look all right. The
low viz national insignia is not standard, but photos seem to indicate this
is correct. The
stencil markings for the AGM-65 Mavericks prominently say “US Air Force”. My
guess is that the Navy would probably not have such on their carriers, but
it’s academic because Mavericks weren’t used on A-4Es.
Chaff dispensers. These
dispensers appears later in the life of the A-4Es. The
kit provides three of them. The
dispenser further aft appeared first, and might have been present on the
VA-212 aircraft. I
don’t see it present on the VA-72 aircraft. Neither
of these would have the more forward bank of dispensers. For
the VF-43 Adversary aircraft all the chaff dispensers were present, but
covered over with a plate as they weren’t utilized.
 Horizontal stabilizers. These
were generally left in a forward edge down configuration on the deck of the
carrier. Doing so
reveals a hole in the tail fin that you can see clear through to the other
side of the airplane – something that Trumpeter doesn’t provide. I
drilled that section out on my model.
Horizontal stabilizers. These
were generally left in a forward edge down configuration on the deck of the
carrier. Doing so
reveals a hole in the tail fin that you can see clear through to the other
side of the airplane – something that Trumpeter doesn’t provide. I
drilled that section out on my model.
Air brakes. The kit
provides you with some nice detail in the two air brake wells on either side
of the rear fuselage. The
problem is that these were almost always closed when the airplane is parked. Sometimes
you see the brakes just barely cracked open, probably because of a loss of
hydraulic pressure.
Control surfaces. All
are separate pieces. The
top of the rudder is molded integral to the tail fin. Chop
it off and attach it to the rudder instead. The
elevators are always in a neutral position with respect to the horizontal
stabilizer (with the whole assembly leading edge down, as mentioned above). The
flaps were often left open, so you can pose them down to expose the colorful
red interior. Note
that the lift spoilers, which mirror the flaps and automatically open
upwards on top of the wing when the aircraft hits the runway, only were
present in A-4F and later Skyhawks. For
the A-4E in this kit, the spoilers should be blended into the surrounding
top surface of the wing and the seam filled to prevent them from appearing
movable, which they were not.
So, once your homework is done on what Echo model Skyhawk you want to depict
during what timeframe, you can proceed with the build. Out
of the box, there is enough there to make a very nice model. Fix
the leading edge wing slat well issue and leave off the forward chaff
dispensers and perhaps the ice cream cone antennae, depending on the date of
operation. Load
your Scooter with the two 300 gallon fuel tanks and the centerline MER with
four of the six Snakeye bombs on it with either Bullpups or two more
Snakeyes hung under the outer pylons. Replace
at least the US national insignia decals and you will be set.
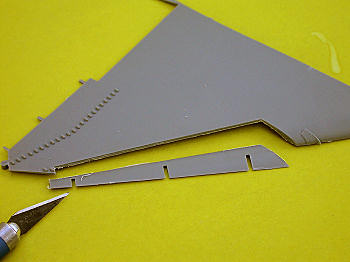 The first thing I did was cut out the wing leading edge slat wells by
scribing them repeatedly with the back of an X-acto knife blade until they
broke free. Then I glued them
back on the wing with the rearmost portion even with the wing surface. I
had to add shims of sheet styrene on the sides to account for the removed
material and filled the gaps with CA glue.
The first thing I did was cut out the wing leading edge slat wells by
scribing them repeatedly with the back of an X-acto knife blade until they
broke free. Then I glued them
back on the wing with the rearmost portion even with the wing surface. I
had to add shims of sheet styrene on the sides to account for the removed
material and filled the gaps with CA glue.
The J52 engine was assembled, even though none of it will be seen in
the completed model. Trumpeter
allows the model to be built so that the rear half of the fuselage is
removable, but I doubt many will utilize this feature. You
need to build the complete engine no matter which option you choose, as it
is needed to assist in the structural integrity of the fuselage and to place
the tailpipe in the right spot.
I decided to order the AMS Resin correction set for this kit. A
little bit of cutting and sanding was needed on the air intakes to get them
to fit to the kit jet engine intake trunk. I
filled the gaps on the outside with CA glue and also sanded off the
hexagonal reinforcing plate as that wasn’t added to A-4Es until much later
in their lives. The AMS intakes
aren’t perfectly seamless, but they make for a very nice transition to the
internal kit parts.
I don’t care for open avionics bays on my models, so all of the kit
bays were glued shut. As
expected, these pieces didn’t fit too well, so the surrounding seams were
filled and then re-scribed. I
sanded down the raised gun blast protection panels, which should not be
proud of the fuselage skin.
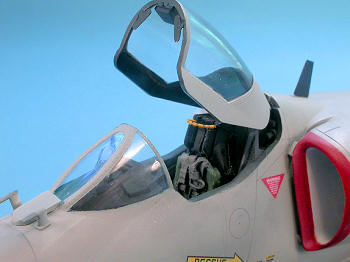 The cockpit was painted overall Dark Gull Gray FS36231, with a flat
black instrument panel coaming, decking behind the seat, and sills. The
AMS Resin set provides you with the missing throttle, a more detailed
control stick, side panels, and an ejection seat with harnesses. I
sanded off the Trumpeter details on the side consoles and added the resin
replacements. Trumpeter’s
instrument panel is made in clear plastic, but there is no acetate to add to
the back – just a decal. So I
painted the panel Dark Gull Gray and applied the decal, which conformed to
the raised detail with an application of Micro Sol. I
know the instrumentation configuration is not quite accurate, but the panel
is recessed under the coaming so far that it’s really hard to see on the
completed model. I added a black
wash and dry-brushed the raised details with light gray. The
ejection seat was painted flat black overall with light green cushions,
medium gray harnesses, and yellow grab handles.
The cockpit was painted overall Dark Gull Gray FS36231, with a flat
black instrument panel coaming, decking behind the seat, and sills. The
AMS Resin set provides you with the missing throttle, a more detailed
control stick, side panels, and an ejection seat with harnesses. I
sanded off the Trumpeter details on the side consoles and added the resin
replacements. Trumpeter’s
instrument panel is made in clear plastic, but there is no acetate to add to
the back – just a decal. So I
painted the panel Dark Gull Gray and applied the decal, which conformed to
the raised detail with an application of Micro Sol. I
know the instrumentation configuration is not quite accurate, but the panel
is recessed under the coaming so far that it’s really hard to see on the
completed model. I added a black
wash and dry-brushed the raised details with light gray. The
ejection seat was painted flat black overall with light green cushions,
medium gray harnesses, and yellow grab handles.
The cockpit tub went into the fuselage half along with the completed
engine assembly and the nose landing gear well. I
added two large fishing sinkers in the nose to prevent tail sitting, which
will surely occur if you forget this step. The
forward fuselage halves were glued together as were the rear fuselage
halves, and the front and back assemblies were mated together. Fit
was just so-so, so I had a bunch of gaps that had to be filled.
I cut the top of the rudder from the tail and glued it onto the rudder
proper. The horizontal
stabilizers, elevators, ailerons, and wing halves were glued together and
the seams filled. As mentioned
above, a Skyhawk at rest usually has the horizontal stabilizers posed with
the leading edge downward, which exposes a triangular gap at the rear of the
tail that you can see through to the other side of the airplane. Trumpeter
doesn’t provide this, so I drilled out an appropriately shaped opening in
the tail and filed and sanded the edges to make it neat.
 The main landing gear struts appear to be a little too tall, not
providing the proper tail-end squat seen on A-4s, so I lopped off about 3 mm
from the top of the plastic struts. The kit provides both metal and plastic
parts for this, but my experience with the bigger and heavier F-8E and
F-100D kits makes me satisfied that the plastic struts are strong enough for
the job. The nose wheel was
snipped off the landing strut and a lot of cutting and filing was required
to restore a proper fork to accept the separate AMS Resin nose wheel.
The main landing gear struts appear to be a little too tall, not
providing the proper tail-end squat seen on A-4s, so I lopped off about 3 mm
from the top of the plastic struts. The kit provides both metal and plastic
parts for this, but my experience with the bigger and heavier F-8E and
F-100D kits makes me satisfied that the plastic struts are strong enough for
the job. The nose wheel was
snipped off the landing strut and a lot of cutting and filing was required
to restore a proper fork to accept the separate AMS Resin nose wheel.
The forward flare dispenser pieces were glued in the recessed and
sanded smooth with the fuselage. The
rear chaff dispenser was glued on, but I promptly sanded it and all the
raised reinforcing sections surrounding it flush with the fuselage as these
were later additions in the service life of A-4E. The
clear navigation lights were added to the wingtips and sanded smooth and
polished back to clarity.
I glued on the wing assembly and had a pretty significant gap to fill
at the wing root. After that was
done, I added the 20mm cannon detail inside the gun bays and glued the doors
closed over them. The cannon
ports on the leading edge of the wing are separate pieces and don’t fit very
well. More filling and sanding
was required to blend them in properly. I
have to say that this kit doesn’t fit as well as other Trumpeter 1/32 scale
kits that I have worked on.
 The ailerons and flaps were glued in place on the wing. Fit
was just okay. Most Skyhawks
have their flaps down when parked, so I chose this option with the kit
pieces. Be careful to securely glue the flap top to the wing – it is nothing
but a butt join. As mentioned above, the flap top is only movable upwards
(as a lift spoiler) on A-4F and later Skyhawks, so I filled in the seam
surrounding these pieces. The rudder was glued into the tail fin which left
more of a separation than is warranted. I
used a shim of sheet styrene at the bottom to make the gap less obvious.
The ailerons and flaps were glued in place on the wing. Fit
was just okay. Most Skyhawks
have their flaps down when parked, so I chose this option with the kit
pieces. Be careful to securely glue the flap top to the wing – it is nothing
but a butt join. As mentioned above, the flap top is only movable upwards
(as a lift spoiler) on A-4F and later Skyhawks, so I filled in the seam
surrounding these pieces. The rudder was glued into the tail fin which left
more of a separation than is warranted. I
used a shim of sheet styrene at the bottom to make the gap less obvious.
I assembled the Mk 82 Snakeye bombs and filled all the resultant gaps
– a tedious process. The MER I
got from a Tamiya F-4C kit was assembled and new holes were drilled in the
bombs to fit the Tamiya mounting points. The
ordnance pylons were assembled and glued under the wings and belly. I
re-scribed the panel lines that were obliterated in the seam filling process
and washed the model in preparation for painting.
Polly Scale
Reefer White was used on the underside, wheel wells, and landing struts. Testors
Acryl Gull Gray FS36440 was used on the top. I
diffused the top paint with random patterns of lighter and darker grays to
break up the monotony of a single color, followed by a misting of the Gull
Gray to pull it all together. The
bombs were painted Testors Acryl Olive Drab with Insignia Yellow noses. The
landing gear oleo struts got a spritz of Testors Aluminum Metalizer, and the
exhaust nozzle was painted with Testors Burnt Metal Metalizer.
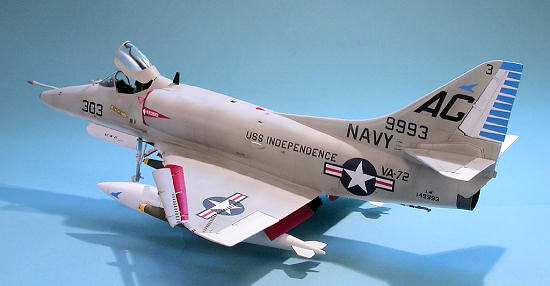
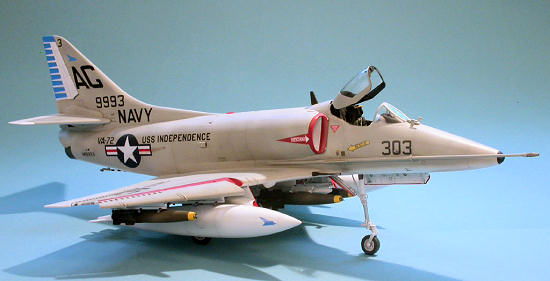 After
evaluating my options, I decided to use the kit decals for a Skyhawk
assigned to VA-72 as deployed on the USS Independence in 1964. Working
with period photographs, I applied the markings and found the Trumpeter
decal quality to be outstanding. The
decals are thin, draw down over even the most uneven surfaces without the
need for a solvent solution, don’t silver, and are opaque. I
just wish Trumpeter did a better job with the artwork. The
national insignia came from an AeroMaster sheet. I
was intimidated by the wing top vortex generators and whether I would be
able to coax the star and bar decal over them. Through
the cutting of tiny slits around each little vane and repeatedly slathering
the decal with Micro Sol, I was able to get it down on the model with an
acceptable level of smoothness. I
used a small brush to apply dark blue and then white paint to touch up the
spots where the gray undersurface was peeking through.
After
evaluating my options, I decided to use the kit decals for a Skyhawk
assigned to VA-72 as deployed on the USS Independence in 1964. Working
with period photographs, I applied the markings and found the Trumpeter
decal quality to be outstanding. The
decals are thin, draw down over even the most uneven surfaces without the
need for a solvent solution, don’t silver, and are opaque. I
just wish Trumpeter did a better job with the artwork. The
national insignia came from an AeroMaster sheet. I
was intimidated by the wing top vortex generators and whether I would be
able to coax the star and bar decal over them. Through
the cutting of tiny slits around each little vane and repeatedly slathering
the decal with Micro Sol, I was able to get it down on the model with an
acceptable level of smoothness. I
used a small brush to apply dark blue and then white paint to touch up the
spots where the gray undersurface was peeking through.
Another coat of Polly Scale Clear Gloss sealed the decals and allowed
me to apply a wash of Payne’s Gray artist’s oil thinned with Turpenoid to
highlight the panel lines. I
also used a number 2 pencil to help accentuate some panel lines. Various
gray and brown pastels were used to dirty up the places that accumulate
grime during carrier operations. Testors Acryl Clear Flat was used as the
finish coat on the Gull Gray surfaces only. The
white parts were left in a semi-gloss state.
The shortened
landing struts were glued in as were the related landing gear doors. Each
door had an Insignia Red outline carefully applied by brush. I
used punched out small circles from chrome mylar and glued them the backs of
the landing light
 lenses. The
bombs were glued onto the MER, and then the whole assembly was glued to the
centerline pylon using metal pins for additional strength. Pins
were also used to help attach the two large fuel tanks. The
navigation lights were painted with clear green and clear red paint. Various
doodads such as pitot tubes, antennae blades, and beacon lights were
carefully added. The ejection
seat, control stick, and throttle were added to the cockpit. Trumpeter
does not provide any mechanism for mounting the canopy in the open position,
so I glued a strip of sheet styrene to the rear of the canopy, painted it
black, and drilled a hole in the rear for insertion of a pin. A
corresponding hole was drilled in the rearmost bulkhead and the canopy was
mounted to that with CA glue.
lenses. The
bombs were glued onto the MER, and then the whole assembly was glued to the
centerline pylon using metal pins for additional strength. Pins
were also used to help attach the two large fuel tanks. The
navigation lights were painted with clear green and clear red paint. Various
doodads such as pitot tubes, antennae blades, and beacon lights were
carefully added. The ejection
seat, control stick, and throttle were added to the cockpit. Trumpeter
does not provide any mechanism for mounting the canopy in the open position,
so I glued a strip of sheet styrene to the rear of the canopy, painted it
black, and drilled a hole in the rear for insertion of a pin. A
corresponding hole was drilled in the rearmost bulkhead and the canopy was
mounted to that with CA glue.
The leading
edge slats were mounted with quite a bit of fiddling before I was happy with
their alignment. The horizontal
stabilizers went on with a press fit. The
refueling probe snapped into place and with that, I was done. All
the bombs hanging under the wings combined with the long probe, open canopy,
rickety leading edge slats, and huge fuel tanks make this a very fragile
model that will require extreme care when transporting.
As
is true with just about everything that Trumpeter offers in this scale, the
good qualities outweigh the bad, although the bad can be truly frustrating. This
A-4E kit builds up to a pretty nice model, and the aftermarket accessories I
used made it even more accurate. One
needs to fix the leading edge slat well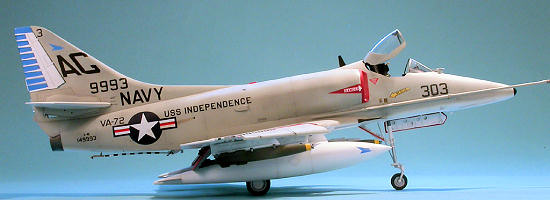 issue, and cutting out the nose
wheel from the strut helps maintain the proper appearance for a large model. I
found the overall fit to be less precise than other Trumpeter kits that I
have built, which led to some extensive seam filling on the fuselage and at
the wing root. I
was able to cobble together enough ordnance from the mishmash of stuff
provided to be presentable. The
kit decals were really a joy to work with, except for the messed up artwork
of the national insignia.
issue, and cutting out the nose
wheel from the strut helps maintain the proper appearance for a large model. I
found the overall fit to be less precise than other Trumpeter kits that I
have built, which led to some extensive seam filling on the fuselage and at
the wing root. I
was able to cobble together enough ordnance from the mishmash of stuff
provided to be presentable. The
kit decals were really a joy to work with, except for the messed up artwork
of the national insignia.
I
put in 75 hours of effort over six months on this project. One has to ask if
this kit, which is quite expensive, is that much better than the older (and
cheaper) Hasegawa kit. I
can’t answer that because I have no experience with the Hasegawa kit, which
has raised panel lines and much less detail. I
can say that I enjoyed building this model and think the final result is
quite striking. Whether
it’s worth it for your modeling budget – that is up to you to decide. For
me it was and I’m happy to have this finished model in my collection of 1/32
scale combat jets from the 1960s.
Thomason, Tommy H: Scooter!
The Douglas A-4 Skyhawk Story
Lee Kolosna
June 2012
If you would like your product reviewed fairly and fairly quickly, please contact the editor or see other details in the
Note to
Contributors.
Back to the Main Page
Back to the Review
Index Page