Monogram 1/48 RF-8G (conversion)
| KIT #: | |
| PRICE: | $ |
| DECALS: | Two Options |
| REVIEWER: | Carmel J. Attard |
| NOTES: | Conversion |
| HISTORY |
On
 which he received a rare peacetime
Commander D.Strong was No2 in a two aircraft flight from NAS
| THE KIT |
2)
Resin conversion set issued by
C & H Miniatures. This consisted of two
fuselage halves, main wing centre section and all the items necessary
to build most of RF-8 versions.
3)
F-8 metal landing gear (RM) No
48158 by Scale Aircraft Conversions of
| CONSTRUCTION |
Basically the conversion consisted literally of substituting the kit
parts for the resin parts and very little modification of the Monogram kit
parts was necessary. The RF-8G just like any aircraft as it aged it gained
weight and lots of lumps and bumps were added. Reference drawings issued
with the resin kit contains a lot of detail to indicate the various
possibilities of configurations that exist and it is essential to research
the subject well and locate clear photos of the particular aircraft being
built in view of the
 changes carried out and that came to be visible on the
aircraft over the years in service.
changes carried out and that came to be visible on the
aircraft over the years in service.
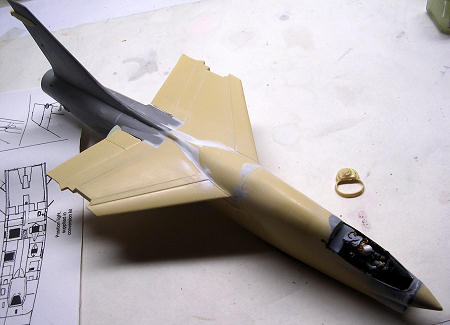
Conversion starts with cutting the front part of the F8 fuselage,
part 1 & 2 along a line 1/16” in front of main landing gear. Wing parts 5 &
6 were discarded and replaced with a new one-pieces cast resin casting. This
had a few panel lines engraved with an Olpa P-cutter tool. If one select to
make the RF-8A then the ventral fins at rear are omitted and also a fuel
dump vent on port fuselage side where the fin would be needs to be added.
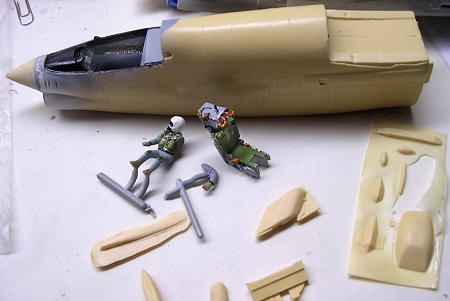
 picture. The Crusader used three ejection seats in its
lifetime. The Martin Baker Mk7 used on later versions was slightly different
and I did minor alterations to the kit F-8 seat but this was of little value
as the cockpit canopy was to be closed hiding much of the changes
completely. Nose wheel well also required some little change and cutting in
order to fit in the resin nose blank area. This meant that 5mm was removed
from front to allow the well box to fit in the resin fuselage aperture at
the bottom. The nose wheel door also had additional fairings that conform
with the nose camera fairing. The cockpit carried a viewfinder, which is
among the resin items. This was hollowed and fixed at centre of cockpit
coaming. Different cameras arrangements are suggested in the instructions as
these varied considerably with different RF-8s. I picked the one layout
fitting to my type. I did not bother to drill open the camera ports and I
applied the decal squares at a stage after paintwork is completed. An offset
strobe light and long pod in resin were both fitted under the fuselage mid
front as per instructions.
picture. The Crusader used three ejection seats in its
lifetime. The Martin Baker Mk7 used on later versions was slightly different
and I did minor alterations to the kit F-8 seat but this was of little value
as the cockpit canopy was to be closed hiding much of the changes
completely. Nose wheel well also required some little change and cutting in
order to fit in the resin nose blank area. This meant that 5mm was removed
from front to allow the well box to fit in the resin fuselage aperture at
the bottom. The nose wheel door also had additional fairings that conform
with the nose camera fairing. The cockpit carried a viewfinder, which is
among the resin items. This was hollowed and fixed at centre of cockpit
coaming. Different cameras arrangements are suggested in the instructions as
these varied considerably with different RF-8s. I picked the one layout
fitting to my type. I did not bother to drill open the camera ports and I
applied the decal squares at a stage after paintwork is completed. An offset
strobe light and long pod in resin were both fitted under the fuselage mid
front as per instructions.
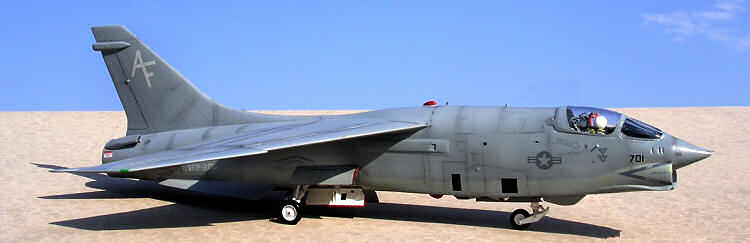
| COLORS & MARKINGS |
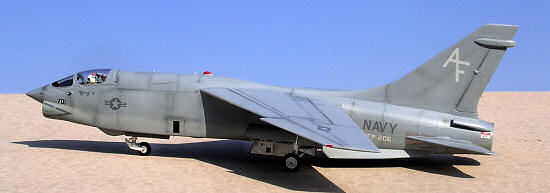 per surfaces airbrushed in Dark Ghost Grey,
Model Master 1741E FS36320. This resulted in the ideal realistic contrast
between the two different shades. Careful study of panel lines indicated
where the weathering was most prominent and carefully added. Decals were of
top quality and only the black and white arrestor hook decal came from the
original Monogram decal sheet. Kit was given a coat of Klear before and
after decal application. Finally an overall coat of Model Master semi gloss
lacquer was applied giving a uniform surface sheen while the cockpit canopy
was still masked. With the thing painted and all decals in place I had to
drill out the main gear wheels so that they fit the metal legs. These were
glued to the metal legs with a tiny amount of super glue. Masking was
removed from the canopy, which was then given another coat of Klear, to the
expressive face of the RF-8 pilot figure that appeared now in a happier
mood.
per surfaces airbrushed in Dark Ghost Grey,
Model Master 1741E FS36320. This resulted in the ideal realistic contrast
between the two different shades. Careful study of panel lines indicated
where the weathering was most prominent and carefully added. Decals were of
top quality and only the black and white arrestor hook decal came from the
original Monogram decal sheet. Kit was given a coat of Klear before and
after decal application. Finally an overall coat of Model Master semi gloss
lacquer was applied giving a uniform surface sheen while the cockpit canopy
was still masked. With the thing painted and all decals in place I had to
drill out the main gear wheels so that they fit the metal legs. These were
glued to the metal legs with a tiny amount of super glue. Masking was
removed from the canopy, which was then given another coat of Klear, to the
expressive face of the RF-8 pilot figure that appeared now in a happier
mood.
| CONCLUSIONS |
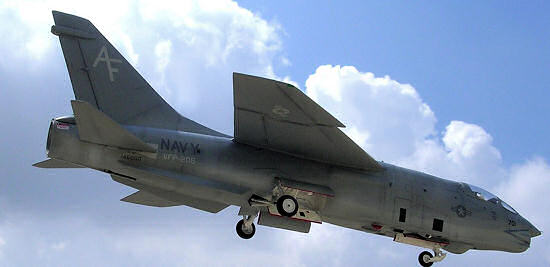 It seems that C & H miniatures
has provided us with a good resin kit conversion with ample of excellent
detail, spot on to produce a much pleasing model. Also I really like the
metal landing gear, the second occasion that I have used the type provided
by Scale Aircraft Conversions which I found so sturdy and a vital set to
apply on cumbersome models, just like I used on the C-124 Globemaster.
Although this type of conversion is intended for the experienced modeller
(so says the instructions) however there is nothing that cannot be overcome
if one goes a step at a time. So it is recommended to just about
all-building levels.
It seems that C & H miniatures
has provided us with a good resin kit conversion with ample of excellent
detail, spot on to produce a much pleasing model. Also I really like the
metal landing gear, the second occasion that I have used the type provided
by Scale Aircraft Conversions which I found so sturdy and a vital set to
apply on cumbersome models, just like I used on the C-124 Globemaster.
Although this type of conversion is intended for the experienced modeller
(so says the instructions) however there is nothing that cannot be overcome
if one goes a step at a time. So it is recommended to just about
all-building levels.| REFERENCES |
Carmel J. Attard
If you would like your product reviewed fairly and fairly quickly, please contact the editor or see other details in the Note to Contributors.