Tamiya 1/32 F-4E (early) Phantom II
| KIT #: | 60310 |
| PRICE: | $213.00 SRP |
| DECALS: | Two options |
| REVIEWER: | Sam Thurman |
| NOTES: | Includes a clear nose to show radar and cannon detail. |
| HISTORY |
The F-4 Phantom II
multi-role fighter, spanning several variants, is one of the most famous and
distinctive military aircraft employed by the United States during its
involvement in the Vietnam War. Originally conceived as a U. S. Navy
carrier-based fighter, the F-4 was ultimately adopted and used extensively by
the U. S. Air Force, as well as the air services of many other countries for
over 30 years. A great deal has been written about its history, including other
reviews appearing within “Modeling Madness,” hence the emphasis herein will be
to describe the “E” version a little more and its origins.
The first U. S. Air
Force variant of the F-4 was the F-4C, which came into service in 1962, and was
essentially the Navy’s F-4B subject to some modifications to meet USAF’s
specific requirements for a land-based version. The F-4C, and its successor the
F-4D, were the first to see combat encounters in the burgeoning air war over
Vietnam that came with the onset of large strikes into North Vietnam in early
1965. As with its naval cousin, the USAF’s F-4C/D aircraft were armed solely
with missiles for air-to-air combat, which proved problematic in many early
encounters with slower, but highly maneuverable, MiG-17 and -21 Soviet fighters
flown by North Vietnamese pilots. The hot, tropical environment of the Vietnam
theater, coupled with high-g maneuvering that frequently occurred during
dogfights (for which the missiles in
 service
were not designed), led to early USAF air-to-air missile reliability on the
order of 10-15%. Beyond the reliability issues with new, complex missile
electronics, many dogfights led to situations where F-4C/D Phantoms achieved
good firing positions on MiGs, but within the minimum range allowed by the
missiles of that era. The USAF began equipping several F-4 squadrons with gun
pods, carried externally on the aircraft’s centerline, by late 1965 in an
attempt to circumvent this.
service
were not designed), led to early USAF air-to-air missile reliability on the
order of 10-15%. Beyond the reliability issues with new, complex missile
electronics, many dogfights led to situations where F-4C/D Phantoms achieved
good firing positions on MiGs, but within the minimum range allowed by the
missiles of that era. The USAF began equipping several F-4 squadrons with gun
pods, carried externally on the aircraft’s centerline, by late 1965 in an
attempt to circumvent this.
The F-4E, which entered
USAF service in Vietnam near the end of 1968, included several improvements
based on combat experience with the F-4C/D airplanes between 1965 and 1967, such
as an inboard Vulcan 20 mm rotary cannon (mounted in the nose) for close-in
dogfighting, a more versatile airborne radar with better capabilities for the
use of the Sparrow radar-guided missile, leading edge slats to enhance combat
maneuverability (appearing in later production versions by 1972), more powerful
engines, and an additional internal fuel tank for improved range. The early
production versions employed a shorter 6-barrel set for the Vulcan cannon, while
later versions (after about 1970) made use of a longer 6-barrel set with higher
muzzle velocities and range. There were more F-4E’s built than any other version
of the aircraft – over 1,300 examples, including those used by other countries.
As the F-4E came into operational use, the bombing offensive against the North (Operation “Rolling Thunder”) was placed in an indefinite hiatus by President Johnson, which nearly eliminated encounters with MiG fighters until new bombing campaigns (Operations “Linebacker” and “Linebacker II”) were conducted in 1972. In this latter phase of the war, the F-4E was used extensively as an attack bomber as well as in air-to-air roles, due to the heavy losses experienced by the F-105 fighter bomber during 1965-68. During 1972, intensive offensive operations by USAF into North Vietnam led to many encounters with newer versions of the MiG-21 fighter, along with the twin-engine MiG-19, in which the F-4E acquitted itself well, being credited with 21 air-to-air victories, of which 5 were accomplished with the 20 mm M61 gun – the USAF leadership realized that the success rate in air-to-air encounters with the 20 mm gun was about 50%, whereas the corresponding rate for the use of missiles was still in the 10-20% range, even after several modifications to the Sparrow and Sidewinder designed to improve their effectiveness in combat. It was also during 1972 that three USAF flight crew members achieved “ace” status, with five aerial victories, along with two USN carrier-based aviators.
| THE KIT |
 This is a large, expensive model with a large (300+) number of parts. Tamiya
offers four different versions of the F-4 in 1/32 scale, all of which appear to
be based on a set of common parts, with some version-specific parts on some
sprues that are called out in a lengthy, detailed 22-page instruction manual.
The kit is very well thought out in many respects, such as the single-piece
fuselage, and a single-piece lower wing that improves its eventual sturdiness as
these parts are assembled. There are a set of small screws used to provide
strength and to reinforce joints between the larger pieces.
This is a large, expensive model with a large (300+) number of parts. Tamiya
offers four different versions of the F-4 in 1/32 scale, all of which appear to
be based on a set of common parts, with some version-specific parts on some
sprues that are called out in a lengthy, detailed 22-page instruction manual.
The kit is very well thought out in many respects, such as the single-piece
fuselage, and a single-piece lower wing that improves its eventual sturdiness as
these parts are assembled. There are a set of small screws used to provide
strength and to reinforce joints between the larger pieces.
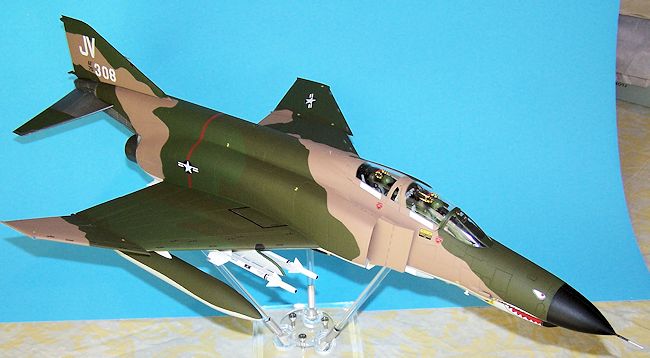
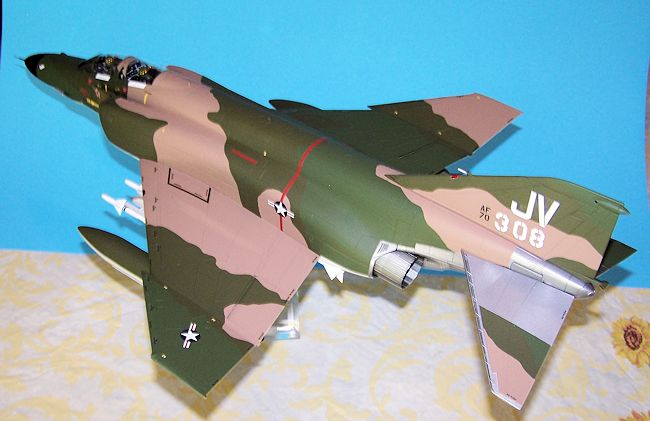
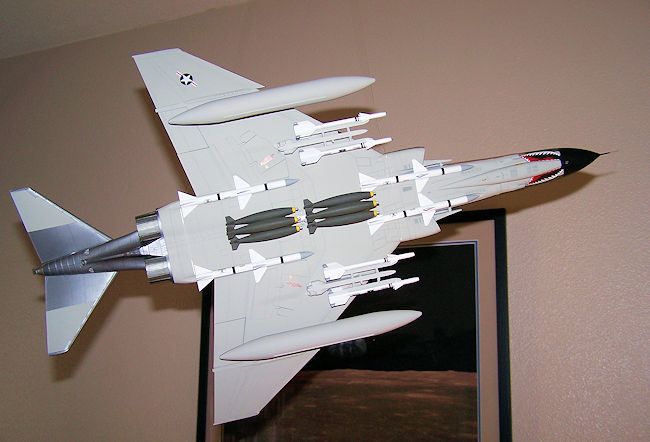
The kit includes a
wealth of detail, the most interesting example of which is the clear plastic
noise assembly, along with parts and decals to portray the airplane’s
Westinghouse airborne radar and M61 Vulcan 20 mm rotary cannon (options here
include both the short barrel assembly and the later long barrel variant). The
cockpit, landing gear assemblies, and underwing ordnance (including Sidewinder
and Sparrow air-to-air missiles, bomb racks, and 370 gallon drop tanks) also
offer excellent detail in out-of-box form. The interior of the exhaust nozzles
are also well rendered, and look realistic once painted and installed. Another
interesting feature is the movable stabilators that fit nicely into the tail
assembly and also appear realistic.
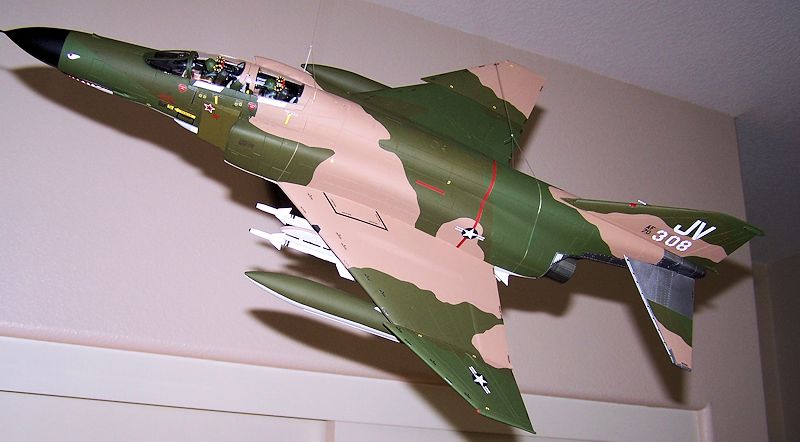
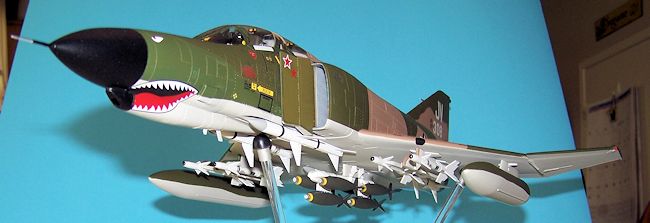
The decal sheet offers
markings for an aircraft of the 469th
Tactical Fighter Squadron, 388th
Tactical Fighter Wing, portrayed either as flown in 1968, from Korat Royal Thai
AFB, or in 1973, while stationed at Andersen AFB on Guam. Painting instructions
and Federal Standard color numbers for reproducing the Southeast Asian (“SEA”)
camouflage scheme are provided as well. There are 100+ decals, most of which
portray the numerous small, stenciled markings found on these airplanes with
various cautions (e.g. “no step”), maintenance and handling information. I came
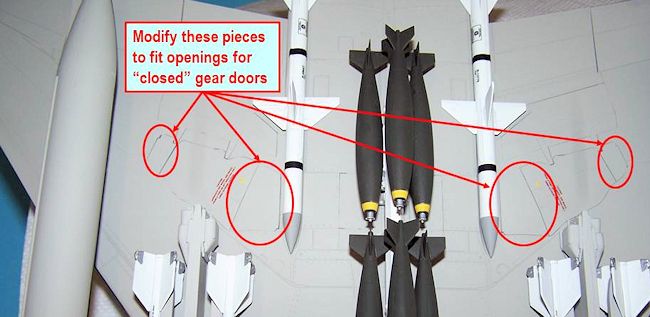
to realize that the kit is designed to be built with the landing gear extended,
whereas I wanted to build the model with the gear up, so it would appear as in
flight and I could hang it for display. Without much trouble, though, I found
that with some relatively
 simple
trimming and shaping of several of the parts (landing gear doors and the
ailerons, which are designed to droop as on the actual aircraft in the absence
of hydraulic pressure), the underside of the model can be assembled with the
gear doors closed while achieving a nice appearance.
simple
trimming and shaping of several of the parts (landing gear doors and the
ailerons, which are designed to droop as on the actual aircraft in the absence
of hydraulic pressure), the underside of the model can be assembled with the
gear doors closed while achieving a nice appearance.
This is actually the
first Tamiya plastic model I’ve ever built – I found the detail and quality of
the parts, decals, and instructions to be everything I had heard of Tamiya kits
by reputation. There were a few, perhaps inevitable, eccentricities in building
and painting this particular kit that I’ll elaborate on below in the section on
construction. As noted in other reviews and information on Tamiya’s suite of F-4
kits, the model is not a flawless portrayal of the actual airplane (e.g., there
are seams visible in the engine inlets whereas the actual aircraft’s intakes
have smooth surfaces), but to my eye, these and other flaws I noted were very
minor and did not detract from the overall quality and appearance of the
finished product.
| CONSTRUCTION |
Per the instructions,
the air intakes are painted and assembled first, followed by the cockpit area.
The cockpit pieces build up into a single assembly, encompassing the instrument
panels and controls, which are affixed into the fuselage with one of the small
screws provided, as well as conventional cement. Some of the instruments are
cleverly represented with decals applied to the back of clear plastic pieces
that fit into the instrument panels, creating an authentic look without having
to paint indicator dial faces, etc. A great deal of caution is advised when
seating the cockpit assembly into the forward fuselage – the instructions call
for insertion of the two ejection seats and attachment of the canopy pieces near
the end, and I found (the hard way, naturally) that the alignment of the cockpit
and gun sight pieces towards the front can prevent the forward canopy piece from
seating properly unless all of these are well aligned!
After the cockpit is
done, the engine turbines and outlets are assembled, along with the stabilators
and the surrounding portions of the tail area. The areas near the exhaust
nozzles need to be painted to simulate the appearance of unpainted titanium,
which is best done prior to the assembly of the parts into the tail section.
After this area is completed, it is possible to mask it off effectively when
priming and painting the large surface areas – light grey underside and
camouflage pattern on the upper surfaces - to come later. The stabilator
assembly is movable and actually works well, provided the instructions are
followed to install it. Next comes the attachment of the fuselage to the lower
wing piece, followed by some parts to complete the tail area, and then the
attachment of the two upper wing pieces, including some details of the main
landing gear wells that need to be painted before assembly. I found after
getting the wings together that there were substantial gaps at the junction of
the fuselage and the upper wing pieces, as was pointed out in other reviews.
These filled in nicely with medium CA glue used as gap filler, and looked smooth
later after priming, sanding and painting.
The next series of steps
involves the painting and assembly of the airborne radar system and M61
nose-mounted 20 mm Gatling gun, for those who wish to take advantage of the
clear plastic nose pieces for such a display. Doing this involves many decals
and can be an impressive mini-project unto itself. Since I wanted merely to
paint the aircraft in its entirety, I assembled these pieces without painting
and decals, as
 some
of them serve as structural elements used later for the attachment of other
parts. Following the nose assembly, next comes a lengthy series of steps for
painting and assembly of the nose gear and main landing gear struts, wheels, and
doors. By test fitting all of the doors into the wheel wells, I found that
several of them can be glued “closed” without modification, although there is
one small piece for the nose gear, as well as a few of the main gear doors, that
need some surgery such that they can be attached in the closed position and with
proper appearance. Some hand trimming with a small X-Acto knife is all that is
needed to do this.
some
of them serve as structural elements used later for the attachment of other
parts. Following the nose assembly, next comes a lengthy series of steps for
painting and assembly of the nose gear and main landing gear struts, wheels, and
doors. By test fitting all of the doors into the wheel wells, I found that
several of them can be glued “closed” without modification, although there is
one small piece for the nose gear, as well as a few of the main gear doors, that
need some surgery such that they can be attached in the closed position and with
proper appearance. Some hand trimming with a small X-Acto knife is all that is
needed to do this.
After figuring out how
to fit the gear doors, next comes another sizeable mini-project to assemble and
paint all of the underwing ordnance, depending upon how extensive one wishes to
be in this aspect of the model. I elected to build the Sparrow and Sidewinder
missiles, the centerline-mounted bomb rack (Multiple Ejector Rack) with six 500
lb. bombs, and the 370 gallon drop tanks (one for each wing). There are two
additional bomb rack assemblies that I didn’t choose to build – these are the
Triple Ejector Racks with three additional 500 lb. bombs each. At this point I
deviated from the instructions, as it appeared that the painting of the exterior
surfaces needed to be done first before mounting all of the ordnance assemblies
onto the underside.
Once all of the ordnance
has been completed, the outer portions of the wings must be assembled, followed
by the ejection seats and the pilot and weapons system officer figures, if
desired. To pose the ailerons for flight, the tabs by which they fit into the
wings need to be bent upwards, to remove the 20 deg of droop they otherwise have
on the ground. Once the ejection seats and crew figures are in place, the
 remainder
of the cockpit instrumentation is then assembled and completed. Once again, I
would recommend test fitting the main pieces to be assembled here, especially
the Heads-Up Display, early when the cockpit is installed, to ensure that the
canopy pieces will fit over them properly when it is time to glue them in place.
The kit parts are designed so that the pilot and WSO canopies can be mounted
either open or closed. To represent a parked aircraft on the ground, parts for
the egress ladder and steps for the crew members are also included that had good
detail. I assembled the canopies closed, following the objective of an
“in-flight” display.
remainder
of the cockpit instrumentation is then assembled and completed. Once again, I
would recommend test fitting the main pieces to be assembled here, especially
the Heads-Up Display, early when the cockpit is installed, to ensure that the
canopy pieces will fit over them properly when it is time to glue them in place.
The kit parts are designed so that the pilot and WSO canopies can be mounted
either open or closed. To represent a parked aircraft on the ground, parts for
the egress ladder and steps for the crew members are also included that had good
detail. I assembled the canopies closed, following the objective of an
“in-flight” display.
After painting the
exterior camouflage scheme (see below for more), I applied all of the exterior
decals along with a few small remaining parts per the instructions (e.g., the
Pitot tube mounted on the nose). After allowing a couple of days for the decals
and setting solution to dry thoroughly, I masked the exterior one more time in
order to spray all of the matte surfaces with a clear coat, Testors Dullcote in
this case. Once the clear was fully dry, I returned to the instructions for
installation of all the underwing ordnance. All of the underwing assemblies fit
well and were attached without much trouble, completing the model.
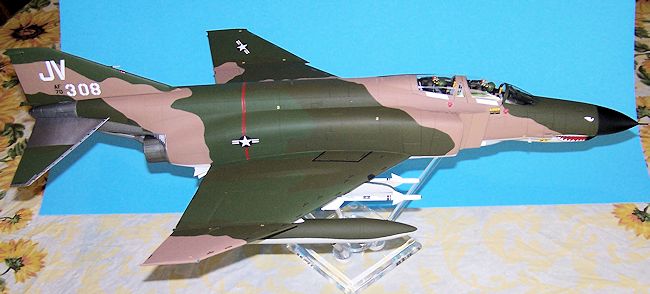
| COLORS & MARKINGS |
 The
kit manual included detailed instructions for the look of the “SEA” camouflage
scheme and how to paint it. The Testors Model Master series includes spray cans
with the Federal Standard color numbers for all of the needed colors –
camouflage grey for the underside, and dark tan, medium green, and dark green
for the upper surfaces – so I elected to use these. Testors offers the same
colors that can be used for airbrush application as well. For the titanium areas
around the exhaust nozzles, I used the corresponding Testors “metalizer” color
and overcoat, which yielded a good appearance after buffing and application of
the clear overcoat.
The
kit manual included detailed instructions for the look of the “SEA” camouflage
scheme and how to paint it. The Testors Model Master series includes spray cans
with the Federal Standard color numbers for all of the needed colors –
camouflage grey for the underside, and dark tan, medium green, and dark green
for the upper surfaces – so I elected to use these. Testors offers the same
colors that can be used for airbrush application as well. For the titanium areas
around the exhaust nozzles, I used the corresponding Testors “metalizer” color
and overcoat, which yielded a good appearance after buffing and application of
the clear overcoat.
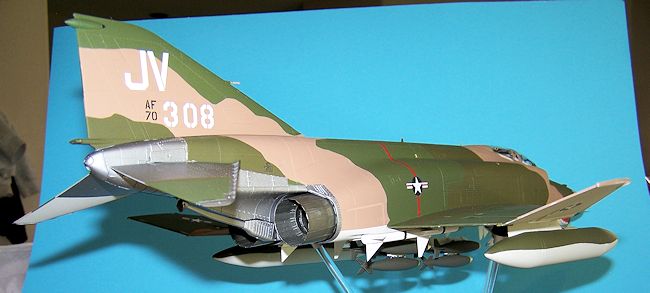
I started the exterior
by masking the titanium areas near the tail, along with the black-painted radome
on the nose and the canopy area, then priming all other areas with Tamiya’s
light grey fine surface primer. After priming, sanding and checking the seams,
etc. was completed, I masked off the upper surfaces and sprayed the underside
first, following the suggested order of application from the instructions. After
the camouflage grey was dry, the underside was masked to paint the entire upper
surface with dark tan first. I then incrementally masked for application of the
medium green areas, and finally the dark green areas, following the pattern
shown in the instructions for the distribution of the colors. To create color
boundaries, I traced patterns onto cellophane tape and cut them out with a sharp
X-Acto knife. This eventually worked well but was very time consuming – the
exterior painting effort took nearly two weeks
 before all
of the colors were completed and I had removed all of the masking tape that had
gone onto the model along the way. I had bottled enamels (also Testors Model
Masters paints) matching these four colors, which came in very handy for
touching up edges where there had been a little paint seepage under the tape.
before all
of the colors were completed and I had removed all of the masking tape that had
gone onto the model along the way. I had bottled enamels (also Testors Model
Masters paints) matching these four colors, which came in very handy for
touching up edges where there had been a little paint seepage under the tape.
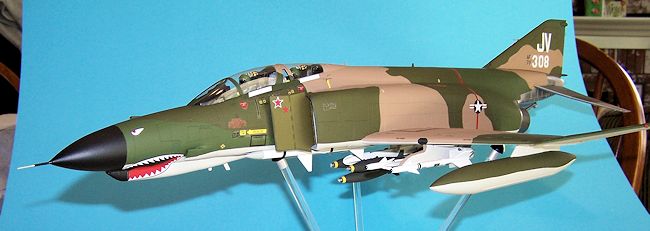
Aside from their large number, the decals included in the kit appeared to be of high quality, had good color registration, and went on without much trouble. I used both Micro-Set and Micro-Sol for decal application, especially for some of the more complex decals, such as those which recreate the signature “shark mouth” painted around the forward portion of the 20 mm cannon fairing on the nose. The USAF national markings were relatively small and subdued, in order to maximize the benefit of the camouflage scheme for these airplanes while operating over an area of dense tropical jungle.
| CONCLUSIONS |
This kit was the most
complex plastic aircraft model I had ever attempted – taking about six months of
weekend and some vacation overtime to complete. Overall I was impressed with the
Tamiya kit, and fairly pleased with the outcome, as an infrequent modeler with
modest skills. This kit is clearly designed for more seasoned, experienced
modelers, given the large number of parts, intricate assembly steps in some
areas, and impressive detail offered, as well as the complexity of the paint
scheme involved. For those with patience and persistence, I think that all of
Tamiya’s F-4 kits, not just the USAF F-4E, can be used to
 create a
large and visually stunning representation of this famous airplane in its
various forms. Whether or not the kit is worth the cost is up to the individual
to decide. I don’t have any regrets, although I admit this scale of project is
not one I would attempt very often.
create a
large and visually stunning representation of this famous airplane in its
various forms. Whether or not the kit is worth the cost is up to the individual
to decide. I don’t have any regrets, although I admit this scale of project is
not one I would attempt very often.
This particular model
now hangs on display in the high school classroom which my son attends as part
of his school’s USAF Junior ROTC Program. He and the other young cadets there
had never heard of the “Phabulous Phantom” or its role as a MiG killer and
attack aircraft over the skies of Vietnam, and other conflicts in which it
served. For them, the plastic modeling hobby has brought a little bit of history
to light!
| REFERENCES |
1.
Davies, Peter,
USAF McDonnell Douglas F-4
Phantom II. Air Vanguard No. 7, Osprey Publishing, Botly,
Oxford, United Kingdom, 2013.
2.
Elward, Brad and Peter
Davies, U. S. Navy F-4
Phantom II MiG Killers 1972-73. Osprey Combat Aircraft No.
30, Osprey Publishing, Botly, Oxford, United Kingdom, 2002.
3.
Michel, Marshall L. III,
Clashes, Air Combat over
North Vietnam 1965-1972. Naval Institute Press, Annapolis,
MD, 1997
4. Michel, Marshall L. III, The Eleven Days of Christmas, America’s Last Vietnam Battle. Encounter Books, New York, NY, 2002.
Sam Thurman
September 2014 If you would like your product reviewed fairly and fairly quickly, please
contact
the editor or see other details in the
Note to
Contributors.