Matchbox 1/72 F-104G Starfighter
| KIT: | Matchbox 1/72 F-104G Starfighter |
| KIT #: | PK-40 |
| PRICE: | Out of Production |
| DECALS: | Two options |
| REVIEWER: | Victor Scheuerman |
| NOTES: | There are better 1/72 F-104s |
| HISTORY |
The Dutch initially purchased 120
single-seaters and an additional 25 were funded through the Military Assistance
Program (MAP). Five squadrons offering three different roles would be filled by
these RF/F-104Gs. A sol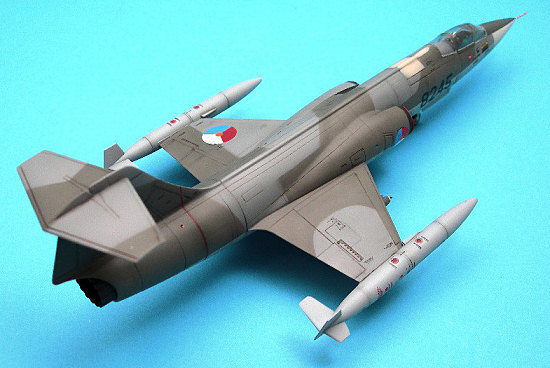 e Tactical-Recce squadron was 306, while both 311 and 312
were Tactical Strike and 322 and 323 were assigned to All-Weather interception.
e Tactical-Recce squadron was 306, while both 311 and 312
were Tactical Strike and 322 and 323 were assigned to All-Weather interception.
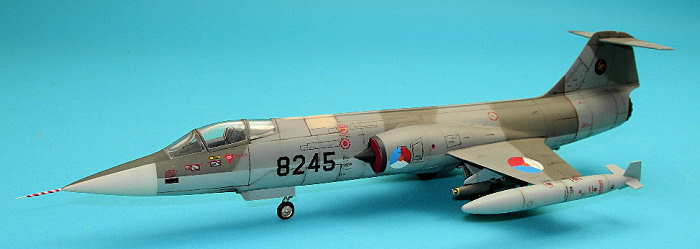
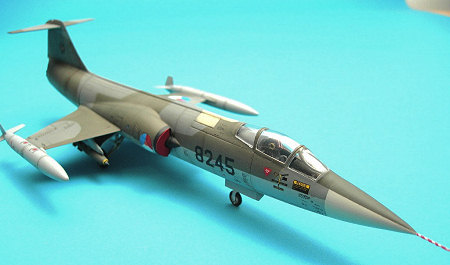
Netherlands was one of only three North Atlantic Treaty Organization (NATO) counties (Spain and Denmark were the others) to have their aircraft initially finish overall in anti-corrosion grey. When disruptive camouflage was applied, they used a similar upper pattern to the Luftwaffe. The main difference and interesting thing about this early Dutch finish is that the anti-corrosion grey was maintained for the lower surfaces and some of the tip-tanks were also left overall in this colour for a while, contrasting with the new camouflage colours.
| THE KIT |
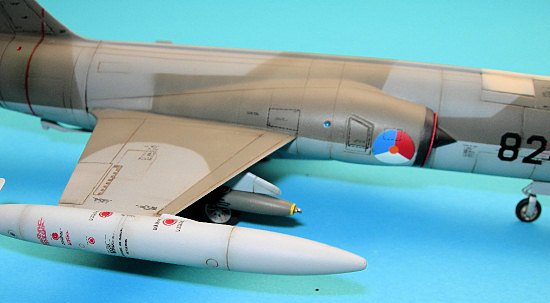
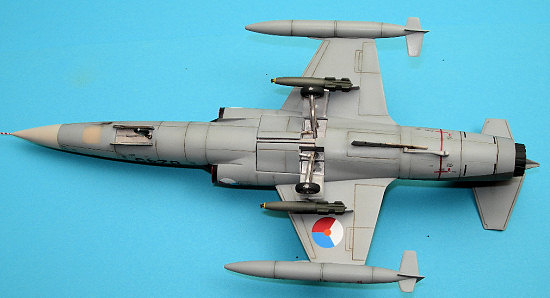
To improve the Matchbox kit is some areas, the spares bin was raided. The completed model has wing tip tanks from the Revell Germany kit, main tires, wing pylons, aft afterburner can, and nose gear doors from a Hasegawa kit while one of the latter’s weapon sets contributed the bombs. AMT/ERTL’s boxing of the ESCI kit donated the Lockheed seat.
| CONSTRUCTION |
With a
bare-bones cockpit being offered, card was used to make a floor, instrument
panel, and side consoles while the much better seat from the AMT/ERTL boxing
(this has a new tree with much better Lockheed and Martin-Baker seats along with
the RWR for the Canadian CF-104) was used. This seat had some lead foil straps
added and then the cockpit and seat were sprayed Dark Gull Grey (all paints used
unless noted otherwise are Model Master Enamels) and the instrument coaming was
done in a dark 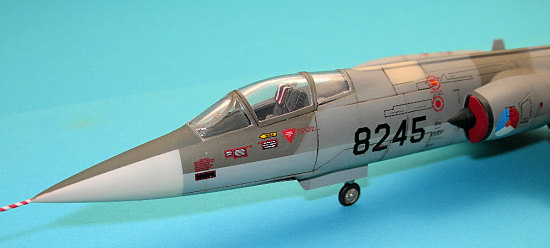 green (Humbrol 116).
When this had dried, it was dry brushed with this colour lightened with white and then detailed painting followed with acrylic paint (various brands). A gloss coat was applied and when this had cured the decal instrument panel from an old Micro Scale sheet was used along with some left overs from previous projects for the side consoles. An oil wash of black was used to bring out the detail and after curing, the cockpit was sprayed with a matt finish. Final step was adding a drop of future on each instrument face to replicate the reflection of glass.
Before
assembly of the main components of the fuselage and intake splitter plate was
done, some lead weights were added to the nose. Assembly was accomplished using
Tamiya Extra Thin liquid cement that is hot (IE strong). A more liberal amount
then normal was used with the parts then being worked a little to help with the
fit. A poor fit was the intake plates/bullets that required filler. When this
was dealt with, the wings were attached to the fuselage and then major seam
issues were corrected. Specific trouble areas were; bottom of the fin, lower
 fuselage/front main gear bay, nose radome, aft fuselage section, and intakes. As
the nose probe was way over scale, it was attached and then cut off at the tip
of the radome. A new probe was made from fine brass tubing.
fuselage/front main gear bay, nose radome, aft fuselage section, and intakes. As
the nose probe was way over scale, it was attached and then cut off at the tip
of the radome. A new probe was made from fine brass tubing.
While filling and sanding all these areas, some of the more pronounced trenches were partial filled with super glue. One of the outline issues with the Matchbox 104s is the bulge in the main gear area. This was greatly reduced by an aggressive sanding with the excellent Squadron Sanding Sticks. Eventually the entire assembly was sanded and after masking the cockpit, a coat of primer from the Tamiya rattle can was laid on. Some panel lines were then added using a combination of OLPHA P-Cutter blade and Testors tape as the guide. All the locations for the formation lights were marked and then lightly drilled so some paint could be added later.
The polished kit canopy was first attached with white glue and when I was happy with the fit, some five minute epoxy was mixed and applied to secure it in place. Tamiya tape was then used to mask the canopy.
| COLORS & MARKINGS |
The rest
of the kit and the ‘borrowed’ parts had been painted along with the fuselage so
some preshading of a dark grey was applied to the entire project after the
cockpit area was sprayed Dark Gull Gray. When this had cured, all the lower
surfaces and the entire tip tanks were sprayed in Light Ghost Gray and masked.
The upper surfaces were painted with Dark Gull Gray and then the
 Olive Drab (ANA
613) was carefully applied using mainly a hand-help paper mask. I was very
please at how well this selection of paints matched the photos of the actual
Dutch aircraft. Final painting was white (lower nose radome), dark green
(anti-glare panel), Radome Tan (fiberglass surfaces on fuselage and aft ventral
strake), aluminum (landing gear and bays).
Olive Drab (ANA
613) was carefully applied using mainly a hand-help paper mask. I was very
please at how well this selection of paints matched the photos of the actual
Dutch aircraft. Final painting was white (lower nose radome), dark green
(anti-glare panel), Radome Tan (fiberglass surfaces on fuselage and aft ventral
strake), aluminum (landing gear and bays).
With the painting completed, the landing gear legs, and main gear forward doors were glued into place. One of the pluses for the Matchbox 104s are the main gears are two separate arms. I have found the ‘normal’ single main gear legs like Revell, Hasegawa ESCI/AMT/ERTL/ITALERI can be a pain to get perfectly level.
To prepare the model for both the decal and oil wash application, it was given a gloss finish and left to fully cure for a week. Italeri offers excellent kit decals so the 312 Squadron and national marking were used from their current 104 kit (ex-ESCI mold). The extensive stenciling was a combination from both Leading Edge Decals and the Hasegawa kit decals. Mr Mark Softer were used on both of the latter decals while Micro Set/Sol was used on the Italeri markings, both worked great. A Raw Umber wash was used on the panel lines and then the surface was given a matt finish.
| FINAL CONSTRUCTION |
 Completion of the project was close at hand. The masking was removed from the
canopy and this was then given a final polish. Next, the smaller main gear
doors, nose gear doors, pylon with bombs, arrestor hook, tip tanks and
horizontal tail were all attached. All the predrilled formation light locations
received a base of silver (lower aft ones are left silver), and then a top
colour of metallic red or blue was applied with a wooden toothpick. As this
model was not going to get a heavy weathering, some dry black pastel was brushed
on the cannon port and aft of the gear wells.
Completion of the project was close at hand. The masking was removed from the
canopy and this was then given a final polish. Next, the smaller main gear
doors, nose gear doors, pylon with bombs, arrestor hook, tip tanks and
horizontal tail were all attached. All the predrilled formation light locations
received a base of silver (lower aft ones are left silver), and then a top
colour of metallic red or blue was applied with a wooden toothpick. As this
model was not going to get a heavy weathering, some dry black pastel was brushed
on the cannon port and aft of the gear wells.
| CONCLUSIONS |
Regardless of what comes in the box; some extra work and ‘borrowing’ where applicable will always improve the final appearance of a kit.
October 2007
If you would like your product reviewed fairly and quickly, please contact me or see other details in the Note to Contributors.