Testors/Italeri 1/72 YF-12A
| KIT #: | 697 |
| PRICE: | $8.99 10 years ago |
| DECALS: | One option |
| REVIEWER: | Robert Myers |
| NOTES: |
| HISTORY |
I really enjoyed doing the research on the YF-12A. I thought it was a spin off of the SR-71. I was wrong. The original spy plane was the A-12. It was a single seat airplane that looked like the SR-71 we are all familiar with. Next came the YF-12A. The three of them were built in a corner of the Lockheed Skunk Works with the A-12s. A second cockpit was added to the airframe for the radar operator. The SR-71 came next. It kept the second cockpit.
The YF-12 was meant to be a fast
interceptor armed with 4 (some references say 3) Hughes AIM-47A nuclear
missiles. It would launch, intercept the Soviet bomber force at
mach 3 and blow them aw ay
with nukes! The test program was ended in 1969.
However, the two surviving aircraft were brought out of storage and
loaned to NASA. One crashed (#936) and one (#935) was flying into
1979. It was then retired to the Air Force Museum on November 7,
1979.
ay
with nukes! The test program was ended in 1969.
However, the two surviving aircraft were brought out of storage and
loaned to NASA. One crashed (#936) and one (#935) was flying into
1979. It was then retired to the Air Force Museum on November 7,
1979.
Just as a note. The only SR-71C is located at the Hill Air Force Base museum. It was built with the aft section of a crashed YF-12A (#934).
| THE KIT |
This is one of the good Testors/Italeri kits. The instructions are great. They give some history on the aircraft and even tell how to mix a good titanium paint. The molding is crisp with virtually no flash. The 70 plus parts fit very well, with one exception. I’ll explain later. The panel lines are delicate and raised, but since there was no sanding across them, there was no damage to correct.
| CONSTRUCTION |
I started with the cockpits. Since I build my aircraft all closed up, I didn’t do much here. The detail level is decent, but all you can see is a faded red/orange headrest thru the window. If you build it open, there is plenty to work with, but again even open the cockpit area is so small very little detail can be seen. That brings up the only fit problem the windscreen and the canopy don’t fit. They are a little oversized. A little sanding and adjusting will fix it. No big deal.
 Next, I just
glued all of the big parts together. Everything fit. No putty! Can I
repeat that? No putty! The nose and cockpit area is a separate
assembly. They fit together right on a panel line. ( I would guess they
did this so the same basic kit could be used to make an A-12 and a SR-71
kit with a minimum of remolding parts.)
Next, I just
glued all of the big parts together. Everything fit. No putty! Can I
repeat that? No putty! The nose and cockpit area is a separate
assembly. They fit together right on a panel line. ( I would guess they
did this so the same basic kit could be used to make an A-12 and a SR-71
kit with a minimum of remolding parts.)
I left off the landing gear, doors, lower fin and missile bay doors. After a good washing, and some liquid masking on the clear parts, the plane went off to the paint booth for a coat of primer. At this point I had to decide what to do about the second problem with this kit. There is a small nipple on the spine of the aircraft. I would imagine it is where plastic was injected into the mold. A small dab of putty and some light sanding would have fixed the problem, but I chose not to. More on that later. The primer looked good.
| COLORS & MARKINGS |
Painting
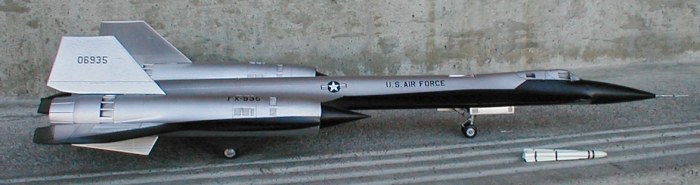
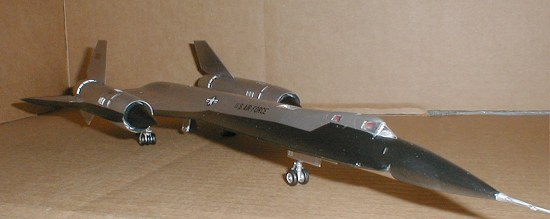
I used a Model Master rattle can to spray everything in flat black. I looked at the aircraft next to my SR-71 and decided they looked too much alike. So, I got out the airbrush and mixed up a little titanium paint. I masked off the black areas with blue 3M painters tape and sprayed on the titanium. This was a little scary. Spraying chrome silver (with 36 drops of orange) worried me. I imagined all kinds of runs and strange shading. It worked great. When I pulled the masking off, I was really impressed with the color scheme.
I brush painted the inside of the
wheel wells and missile bays titanium. The landing gear was painted
aluminum just to provide a little contrast. The tires are flat black,
They would also be accurate in a medium to dark grey. ( I have looked at
the real ones and the two different colors are both accurate.) The
wheels can be black, silver or grey. The missiles we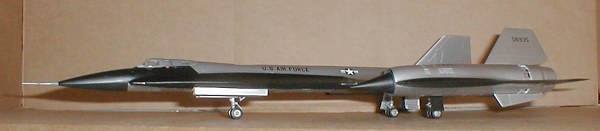 re painted white
with red pin striping tape used for the markings. Decals that small
drive me crazy. Remember that little plastic nipple on the spine? I got
lazy. I put a drop of silver paint on it. When it dried I put a drop of
stoplight red on the silver. So now the plane has a light. I know you purests will have me strung up, but give me a break. I build for fun,
not contests.
re painted white
with red pin striping tape used for the markings. Decals that small
drive me crazy. Remember that little plastic nipple on the spine? I got
lazy. I put a drop of silver paint on it. When it dried I put a drop of
stoplight red on the silver. So now the plane has a light. I know you purests will have me strung up, but give me a break. I build for fun,
not contests.
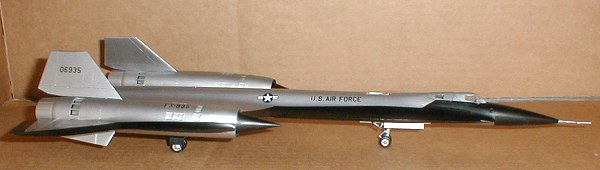
This aircraft #935 is built and painted as it appeared in early 1963 with no camera pods. The two tone finishes did not last long. After 1963 all three aircraft were finished in the overall flat black.
Decals
I used the kit decals. There are enough decals to build any one of the three aircraft produced. They were pretty old, but they stayed together. I used a little Micro Sol to help them settle in place. After they dried, I coated the whole thing with Future. To the eye the decals look painted on. (Unfortunately, the camera can pick up the different shading under the clear decal film.) The plane was a little to shinny, if you know what I mean! I sprayed it with a semi-gloss coat. Flat would have been more accurate, but I am going to display it next to my SR-71 and I want a little difference in the finishes.
| FINAL CONSTRUCTION |
 I glued on the landing gear and doors,
no surprises there. Next was the fin at the rear of the plane. Since the
plane is parked I glued it on in the folded mode. The missile bay doors
have to be cut to pose them open. I cut one set and glued the other set on
closed. The open doors have to be put on with small drops of super glue
working from on end the other to keep them straight. Be careful here, it
looks pretty bad to have the front of the door hanging off into space. One
missile was glued in the open bay. I saved the second one for some extra
detailing. I will display it in front of the aircraft.
I glued on the landing gear and doors,
no surprises there. Next was the fin at the rear of the plane. Since the
plane is parked I glued it on in the folded mode. The missile bay doors
have to be cut to pose them open. I cut one set and glued the other set on
closed. The open doors have to be put on with small drops of super glue
working from on end the other to keep them straight. Be careful here, it
looks pretty bad to have the front of the door hanging off into space. One
missile was glued in the open bay. I saved the second one for some extra
detailing. I will display it in front of the aircraft.
Some of you sharp readers may notice that I didn’t mention nose weight. It doesn’t need any. It balances well on its landing gear.
| CONCLUSIONS |
This airplane is one of the easiest kits I have ever built. It also has great detail and accuracy. I am going to prowl ebay and the swap meets for more. I still have to do an A-12, SR-71C and the YF-12C.
My hands and eyes are over 50. Please forgive my shortcuts and remember this is a hobby, I build for enjoyment. Those of you that can do better and add more detail please do, you’ll like this one. Me, I am happy having a unique kit and an enjoyable build rather than a trophy.
| REFERENCES |
Testors kit instructions
SR-71 online - The Blackbird Archive
December 2004
Copyright ModelingMadness.com. All rights reserved. No reproduction in part or in whole without express permission.
If you would like your product reviewed fairly and fairly quickly, please contact the editor or see other details in the Note to Contributors.