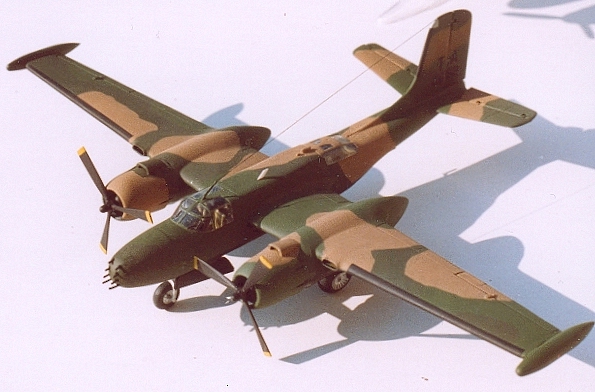
| KIT: | Airfix 1/72 A/B-26 Invader |
| KIT #: | ? |
| PRICE: | £5.00 on sale |
| DECALS: | Two options |
| REVIEWER: | Tim Mansfield |
| NOTES: |

| HISTORY |
The Douglas B-26K Counter Invader is the ultimate development of the classic A-26 Invader, a medium bomber from WW2.
Very briefly the A-26 Invader was produced towards the end of World War 2 as a replacement for the A-20 Havoc medium bomber, serving during the final year of conflict. Just after the end of the war, when all B-26 Martin Marauders had been retired, the Invader was re-designated the B-26. Some survivors continued to serve in Korea in a night interdiction role.
Examples from both wars are options in the standard Airfix kit.
USAF service by the B-26 did not cease after Korea. Standard examples continued to operate in Vietnam until 1964 under the USAF 'Farm Gate' project. At this point the type was withdrawn from USAF active service following a number of structural failures.
 However the USAF had already
decided there was more potential to the Invader as a Counter Insurgency
aircraft, and selected 40 low-hour examples for re-manufacture optimised to
that role. The result was the B-26K Counter Invader, capable of over
400mph, fully aerobatic, and an endurance of over 8 hours. Compared to a
custom made jet or turbine plane, it was also available, proven and cheap!
The Counter-Invader was initially blooded in the Congo from 1964-1966 with mercenary crews, then served from 1966-1969, with the 606 and 609 Special Operations Squadrons USAF at Nakhon Phanom in Vietnam.
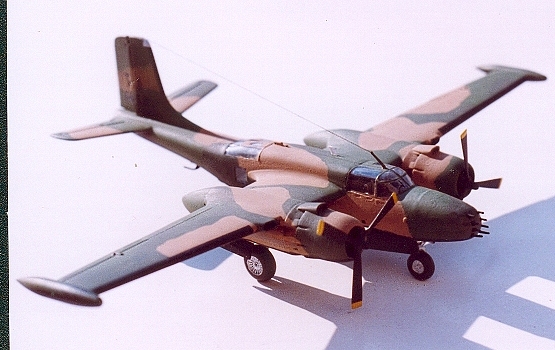
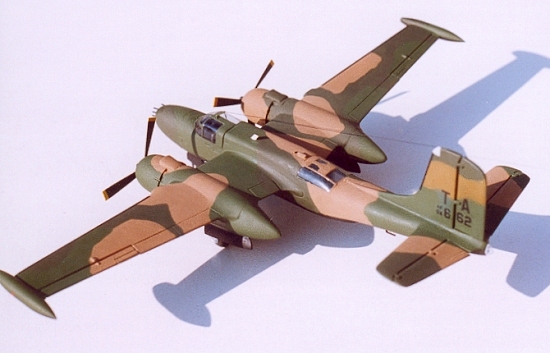
Re-manufacture was carried out by On-Mark Engineering, and consisted of re-building the cockpit with full dual controls and new avionics. The fuselage was re-built without turrets, and a larger rudder was fitted. Wings had 8 underwing hardpoints, and wingtip fuel tanks added. Original engines were replaced with more powerful ones fitted with fully reversible propellers. A full 3 tone camouflage over black undersides was used in Vietnam.
After Vietnam the surviving Counter Invaders were returned to the bone-yards of Arizona, where most were rapidly and deliberately scrapped - so that this cheap and highly effective weapons platform could not find its way into the hands of a potential enemy. The only surviving example that I know of stands guard duty at the entrance of Hulbert Field, Florida, home of the USAF Special Operations Squadrons.
| THE KIT |
The Airfix kit has been with us since 1971, and is a typical rivet-monster of the period. However if you want any sort of Invader in 72nd scale, it is your only starting point.
This article starts with a pile of Invaders for sale in my local model centre at the knock-down price of £5.00.
I had built a natural metal, solid nose A-26B in 1993, so I knew exactly what I was getting for my money, but being a bargain hunter I had to have one. Where I build a duplicate version of a kit, I like it to be as different as possible from the original – and the nocturnal B-26C would fullfil that requirement. . . . . . . . . . . . . . . . . . . . . . . . .sometime.
My interest was revived a couple of years later when I re-discovered an article about the B-26K Counter Invader in the book book ‘Vietnam - Air War Debrief’ – now that really would contrast and compliment the original Invader!
A hunt through my spares box revealed some appropriate looking fuel tanks for the wingtips (thought to be from a Matchbox single seat Hawk 200), and my pending pile yielded square-tip propellers from a Heller DC-6B Cloudmaster that I could use as masters, or share between both models. My interest was high so the project was started, If it all went pear shaped £5.00 was not too much to sacrifice on a 'learning experience'.
| CONSTRUCTION |
Construction of this kit is fairly straightforward, so I'll just concentrate on the areas where I diverged from the standard kit instructions.
Cockpit
 I removed the lump from the
port side cockpit floor and installed 2 spare seats from an Academy B-17
Fortress. Replacement control yokes were made from strut and paper clips,
and installed for both pilots. The cockpit was the painted black, with
metallic grey floor and dark green seats. Harnesses were made from thinly
sliced Tamiya masking tape to contrast the seat colour.
Fuselage
The gunner's compartment was completed with similar interior decor as the cockpit, omitting the sighting periscope. The resulting holes were filled with Humbrol Clearfix.
I don’t know if the seat was still there on the Counter Invader – and am certain that nobody would use it in combat, but mine retains the seat for daytime jollies.
My plan for a larger rudder was to insert a sheet of plasticard between the rudder halves, then cut a slightly extended outline and re-profile the section.
However this composite went AWOL on my model bench, so I fabricated a new rudder using some round section for the hinge-line, and thin plasticard skins. Trimmed to shape, this was installed as the fuselage was assembled, along with the turret blanking plates.
I sanded away the upper turret contours, leaving a constant upper fuselage section from the cockpit to the gunner's compartment. I have to confess that the lower fuselage was not treated similarly, being fairly well concealed. The bomb-bay was assembled closed, and no kit aerials, steps or intakes were installed.
Then the original rudder re-surfaced, too late to be used, why does that always happen?
Wings
I cropped each wingtip just outboard the ailerons, then assembled the wings according to the instructions. I removed the moulded guns, fitted the tanks, and filled the underwing armament mounting holes. To speed up projects a lot of my models are finished clean, the Counter Invader would be no different.
The wingtip fuel tanks which had started my interest in this project were 45mm long and 7mm diameter, with a straight waist section which roughly matched the newly truncated wings. A survey of my completed models shows that finless tanks from an Airfix Hawk or any first generation Harrier kit would be acceptable alternates with my level of references.
 Engines and Propellers
The engine blocks were assembled without modification. I paint my radial engines with Aeromaster Tire Black paint.
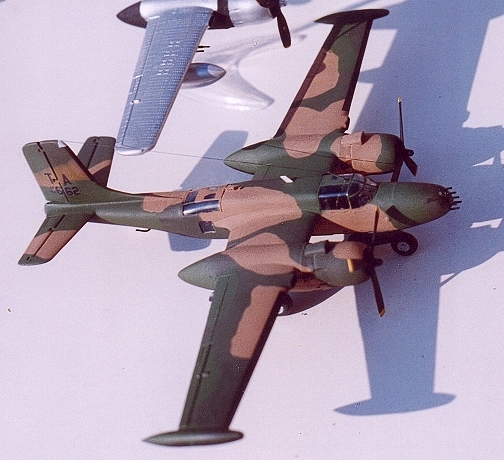
The cowlings required considerable attention with coarse wet'n'dry to remove the leading edge air intakes and create a round cross section. This exercise had to be repeated with successively finer grades to restore an acceptable surface.
New air intakes were butchered from Airfix Short Stirling intakes. When I was happy with all the components, the engines were assembled.
The real weak point of the entire project would always be the propellers. With hindsight I should have started with these before taking my scalpel to any other part of the kit.
My first plan was to create a set of correctly shaped blades from plasticard, mastered from the DC-6B props, and graft them onto the original hubs. However I soon realised that this was not a practical solution. The result, if I could successfully build a propeller before amputating my fingers, would look like something from an early steamship!
Plan 2 was to share propellers with the DC-6B, and accept the compromise that these two Douglas Aircraft models would never be seen together.
Airframe Assembly
The wings were mated to the fuselage and engines without further modification. At this point I removed all those horrible rivets, and smoothed all the joints. Also, I packed the solid nose with plasticene to achieve an adequate balance, and completed the basic airframe.
Now that the airframe was complete, I realised that the DC-6 propellers were a bit too big, and clashed with the fuselage. It was necessary to trip 2mm from each tip.
Now the DC-6 was being corrupted, and it should really have natural metal coloured props!
In desperation I hatched Plan 3, and sent a parts replacement slip to Heller, requesting 2 DC-6 propellers.
My interest in this project was waning, it was in real danger of being returned to the pending shelf . . . . . . . . . . . . . . . . . . . . . . . . . . . . . . . . . . or consigned to the bin!
A few weeks later the replacement props turned up. Saved again, thanks Heller! The rest would be downhill, but you will hear more about the propellers later.
| COLORS & MARKINGS |
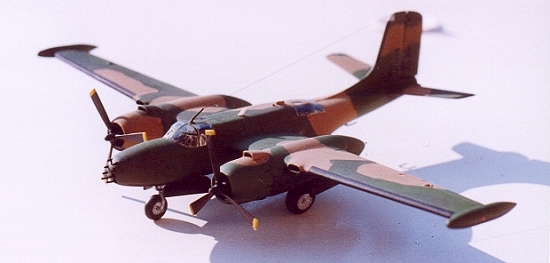 By this stage I'd acquired a
copy of Airplane Magazine No 60, with a 3 view colour diagram of the
Counter Invader. This and the photos from the book were my painting guides
to the theatre standard 3 tone camouflage over black undersides. My model
was brush painted with Humbrol numbers 116, 117 and 118, with 33 for the
undersides, de-icer boots and propellers. I couldn't work out what the
light patch at the top of the fin is, so I just painted it light grey.
National insignia were not applied to Counter Invaders. Markings were restricted to tail codes and aircraft number on the vertical tail. A thorough hunt through my private decal-bank revealed a way of constructing a set of markings for TA 64-662 in black, which neatly fitted into the appropriate range (64-630 to 64-679).
I applied the decals over a wet patch of Johnson's Klear, then pressed them down with a rag. I find that this gives no space for air under the decal, and hence eliminates the risk of silvering. It dries quickly and seals the decal to the model, so no air can creep underneath later. I treated the whole airframe with Humbrol Flat Cote to achieve a consistent flat finish.
| FINAL CONSTRUCTION |
The B-26 has a pronounced 'sit up and beg' posture, which is not reproduced on the model Invaders that I have seen. I decided to replicate this by shortening the main undercarriage legs slightly. I found it very difficult to achieve any strength it the undercarriage again, and resorted to driving red hot paperclips into the legs before the model could stand properly again.
Then I discovered that my cutting was not as equal as I had hoped, and the port leg was shorter than the starboard, to the extent that the propeller almost touches the ground on that side!
Aerials were cut from various thicknesses of plasticard and paperclips, and applied to give the look of a Counter Invader. A nylon thread was anchored with superglue and rigged from the cockpit mast to the tail. Then I run a brush full of acrylic black paint along the nylon for an authentic look.
Final detail of windscreen wipers and navigation lights were added using gel pens. I find I can use these more accurately than a brush for this sort of detail, but they do take a lot longer to dry, so the model has to be handled with care to avoid smudging.
| CONCLUSIONS |
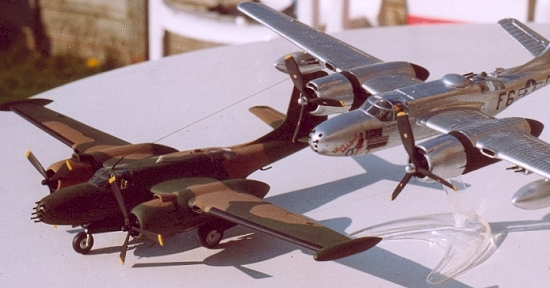 Overall I am delighted with
the outcome of my Counter Invader project, which has attracted favourable
comments at my local IPMS branch and model shows – and achieves my
objective of representing an aircraft very different to the kit which I
bought.
I have completed other conversions, but always with the aid of a commercial conversion set. This is what sets my Counter Invader apart, and adds satisfaction to the project.
The difficulties encountered made the final outcome all the more rewarding.
March 2005
Footnote
With hindsight, if the diagram in Aeroplane Magazine is accurate, then the tip-tanks should be longer, slightly slimmer, and have more pointed rear ends. That said, I can't suggest an accurate donor part, but nobody has ever commented that mine look inaccurate.
If you would like your product reviewed fairly and quickly by a site that has 300,000 visitors a month, please contact me or see other details in the Note to Contributors.