Tamiya 1/48 A-1H Skyraider
| KIT #: | 61058 |
| PRICE: | $39.00 MSRP |
| DECALS: | Two options |
| REVIEWER: | Dan Lee |
| NOTES: | Black Box cockpit and TD wheels used |
| HISTORY |
The A-1 Skyraider aka Able Dog/Sandy/Spad/Flying Dumptruck/etc was an odd duck in the 1950s and 60s when military aviation took to the jet age inspired mantra of “Faster, Higher.” The Ed Heinemann designed single engined, single seated USN bomber (originally a torpedo bomber replacement for the Avenger) had the unglamorous but very necessary job to fly down into the weeds and drop high explosives on various things and people.
It proved its worth durning the Korean War with its long range, ability to take damage and amazing payload while flying from carrier decks in the treacherous waters of the North West Pacific.
 Over a decade
later, the Skyraider was involved with another war in Asia, this time Vietnam
where it served with distinction in the USAF, USN and VNAF till it was replaced
by the Intruder and Corsair II.
Over a decade
later, the Skyraider was involved with another war in Asia, this time Vietnam
where it served with distinction in the USAF, USN and VNAF till it was replaced
by the Intruder and Corsair II.
Dieter Dengler
Originally born in Germany, Dieter was engrossed with American planes flying over his home in WW2 that he wanted to get to America to fly. It was an adventure just to get to fly which included living on the streets of NY, enlisting in the USAF and then attending college before he finally getting his Golden Wings.
During Survival training,
Dieter proved to be one of the best students ever as he escaped three times.
A lot of that due to his rough
childhood in post war Germany.
Little did he realize how important
that would be
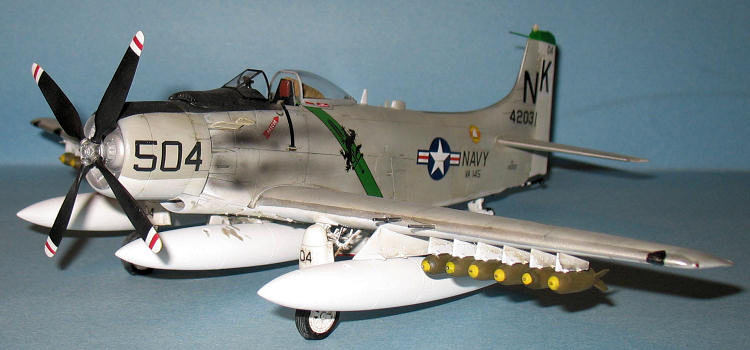
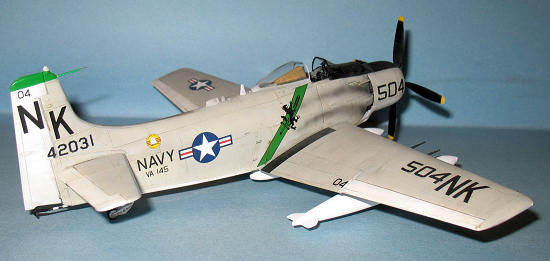
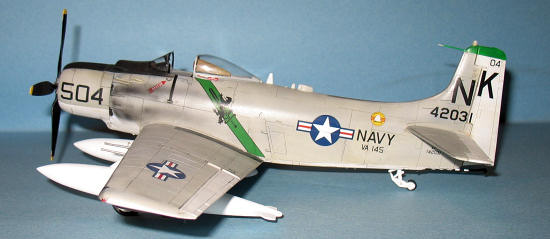
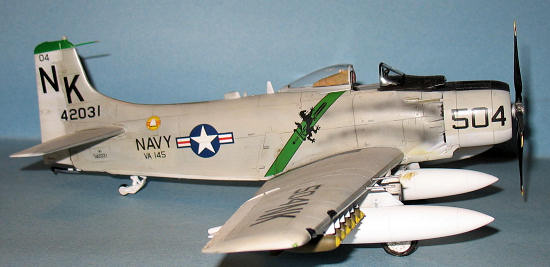
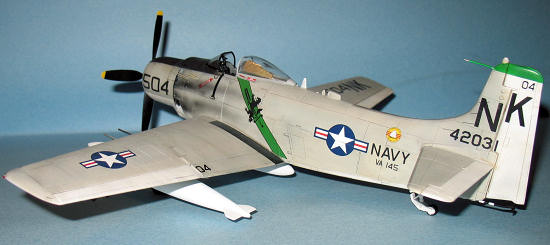
Dieter was assigned to fly A-1 Skyraiders and joined VA-145 (The Swordsman) which was based on the USS Ranger as part of the task force at Yankee Station for air ops over North Vietnam. On Feb 1, 1966, Dieter flew his first combat mission in A-1J BuNo 142031 and was shot down after his flight was diverted from their original target in North Vietnam to a secondary one over Laos where his Skyraider was hit and crashed.
The events of his capture and escape are chronicled much better than I could ever write in Werner Herzog’s documentary film “Little Dieter Wants To Fly” and the dramatized “Rescue Dawn” starring Christian Bale. I’ve seen both and I find the documentary more compelling although Rescue Dawn is a decent enough movie.
Dieter was one of the few
naval aviators to escape from a prison in the Vietnam war.
Several years later, he left the
Navy and flew for
| THE KIT |
 The Tamiya
Skyraider kit is one of the best model kits around that has few if any building
vices.
It is well detailed OOB and fairly
accurate for a Vietnam era Skyraider.
The Tamiya
Skyraider kit is one of the best model kits around that has few if any building
vices.
It is well detailed OOB and fairly
accurate for a Vietnam era Skyraider.
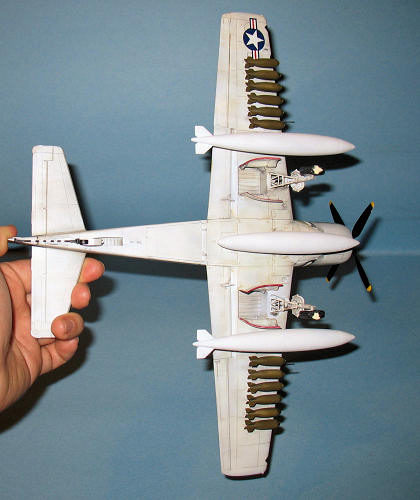
A quick look on the parts show that they are flash free and fit well together. One of the bonuses to this kit is the amount of ordinance that you get including fuel tanks, 2000lb WW2 bombs, rockets, rocket pods, cluster bombs and 250lb bombs.
Only weaknesses I can see are the cockpit seat and the cockpit although I am told that the wheel wells are also lacking. Given a choice between using a replacement cockpit or replacement wheel wells I would go with the replacement cockpit 49 times out of 50.
| CONSTRUCTION |
 It all begins
with the Black Box Cockpit (I had purchased this a long time ago) and I used
cockpit photos to paint it while ignoring Tamiya’s suggestions.
It was rather easy to install.
The now out of production Black Box
cockpit has much better detail in than the Tamiya cockpit so I thought it was
worth it until I took one look at the headrest and discovered that it was off by
a noticeable 20 degrees or so.
Of course, I didn’t realize this
till after the cockpit was in tight and it was way too late to do anything.
If you look closely you can see it
in the photos.
It all begins
with the Black Box Cockpit (I had purchased this a long time ago) and I used
cockpit photos to paint it while ignoring Tamiya’s suggestions.
It was rather easy to install.
The now out of production Black Box
cockpit has much better detail in than the Tamiya cockpit so I thought it was
worth it until I took one look at the headrest and discovered that it was off by
a noticeable 20 degrees or so.
Of course, I didn’t realize this
till after the cockpit was in tight and it was way too late to do anything.
If you look closely you can see it
in the photos.
The rest of the Skyraider kit goes well together. I opted for a closed up engine (less work naturally) and more realistic. The seams were not so bad except the ones that were in between the various antenna. I used some folded up sandpaper to deal with that. Otherwise follow the instructions and you won’t go wrong.
| COLORS & MARKINGS |
Paint
The Skryaiders of VA-145 had the Lt Gull Grey over Insignia White markings which are very straightforward to do. I preshaded the model with flat black and dark grey. Then I painted on the white areas using Tamiya Flat White instead of Insignia White because it covers better than most whites and after a wash I can barely tell the difference between the two. Once dry, I masked off the various areas and sprayed on Gunze Lt. Gull Grey in thin coats so that the Preshading would show. The canopies and engine section were masked and done at the same time.
The VA-145 Swordsman also had
painted the top of the tail green (actually willow green.)
Fortunately, I had Gunze Bright
Green which was close enough.
Tamiya Park Green is also an
option, but I found it too light compared to the green on the Swordsman
 Markings.
It was masked and sprayed on, the
tail pitot was done at the same time.
Markings.
It was masked and sprayed on, the
tail pitot was done at the same time.
Once the grey dried, I masked off the leading edges of the tailplanes, tail and wings and sprayed on Tamiya Aluminum as the basecoat and a light coat of Talon Aluminum. I sprayed on two coats of Gunze Gloss for the decals.
Markings
A long painful search on the internet yielded very little useful information except a “skin” of Dieter’s plane 504 for the Microsoft Combat Flight Simulator (which I used as the basis for my markings) and there were no 1/48 scale decals of Dieter’s ill-fated Skyraider so I improvised (Hasegawa does have the markings for their 1/72 Skyraider but any photos I could find of it were on someone’s photo log till they changed the privacy settings and could not use it for information), I used the Tamiya Decal Sheet, Eagle Strike 48006 and Super Scale 48-1003 (which had the Vietnam Era Swordsman markings) to make most of the markings for this plane.
However, I ended up using numbers leftover from my F-3F-1 build for the Tail BuNo as I couldn’t didn’t have the right size or color for them. Also, it should be noted that 504 was also an A-1J not H. The markings for the smaller BuNo next to the tailhook is missing a J as I didn’t have one in that size. I suspect that the Gulf of Tonkin Yacht Club decals were not used at this time either. Basically a lot of what I did was based on semi-ignorant guesses and do not claim any accuracy of any sort.
 Weathering
I opted for the slightly dirty Skyraider which meant a thin watercolor wash of a bit of black mixed with burnt sienna and raw umber. I decided to make the underside more dirty than the topside based on what I read in reviews and on the web. Based on the “skin”, I sprayed on the exhaust stains using very thin Flat Black at low pressure.
The whole thing was sprayed with the last of my Gunze Flat Coat and I moved on to final assembly.
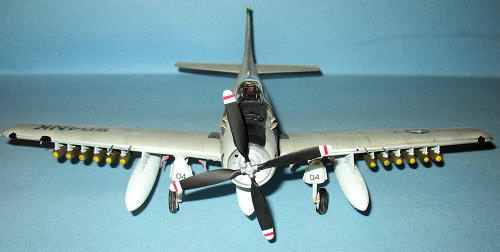
Propeller
This was an exercise in itself as I wanted to be more difficult and paint the prop tips instead of using decals. The Hub was painted first with AS-12 Aluminum from the spray can. The hub was then masked off and then sprayed flat black. The tips were masked off on both sides and sprayed flat white (although the backside of the prop was done in a separate step.) Once done, the tips were masked again so the flat red stripe was painted on in the front and yellow at the rear.
Each masking step was done when the paint was sufficiently dry and it took three days of work to paint the prop. Why would I do all this extra work? Well, I was never all that successful with any sort of decals that sit on the leading edges and it looks better (and I’m a lazy guy by nature so it surprises me, too.)
Tailhook
Another amount of work painting and masking. The tailhook was painted flat white first then masked off with carefully cut strips of green painter’s tape before flat black was added. I let paint dry before I removed the masks.
| FINAL CONSTRUCTION |
 I did not
attach the engine on the plane till the exhaust pipes (drybrushed steel, rust,
red brown and black) were glued on.
I then masked then painted the flat
black glare panel.
I did not
attach the engine on the plane till the exhaust pipes (drybrushed steel, rust,
red brown and black) were glued on.
I then masked then painted the flat
black glare panel.
A lot of filling and sanding
of bombs (I opted for the 12 250lb bombs as it was the closest equivalent of
Dieter’s combat payload) and fuel tanks--let me repeat that I really wish
someone could come up with a better (ie: lazier) way of doing ordinance.
The yellow bomb nose markings were
done using a drafting template as the mask (cover all the holes except the one
you want, stick part in template and airbrush on yellow.)
The prop, tailhook, various pitot
tubes, gunsight and cannon barrels were added.
The True details wheels were cut
from the pour stubs, sanded, painted, drybrushed with dark grey, weathered and
glued on with CA glue.
| CONCLUSIONS |
Aside from the bombs and tanks, the Tamiya A-1H Skyraider is an excellent kit to build with few, if any, vices. I heartily recommend it unless you really hate assembling bombs and fuel tanks (having assembled/filled/sanded 12 bombs and 3 fuel tanks, I can fully understand why) or you have a loathing of masking. I definitely used a lot of tape for this one.
Despite the errors (self inflicted or otherwise) I am happy I finally built this Skyraider.
| REFERENCES |
Much thanks to the person on the forum who directed me to Able Dog (the A-1 Skyraider memorial site.)
Much of the information from Wiki/AbleDog
January 2009
If you would like your product reviewed fairly and quickly, please contact me or see other details in the Note to Contributors.