Matchbox 1/72 AH-1G Cobra
| KIT: | Matchbox 1/72 AH-1G Cobra |
| KIT #: | PK-9 |
| PRICE: | $2.15 CDN back in the 1970s |
| DECALS: | Two options |
| REVIEWER: | Peter Kwong |
| NOTES: |
| HISTORY |
 With the success of the Bell Huey
UH-1 gunship helicopter, Bell designed a helicopter dedicated to the gunship
role. The result was the Bell 209 design, later redesignated AH-1. The design
incorporated a tandem seating arrangement where the gunner sat at the front,
giving the gunner a clear view of the targets, while the pilot sat behind and
above the gunner. The large greenhouse canopy posed a heating problem for its
crew, so an air conditioning system was incorporated into the design. Early
versions also included ash trays for the crew, although this was later removed
from the design. The first production AH-1G was first flown on Sept 1966 and was
armed with a TAT-102 turret carrying a 7.62 mm multi-barrel mini-gun. Hardpoints
on its wings allowed the aircraft to carry external armament like the XM-159
2.75 inch FFAR rocket pods and the XM-18 M48E1 6 barrel 4.62 mm mini-gun. To
solve a yaw stability problem with the early –Gs, the tail rotor was moved from
the port side to the starboard side in later –Gs. Other visible changes included
removing the landing lights from the nose and putting them behind the chin
turret in a retractable mechanism. Later –Gs had its chin turret replaced with
the XM-28 turret carrying a GAU-2B/A mini-gun and a XM-129 40mm grenade
launcher. The –Gs were used both by the US Army and the US Marines, with he
Marines eventually switching to a dual engine version called the AH-1J Sea Cobra
once that was available from Bell.
With the success of the Bell Huey
UH-1 gunship helicopter, Bell designed a helicopter dedicated to the gunship
role. The result was the Bell 209 design, later redesignated AH-1. The design
incorporated a tandem seating arrangement where the gunner sat at the front,
giving the gunner a clear view of the targets, while the pilot sat behind and
above the gunner. The large greenhouse canopy posed a heating problem for its
crew, so an air conditioning system was incorporated into the design. Early
versions also included ash trays for the crew, although this was later removed
from the design. The first production AH-1G was first flown on Sept 1966 and was
armed with a TAT-102 turret carrying a 7.62 mm multi-barrel mini-gun. Hardpoints
on its wings allowed the aircraft to carry external armament like the XM-159
2.75 inch FFAR rocket pods and the XM-18 M48E1 6 barrel 4.62 mm mini-gun. To
solve a yaw stability problem with the early –Gs, the tail rotor was moved from
the port side to the starboard side in later –Gs. Other visible changes included
removing the landing lights from the nose and putting them behind the chin
turret in a retractable mechanism. Later –Gs had its chin turret replaced with
the XM-28 turret carrying a GAU-2B/A mini-gun and a XM-129 40mm grenade
launcher. The –Gs were used both by the US Army and the US Marines, with he
Marines eventually switching to a dual engine version called the AH-1J Sea Cobra
once that was available from Bell.
| THE KIT |
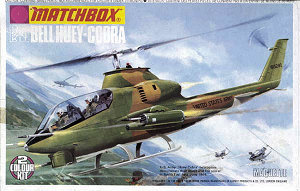 As with most of the Matchbox kits I
own, I bought them during my high school years at the local Woodwards department
store when they were on sale. I knew nothing about the airplanes themselves, but
the box art was enough to convince me I needed to have a model of it.
As with most of the Matchbox kits I
own, I bought them during my high school years at the local Woodwards department
store when they were on sale. I knew nothing about the airplanes themselves, but
the box art was enough to convince me I needed to have a model of it.
This 1973 kit is molded in tan and
olive drab colours and consists of 35 parts. The standard Matchbox transparent
stand is provided along with a one piece curved windscreen. The surface detail
i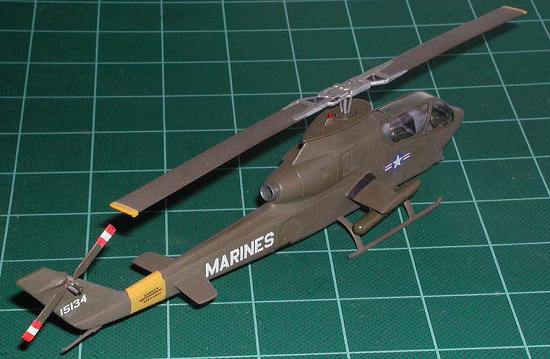 s a mix of raised and deep sunken lines. The cockpit consists of 2 cleanly
molded crew members, 2 seats, 2 control sticks, a rear bulkhead and a coaming
between the 2 crew positions. A single chin gun (which looks like a single
barrel gun), gun pod and FFAR rocket launchers are provided as weapons. While
the kit does not explicitly say what version of the AH-1, it appears to be the
–G version. Also, the tail rotor is on the right hand side indicating it was a
later –G model. The chin gun didn’t seem to match the weapons seen in photos of
the AH-1. Most photos show a grenade launcher and a gatling gun, rather than a
single gun for a cobra with a tail rotor on the starboard side. An interesting
note is that the instructions say technical information and assistance was
provided by Bell Hellicopter (sic) Company.
s a mix of raised and deep sunken lines. The cockpit consists of 2 cleanly
molded crew members, 2 seats, 2 control sticks, a rear bulkhead and a coaming
between the 2 crew positions. A single chin gun (which looks like a single
barrel gun), gun pod and FFAR rocket launchers are provided as weapons. While
the kit does not explicitly say what version of the AH-1, it appears to be the
–G version. Also, the tail rotor is on the right hand side indicating it was a
later –G model. The chin gun didn’t seem to match the weapons seen in photos of
the AH-1. Most photos show a grenade launcher and a gatling gun, rather than a
single gun for a cobra with a tail rotor on the starboard side. An interesting
note is that the instructions say technical information and assistance was
provided by Bell Hellicopter (sic) Company.
Instruction sheet contains detailed painting guide and 9 steps of instructions, each step consisting of exploded drawings showing what part goes where. Paint numbers are from the Humbrol Authentic Range.
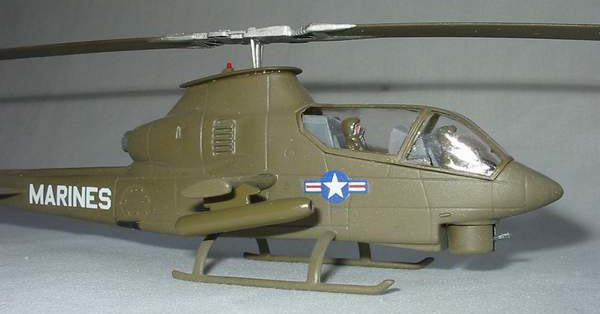
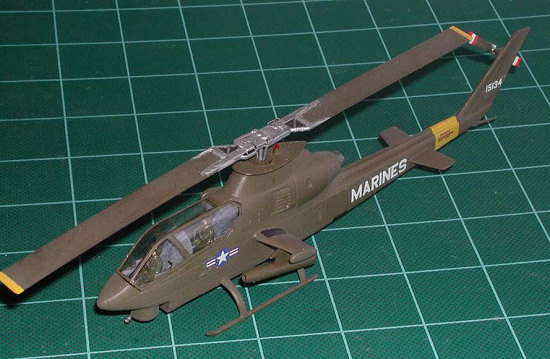
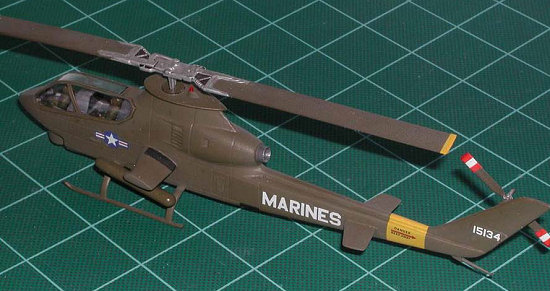
Decals are provided for two versions: US Army 235th Attack Helicopter Flight and a generic US Marines aircraft. The box cover represents neither of these.
| CONSTRUCTION |
This kit was built as a practice kit to try out all the new techniques I had read about in the years since high school. So the kit was built pretty much out of the box, with a focus on the basics of clean assembly, painting and decaling. I do not know how this kit compares with the real thing.
The interior of the cockpit and the bulkheads and seats were painted with a dark grey (Model Masters acrylic gunship gray). The crew members were given olive drab flight suits, black boots and gloves, silver goggles and flesh colour skin. I lost the control columns in the intervening 3 years that elapsed before completing this kit so I replaced them with wire and painted them black. The replacements look pretty awful but are hard to see, luckily.
 The exhaust cone thickness was
thinned down using a round file on the inside of the exhaust. The cockpit, chin
turret and exhaust cone were glued to one fuselage half, then the 2 fuselage
halves were glued together. If you don’t care for a rotating chin turret, you
might want to leave if off until the very end. Some filler was needed here and
there when the 2 fuselage halves were joined. When trying to eliminate the seam
at the fuselage top just behind the pilot where the canopy should touch, be
careful not to sand off too much or else you will end up with a gap between the
canopy and the rest of the fuselage. The bottom front of the fuselage halves has
sink marks that need to be filled and sanded. This model is a tail sitter so put
some weight at the front. If like me, you forget, then a combination of the crew
members plus the canopy will provide enough weight to get it off its tail.
The exhaust cone thickness was
thinned down using a round file on the inside of the exhaust. The cockpit, chin
turret and exhaust cone were glued to one fuselage half, then the 2 fuselage
halves were glued together. If you don’t care for a rotating chin turret, you
might want to leave if off until the very end. Some filler was needed here and
there when the 2 fuselage halves were joined. When trying to eliminate the seam
at the fuselage top just behind the pilot where the canopy should touch, be
careful not to sand off too much or else you will end up with a gap between the
canopy and the rest of the fuselage. The bottom front of the fuselage halves has
sink marks that need to be filled and sanded. This model is a tail sitter so put
some weight at the front. If like me, you forget, then a combination of the crew
members plus the canopy will provide enough weight to get it off its tail.
The tail fin comes in halves separate from the fuselage. The fit of the vertical fin to the fuselage required putty to smooth the transition. You might want to glue the fin to the fuselage half first then glue 2 fuselage halves together.
The horizontal tail fins were attached next. The slots in the fuselage halves for the 2 horizontal fins are much thicker than the thickness of the tabs on the fins. I shimmed some plastic into the slot to make the fins fit tighter. You’ll still have to align the fins. The 2 wing stubs fit a little better but the fit is still a bit loose. For both the wings and horizontal fin, some putting along the joint lines will be needed.
One of the main rotor blades had a small sink mark at the end closest to the engine but filling it is simple. The detail on the main rotor hub is decent, but could be enhanced by removing the plastic between the linkage arms. I just left it and painted the area black.
At this point, I proceeded to painting although in hindsight, I should have cleaned up the mold lines on the main struts and glued the struts to the airframe before painting.
| COLORS & MARKINGS |
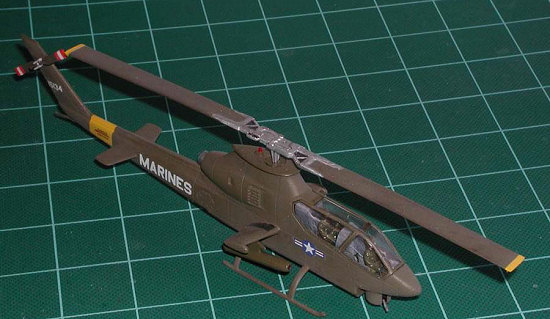
I chose the green Marines version because I didn’t have a bottle of tan paint (US Army version) but did have a bottle of Gunze olive drab paint. Strangely enough, neither all tan or all olive drab scheme matches the two-tone scheme on the box top. The whole airframe was airbrushed olive drab once the masked canopy was tacked on with white glue. The rotor blades, main skids and tail skid were also painted the same colour according to the painting instructions. The painting guide calls for the main blades to be black on the underside, but I was just wanted to finish the kit so I didn’t bother with the extra masking and painting. The main rotor was painted flat aluminum with some dirty wash thrown in to try to highlight the details. The exhaust cone was brushed Humbrol acrylic gun metal and then dry brushed with flat aluminum.
 Once the paint had dried, the decals
were put on. The Gunze paint dried to a semi-gloss sheen so I didn’t put any
gloss coat. The fuselage yellow band is too long and will wrap around. It is
also not opaque enough so where the band wraps around, the yellow will be more
intense than the rest of band. A friend pointed out that with the bleed through,
the yellow band looks weathered. Hmmm, that’s a positive spin on it. You also
have to make sure that the 2 warning arrows are pointing to the rear and they
line up on either side of the fuselage because the arrows are printed on the
yellow band, rather than being separate.
Once the paint had dried, the decals
were put on. The Gunze paint dried to a semi-gloss sheen so I didn’t put any
gloss coat. The fuselage yellow band is too long and will wrap around. It is
also not opaque enough so where the band wraps around, the yellow will be more
intense than the rest of band. A friend pointed out that with the bleed through,
the yellow band looks weathered. Hmmm, that’s a positive spin on it. You also
have to make sure that the 2 warning arrows are pointing to the rear and they
line up on either side of the fuselage because the arrows are printed on the
yellow band, rather than being separate.
The yellow decal strips for the main rotor blade tips are too short to wrap all the way around the blade as were the red and white decal strip for the tail blades. These were replaced with Superscale yellow, red and white decal films, which unfortunately were not very opaque. I put a double layer of white decal film on the tail blades, followed by a double layer of red decal film on top. It would have been easier, and look better, to just paint these tips rather than use the decal film. The white MARINES decal was put on and they settled very nicely with applications of Decalset, but there is some bleeding of the underlying olive drab colour though (more “weathering”?). The stars and bars went on easily as well. After several applications of Decalset, the decaled areas were washed of residue.
| FINAL CONSTRUCTION |
With the paint dried, main rotor assembly was glued together. The tailskid and main skid were attached using superglue. Pay attention to the alignment of the main skid because the left and right are separate parts. I attached the gun pod to the stub wings but left off the FFAR launchers because I got frustrated trying to get rid of the seam lines. The tail blade was assembled and then attached to the tail. Everything was then given a coat of Gunze flat coat. Some white flakes got onto the finish but these were gingerly removed with a wooden toothpick.
The canopy fit to the fuselage is not too good so some dry fitting work here is recommended. Finally, the main rotor was glued with superglue, the clear part snapped into place and the red warning light at the main rotor mast was painted red. Done, at last!
| CONCLUSIONS |
The chin turret gun really looks suspect. The original Matchbox decals are usable although I would recommend painting the yellow, red and white stripes. The red warning arrows should then be cut out and applied separately.
If you have this kit already, it makes a great practice kit because of the low parts count, but has just enough loose fitting parts to present a small challenge with using shims and putty. The single camouflage colour is a simple paint scheme for beginners to learn airbrushing skills.
If don’t have one already, however, then newer versions of the cobra are available from other manufacturers.
| REFERENCES |
Verier, Mike, “Bell AH-1 Cobra”, Osprey Air Combat.
Op Rees, Elfan, “World Military Helicopters”, Janes Publications.
Various web sites found by searching for AH-1 using Google.
December 2007
Copyright ModelingMadness.com. All rights reserved. No reproduction in part or in whole without express permission from the editor.
If you would like your product reviewed fairly and quickly, please contact the editor or see other details in the Note to Contributors.
Back to the Review Index Page 2015