Italeri 1/48 ACH-47A Chinook
| KIT #: | 2647 |
| PRICE: | $64.95 MSRP |
| DECALS: | Three options |
| REVIEWER: | Lee Kolosna |
| NOTES: | Converted to standard CH-47A |
| HISTORY |
The Boeing CH-47 Chinook has served with the United States Army and Air Force for over forty years now, providing medium-lift cargo handling and personnel transport duties.
 Development began in 1956 and led to the deployment of the
twin-engine, twin rotor helicopter in Vietnam starting in 1962. Much like
the highly utilitarian C-130, the Chinook has been adapted for a myriad of
uses, from search and rescue to covert team insertion to gunship
configurations. The ACH-47A was the first attempt at the latter mission,
with four aircraft being converted from the standard cargo hauling
configuration by adding five .50 caliber machine guns, two 20 mm cannon, two
2.75 inch rocket launchers, and a 40mm grenade launcher. Performance of the
gunship in combat was satisfactory, but the concept wasn’t pursued as more
cost effective platforms like the AH-1 Cobra and gunship versions of the
UH-1 Iroquois (Huey) took over the role as the war continued in Southeast
Asia.
Development began in 1956 and led to the deployment of the
twin-engine, twin rotor helicopter in Vietnam starting in 1962. Much like
the highly utilitarian C-130, the Chinook has been adapted for a myriad of
uses, from search and rescue to covert team insertion to gunship
configurations. The ACH-47A was the first attempt at the latter mission,
with four aircraft being converted from the standard cargo hauling
configuration by adding five .50 caliber machine guns, two 20 mm cannon, two
2.75 inch rocket launchers, and a 40mm grenade launcher. Performance of the
gunship in combat was satisfactory, but the concept wasn’t pursued as more
cost effective platforms like the AH-1 Cobra and gunship versions of the
UH-1 Iroquois (Huey) took over the role as the war continued in Southeast
Asia.
CH-47D models fly today in large numbers with a number of air forces around the world. In US service, the Chinook is projected to continue serving for at least another twenty years, making this design one of unprecedented longevity.
| THE KIT |
Those of
us old enough to remember the Aurora HC-1 (the helicopter’s pre-1962
designation) Chinook model know that it was the only 1/48 scale offering for
decades until Italeri’s decision to produce a new CH-47 series. I vaguely
remember building one as a kid in the 60s, smearing glue on the porthole
windows and making a mess of things. Italeri, along with Academy, have
expended considerable effort in making an extensive catalog of helicopters
in both 1/72 and 1/48 scale. Chinook fans rejoiced when they learned that
both companies would release kits in the larger scale, with Italeri being
first with an ACH-47A version. In my opinion that is kind of an odd choice,
as the CH-47D is so much more prevalent nowadays. Only four ACH-47As were
made, but model companies know that things with guns tend to sell better
than their unarmed cousins. As of this writing, we still only
 have an
announcement of intention of a release from Academy, so the Italeri kit is
it for now. It seems pretty clear from what’s in the box that Italeri will
be producing further versions of the kit, including a Plane Jane cargo
hauler and a covert operations MH-47E.
have an
announcement of intention of a release from Academy, so the Italeri kit is
it for now. It seems pretty clear from what’s in the box that Italeri will
be producing further versions of the kit, including a Plane Jane cargo
hauler and a covert operations MH-47E.
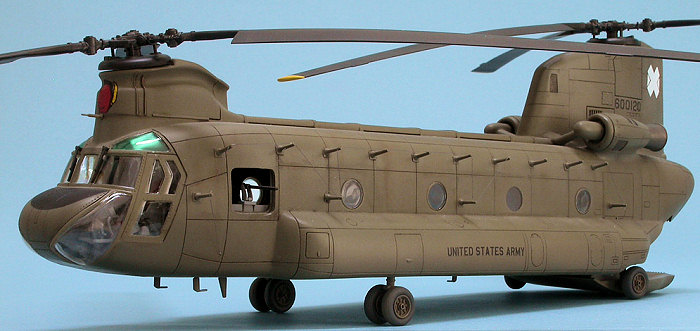
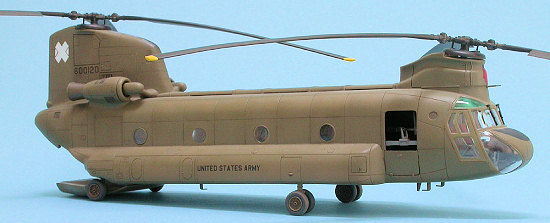
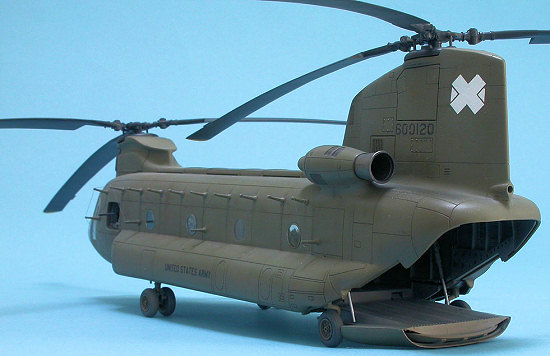
The kit is molded in Olive Drab and clear plastic. Following a trend in model kit design, the panel lines are all recessed and there is no rivet detail whatsoever. This is unfortunate because the real helicopter is festooned with thousands of raised rivets. The interior is fairly well detailed, although Chinook experts point out that some of the instrument configuration is fictional. The overall shape is fairly good, although the front rotor pylon is a bit too short and not sharply defined enough. Fixing that is quite complicated. Italeri made a number of mistakes on the external armor, as it should only be mounted on the port side of the aircraft instead of both sides as provided in the kit. The raised area around each porthole window is not correct and should be sanded off. There are some minor issues with the shape of the front bubble windows that are difficult to correct. The mounts for the machine guns in the doors are too tall.
The entire nose is made of clear plastic to save the modeler the pain of gluing in individual window panes like in the old Aurora kit that I ruined decades ago. Panels on the rear rotor pylon can be left open to allow viewers to ooh and ah at some rather mundane internal detail. The interior is patterned for the gunship configuration only and includes ammunition storage, canvas containers for the empty .50 caliber shells, and a hinged rear door so you can pose it either open or closed.
Decals are provided for two helicopters that were used in Vietnam, and one that was stationed at the Aberdeen Proving Grounds for testing in 1966. I used some of the kit markings on my build and they are of decent quality with a matt finish.
Over the
past several years, I’ve been involved in building over a dozen different
models for veterans whom I’ve had the pleasure of meeting. One such
gentleman is a member of my modeling club and due to his age cannot really
build kits anymore. 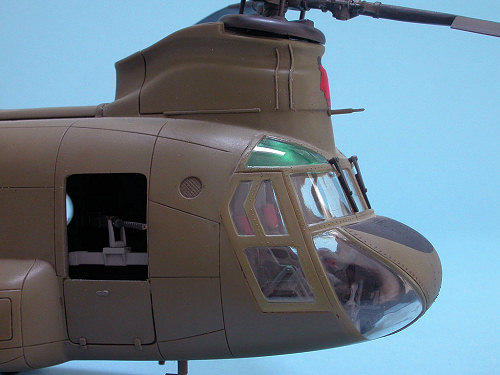 He was born in Germany and emigrated to the United
States after the war. He enlisted in the US Army to serve in Vietnam. He
attends just about every model club meeting and has been bugging me for
years about building him a model of a CH-47A that he crewed on with the 205th
Assault Support Helicopter Company -- the “Geronimos”. He specifically
wanted me to build 66-00120, which he was on when it was blasted out of the
sky by Viet Cong RPGs during a recovery mission of a downed Huey on 22
October 1968. Three of his fellow crew members were killed that day, and he
always honors their names when he visits the Vietnam Memorial in Washington
DC.
He was born in Germany and emigrated to the United
States after the war. He enlisted in the US Army to serve in Vietnam. He
attends just about every model club meeting and has been bugging me for
years about building him a model of a CH-47A that he crewed on with the 205th
Assault Support Helicopter Company -- the “Geronimos”. He specifically
wanted me to build 66-00120, which he was on when it was blasted out of the
sky by Viet Cong RPGs during a recovery mission of a downed Huey on 22
October 1968. Three of his fellow crew members were killed that day, and he
always honors their names when he visits the Vietnam Memorial in Washington
DC.
I thought about building the giant Trumpeter 1/35 scale kit when it was announced, but that price tag was way too high even for a generous soul such as me. I promised I would build the announced Academy kit just as soon as it came out, but when the Italeri kit was released, I read an on-line review (which turned out to be wrong, by the way) that stated that I could make a CH-47A from the kit merely by leaving the gunship parts off, so I thought I was in luck. The conversion was a little more involved in that I had to fill in the mid-fuselage hatch on both sides and restore the porthole window. There are no passenger seats inside and there wasn’t much I could do about that. It may not be entirely accurate, but the final result comes close to what my friend remembers his helicopter looked like on that fateful day in 1968.
| CONSTRUCTION |
Italeri engineers the kit with an inner fuselage that is constructed
first and is enclosed by the three external fuselage pieces. I painted
everything inside with FS36231 Dark Gull Gray. The instructions call for a
Chromate Yellow ceiling and that appears to be correct for the four gunship
helicopters, but my friend remembers his cargo hauler as gray overall. The
instrument panel hood 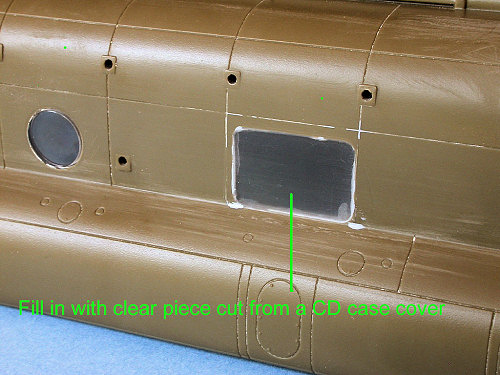 and various electrical boxes were painted black. The
armor plating on the pilot seats was cut off and the cushions painted
Insignia Red. I used the kit decal harnesses. For weathering I applied a
Burnt Umber wash, drybrushed with light gray and silver, dusted the cargo
area with dark gray pastels, and used a silver pencil to simulate paint
chipping in the high traffic areas. Kit decals were used for the instrument
panels and look very nice. I had problems adding the seats to the cockpit
flooring and if I were to do it again, I would glue the side braces to the
floor first, then glue the seats to the braces.
and various electrical boxes were painted black. The
armor plating on the pilot seats was cut off and the cushions painted
Insignia Red. I used the kit decal harnesses. For weathering I applied a
Burnt Umber wash, drybrushed with light gray and silver, dusted the cargo
area with dark gray pastels, and used a silver pencil to simulate paint
chipping in the high traffic areas. Kit decals were used for the instrument
panels and look very nice. I had problems adding the seats to the cockpit
flooring and if I were to do it again, I would glue the side braces to the
floor first, then glue the seats to the braces.
To fill the mid-fuselage hatch openings, I cut appropriately sized pieces from the cover of a CD case and faired them in CA glue. After all the heavy sanding, I polished the clear styrene back to clarity with a tri-grit file and Novus Plastic Polish #2. I sanded the surround of each porthole window off the exterior and inserted the clear pieces. I glued the two maintenance access doors at the front of the rear rotor plylon to their respective fuselage halves. The three fuselage pieces were then glued together, trapping the interior section within. It is here my first real disappointment set in when I saw the resultant gaps that needed to be filled along every seam. These were particularly wide along the spine. How a state-of-the-art model could fit so poorly is puzzling to me. I filled the gaps with CA glue and went to town sanding them out.
My disappointment deepened and my enthusiasm for the project
really took a dive when I glued on the engine pods. The fit
 was terrible
with highly visible gaps. I think this is inexcusable of Italeri in this
day of CAD/CAM design. CA glue was slopped into the trenches and sanded
down, followed by a smoothing layer of Mr. Surfacer 1000.
was terrible
with highly visible gaps. I think this is inexcusable of Italeri in this
day of CAD/CAM design. CA glue was slopped into the trenches and sanded
down, followed by a smoothing layer of Mr. Surfacer 1000.
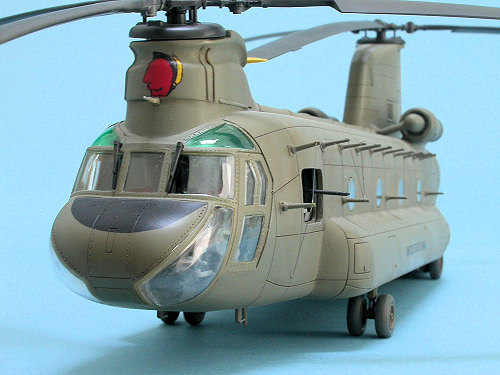
More profanity followed when I glued on the huge clear styrene nose piece after painting the eyebrow windows on the inside with Testors Acryl clear green. Fit was poor there as well, particularly at the bottom. I filled the gaps with CA glue and sanded then smooth, which of course corrupted the transparency of the windows. I polished them out with the same method as the porthole window described above, but I wasn’t very happy when I discovered that some of the CA glue accelerator had run into the gap and marred the inside of the bubble windows in a couple of spots. Nothing could be done about that, although fortunately it’s not too noticeable unless you know what you are looking for. And the builder of the model (me) always sees it when he looks at the model. Sigh…
I cleaned the model with soap and water to remove all the sanding dust, rescribed the panel lines lost during the extensive seam filling process, and masked all the windows with drafting tape. I used a circle template to make the masks for the porthole windows. With that task done, it was off to the paint shop.
| COLORS AND MARKINGS |
Testors
Acryl Olive Drab FS34087 was used overall. Since helicopters work very
hard in dirty conditions, I faded the paint by applying more Olive Drab that
had been lightened with white on the top surfaces of the aircraft. I masked
the anti-glare panel and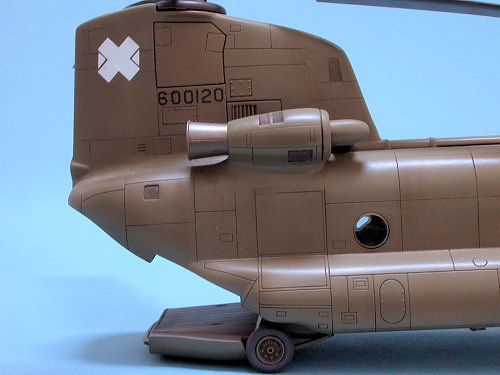 painted it flat black. A coat of Future Floor polish was added to provide a
base for the decals and weathering.
painted it flat black. A coat of Future Floor polish was added to provide a
base for the decals and weathering.
The aircraft’s markings were specified by my friend and came from a variety of sources. He had no photographs and I couldn’t find any through extensive internet searching, either, so his remembrances are all that I had. The Indian head was hand drawn and outlined with a black fine-point Sharpie and cut out from a solid red decal sheet, with the headdress coming from yellow decal sheet. The white Xs on the side of the tail came from white decal sheet. The serial number was pieced together from an Eagle Strike US letters and numbers sheet, and the United States Army markings came from the kit decals.
The whole model got a very light coat of highly-thinned Testors Acryl Khaki, with a heavier application around the bottom and the wheels to mimic the reddish dust ubiquitous in Southeast Asia. A wash of Burnt Umber and Payne’s Gray artist’s oils thinned with turpenoid was applied to the panel lines and wheel wells. Brown, black, and light green pastel chalks were used to add more variation in the paint. The rotor blades were painted Polly Scale Steam Power Black with Insignia Yellow tips and weathered using silver drybrushed on the rotors themselves and light gray pastels on the blade portion. The tires were painted Polly Scale RLM 66 and weathered with light gray and khaki.
A final coat of Testors Dullcote Lacquer sealed all the weathering.
| FINAL BITS |
The landing struts didn’t fit into their appointed holes, so I had to
open them up wider to accept the locating pins. Careful attention was
made to insure that all four sets of
 wheels touch the ground at
the same time. I bent the rotor blades by hand until they exhibited
the proper amount of droop. I didn’t glue the blade assemblies onto
the top of the pylons so that they can be removed for transport. It’s
a nice, tight fit as it is. I removed all the masks from the
transparencies and uttered some more expletives when I saw the dust that had
accumulated inside the cockpit windows. I taped a Q-tip to a wooden
dowel, moistened it with Windex, and fished it through the rear hatch up to
the front as I wiped down the inner surfaces of the windows as best I could.
wheels touch the ground at
the same time. I bent the rotor blades by hand until they exhibited
the proper amount of droop. I didn’t glue the blade assemblies onto
the top of the pylons so that they can be removed for transport. It’s
a nice, tight fit as it is. I removed all the masks from the
transparencies and uttered some more expletives when I saw the dust that had
accumulated inside the cockpit windows. I taped a Q-tip to a wooden
dowel, moistened it with Windex, and fished it through the rear hatch up to
the front as I wiped down the inner surfaces of the windows as best I could.
The instructions have you clip off 5mm from each aerial wire mast on the port side of the helicopter, which I did. I ran a long piece of invisible nylon thread along the tops and secured them with a spot of CA glue and accelerator. The aerial wire was painted dark gray. In looking at reference photos of CH-47As, it appears that the mast positions were slightly altered around the extra hatch opening for the gunship models. It was too late for me to correct this and I doubt my friend will notice. The makeshift porthole window came out fairly well. You can tell that it’s different than the others, but only upon fairly close inspection. The engine exhausts were painted with Testors Burnt Metal Metalizer and dirtied up with black pastels. I added the .50 caliber machine guns on the forward door mounts. When I showed pictures of the model to my friend, he pointed out that they used M60 machine guns instead, so I ordered a resin set from Cobra Company and installed them. The photos for this review show the earlier configuration. With that last step, I was done.
| CONCLUSIONS |
I didn’t wait for the regular CH-47A version of the Chinook to be released although it will surely arrive sometime in the coming year or two. That said, my conversion of the gunship into a trash-hauler came off fairly well with the only glaring thing missing being the red canvas troop seats in the cargo bay.
I am quite disappointed, however, with what should be a state-of-the-art kit from Italeri. While the end result looks pretty good and my friend was so thrilled with it that he built himself a custom base to proudly display it in his home, it took way too much unnecessary work to get there. As time goes by, I’m sure that I’ll forget the bad things and just remember the project for what was: a way to honor a man who bravely served his adopted country and nearly gave his life in doing it.
| REFERENCES |
Oldhooker, Frank: http://cs.finescale.com/forums/687370/ShowPost.aspx
Copyright ModelingMadness.com. All rights reserved. No reproduction in part or in whole without express permission.
If you would like your product reviewed fairly and fairly quickly, please contact the editor or see other details in the Note to Contributors.
Back to the Review Index Page2015