Italeri 1/72 A-6E Intruder
| KIT #: | 041 |
| PRICE: | €6,50 from the 50% off bargain bin @ the local hobby shop |
| DECALS: | Two options |
| REVIEWER: | Jeroen Koen |
| NOTES: | Superscale 72-631 “Desert Storm A-6E Intruders” used |
| HISTORY |
Grummans Intruder was different from all it's contemporaries. The trend was
either bigger or faster, or both, and the odd looking -form following
function- Intruder was neither big, nor fast. In the late 1950s the Navy
obtained newer and bigger aircraft than ever to carry out the nuclear strike
role: From the North American AJ Savage, to the Douglas A3D Skywarrior into
the ultimate bomber to ever grace a carrier deck: the North American A-5
Vigilante. However, as the navy was realizing by then, making nuclear
strikes in highly defended areas with manned bombers was getting more and
more difficult, if not impossible. The result was that the nuclear strike
role slowly went to the nuclear submarines, however, as the Korean war had
shown, there was still a need for an attack plane to fight so called
'Limited Conflicts', instead of the all-out nuclear war the navy air arm was
prepared for.
The big attack bombers proved unsuitable for this job, and the then new A-4
Skyhawk was showing great promise in the light attack role. The heavier
attack role was still in the hands of the ageing A-1 Skyraider, which
rapidly needed an all-weather replacement.
 The
result was a competition for an all-weather, twin engined attack bomber,
both for the navy and marine corps. The latter was intended for close air
support missions and would have to be STOL.
The
result was a competition for an all-weather, twin engined attack bomber,
both for the navy and marine corps. The latter was intended for close air
support missions and would have to be STOL.
Out of the competing designs by Douglas, Boeing, Bell, North-American and
Grumman, the Grumman design was eventually selected -apparently mostly
because of its tilting
exhausts, to meet the USMC STOL requirements.
It was the first navy aircraft to be
purchased, that viewed everything as one big system, rather than all
sub-systems being separate and the navy taking care of their integration.
Now that job was done at the manufacturer, like the Air Force had done with
their Convair F-106. Designated weapons, next to the regular stuff that goes
boom, to be integrated were the (later cancelled) X-ASM-8 Corvus and
Designated A2F-1, the mock-up was completed in 1958, with prototypes,
without avionics, flying in 1959. After a series of changes, including
moving the stabilizers aft, eliminating the complex yet ineffective STOL
tilting exhausts (somewhat to the dismay of the marines!), fitting a fixed
refuelling probe instead of the earlier detachable one, and adding
split-wingtip brakes, as the fuselage ones were found to be ineffective.
Later A-6As dispensed with the fuselage brakes completely, on earlier ones
they were wired shut but left in place.
The first all-up avionics prototype flew in 1960, but reliability was poor
-not surprising, since Grumman
had all components running up in a lab only a week before that! After months
of testing and updating, reliability was still poor -however, the systems
had shown their potential, and the navy wanted the Intruder, now designated
A-6A, operational as quickly as possible.
 In
early 1962, just four years after the mock-up was completed, the first
operational unit received their A-6As: VA-42, the east coast training
squadron. By 1963, VA-75 and VA-85 were also getting up to speed quickly in
anticipation of the ever growing involvement in
In
early 1962, just four years after the mock-up was completed, the first
operational unit received their A-6As: VA-42, the east coast training
squadron. By 1963, VA-75 and VA-85 were also getting up to speed quickly in
anticipation of the ever growing involvement in
From there on, things moved quickly, with VA-85, VA-65, VA-35, VA-196 and
many others being deployed -some on more than one tour. The Intruder was
highly effective in its role, flying mainly at night and in adverse weather
-reliability continued to be a problem, though, most units having a ready
rate of only 35%. When DIANE (Digital Integrated Attack & Navigation
Equipment) did work, it worked very well. For a while, the A-6 was the only
aircraft in the entire US arsenal that could operate in all-weather. Based
on the radar data, an artificial image was projected on a
As the electronics became smaller and more reliable, both Grumman and the
navy quickly realized the potential for the Intruder. Designated A-6E, (the
A-6B was an A-6A with Iron Hand equipment, the C a special bird with a big
sensor dome under it's belly) the separate search and track radars were
removed an replaced with a single unit capable of doing both. Electronics
were also upgraded, with new computers, ECM equipment, and newer memory
instead of the old drum-type that was crammed everywhere -including between
the B/N's legs!
The airframes themselves were still good enough, so nearly all earlier A-6Es
were converted from A-6As. Later, new-builds were also bought, to replace
losses and over-time examples. In the early 1980s, most Es received the
distinctive TRAM turret under the
 nose,
evidence of the ever increasing power and downscaling of electronics: that
small turret was more capable than the huge pod slung under the A-6C -do a
google search and you'll see what I mean! New weapon capabilities were
also integrated, including the
nose,
evidence of the ever increasing power and downscaling of electronics: that
small turret was more capable than the huge pod slung under the A-6C -do a
google search and you'll see what I mean! New weapon capabilities were
also integrated, including the
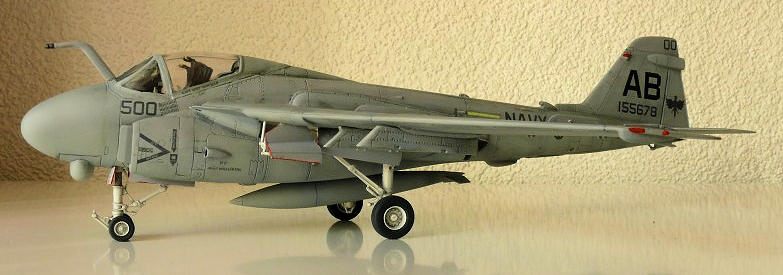
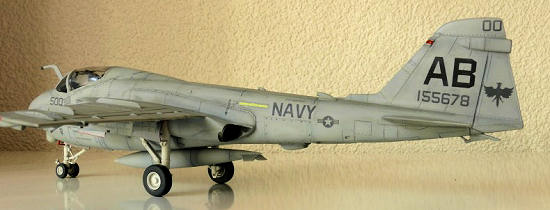
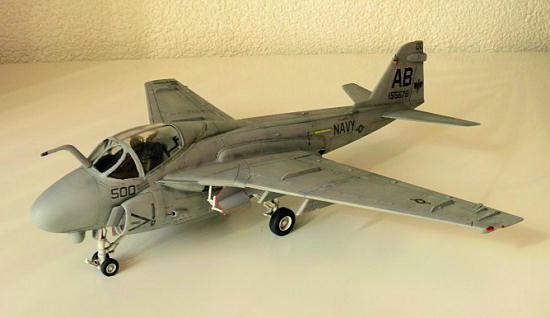
These capabilities were quickly put to use, in conflicts such as the raids on Libya and Lebanon in the 1980s, as well as Desert Storm, Desert Shield, Bosnia and Somalia.
As the Intruders were getting higher airframe times, fractures developed in
the wings. Both Grumman and Boeing submitted new wings: the Grumman one
based on the Prowler wing, the Boeing one essentially the normal wing, but
made mostly of composite materials. It was intended that Intruders received
this wing in the SWIP-program, that also updated electronics and weapon
capabilities, including the ability to carry the
Even though a number of Intruders were so equipped, post Cold War budget cuts and the desire for the stealthy A-12 Avenger II (that later got cancelled itself) spelled the end for the venerable A-6: the last official flight was with VA-75 in 1997, being launched from the USS Enterprise. A few were dumped as artificial reefs, but most were scrapped or being stored, leaving the navy without a dedicated tanker in the form of the KA-6D, as well as a long ranged, all weather attack aircraft -basically until this day!
| THE KIT |
The Italeri kit is copyrighted 1994 and features engraved panel lines, a
decent cockpit, and options for folding wings, extended boarding ladders,
and an open cockpit, all in Italeri's usual somewhat soft grey plastic.
There are 2 box-filling large sprue's and one small clear sprue rattling
loose -curiously, the other example I have of this kit has the clear parts
put in a separate bag. There's very little flash, which is always nice,
there are also numerous pin-marks which is not so nice...
The overall feel of finesse is lower than that of the Fujimi series of
Intruders; these have finer panel lines and also have intake- and exhaust
ducting, which the Italeri kit lacks. The intake shape of the Italeri kit is
better than Fujimi's, though, which are noticeably too round. Italeri has
nailed the shape better, flattening out the center a bit.
 The
design of the kit follows most other Intruder kits: 2 fuselage halves, a
separate bottom piece and also as separate nose that you gotta fill with
lots of weight, as the A-6 is a major tail sitter!
The
design of the kit follows most other Intruder kits: 2 fuselage halves, a
separate bottom piece and also as separate nose that you gotta fill with
lots of weight, as the A-6 is a major tail sitter!
The wings are in four pieces as they can be built folded. Slats and flaps
are moulded closed. There are also a few inserts for the rear fuselage to
enable a KA-6D (and perhaps ever an A-6A?), and it appears they do an EA-6A
with a mould insert as well, since there's a nice raised line on the tail.
There are a few small issues that I know of, but I'll explain them later.
The nose wheel well is boxed in, the main wells are not and detail is sparse
in those.
Decals are for 2 versions, one navy VA-36 from USS Theodore Roosevelt in
1993, and one marine corps VMA(AW)-332, both ca. 1993. There's a bit of
stencilling, slime lights that look overly yellow, and walkways are also
included as decals. Weapons are also included and consist of 2
RoG has also boxed this kit with colourful VA-115 and Desert Storm VMA(AW)-533 decals, and it also appears in a Tamiya box. The RoG issue is the one to get if you're in the market for an A-6, as those decals are really nice and much more comprehensive than Italeri's. Not much aftermarket decals are available for the A-6, as it's not as popular as say F-4 or F-14s?
| CONSTRUCTION |
Having built one of these in a far away past, I remembered the construction
being not overly difficult. So I started with the fuselage halves: once
cleaned up I taped them and the bottom fuselage insert together to see if I
could shove in the cockpit at a later stage. With a bit of effort, that's
possible, so the whole lot was glued together and left to dry. When dried a
bit, I added the large bottom insert, which also houses part of the wheel
well, and at the same time added the insert with the bottom electronics hump
and chaff-/flare dispensers. The well for the tailhook is also separate and
with a bit of trimming and shimming the whole lot of belly inserts fitted
not too bad. Unfortunately there's a less pleasant
Italeri hallmark with these inserts, as the panel lines don't
 match
up. I thought there were too many to think about rescribing, so I left that
as it was. It's the bottom side anyway!
match
up. I thought there were too many to think about rescribing, so I left that
as it was. It's the bottom side anyway!
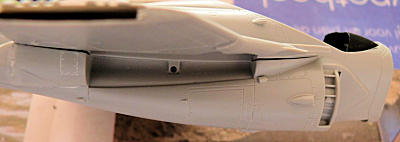
The exhausts were also painted black
on the insides to hide lack of details (although blanking plates with
fanblades are included for both intakes and exhausts) and attached- the fit
is not too good resulting a few steps and gaps.
That was then left to dry while I filled and sanded pinmarks everywhere:
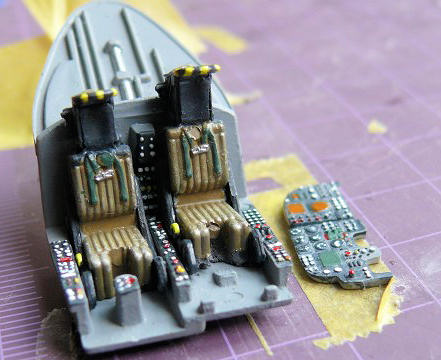
gear doors, gear, wheels, cockpit, you name it, they're there! After that
was done I assembled the main cockpit parts and cleaned up the instrument
panel. I also cut off a few millimetres off the control stick as that
curiously sticks out above the glare shield...? I brush painted the
seats Panzergrau, the cushions were painted Khaki, all with Humbrol enamels.
After that I gave them a wash with pure black and a bit of a dry-brush with
dark gull grey and the cushions with yellow, which looks better than pure
white. Then I painted the instrument panel and a few other details. I didn't
do any extra detailing as my objective was to do a weathered low-viz
Intruder so I wanted to proceed to
 painting
as soon as possible. After that the wing halves were assembled; omitting the
detailing bits that you see when you build it with the wings folded. A quick
dry-fit revealed that just getting a decent wing attachment would be
problematic enough without that extra stuff that you'll never see.
painting
as soon as possible. After that the wing halves were assembled; omitting the
detailing bits that you see when you build it with the wings folded. A quick
dry-fit revealed that just getting a decent wing attachment would be
problematic enough without that extra stuff that you'll never see.
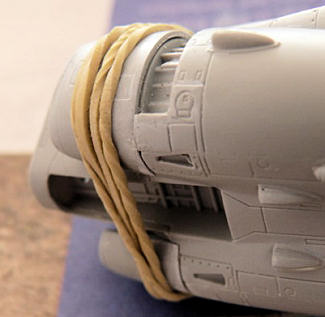
With the cockpit and wing halves completed and out of the way I filled and
sanded the seams on the fuselage and exhausts, the latter needing a second
round of heavy duty sanding and filling to help blend them in. With that
done, I dry-fitted the wing halves on the fuselage and guess what, more
gaps! I glued some 0,3mm Evergreen strip on where the wings go down on the
fuselage, but first attached the intakes and boarding ladders, which I
closed up. Out comes the roughest grit sandpaper again to eliminate the
steps! No gaps, though, so just sanding was enough, just a bit of filler
being needed at the bottom of the intakes.. Filler was also needed on the
wing-to-fuselage attachment,
and after a bit of fiddling and heavy-duty clamping I managed to get it to
look OK. Just be careful that you don't end up with one wing sitting higher
than the other so you have to break everything again... been there, done
that.
 After
that the outer wings were attached with tube glue, the fit is dodgy to say
the least. I just melted everything down with tube glue like I did with my
first ever kit (hmmm... that was an Italeri kit, too!). Very little gap
remained after that, just a dent and the fold hinges stick out way to high
-nothing sandpaper can't fix, just had to re-scribe the hinge details, but
it looks much better. While at it, I scribed all destroyed detail on the
fuselage as well. Back to the
wings, the inner wing fence is too far outboard as well, it should be in
line with the inner pylon. Still slogging through, I left that as is -the
outboard pylon, however, is too far inboard. That's an easy fix, just fill
the holes in the wing and remove the pins on the pylon itself and place
against the ridge that's on the outer wing end. A few air scoops were also
drilled out and attached, curiously the one on the back in the center of the
fuselage is missing -even though Italeri left a gap in the walkway decal
that goes over there? I just robbed it from something crashed out of the
sparesbox.
After
that the outer wings were attached with tube glue, the fit is dodgy to say
the least. I just melted everything down with tube glue like I did with my
first ever kit (hmmm... that was an Italeri kit, too!). Very little gap
remained after that, just a dent and the fold hinges stick out way to high
-nothing sandpaper can't fix, just had to re-scribe the hinge details, but
it looks much better. While at it, I scribed all destroyed detail on the
fuselage as well. Back to the
wings, the inner wing fence is too far outboard as well, it should be in
line with the inner pylon. Still slogging through, I left that as is -the
outboard pylon, however, is too far inboard. That's an easy fix, just fill
the holes in the wing and remove the pins on the pylon itself and place
against the ridge that's on the outer wing end. A few air scoops were also
drilled out and attached, curiously the one on the back in the center of the
fuselage is missing -even though Italeri left a gap in the walkway decal
that goes over there? I just robbed it from something crashed out of the
sparesbox.
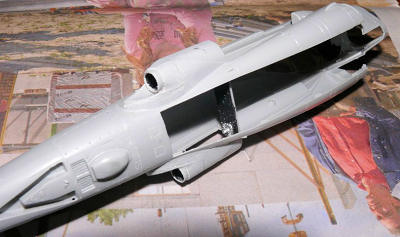
Hoping for something that can just be glued in place, I inserted the
cockpit, guess what, that fits pretty well! Only attaching the instrument
panel through the still open nose was a bit difficult, but in the end it
turned out pretty nice. With that big glass cockpit it pays to do some extra
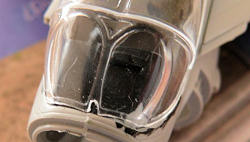
painting or detailing, even if closing it up. Optimistically I tried fitting
the windshield... that has a V-shape at the front, while the fuselage slot
it fits into is straight! It also sits way too high, and after sanding the
glare shield paper
 thin
and enlarging the cut-out in the fuselage, I managed a decent fit. Quite a
few applications of filler were needed to get it to sort of blend in -have
to think of a better way for the next Intruder.
thin
and enlarging the cut-out in the fuselage, I managed a decent fit. Quite a
few applications of filler were needed to get it to sort of blend in -have
to think of a better way for the next Intruder.
Bending and sanding that windshield made sure the canopy itself did not fit
much better, though that has more to do with the hacking in the fuselage
front than the parts themselves not lining up. I just managed to glue the
windshield a bit twisted in relation to the centreline seam, so more
scraping, sanding and filling it was to get the sliding part to line up.
Then I attached the nose, stuffed with lead, which does not attach on a
panel line so that was also sanded and filled. Fit is not too bad on this.
By this time I was starting to lose interest in this kit, so I finished some
old stuff first and in between masked off the clear parts, that's great fun
with those curves, but with thin strips of tape it's doable. While
airbrushing the old stuff, I painted the cockpit
 framing
black and shot a coat of primer, revealing more forgotten or second (or
third...) rounds of filling and sanding.
framing
black and shot a coat of primer, revealing more forgotten or second (or
third...) rounds of filling and sanding.
Back to the old stuff it was, then...
After a month of disinterest, I practised my painting with an old Revell Corsair II -with help and motivation from the MM Forums that came out very nice. Intruder interest was back at once! I filled and sanded some more, assembled and sanded the droptank and shot everything again with primer. That's better, time for the paint shop.
| COLORS & MARKINGS |
The Superscale set I would use had markings for a VA-85 airplane, having
used part of the set earlier that was about the only one I could still do
with what's left. So, to quote Superscale, a 'heavily weathered and
oversprayed' Intruder it would be.
I started airbrushing the wheel wells gloss white and stuffing those with
tape. The I pre-shaded along the most important panel lines, to prevent the
Mondriaan effect (a Dutch painter, don't know how famous he is around the
world, but just look up his work
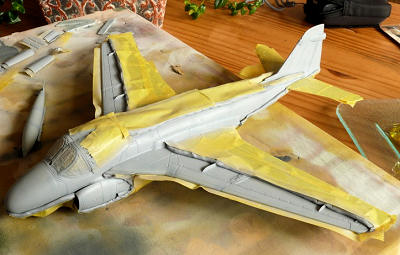 to see
what I mean!) I didn't want
nice and straight panel line shading so I looked at photo's and added
blotches and black areas at random. Then I lightly oversprayed that with
Humbrol Light Ghost Grey, then added white, filled panels neatly, others not
so neatly, covered up more black, or on some area's less, added white and
repeated that a few times adding more and more white and, starting with some
fresh paint straight from the tin I blotched along some more spots until I
felt it was enough. I masked all that off and repeated that for the
topsides, using Humbrol Dark Ghost Grey.
to see
what I mean!) I didn't want
nice and straight panel line shading so I looked at photo's and added
blotches and black areas at random. Then I lightly oversprayed that with
Humbrol Light Ghost Grey, then added white, filled panels neatly, others not
so neatly, covered up more black, or on some area's less, added white and
repeated that a few times adding more and more white and, starting with some
fresh paint straight from the tin I blotched along some more spots until I
felt it was enough. I masked all that off and repeated that for the
topsides, using Humbrol Dark Ghost Grey.
Superscale will tell you to do more of a Prowler scheme with Dark Gull Grey
on the tail and cockpit area, but I could not find that in photo's so I
stuck to just both Ghost Greys.
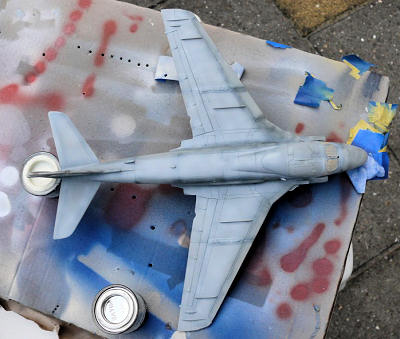
When I removed the masking I was sort of amazed, that the whole plane now
looked like it was just one blotchy grey! Well, almost like the real thing,
when you know where to look, you'll see the demarcation, mostly on the rear
fuselage and the nose.
After that was thoroughly dry I gave it a good glosscoat and it was time for
decals. Although over 10 years old, they performed beautifully, settling
down into the panel lines with Daco decal softener of the medium variety. I
do think there's a bit of an issue
 with
them, as I've seen photo's of this specific plane with both the bomb
markings and same crew names, that show bold nose modex numbers, a smaller
AB tail code and also a smaller bird that sits a bit higher too -or perhaps
the decals were scaled for another Intruder kit that's slightly larger? I'm
a sort of historical builder, as long as it looks good, it's fine with me,
but you may want to check your references first yourself.
with
them, as I've seen photo's of this specific plane with both the bomb
markings and same crew names, that show bold nose modex numbers, a smaller
AB tail code and also a smaller bird that sits a bit higher too -or perhaps
the decals were scaled for another Intruder kit that's slightly larger? I'm
a sort of historical builder, as long as it looks good, it's fine with me,
but you may want to check your references first yourself.
As I'd used the national insignias on the earlier build, I used the ones
from the kit, they worked fine, as is my usual experience with Italeri kit
decals.
With everything on it (got to love these low-viz schemes: hardly any
stencilling!) I glossed the decalled areas and gave it a wash with Payne's
Gray (an almost black) acrylic artists paint, thinned with tap water and a
bit of dishwasher detergent. The excess was wiped off and a thin protective
coat of varnish applied.
I then painted some loose stuff, like gears, wheels, gear doors, with those
nice red edges that everybody loves about USN aircraft, well, you know, that
sort of loose stuff, some of which was also given an acrylic wash.
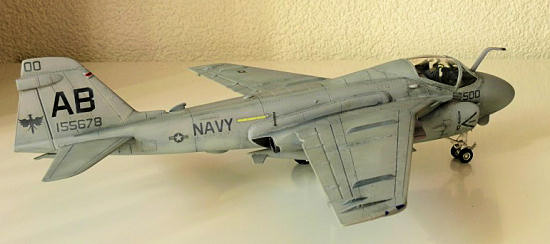
I painted the walkways by masking them off and brush-painting with various greys and black, mixed with Dark Ghost Grey to help blend them in. The advantage of brush painting over airbrushing is that they get a bit of texture as well. They're also provided as decals by Italeri, but the colour of those looked like factory new, so there's way to much contrast that's difficult to blend in.
| FINAL CONSTRUCTION |
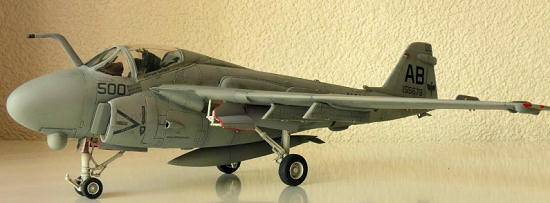 As
there's really not much breakable stuff sticking out of Intruders, I only
needed to attach a few antennae, the gear and doors and such. The nose gear
door has a navigation light moulded on, that should be removed when doing a
TRAM Intruder -on the real thing it interfered with the IR-sensors and was
moved to the belly. With that done, suddenly heard the nose weight come
loose, so that rattles around now when doing mock attacks against Saddam's
troops. After attaching the drop tank, I gave it an enamel flat coat,
removed the canopy masking and painted the navigation lights with gloss
paints. The 2 forward windows were tinted using green and blue tinted
Future, which doesn't really show up in the pictures, but on the real thing
you can see it's there! Finally the distinctive refuelling probe was
attached, I took a beer, made some photos and I called her done.
As
there's really not much breakable stuff sticking out of Intruders, I only
needed to attach a few antennae, the gear and doors and such. The nose gear
door has a navigation light moulded on, that should be removed when doing a
TRAM Intruder -on the real thing it interfered with the IR-sensors and was
moved to the belly. With that done, suddenly heard the nose weight come
loose, so that rattles around now when doing mock attacks against Saddam's
troops. After attaching the drop tank, I gave it an enamel flat coat,
removed the canopy masking and painted the navigation lights with gloss
paints. The 2 forward windows were tinted using green and blue tinted
Future, which doesn't really show up in the pictures, but on the real thing
you can see it's there! Finally the distinctive refuelling probe was
attached, I took a beer, made some photos and I called her done.
Well... almost! I forgot the tail antenna but after taking the pictures, that's now in place, too. Proost!
| CONCLUSIONS |
 Although
not an overly difficult build, it could have been a bit better too
considering it's a 1990s kit of a mainstream manufacturer. While I'm now
working on a 1970s vintage Italeri Junkers 188, comparing the fit is no
contest, the old kit wins hands down! Most of it is easily fixable with card
and filler, but the windshield takes too much fussing to fit properly.
Detailing of the cockpit is OK at best, the wheel bays are a bit Spartan,
too, and it beats me why the main wheel wells aren't boxed in? The kit
decals look good (and work good as well) and of course there's the weapons
you get with it for free. More importantly, it captures the strange yet
complex shape of the Intruder quite well in my eyes. Besides, it's readily
available, unlike the Fujimi offerings which, at least here, are quite hard
to come by.
Although
not an overly difficult build, it could have been a bit better too
considering it's a 1990s kit of a mainstream manufacturer. While I'm now
working on a 1970s vintage Italeri Junkers 188, comparing the fit is no
contest, the old kit wins hands down! Most of it is easily fixable with card
and filler, but the windshield takes too much fussing to fit properly.
Detailing of the cockpit is OK at best, the wheel bays are a bit Spartan,
too, and it beats me why the main wheel wells aren't boxed in? The kit
decals look good (and work good as well) and of course there's the weapons
you get with it for free. More importantly, it captures the strange yet
complex shape of the Intruder quite well in my eyes. Besides, it's readily
available, unlike the Fujimi offerings which, at least here, are quite hard
to come by.
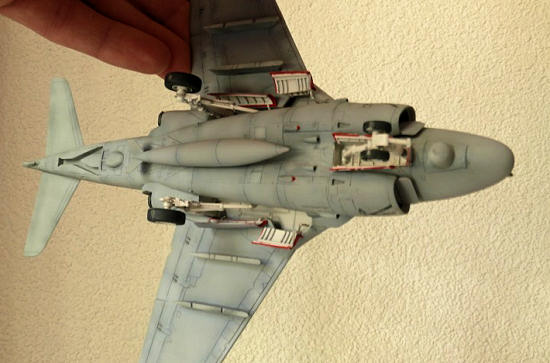
Of course I did take the difficult route: extending the stairs and folding
the wings makes things a whole lot easier!
Comparing it with the competition, it looks the most Intruderish to me, is
cheap and available and makes into a neat looking model -if only there were
some more aftermarket decals!
| REFERENCES |
Warbird-Tech vol 33 by Dennis Jenkins
A-6 Colours & Markings part 1 by Bert Kinzey and Ray Leader
Intruder! (squadron publication)
by Lou Drendel
October 2009
If you would like your product reviewed fairly and quickly, please contact me or see other details in the Note to Contributors.