| KIT #: | ? |
| PRICE: | around $15.98 msrp |
| DECALS: | One option |
| REVIEWER: | Joel Hamm |
| NOTES: |
| HISTORY |
Boredom and frustration with Czech short-run yellow wingers was threatening my
continued participation in the hobby.
Banking on a change of pace to rekindle interest, I dove into the
whirlymaflopter stas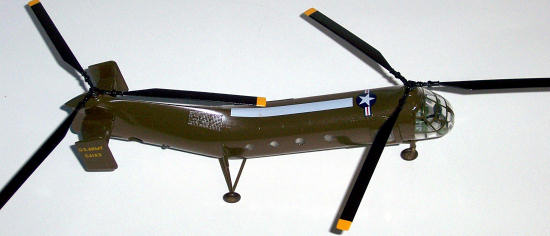 h seeking a quick’n’easy
instant gratifier.
Bypassing several Special Hobby and MPM kits that seemed to be
anything but, I settled on this Hobbycraft
release that was bought at a rummage sale and intended for just such
an occasion.
h seeking a quick’n’easy
instant gratifier.
Bypassing several Special Hobby and MPM kits that seemed to be
anything but, I settled on this Hobbycraft
release that was bought at a rummage sale and intended for just such
an occasion.
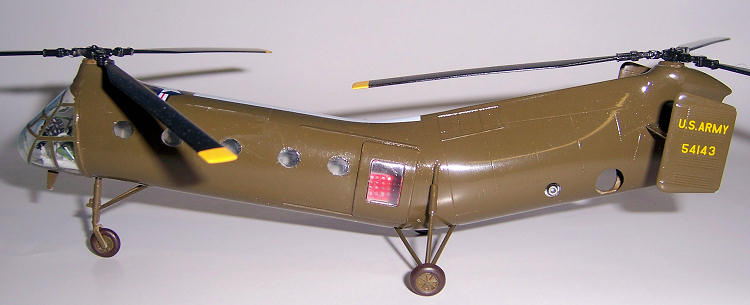
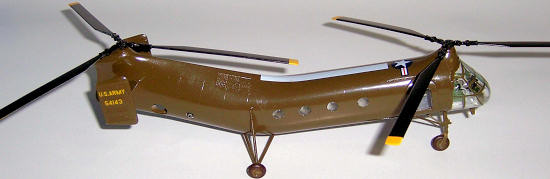
‘Snot my thing. You want history - go Googling. For the sake of filling this required paragraph, I’ll just say that while Sikorski stuck to the Single main rotor configuration, and Kaman put its faith in intermeshing egg-beater blades, Piaseki, which later became Boeing Vertol, preached the Gospel of tandem twin main rotors and did alright with the H-21 Shawnee / Workhorse; better known as the Flying Banana, which served with all US services, several foreign lands, and pioneered the helicopter gunship concept in Viet Nam.
| THE KIT |
Hobbycraft
has always offered well-molded but somewhat simplified renderings of
off-the-beaten-track subjects; probably aimed at the builder who has less time,
patience, and money than craving for museum-class accuracy and detail. First
glance showed the molding to be OK.
No warps, sink holes or other boogers.
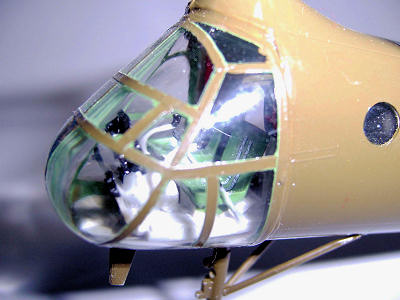
Transparencies were exceptionally clear. A tad heavy on
 the framing,
but that would facilitate painting.
The cabin windows, though thick, were not flawed by the old
Airfix-style shrink dimples.
The decals appeared to be thick and promised trouble but this turned
out to be a false impression. Instructions were worse than useless, providing no
location clues for the few parts that needed them, and steering the
literal-minded builder into gross error.
The plan view drawing called for both rotors to spin in the same
direction, which would have made for an interesting attempt at a first flight as
soon as the disks intermingled.
Viewed from above, the forward set should turn counter-clockwise
and the rear clockwise.
the framing,
but that would facilitate painting.
The cabin windows, though thick, were not flawed by the old
Airfix-style shrink dimples.
The decals appeared to be thick and promised trouble but this turned
out to be a false impression. Instructions were worse than useless, providing no
location clues for the few parts that needed them, and steering the
literal-minded builder into gross error.
The plan view drawing called for both rotors to spin in the same
direction, which would have made for an interesting attempt at a first flight as
soon as the disks intermingled.
Viewed from above, the forward set should turn counter-clockwise
and the rear clockwise.
With a huge greenhouse, all that cabin glass, 2 separately molded cargo doors and 2 huge engine bay doors that could also be displayed open, this would be an excellent subject for “interiorizing”; however absolutely nothing is provided to fill the cabin or engine compartment. The flight deck, on the other hand, is quite complete. I believe there is a cottage company somewhere that casts resin interiors for 1/72 ‘copters, but at a price several times that of the kit.
| CONSTRUCTION |
Job #1 was cementing in the sets of conjoined oval cabin windows, which have to
be inserted from inside.
Interior detail would not have been difficult to fashion.
According to the few available GOOGLE-graphs, the port side held a
line of side-facing canvas bench seats, and the starboard was lined with cargo
netting; all of which would have been simple to scratch-form.
But I was lazy.
Too lazy to do any further research. Since the spaces opposite the
door transparencies was highly visible, I stuck a
 semi-plausible jump seat at
the forward door and a square of red netting in the rear. I believe the net was
a rescue hoist that came with an ancient Airfix Sea King.
I eventually came upon an interior shot
showing
that what went behind the left forward bulkhead was an open shelf-work
full of radio boxes; which also would have been easy
to fashion from scrap.
semi-plausible jump seat at
the forward door and a square of red netting in the rear. I believe the net was
a rescue hoist that came with an ancient Airfix Sea King.
I eventually came upon an interior shot
showing
that what went behind the left forward bulkhead was an open shelf-work
full of radio boxes; which also would have been easy
to fashion from scrap.
Because all the flight deck detail can be added from the front, the only parts
that need at this point to be inserted into the fuselage halves are the deck and
bulkhead. A few grams of Pb stuck to the forward floor added some insurance
against tail-sitting. Gluing the large clamshell pieces together would have been
a chore, but all of the openings allowed It to be done by taping the body
together then running liquid cement into the seam from inside.
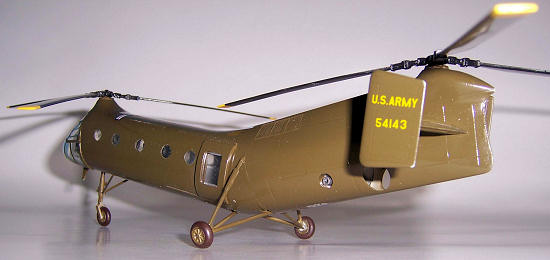
Assuming the engine bay doors are to be displayed closed, a better building sequence, however, might be to first affix them to the fuselage halves. These large panels fit very poorly, leave large gaps and are impossible to align flush with the exterior surfaces. Much putty, sanding , and re-scribing here, Folks. A minor “accurizing” job consisted of sanding away the too-short door-slide rails and making new ones of strip stock. Adding tail fins and the rotor hub buttons moved the airframe to the paint shop.
| COLORS & MARKINGS |
 Pretty simple.
Overall Army Green. Before jumping on my case about using gloss paints,
please check your references and note that, except for especially battle-weary
specimens, these A/C wore a shiny coat. Oval windows had first to be
masked with my standard 50/50 more-or-less mix of white glue and dish-wash
liquid. A mish-mosh of green and orange from Testors little square bottles
fairly well matched some federal standard chips stuck in the back of
a reference book. Olive Drabs likely take first prize for color
variability, both straight from the factory and after sitting in the sun (though
Fluorescent
Orange is right on its heels).
Pretty simple.
Overall Army Green. Before jumping on my case about using gloss paints,
please check your references and note that, except for especially battle-weary
specimens, these A/C wore a shiny coat. Oval windows had first to be
masked with my standard 50/50 more-or-less mix of white glue and dish-wash
liquid. A mish-mosh of green and orange from Testors little square bottles
fairly well matched some federal standard chips stuck in the back of
a reference book. Olive Drabs likely take first prize for color
variability, both straight from the factory and after sitting in the sun (though
Fluorescent
Orange is right on its heels).
Transfers, as noted, look to be a problem. They are heavy, but after dousing with both Micro-sol and Solvaset, and firm rolling or patting down, they snuggle down and shrink into all contours and scribing lines. A light mist of full-bodied Future sealed everything and appropriately toned down the gloss.
| FINAL CONSTRUCTION |
The cargo and engine bays might have been vacant, but the flight deck comprised
ovefr a dozen parts.
The only missing items were a pair of collective sticks, easily made
from scrap or stretched sprue and stuck to the left of each seat.
I also busied-up the bulkhead with a fire extinguisher and first-aid
box, items which often are hung in that location.
The instrument console raised a minor alarm; appearing
too neat, rectangular, and all boxed-in like a 1972 Zenith console TV.
Without bothering to check
 any photos, I assumed that like all early
planes, particularly heli’s, the panel would be a hodge-podge with the
instrument cases clearly visible on the backside.
That’s what I scratch-built, only to later find a clear photograph
showing that the instrument console really did resemble a console TV.
Oh ye of little faith.
Oh well, mine looks more authentic.
any photos, I assumed that like all early
planes, particularly heli’s, the panel would be a hodge-podge with the
instrument cases clearly visible on the backside.
That’s what I scratch-built, only to later find a clear photograph
showing that the instrument console really did resemble a console TV.
Oh ye of little faith.
Oh well, mine looks more authentic.
That same photo also confirmed the accuracy of the kit seats. Three possible
tweaks: round
the corners of the seat back just a bit, add diagonal tubular braces between the
seat pan and back, and add belts (mine were from a Truedetails decal sheet).
The heavy-handed glass-house framing simplified masking and brush painting.
The transparency fit fairly well, except at the very top where
the rotor housing overhangs like a neanderthal’s brow ridge.
Had I test fit the canopy before paining, that would have been a
simple few strokes of a file;
but as I said, I was lazy.
I minimized the seam mismatch by fairing it with white
 glue and paint.
Each rotor hub assembly include three little perforated, triangular
thingymahoozies,
the proper placement of which is omitted from the instruction drawing.
A search of on-line photos revealed these to be arms for the
pitch-change links, which should extend perpendicularly from the trailing side
of the blade attach
point.
BUT….they are grossly oversize, and even after trimming to the point that
they could not be held in a surgical forceps were still too big; and were
chucked. Other bits and pieces of rotor control linkage would also be invisible
in this scale, so the semi-simplified hubs were left un-embellished.
Struts, wheels, and other appurtenances went on without need for note. The
banana’s rotor blades hung in an odd manner.
They were not bowed, but remained straight
and drooped at an angle from the hub.
| CONCLUSIONS |
January 2010
If you would like your product reviewed fairly and quickly, please contact me or see other details in the Note to Contributors.