Monogram 1/48 F-106A Delta Dart
|
KIT: |
Monogram 1/48 F-106A Delta Dart |
|
KIT #: |
5828 |
|
PRICE: |
Can't remember. Been on the stash for
ages. |
|
DECALS: |
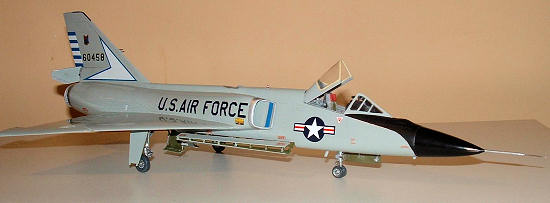
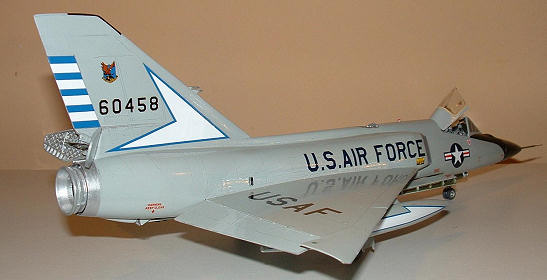
One option: 84 FIS |
|
REVIEWER: |
Julien Dixon |
|
NOTES: |
|
No History provided. Search the web for more info.
If
you want a 1/48th
F-106A then this is as they say the only game in town. This kit was originally
released by Monogram in 1983 as #5809. As such it is typical 1980’s engineering
and contains the now dreaded RAISED PANNEL LINES (oh
no how will I cope).
 This is the
“Century Series” boxing from 1990.
This is the
“Century Series” boxing from 1990.
Overall the parts look good
in the box. The actual main fuselage is spit down the centre line as normal but
has a bottom section, this means you will get a top seam and then seams down
each side at the front and back. I think Monogram
engineered it in this way for 2 reasons;
-
To enable the large delta wing to be made
in one piece.
-
To enable the large Weapons bay to be
moulded in one piece.
In fact the
mouldings of the large weapons bay and the undercarriage bays are excellent and
still are better than many “modern kits”. If you are prepared to have the
weapons bays open then you will have to do a lot of work, as painting the bays,
along with all their components and the Missiles will add a lot of time to the
build.
I should mention at the
start that being a raised panel line kit I always plan my construction to take
into account of this and always look for ways of minimising filling/sanding,
which will cause a loss of this detail, some of which is not easily replaced.
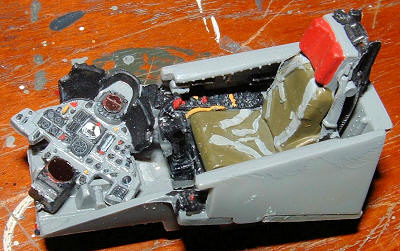 Here
I started with the cockpit (well don’t we all!). Now I know there is a nice
Blackbox pit out there for this model, but to be honest it does not need it.
Monogram to their credit have produced a very detailed cockpit with a good seat.
Now when this is all closed up you can actually see very little of it anyway.
Here
I started with the cockpit (well don’t we all!). Now I know there is a nice
Blackbox pit out there for this model, but to be honest it does not need it.
Monogram to their credit have produced a very detailed cockpit with a good seat.
Now when this is all closed up you can actually see very little of it anyway.
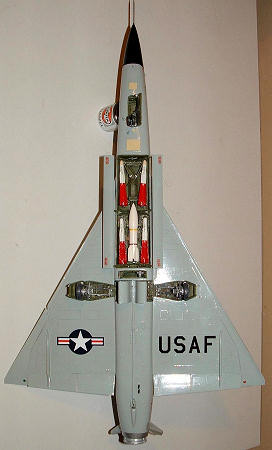
With the pit all done I turned my intention to the main wheel bays
and missile bays, these are moulded into the top & bottom halves of the big
delta wing. One thing I did not like about the kit engineering is at this stage
of gluing the two halves together you have to put in the gear well walls and
these contain the actuators for the gear doors. I managed to break all of these
off, with one being lost to the carpet monster. It was at this stage before
assembly that I decided to paint the interior of the missile bay & wheel wells
as it would mean a lot of handling which was easier prior to assembly.
Next stage was close everything up, cockpit went in along with the
exhaust nozzle (which I just painted aluminium) and the main fuselage sides were
closed together. Next the large main wing is joined to this. Now it is a bit
tricky to get the joint on the wing and the rear fuselage joint all together at
the same time. It is worth being patient and using slow setting glu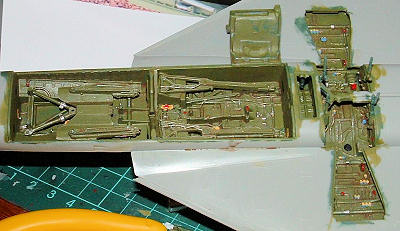 e
as it saves a lot of work later.
e
as it saves a lot of work later.
The next stage
was to fit the intakes, now there is a gap with these. You can ether get the
wing root close, or the fuselage close, but not both. I chose to get the side
close so there would be no sanding and corresponding loss of raised detail. The
wing root was then filled with tamyia putty. This was removed using acetone and
a cotton bud (American translation = Qtip). A couple of these applications gave
a stress free fill, without any loss of detail. I wish the rear fuselage was so
easy!
For the rear fuselage join,
it is a straight butt fit and you can not get around standard filling and
sanding. It is tight in there to start with and the dropped flaps do get in the
way. I did the best job I could but this is one area of the kit I was not happy
with. If I do another I will look into different ways of doing this joint.
Once done with these areas
the main airframe was due for paint.
Well it’s a
centaury series Interceptor so it will be ADC grey. Now as I intended to use
xtracolor ADC Grey I undercoated with Humbrol primer (I know to do this from a
painful experience with flaking paint on an F-101B!).
Once
this had fully cured in my purpose built paint drying facility, oh go on then
the airing cupboard
J I brush
painted on 2 coats of ADC grey allowing enough time between coats for the first
one to cure. I allowed a week for this process as xtracolor’s ADC
 grey is not
the fastest curing paint.
grey is not
the fastest curing paint.
Here my second
coat went on a bit thicker than I had liked, this was not a complete disaster.
As I brush paint I generally polish out my topcoat with an 8000 grit polishing
pad prior to gloss coating as I find it helps, and gets rid of any problems!
Here you get an additional benefit with “ye olde raised panel line kits” this is
that the polishing actually makes the panel lines stand out, as I take the paint
off them down to the underlying plastic (or undercoat depending on the kit).
The
front antiglare panel was masked of by hand using numerous photos and drawings
to get it right. In a previous job I used to draw plans for submarines so I am
used to drawing complex curves in 2D and believe you me this helps here. The
anti glare panel was painted using semi-matt black and the radome gloss black. I
know these radomes were fiberglass and did weather out so I was unsure of the
really gloss black. I asked an old 48th
FIS crewcheif about this and he told me they used to polish them with black boot
polish to get them shinny. Now you do learn some surprising things when doing
your research!
After
top coating with Klear/future it was time for the decals. This monogram boxing
only gives you markings for the 84th
FIS. These are not bad but unfortunately they were not in register. I had
already decided to use markings for the 48th
Fighter Intercept Squadron. These were from an old Detail & Scale sheet 0448.
These can be seen in Scott’s decal archive at :
http://modelingmadness.com/scotts/decals/ds0448.htm
 Annoyingly,
the Detail & Scale sheet does not give you any Insignia or markings such as the
USAF for the wings and the U.S. AIR FORCE titles for the sides. I had intended
to use a Superscale sheet for all these additional markings. However after
triple checking my references, the Big U.S. AIR FORCE titles looked too thin on
the Superscale sheet.
I ended up using the Monogram ones, with yellow
Rescue placards from the Superscale Sheet. For The USAF titles on the wings I
used the Superscale ones as the Monogram ones looked too thick this time.
Annoyingly,
the Detail & Scale sheet does not give you any Insignia or markings such as the
USAF for the wings and the U.S. AIR FORCE titles for the sides. I had intended
to use a Superscale sheet for all these additional markings. However after
triple checking my references, the Big U.S. AIR FORCE titles looked too thin on
the Superscale sheet.
I ended up using the Monogram ones, with yellow
Rescue placards from the Superscale Sheet. For The USAF titles on the wings I
used the Superscale ones as the Monogram ones looked too thick this time.
For
the insignia I used ones from a set of Eaglestrike insignia I had. I actually
have 2 sets of these in 1/48th
as I think they are these best
US
insignia out there. Colour definition is spot on and they have virtually no
carrier film.
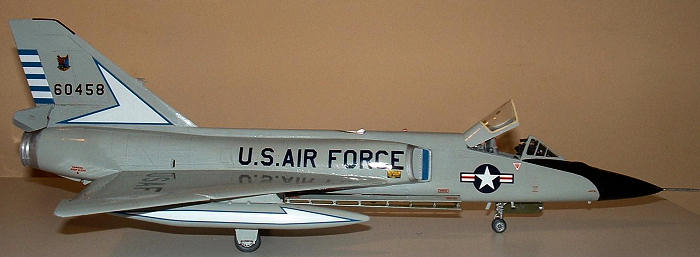
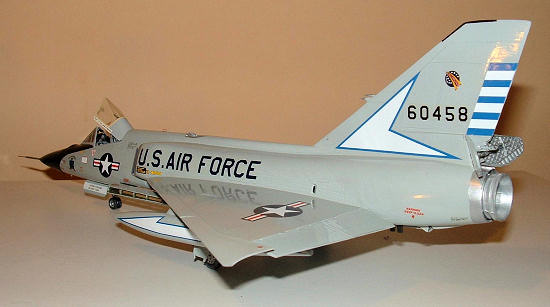
The
actual aircraft markings I used were from the Detail & Scale sheet were for
aircraft 560458. For information this was the 6th
F-106 produced by Convair at
San Diego
in Nov 1957. Initially it was used for MB-1 separation/ballistics tests at
Holloman. In 1961 its was upgraded from Test to Tactical and sent to the 48th
FIS at Langley AFB. In 1984 it went to AMARC for storage with 5567.3 hours. In
1993 it was converted to a QF-106 drone, and then shot down by an AIM-9M in Sept
1995.
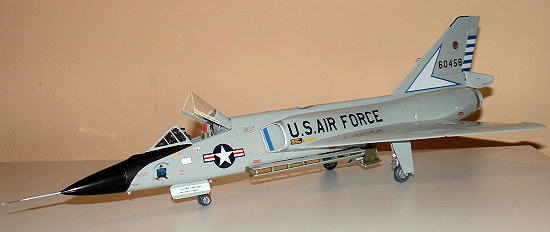
 The
detail & scale sheet gives you options for early 106’s with the framed canopy or
late ones with the bubble canopy. I chose the later one as the markings are more
colourful and in addition this was one of a few 106’s to have nose art. The
560458 carried this for William Tell at Tyndall in 1976. The Nose art is “Thunderchicken”
but to date I have not been able to figure out the significance of this.
The
detail & scale sheet gives you options for early 106’s with the framed canopy or
late ones with the bubble canopy. I chose the later one as the markings are more
colourful and in addition this was one of a few 106’s to have nose art. The
560458 carried this for William Tell at Tyndall in 1976. The Nose art is “Thunderchicken”
but to date I have not been able to figure out the significance of this.
Also
on the decal sheet for this aircraft at William Tell are some red inverted U
shaped markings. I was only able to find one photo of these applied to the
aircraft. Apparently due to the humidity (and potential of “borrowing” of
electronics boxes,
which according to old crew chiefs happened at
William Tell meets) the avionics bays were sealed with coloured tape. As these
were only really a one time marking I decided not to apply them.
The detail and
scale decals despite their age went down with no problems.
When finished
they had a couple of coats of future/klear.
With all the
painting/decaling completed it was time to finish off. This meant the landing
gear. The front gear was assembled and slipped into place. Now the instructions
would have you do this early on but it can be left until last.
The main gear is
quite complex and the instructions not 100% great in this area, there is the
gear itself and the complex system for the main gear doors which again is one of
those jobs where you need 3 hands!
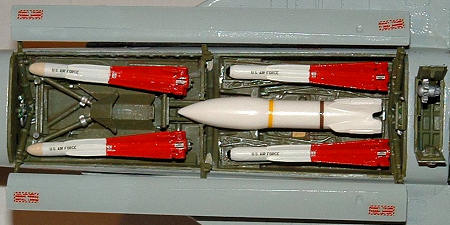 Also
at this stage is the weapons fit. Now the kit missiles are great looking, you
get Aim-4 Falcons and the AIR-2 Genie. The Genie is fine, I just painted it
white and put a couple of coloured bands on it. Photos of “live” Genie’s are
nearly impossible to find, but I was able to ascertain that they were not really
marked in any way.
Also
at this stage is the weapons fit. Now the kit missiles are great looking, you
get Aim-4 Falcons and the AIR-2 Genie. The Genie is fine, I just painted it
white and put a couple of coloured bands on it. Photos of “live” Genie’s are
nearly impossible to find, but I was able to ascertain that they were not really
marked in any way.
The
AIM-4 Falcons are a different story. They just looked too big in the weapons
bay. To counter this I used 4 from the Hasegawa weapons set. Now these come in
the Radar beam riding version only. An almost standard fit for a fully armed
Dart was 2 Radar and 2 IR missiles which were ripple fired (1 x each), it was
interesting to note in my reading into the Falcons that they were not proximity
fused weapons like today’s air to air missiles but actually needed a hit to
explode. To represent the IR missiles this I just re-profiled the noses of the
missiles. Painting and decaling the missiles took a lot of time.
To be honest I
really enjoyed building this old kit. I love these old fighters and this builds
up to a large impressive model, but you have to put the time and effort in.
OK it’s not a
Tamygawa kit, it has fit and has engineering issues, but overcoming these gives
me a great sense of achievement. I now just have to find somewhere to put it as
it won’t fit into my display case!
Oh did I say it
looks great!
 A
full history of this aircraft is;
A
full history of this aircraft is;
Nov
1957 - 6th F-106 produced by Convair at San Diego CA
(To Test - Initially to Holloman for MB-1 separation/ballistics)
Feb 1961 - Upgraded from TEST-TO-TACTICAL (5th of 35 A/C)
02 Mar 61 - To 48th FIS Langley AFB VA
10 Jul 68 - To 318th FIS McChord AFB WA
23 Dec 68 - To 48th FIS Langley AFB VA
01 Oct 79 - Command change from ADCOM to TAC
30 Jan 82 - To ADWC Tyndall AFB FL
05 Apr 84 - To Davis Monthan AFB AZ for storage FN051 (5567.3 Hrs)
28 Jan 93 - To AEL Inc., East Alton IL for drone conversion
21 Apr 93 - To Tyndall AFB as QF-106 drone S/N AD230
06 Sep 95 - Shot down on 1st NULLO by an AIM-9M
Readers might also like to know this kit has again been
re-released, this time under the Revel Brand Name. This now comes with a decal
option for 456th
FIS Castle AFB 1962 (Early one with large Number on Fuselage) and 48th
FIS Langley AFB 1972.
In addition
there are quite a number of F-106 decals sheets available from Eagle Strike
(some really nice ones here!), Superscale, Aeromaster and Fox One. Also I note
that Hannants have the Falcon conversion to do a B listed as being in stock.
Given all this,
go on get one you will have fun! After all that’s what our hobby’s all about.
Julien Dixon
June 2008
If you would like your product reviewed fairly and quickly, please
contact
me or see other details in the
Note to
Contributors.
Back to the Main Page
Back to the Review
Index Page