| KIT: | Hasegawa 1/48 A-4M Skyhawk |
| KIT #: | 07233 |
| PRICE: | $32.98 MSRP |
| DECALS: | Two options |
| REVIEWER: | Tom Cleaver |
| NOTES: | Cutting Edge cockpit and decals (48193) used |
| HISTORY |
The last version of the Douglas Skyhawk carrier‑based attack aircraft to be built for U.S. service, the A‑4M saw in front‑line service with the U.S. Marines for 20 years ‑ longer than all other Skyhawks to fly in U.S. insignia combined. Today, 34 years after the first A‑4M came off the Douglas Palmdale production line on April 10, 1970, and not retired from the last Marine attack squadron until 1994, A‑4Ms still serve in the Argentine naval air force and the Brazilian Air Force, where they last performed a carrier landing as the USS “Ronald Reagan” steamed past Brazil on its way around South America to San Diego this past summer.
 The Skyhawk series was perhaps the most successful single‑purpose post‑war
aircraft of the 20th Century. As a close support light attack aircraft, it
had no equal, and was produced in greater quantities than any of its
would‑be multi‑role competitors. The original objective set by the U.S.
Navy for Douglas chief designer Ed Heineman was to produce a lightweight,
high‑ performance, carrier‑based day attack aircraft capable of
dive‑bombing, interdiction or close air support, operating against sea or
land targets with or without fighter escort in a hostile environment. The
resulting A‑4 Skyhawk weighed in at 15,000 pounds, half the weight the Navy
had expected for a jet‑powered replacement for the A‑1 Skyraider, and was
capable of carrying a nuclear bomb.
The Skyhawk series was perhaps the most successful single‑purpose post‑war
aircraft of the 20th Century. As a close support light attack aircraft, it
had no equal, and was produced in greater quantities than any of its
would‑be multi‑role competitors. The original objective set by the U.S.
Navy for Douglas chief designer Ed Heineman was to produce a lightweight,
high‑ performance, carrier‑based day attack aircraft capable of
dive‑bombing, interdiction or close air support, operating against sea or
land targets with or without fighter escort in a hostile environment. The
resulting A‑4 Skyhawk weighed in at 15,000 pounds, half the weight the Navy
had expected for a jet‑powered replacement for the A‑1 Skyraider, and was
capable of carrying a nuclear bomb.
In the mid‑Sixties, the Navy looked for a replacement aircraft for the Skyhawk, and ended up accepting the Vought A‑7 Corsair II attack bomber. The Marines, however, opted for an updated Skyhawk, which was available for a unit price of $1.5 million in 1969 dollars, much less than the A‑7. The A‑4M, which first appeared in 1969, was specifically developed to meet USMC requirements in the light of Vietnam combat experience.
 Powered by a Pratt & Whitney J52‑P‑408A rated at 11,200 lbs thrust ‑ 20%
more power than available in the A‑4F ‑ and fitted with a smokeless burner
can, the A‑4M had a better than 100 percent improvement in maneuverability
at Mach 0.75 at sea level (from 1.5 to 3.2G), a 50% improvement in rate of
climb (from 5,620fpm to 8,400fpm), a 45‑knot increase in maximum speed at
sea level, with takeoff distance reduced from 3.720 feet on a standard day
to 2,700 feet. Internal armament was increased 100 percent to 400rpg, and
the tight cockpit was given an enlarged canopy to improve pilot visibility.
Powered by a Pratt & Whitney J52‑P‑408A rated at 11,200 lbs thrust ‑ 20%
more power than available in the A‑4F ‑ and fitted with a smokeless burner
can, the A‑4M had a better than 100 percent improvement in maneuverability
at Mach 0.75 at sea level (from 1.5 to 3.2G), a 50% improvement in rate of
climb (from 5,620fpm to 8,400fpm), a 45‑knot increase in maximum speed at
sea level, with takeoff distance reduced from 3.720 feet on a standard day
to 2,700 feet. Internal armament was increased 100 percent to 400rpg, and
the tight cockpit was given an enlarged canopy to improve pilot visibility.
The A‑4M entered squadron service on April 16, 1971, when VMA‑324 took delivery of four aircraft at MCAS Cherry Point, and the A‑4M saw combat in Vietnam in 1972, providing air support against the North Vietnamese Spring Offensive.
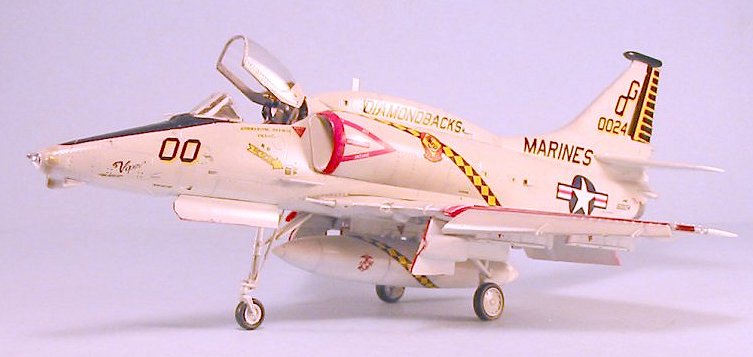
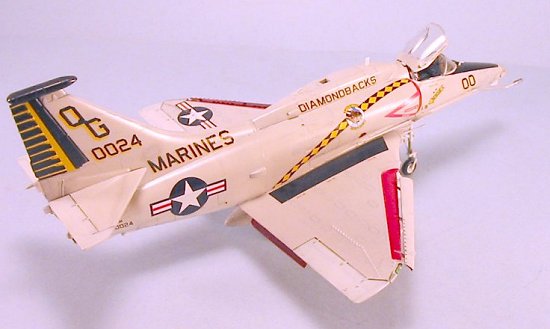
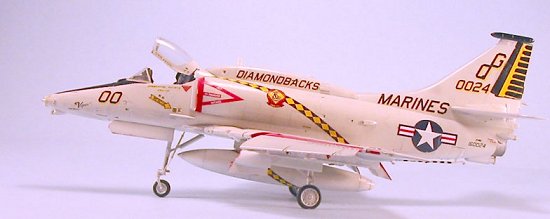
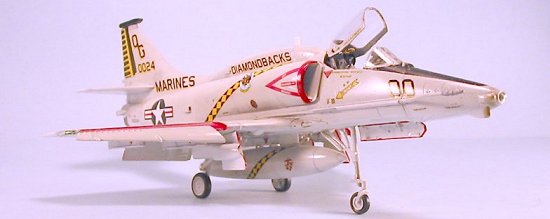
The Skyhawk finally left service with the Marines when VMA-131 “Diamondbacks” turned in their last A-4M at NAS Willow Grove on August 7, 1994.
| THE KIT |
 It was inevitable, given Hasegawa's history to date of maximizing the use
of molds for multiple‑subtype aircraft, that there would be an A‑4M
released, finally showing up in the summer of 2004.
It was inevitable, given Hasegawa's history to date of maximizing the use
of molds for multiple‑subtype aircraft, that there would be an A‑4M
released, finally showing up in the summer of 2004.
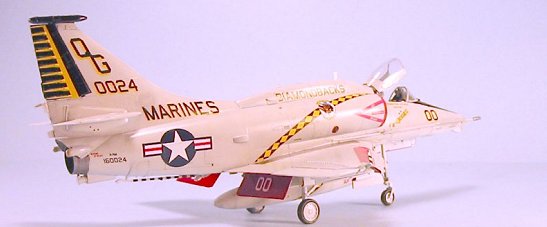
As with the other Skyhawk variants, the A-4M kit provides basic airframe sprues, with separate sprues for the different nose and enlarged air intakes. The kit decals provide markings for a VMA-214 “Blacksheep” and VMA-323 “Death Rattlers.” Both of these are early-production A-4Ms with the glass nose painted over.
| CONSTRUCTION |
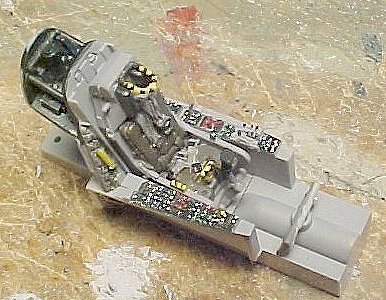 Construction for me started with the Cutting Edge resin cockpit I had
decided to use with the kit. The kit cockpit is acceptable, but this resin
cockpit is much superior, with a seat that has molded-in seatbelt detail
that looks far superior to the kit seat. Once this was painted and
installed, I attached the nose pieces to their respective fuselage halves
and then filled the nose with fish weights, then glued the fuselage
together.
Construction for me started with the Cutting Edge resin cockpit I had
decided to use with the kit. The kit cockpit is acceptable, but this resin
cockpit is much superior, with a seat that has molded-in seatbelt detail
that looks far superior to the kit seat. Once this was painted and
installed, I attached the nose pieces to their respective fuselage halves
and then filled the nose with fish weights, then glued the fuselage
together.
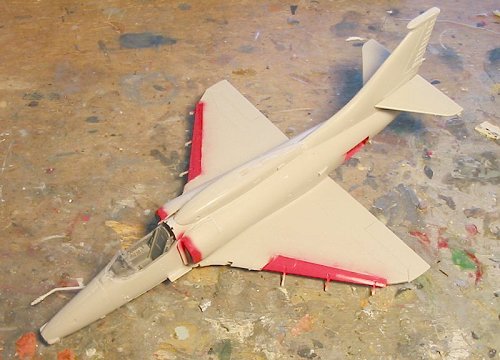
I then painted the interior of the intakes and attached them to the fuselage.
 The wing was assembled and test‑fitted to the fuselage. Testing for
nose‑heaviness revealed a need for more weight, which was glued in behind
the cockpit and to the rear of the nose wheel well.
Satisfied I had a nose‑sitter, I glued the wing and fuselage together.
With the electronics hump, horizontal stabilizer and braking parachute pack
attached, as well as the resin antennas to the trailing edge of the
vertical fin, the model was ready for paint.
The wing was assembled and test‑fitted to the fuselage. Testing for
nose‑heaviness revealed a need for more weight, which was glued in behind
the cockpit and to the rear of the nose wheel well.
Satisfied I had a nose‑sitter, I glued the wing and fuselage together.
With the electronics hump, horizontal stabilizer and braking parachute pack
attached, as well as the resin antennas to the trailing edge of the
vertical fin, the model was ready for paint.
I also used the 300-gallon centerline drop tank from a Tamiya Skyraider for this model. Since the kit-supplied tanks are not the proper size.
| COLORS & MARKINGS |
Painting:
 I
first painted the inner areas of the wing slats, flaps and dive brakes with
Gunze‑Sangyo "Shine Red." When all that was dry I masked these areas off
and pre‑shaded the rest of the model with Tamiya XF‑24 Dark Grey.
I
first painted the inner areas of the wing slats, flaps and dive brakes with
Gunze‑Sangyo "Shine Red." When all that was dry I masked these areas off
and pre‑shaded the rest of the model with Tamiya XF‑24 Dark Grey.
The model was painted with Gunze‑Sanyo H‑316 "White FS17875" for the lower surfaces and Xtracrylix XA1137 "Light Gull Grey - FS16440" for the upper surfaces. I then masked the areas for the anti-glare panel and the black rudder and vertical fin cap, and painted them with Tamiya X-18 “Semigloss Black.” Once that was completed, I hand‑painted the red borders of the landing gear doors. When all was dry, I gave the model a good coat of Future.
Because I was making a mid-production A-4M with the “glass” nose, I did not attach the nose tip at this point, and hand-painted the various bits on the nose with Gunze-Sangyo “Radome Tan” where appropriate.
Decals:
 The Cutting Edge sheet provided the aircraft flown by the Squadron
commander of VMA-131 “Diamondbacks” at the time the squadron became the
last unit in the Marine Corps to give up the A-4M in 1994. The Cutting Edge
decals went on easily under a coat of Micro‑Sol, with the only "fiddly bit"
being the stripes on rudder and the stripes on the fuselage sides and the
drop tank. When these were completely set, I washed the model to get rid
of dried decal solvent, and gave it a coat of Testors ModelMaster Sealer,
which gave it the correct overall gloss finish, without being too glossy
for the scale.
The Cutting Edge sheet provided the aircraft flown by the Squadron
commander of VMA-131 “Diamondbacks” at the time the squadron became the
last unit in the Marine Corps to give up the A-4M in 1994. The Cutting Edge
decals went on easily under a coat of Micro‑Sol, with the only "fiddly bit"
being the stripes on rudder and the stripes on the fuselage sides and the
drop tank. When these were completely set, I washed the model to get rid
of dried decal solvent, and gave it a coat of Testors ModelMaster Sealer,
which gave it the correct overall gloss finish, without being too glossy
for the scale.
| FINAL CONSTRUCTION |
I attached the landing gear, lowered the flaps and attached the enlarged canopy in the open position. I glued in the clear nose cap as the last thing.
| CONCLUSIONS |
I really like Hasegawa's Scooters, since they are accurate and comparatively easy to construct. If you're one of those who have been waiting for this kit of the ultimate A-4, this kit is what you’ve been waiting for. The completed model looks good sitting next to my other Skyhawks.
September 2004
Thanks to HobbyLink Japan for the review copy.
Thanks to Meteor Productions for the resin cockpit and aftermarket decals.
If you would like your product reviewed fairly and quickly by a site that has over 250,000 visitors a month, please contact me or see other details in the Note to Contributors.