Falcon/Airmodel 1/72 RF-8G Crusader
| KIT #: | ? |
| PRICE: | $? |
| DECALS: | None |
| REVIEWER: | Carmel J. Attard |
| NOTES: | Vacuform conversion |
| HISTORY |
I have always been interested in reconnaissance
version of the F8 Crusader ever since I detected their presence on the decks of
the 6th fleet carriers USS
Shangri-La and USS FD Roosevelt back in late 60s. On an occasion one of these
also landed at Luqa airfield. During the time when the F8 Crusader fighter was
enjoying a highly successful service, development of a dedicated
photo-reconnaissance platform also began. Utilising the 32nd
F8U-1 Bu No141363 the installed 4x20mm cannon and related fire control were
deleted to accommodate the cameras and film canisters, the fuselage belly was
flattened
and the in-flight refuelling probe
was completely enclosed, thereby altering the characteristic ‘bump’ on the
Crusader’s port side. The horizontal tail was slightly reduced to increase the
aircraft speed which would be the only difference.
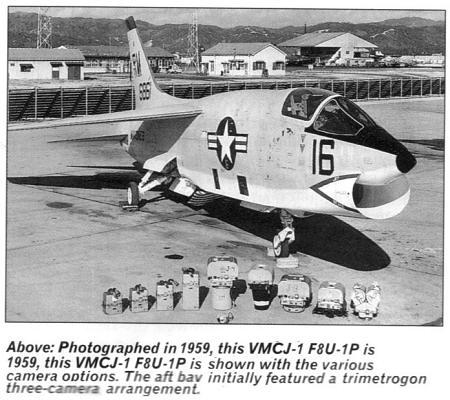 The
original suite of cameras included three trimetrogen cameras which provided
horizontal to Horizontal coverage at station 2.. Eventually the definitive
camera arrangement was: 2 cameras giving vertical and oblique views in Station 3
and 4 while Station 1 located below and forward of the cockpit, mounted a
forward- looking oblique camera that photographed the aircraft flight path.
Station 1 could operate a 16mm movie camera. Cameras in station 3 and 4 could
give several degrees of obliquity, the most common used was5, 15 and 30 degrees.
The cameras were manufactured by Chicago Aerial and were Ka-66, Ka-51,-53 and
Ka-45 or -51. Lens focal length varied from 3” in Ka-66 camera to 6” and 12” in
oblique and vertical cameras. Vertical cameras in Station 3 and 4 also used to
air-to-air photography, beloved of squadron public affairs officers and
enthusiasts alike. Nothing matched a well lit5”x5” aerial negative and resulting
prints taken by an experienced pilot of an F8U-1P which became a fine art and
skill could only be acquired with experience.
The
first Navy squadron to acquire the RF-8A was VFP-61. The photo Crusader’s first
operational test came in late autumn 1962 and involved both the Navy and Marines
RF-8As. These were needed for a low-level, high-speed, reconnaissance to confirm
the earlier U-2 photographs, which only showed earth moving and unconfirmed
construction activities.
One
of the early Navy reconnaissance squadrons was VFP-63 which started to equip
F8U-1P back in July 1961. Several aircraft of the type were embarked in
 beginning to join the fleet. In 1968 they joined Shangri-La and FD Roosevelt in
the
beginning to join the fleet. In 1968 they joined Shangri-La and FD Roosevelt in
the
The RF-8G served with several Navy and Marines
squadrons. On 22nd March 1982 it
was time for the RF-8G to initiate its retreat and the carrier Coral Sea sailed
with its air Wing 14 after its Indian Ocean deployment to its hope port where
RF-8G Bu No 144618 of Detachment 2 landed at Miramar to fully end its cruise and
the last deployment of Crusader Squadron. All the crew who maintained and flew
the RF-8 remain part of the history of a great aircraft. It was fun aircraft to
fly and created a source of respectability and confidence for those who flew it.
VFP-63 retired after 33 years of Photo-reconnaissance to the Navy.
| THE KIT |
Both
Falcon and Airmodel produce a vac form kit conversion for use with any Crusader
F8 kits. Whereas the Airmodel caters for a forward nose vac form parts in green
plastic, the Falcon industries issues the vac form nose as well as the upper
wing half, since this item differed considerably from that of the fighter
version. The latter is in white plastic. I have used both products and
 practically they go by the same procedure and I will go by describing how one
can go about building the model making continuous reference to the Falcon
conversion kit as it was the more recent kit build of the two.
practically they go by the same procedure and I will go by describing how one
can go about building the model making continuous reference to the Falcon
conversion kit as it was the more recent kit build of the two.
Undoubtedly Falcon Industries of New Zealand have carried a enviable reputation
as producers of both high quality vac form kits and crystal clear canopies.
Having experienced the vac form conversion of a TA-7 and the Grumman Trader I
went for their RF-8 Crusader conversion and once again with a convincing result.
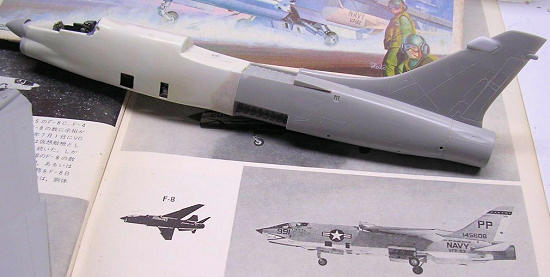
The RF8 Crusader is at a glance outwardly similar to the basic fighter version but does in fact contain a number of differences. These mainly result in a completely different forward fuselage shape, having the underside of a flat section as compared to the fighter version. There is an added fairing containing forward-looking camera under the forward nose are and aft of the cockpit there is a distinctive ‘hump’ on top of the fuselage in line with the wing leading edge. Building the RF8G is made easier using the Falcon conversion kit merged with a Hasegawa F8E kit. The Falcon kit in fact comes in a set containing also the F-100F and the TA-7C nose conversions. The RF8 set consists of two new forward fuselage halves and an upper wing centre section. I have done away with the wing centre section in preference to building up the ‘hump’ with filler on top of the Hasegawa wing part which I found just as simple to do.
| CONSTRUCTION |
The vac form conversion parts were first cut from the carrier sheet and the
excess plastic removed by sanding down on a sheet of wet and dry, medium
grade, secured to a rectangular flat wooden backing. The vac form parts had
the camera parts opened by first drilling 4 small holes at corners at each
camera opening port. Then cut with a pointed blade to bring the square port
aperture.
 I made continual reference to detailed photos and drawings from
reference material like ‘Wings of Fame’ volume5 and ‘Aviation News’ Vol 7 No
15. These deal very comprehensively about the reconnaissance type including
scale plans. It is imperative that one decides from a very early stage which
particular aircraft one decides to build as one RF8 varied from another in
the camera combination as well as sensors it carries. In my case, for the
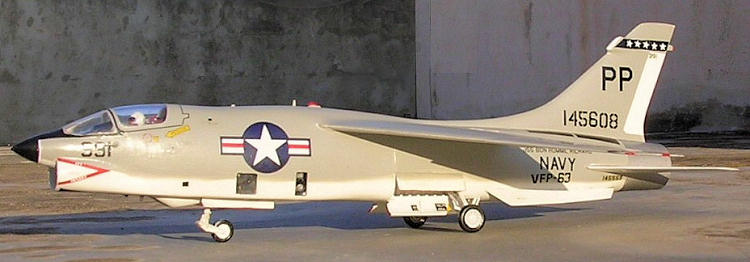
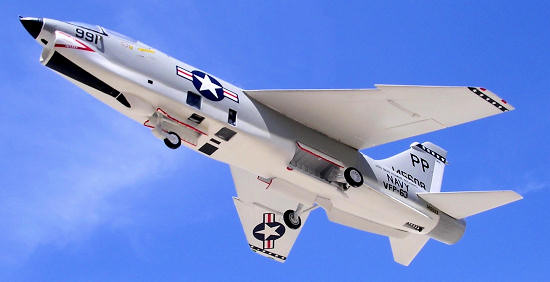
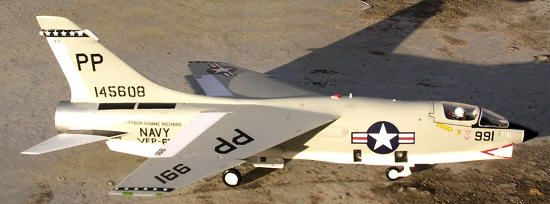
Falcon build I picked an RF8G shown in one of the photo pages of Koku Fan
1973 No41 on page 71. This is RF8G having Bu No 145608, nose identification
991 coded PP. This served as a detachment on board the USS Bon Home Richard
during the
I made continual reference to detailed photos and drawings from
reference material like ‘Wings of Fame’ volume5 and ‘Aviation News’ Vol 7 No
15. These deal very comprehensively about the reconnaissance type including
scale plans. It is imperative that one decides from a very early stage which
particular aircraft one decides to build as one RF8 varied from another in
the camera combination as well as sensors it carries. In my case, for the
Falcon build I picked an RF8G shown in one of the photo pages of Koku Fan
1973 No41 on page 71. This is RF8G having Bu No 145608, nose identification
991 coded PP. This served as a detachment on board the USS Bon Home Richard
during the
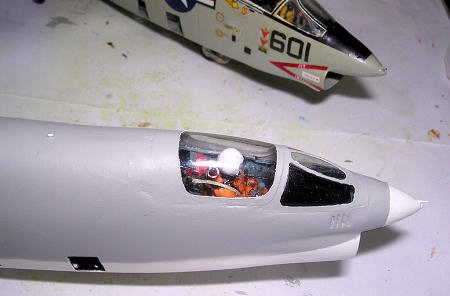
Having completed the windows apertures I then added camera equipment, side and
vertical ones which were constructed out of sprue of different diameters,
assembled and painted in black and greys. The surrounding interior was also
painted black. The vac form fuselage nose was cemented into one piece and place
aside. The Hasegawa F8 fuselage sides were assembled and cut in half with a
razor saw at a point 1mm forward of the main undercarriage bay. Once set, the
replacement forward fuselage was then attached to the rear fuselage from
Hasegawa kit adding plastic tabs on the inside to provide a more secure and
aligned joint.
 Revell Plasto filler was applied around the immediate area at the
joining part. The discarded F8 forward fuselage was then joined on its own and
had the first 3mm of the intake front cut across to use as a replacement to the
same part on the vac form kit.. I also used the F8 kit nose cone. These were
joined and a small amount of filler applied and smoothened with wet and dry
paper. The wing parts were assembled and attached to the fuselage. The ‘Hump’
was built up in narrow layers of Plasto filler which was in the end given a true
shape using wet and dry sanding.
Revell Plasto filler was applied around the immediate area at the
joining part. The discarded F8 forward fuselage was then joined on its own and
had the first 3mm of the intake front cut across to use as a replacement to the
same part on the vac form kit.. I also used the F8 kit nose cone. These were
joined and a small amount of filler applied and smoothened with wet and dry
paper. The wing parts were assembled and attached to the fuselage. The ‘Hump’
was built up in narrow layers of Plasto filler which was in the end given a true
shape using wet and dry sanding.
Kit cockpit interior and wheel legs were assembled as per instructions, a crew figure added and decal instruments added to front panel and side consoles. Seat belts were made from masking tape cut to strips. Pilot figure painted in colours of same era. A radar scope was also added to central upper of instrument panel. Cockpit interior was medium grey and all consoles in black and dark grey. With the kit assembly almost complete the canopy was fixed in place and masked. A small amount of filler was added to the exhaust pipe where the flat portion to rest the intake ducts that were not on this model and sanded round to conform diameter of pipe.
| COLORS & MARKINGS |
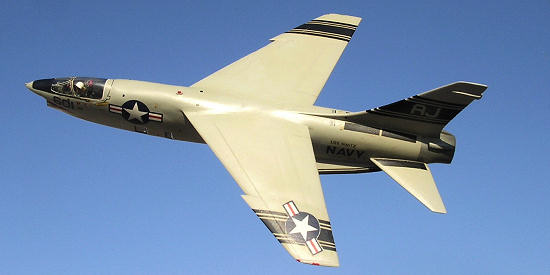 The RF-8Gs wear the standard USN Gull grey FS36440/ white FS37875 scheme
with black anti glare panels forward of the cockpit. I used Model Master
Semi brilliant white and flat grey 1730E. The colour scheme was a straight
forward job and the rest was to sort out the various sizes Bu numbers from
different decal sheets. The Modex number presentation was standard, as was
also the PP tail codes. For the Navy enthusiasts who models aircraft with
markings of their taste I can recommend the follow decal sheets out of which
one can pick all size of letters and numerals. In fact I picked all the
markings from these sheets: Aeromaster 72-011 which contains US 45 degrees
ID letters; Scale Master SM-15B; Super Scale 72-84 for USN and Marines MOD
insignia. The dark blue stripes with white stars VFP-63 motifs came from
Micro Scale Crusader sheet 72-204 with some alteration. Black decal sheet
provided fuselage and tail plane walk way areas. Other markings were picked
from the Hasegawa sheet. Kristal Kleer was used for the camera windows which
was clear enough to show the camera arrangement inside the fuselage.
The RF-8Gs wear the standard USN Gull grey FS36440/ white FS37875 scheme
with black anti glare panels forward of the cockpit. I used Model Master
Semi brilliant white and flat grey 1730E. The colour scheme was a straight
forward job and the rest was to sort out the various sizes Bu numbers from
different decal sheets. The Modex number presentation was standard, as was
also the PP tail codes. For the Navy enthusiasts who models aircraft with
markings of their taste I can recommend the follow decal sheets out of which
one can pick all size of letters and numerals. In fact I picked all the
markings from these sheets: Aeromaster 72-011 which contains US 45 degrees
ID letters; Scale Master SM-15B; Super Scale 72-84 for USN and Marines MOD
insignia. The dark blue stripes with white stars VFP-63 motifs came from
Micro Scale Crusader sheet 72-204 with some alteration. Black decal sheet
provided fuselage and tail plane walk way areas. Other markings were picked
from the Hasegawa sheet. Kristal Kleer was used for the camera windows which
was clear enough to show the camera arrangement inside the fuselage.
| CONCLUSIONS |
 Whether one uses the Falcon or Airmodel conversion set depends on
availability and I highly recommend the Falcon set which may prove the
better of the two. I recommend to anyone who has not yet tried their hand on
vac form kits. It is a pity that these Falcon conversion kits come without
decals which maybe the only drawback I could find. The finished article
looked very pleasing creating an impression of an aircraft ready for action
whether it is
Whether one uses the Falcon or Airmodel conversion set depends on
availability and I highly recommend the Falcon set which may prove the
better of the two. I recommend to anyone who has not yet tried their hand on
vac form kits. It is a pity that these Falcon conversion kits come without
decals which maybe the only drawback I could find. The finished article
looked very pleasing creating an impression of an aircraft ready for action
whether it is
If you would like your product reviewed fairly and quickly, please contact me or see other details in the Note to Contributors.