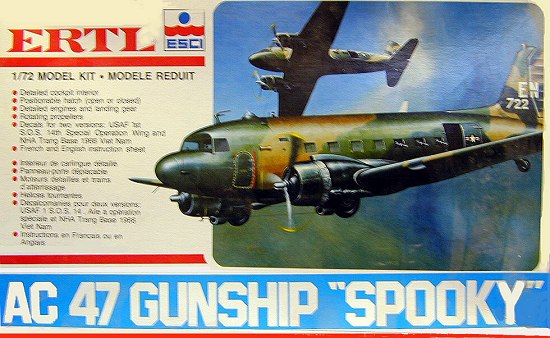
ESCI 1/72 AC-47 Gunship
KIT # |
8555 |
|
PRICE: |
$7 |
|
DECALS: |
“Spooky” And 1 other aircraft of the 1st SOS, 14TH SOW, Na Trang AB |
|
REVIEW & PHOTOS BY: |
|
|
NOTES: |
|
HISTORY |
The
AC-47 gunship, a formidable weapons platform based on the venerable C-47/DC-3
“Gooney Bird,” was born in the early sixties as a result of USAF Air Commando
operations in Southeast Asia supporting the Vietnamese Air Force against the
Viet Cong. The aircraft emerged from a suggestion submitted to the Tactical Air
Command’s Limited War Committee by Lt.Col. Gilmour C.
MacDonald, who advocated using lateral or side-firing weapons system from an
aircraft. The concept is based on an airborne maneuver called the “pylon turn”,
in which an aircraft is placed in a left bank and flies a circular
 pattern around a fixed
reference
point. The
concept was further developed by Bell Aerospace engineers and submitted to
Aeronautical Systems Division at Wright Patterson AFB for evaluation. After
several years and iterations,
Bell’s proposal
to evaluate side-firing aircraft concepts came to fruition as part of “Project Tailchaser.” The project evaluated items such as pointing and tracking of
targets, but no weapons were fired during the evaluations.
pattern around a fixed
reference
point. The
concept was further developed by Bell Aerospace engineers and submitted to
Aeronautical Systems Division at Wright Patterson AFB for evaluation. After
several years and iterations,
Bell’s proposal
to evaluate side-firing aircraft concepts came to fruition as part of “Project Tailchaser.” The project evaluated items such as pointing and tracking of
targets, but no weapons were fired during the evaluations.
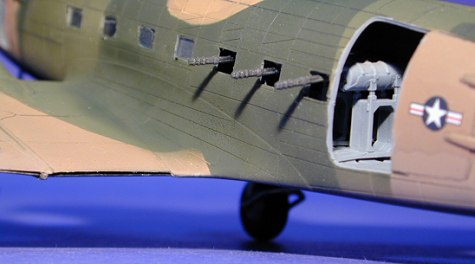
In 1964, firing tests were finally authorized as part of Project Gunship I, and an armed C-131 was employed at Eglin AFB, Florida using a relatively new weapon: the 7.62mm General Electric SUU-IIA/A Gatling gun pod. After outstanding results, additional tests were conducted using a C-47. Based on these results, the concept was ready for combat evaluation in South Vietnam. A team from Eglin mounted three miniguns in an Air Commando C-47 (43-48579). The first mission was flown on December 15, 1964, when the aircraft was used to break up a VC assault in the Mekong Delta, and another at Trung Hung. The final deployment configuration of the AC-47 included three 7.62mm Gatling guns, 21,000 rounds of 7.62mm ammunition, 24 to 56 flares (manually tossed out the door), and a crew of seven.
The AC-47 was used in Southeast Asia from 1964 to 1969 before being replaced by AC-119Gs/Ks and later AC-130s. During that time, they successfully defended nearly 4000 hamlets and outposts, fired over 97 million rounds and killed over 5300 VC and North Vietnamese troops. The aircraft’s distinguished service in the war was accentuated on 24 February 1969, when Spooky 71 was hit by enemy mortar fire while defending Long Binh. Airman First Class John L. Levitow, who was severely wounded by shrapnel, saved the aircraft and crew by throwing an ignited flare through the open cargo door. He was later awarded the Medal of Honor for his actions on that night.
THE KIT |
I normally build 1/48th aircraft kits, but after our distinguished editor challenged me in one of his penetrating editorials, I took his advice and dipped into my vast collection of 1/72 kits to see if anything in there interested me. Lo and behold, I found an AC-47 gunship, so I decided to give it a go.
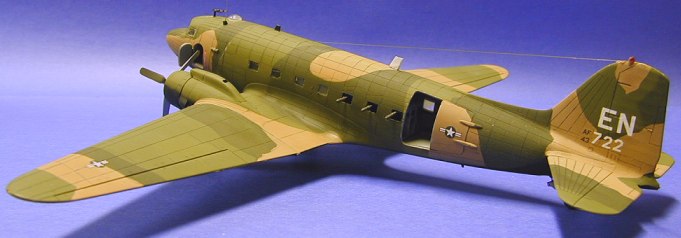
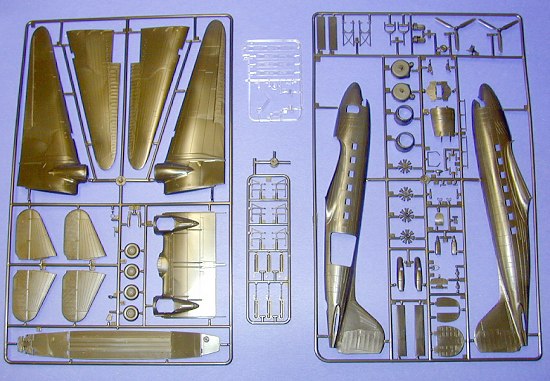
The ESCI DC-3/C-47 kits have been around for some time. I am not sure when I purchased the ERTL/ESCI version that I built, but it cost me $7.00 when I bought it, so that ought to tell you something about its age. The kit contains 77 parts molded on two olive drab sprues and a clear sprue of 10 parts. The decal sheet has markings for two aircraft, both from the 1st SOS, 14th Special Operations Wing based at Nha Trang Air Base, South Vietnam. All panel lines are scribed, although slightly heavy for the scale, and the fabric control surfaces are nicely molded. The cockpit is sufficient for the scale, and there is a nice instrument panel decal included on the decal sheet.
|
CONSTRUCTION |
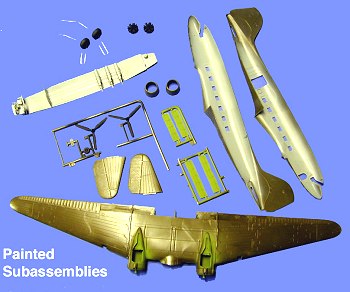 As
per my usual practice, I started assembling the kit in subassemblies. The aft
cargo and cargo decks are a single piece to which one mounts the three assembled
miniguns, the cockpit and cargo bulkheads, the control wheels, the cockpit seats
and the instrument panel. After assembling this, I set it aside for the next
subassemblies: the wings and horizontal stabilizers. Next, I glued the engines
together and set them aside.
As
per my usual practice, I started assembling the kit in subassemblies. The aft
cargo and cargo decks are a single piece to which one mounts the three assembled
miniguns, the cockpit and cargo bulkheads, the control wheels, the cockpit seats
and the instrument panel. After assembling this, I set it aside for the next
subassemblies: the wings and horizontal stabilizers. Next, I glued the engines
together and set them aside.
The final subassemblies were the main landing gear and the tail wheel. These are somewhat delicate, so care must be taken so that the pieces do not break. At this point, I took an Exacto knife and cut the forward half of the cargo door off and tossed it into the parts bin. Now everything was ready for painting.
Since the cockpit and cargo area are all one color (at least as far as I could tell from all the references I had available), I sprayed the interior (including fuselage halves) medium gray. I then spray-painted all of the parts that would be flat black (instrument panel, tires, engines) and set them aside. At this point, I covered the instrument panel with a puddle of Future, and once dry, applied the instrument decal. When the interior was dry, I used a combination of Testors Glue and methyl ethyl ketone (MEK) to secure the cargo and cockpit floor assembly to the right fuselage half. I next used MEK to set the clear window assemblies (three on the right side and one on the left where the guns are) into the fuselage halves. At this point, I joined the fuselage halves with glue and MEK and then set everything aside to dry.
 Once the fuselage
was dry, it was time to sand down the seams. Careful fitting is required here,
as the seams can get misaligned if one isn’t paying attention. I used a
combination of 400, 2000 and 6000 grit sandpaper and wet sanded the seam, trying
to minimize damage to the myriad of panel lines. Once I was satisfied with the
fuselage, I was now ready to attach the wing assembly. This was a tight fit, and
required a combination of test fitting and trimming to get it into place. Even
then, I could tell I would need to do some filling and sanding, especially
around the area where the forward part of the wing meets the fuselage and along
the fuselage sides/wing seams.
Once the fuselage
was dry, it was time to sand down the seams. Careful fitting is required here,
as the seams can get misaligned if one isn’t paying attention. I used a
combination of 400, 2000 and 6000 grit sandpaper and wet sanded the seam, trying
to minimize damage to the myriad of panel lines. Once I was satisfied with the
fuselage, I was now ready to attach the wing assembly. This was a tight fit, and
required a combination of test fitting and trimming to get it into place. Even
then, I could tell I would need to do some filling and sanding, especially
around the area where the forward part of the wing meets the fuselage and along
the fuselage sides/wing seams.
I went ahead and
attached the horizontal stabilizers, and then started filling the
wing-to-fuselage seam with Mr. Surfacer 1000. I also noticed that, as careful as
I had tried to be, I needed to fill the fuselage seams at various locations.
Once I had applied enough Surfacer to build up the seams, I started the wet
sanding process to smooth them out. Again, this is a trial and error process,
and you really won’t know if you’ve done the job right until you apply a primer
coat of paint. The final step was to rescribe as many “screwed up “panel lines
as possible. For this I used a Squadron Shop scriber that I purchased at a local
Hobbytown (there are several “weapons of choice” for this odious task, so do
your research, practice with each,
 and
choose accordingly).
and
choose accordingly).
The next step was to glue on the engines. Once in place, I glued on the cowls (after painting their interiors chromate green). At this point, I was ready to start painting the exterior of the model.
In preparation, I completed another hated task: masking all of the small windows in the cargo area. For this, I used an old bottle of Micro Mask liquid masking medium. I tried to be careful not to get the stuff on the plastic fuselage, but sometimes this is pretty tough to do, and you generally find out when you peel the stuff off. Once this stuff was dry, I stuffed wet Kleenex into the open cargo door, inside the fuselage and around the miniguns as best as I could, into the cockpit window, and into the wheel wells (now painted chromate green). I then applied a coat of Testors flat white all over the model and evaluated the seams. Those that needed touching up received another application of Mr. Surfacer and the attendant wet sanding. I then reapplied the flat white primer coat where needed.
PAINT & FINAL ASSEMBLY |
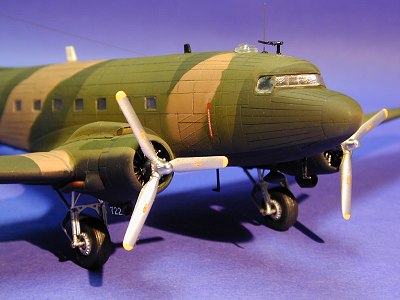
The first exterior finish color I applied was flat black to the undersides of the model. I then decided to use a combination of Parafilm and Scotch tape to mask and paint the upper surface Vietnam camo scheme. This was tedious, and I seriously thought about just free-handing the scheme, but I pressed on and finished the job by spraying on the tan color, letting it dry, masking for the medium green areas, spraying that color, then masking for the dark green areas and painting that color.
 While the model was
drying, I painted the props. Most of the pictures I could find of the AC-47
showed the aircraft with NMF props, so I spray-painted the prop blades Floquil
Bright Silver and then brush-painted the hubs Humbrol Chrome Silver.
While the model was
drying, I painted the props. Most of the pictures I could find of the AC-47
showed the aircraft with NMF props, so I spray-painted the prop blades Floquil
Bright Silver and then brush-painted the hubs Humbrol Chrome Silver.
As usual with camo patterns, I had to touch up several areas where either the tape or Parafilm had not sealed well or I had been careless about masking for overspray. At any rate, I touched up the areas that needed it.
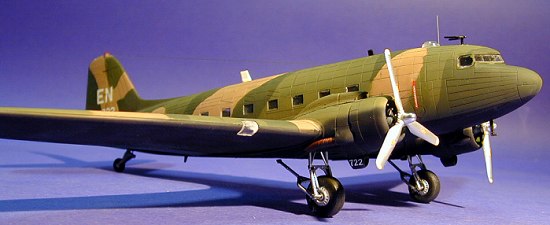
At this point, I was ready to apply the decals. Being basically lazy in my approach to modeling, I cringed at the thought of coating the entire model with Future, so I decided to try another technique: placing the individual decals into puddles of Future placed on the model. This technique was made more appealing by the fact that this model has very few exterior markings. I tried it first on a wing national insignia, and after it dried, decided that this would work okay. Since I didn’t have any aftermarket decals for AC-47s, I was left with using the kit decals, and you can imagine how fragile they were after all these years. Yep: you guessed it – I dorked up a couple of them, so I had to improvise with an old set of HO scale Gothic alphabet and numbers decals by Microscale.
Once the decals were
dry, I sprayed the entire model with Testors Dullcoat. I then attached all of
the small parts (landing gear, propellers and the remaining clear parts such as
the landing lights and the nav dome on the top of the fuselage). The kit only
contains a few of the antennas carried by the real airplane, so after looking at
a lot of reference pictures, I added the FM command antenna using a length of
steel guitar string and the radio compass sense and IFF blade antennas using
plastic stock. I used stretched
 sprue secured with Tacky Glue for the liaison
antenna running from the top of the tail to the fuselage. I then hand painted
various parts, including the minigun barrels protruding from the cargo bay
windows.
sprue secured with Tacky Glue for the liaison
antenna running from the top of the tail to the fuselage. I then hand painted
various parts, including the minigun barrels protruding from the cargo bay
windows.
The final painting task was to paint the tail beacon and left wing light with Tamiya clear red and the right wing light Tamiya clear green. At this point, I decided to try another new technique for me: highlighting the panel lines with a Koh-I-Noor rapidomatic .3mm mechanical lead pencil that I purchased at Hobby Lobby. The nice thing about this technique is that, if you mess up (and you will), you can erase the messed up line and redo it.
I normally don’t highlight panel lines on my models, and this is the first technique I have tried to achieve this effect, so as far as I am concerned, the jury is still out on this one. Like any technique, I think it just takes experimenting with until one is comfortable with the particular technique before it becomes a common modeling practice. To each his own!
CONCLUSIONS |
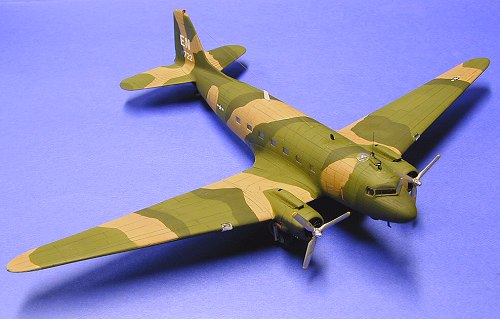
This was a fun kit to build, and, considering its age, it goes together with minimal effort. Sanding and filling will be required, but when it’s assembled, it looks like a Gooney Bird! Thanks for challenging me, Scott – I intend to build some more 1/72 kits in the future!
REFERENCES |
1.
“AC-47 Gunship Pages,”
http://www.ac-119gunships.com/gunshipac47.htm, website, 2002.
2.
Larry Davis, “Gunships – A Pictorial History of Spooky,” Squadron Signal
Publications, 1982.
April 2003
Copyright ModelingMadness.com.
If you would like your product reviewed fairly and fairly quickly, please contact the editor or see other details in the Note to Contributors.