Revell 1/72 RA-5C Vigilante
|
KIT # |
4367 |
|
PRICE: |
$8.00 |
|
DECALS: |
RVAH-7, USS Kitty Hawk |
|
REVIEW: |
Robert Shockley |
|
NOTES: |
Superscale sheet 72-093: $5.95 |
|
HISTORY |
Awhile back I purchased Revell's RA-5C Vigilante recon-bird and had initially planned to convert it to the true bomber version. Those dreams came to a crashing halt when Mr. S. Van Aken sent me some scans of an A-5 bomber. I was able to see how much work it would take, particularly removing the 'hump' off the back of the jet (too bad, because the nuclear bomb loading assembly really looked neat). Someone should manufacture a decent bomber version of this jet though, because it is (in my humble opinion at least) one of the most beautiful Navy jets ever to fly off a carrier deck. Please don't infer that I'm knocking on recon-pilots though, because anyone who's got the Huevo's to fly through a target area AFTER a strike, when the AAA is all warmed-up, deserves all the accolades they can get.
|
THE KIT |
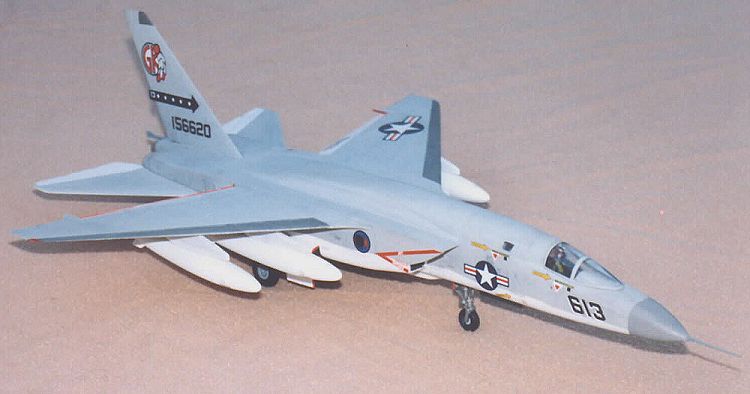
Revell's kit has been reviewed quite aptly alreadyhere in Modeling Madness, so I'll just add my own thoughts without repeating too much. Anyone attempting this kit should be prepared to do a LOT of filling, filing and sanding, mainly in the areas of the fuselage, where there are several plugs (fuselage top, between the wings; the intakes; the tailfin panel; arrestor hook panel, and the tail cone). I decided not to fill-in the seam around the arrestor hook panel so that you could see how bad these plugs are (Okay, okay,,, I forgot and was well into the painting stage when I noticed the seam glaring at me saying "gotcha !")
|
CONSTRUCTION |
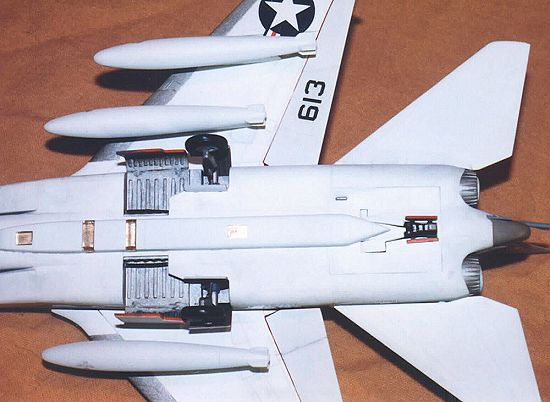
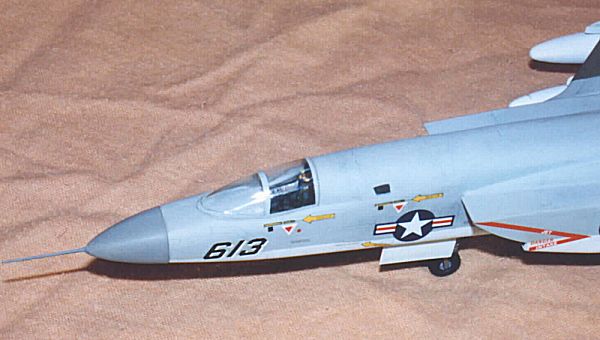
I opted to 'drop the hook', so I installed a styrene box with wiring detail on the inside of the arrestor hook panel. I also added a bit of wiring to all three wheel bays prior to putting the fuselage together, in addition to making some cockpit detail out of some old 1/700 model ship superstructure parts. Speaking of the cockpit, you can forget about wasting any time on the rear seat area, as it's pretty much impossible to see through the windows. I usually include figures, as it adds a bit of color to the cockpit, and hides poorly designed seats. There are some nasty flash and seam lines to clean-up with these two figures. I fashioned a control stick out of sprue and added ejector handles to the top of the seat. The control panel is a poor fit and does not reach to both sides of the fuselage, leaving the only contact area to be just under the windscreen. A decal panel gauge is included.
Since I 'dropped the hook', it only seemed natural to 'drop the flaps', so I cut those out with an X-acto saw blade and made some 'hinges' out of stretched sprue. Painting the inside edges of the flaps flat red adds some nice color to break-up the 'grey-ness' of the paint scheme (Model Master Flat Gull Grey over Testors Flat White). The gear door edges got the same treatment. Go ahead and remove the locating pins from the drop tanks, as they totally mess-up alignment of the two tank halves. I was THIS close to making one of those "What If..." models and hanging a bunch of Mk. 82 Snake Eyes and T.V. Glide bombs instead of the fuel tanks but sanity prevailed and I stuck with the tanks (it would've looked pretty cool though, and I'd wager Five dollars that Viet Nam RA-5C pilots wanted to do the same thing).
|
PAINT & DECALS |
According to reference photo's, the nose cone is painted a sorta biege-white, so I mixed some Gull Grey and Light Tan and hand painted it and the tail cone. It's a bit dark, but I'm not complaining with the over-all look. I believe Humbrol makes a 'Radome Tan' if you're particular. I didn't have any problems with the fit of the nose cone luckily, and no, you don't have to add weight to make the model sit on it's wheels. I did paint the aircraft in stages, in that I painted the fuselage grey and white, and then attached the wing. Naturally there was a seam to fill on the upper edges where the wing meets the fuselage, but masking off the white under belly was easy pretty easy. I highly recommend leaving off the drop tanks until after decaling and installation of the landing gear. The stabilator locating pins are too small in diameter to provide a snug fit in the holes provided in the fuselage. You can either shore-up the holes or the pins to get a snug fit. I added a small piece of styrene to the pin and filed it down to where it fit snugly in the hole. The recon-pack on the belly fits nice and flush though there are no indicators on where to position it so practice fits are required before attachment.
After the painting was done, I decided to 'dirty it up a bit' and applied several washes of Pro Modeler Gunship Grey after I put on a coat or two of Dulcoat. The wash worked okay except for just above the left Stabilator. When I was washing the underside, some wash seeped between the fuselage and Stabilator and 'dripped UP' the fuselage, and I was unable to get it cleaned off. A set of Super Scale decals was obtained from B & J Hobby over the internet, and I opted to do an aircraft from RVAH-5 (The Savage Sons) located at Key West, Florida, in the summer of 1977 (ser# 156620/GK-613). Interestingly enough, on Scotty's website is a Reference photo of another RA-5C from RVAH-5. In Scott's review, he mentioned breaking off the fuel-dump part near the tailcone several times so I saved that for last. I also made my own pitot tube out of stretched 'glass' styrene sprue. 'Glass' holds a straighter point than regular sprue. I tried Future floor polish for the first time on the canopy and was really happy with the result...don't know why I'd declined to use the stuff over the last couple of years.
|
CONCLUSIONS |
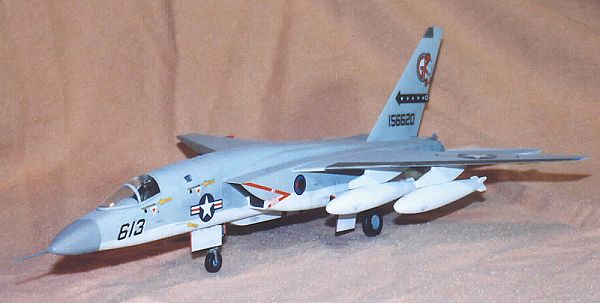
The end result provided me with a pretty decent looking Vigilante, though it took a lot of work, particularly with the fuselage plugs. The kit decal sheet is lacking in 'Don't Step' and other various stenciling. An aftermarket set really helps, though it was pretty hard to find a set for the Vigilante. The cockpit definitely needs filling with detail as the canopy is nearly frame-less and allows a good view inside. Gear door actuating mechanisms would also help, (particularly with the nose door) and I wish I'd added some.
Now I have to hold my breath until someone makes an A-5 bomber version (WITH THE NUKES, PLEASE !!)