Fujimi
1/72 Mig-21bis “Fishbed”
| KIT #: | H-12 |
| PRICE: | approx $22.00 |
| DECALS: | Three options or more, depending on the boxing |
| REVIEWER: | Gordon Zammitt |
| NOTES: | Can really be made as a bis version not an MF. |
| HISTORY |
 The Mig-21 was
quite a radical design change from the previous Mig jet fighters that were
produced previously. The new fighter went back to a single engine design
after the twin engined Mig-19, and the highly swept wings were transformed
into a delta shape but still kept a conventional tail configuration and a
front intake. It still was a quite straight forward design (compared to,
say, the F-4 of the same era) which aided its production in the
The Mig-21 was
quite a radical design change from the previous Mig jet fighters that were
produced previously. The new fighter went back to a single engine design
after the twin engined Mig-19, and the highly swept wings were transformed
into a delta shape but still kept a conventional tail configuration and a
front intake. It still was a quite straight forward design (compared to,
say, the F-4 of the same era) which aided its production in the
| THE KIT |
The Fujimi Mig-21’s are no new
comers, and on opening the box one is pleased with the excellent moulding
and separately
 packaged sprues. The kit was considered by many modelers (not
all though) to be the best in 1/72nd
scale, up until the Zvezda offering was issued. The moulding quality is by
far the best but there are several inaccuracies in the kit.
packaged sprues. The kit was considered by many modelers (not
all though) to be the best in 1/72nd
scale, up until the Zvezda offering was issued. The moulding quality is by
far the best but there are several inaccuracies in the kit.
Fujimi produced
the kit in modular design to make different versions. The versions available
to my knowledge are PF/FL, RF, MF, bis, SMT and recently a Lancer version.
As already mentioned, there are various inaccuracies in the kit but most are
quite within my personal limits, but getting a sprue for the spine and tail
labeled “MF,bis” is unacceptable! The main outward difference between the MF
and bis version is the spine. The bis version has a wider spine which is
faired further into the vertical tail surface. The Fujimi kits
 can only make
a bis version. The recently issued Lancer version is also a basic bis
version with added details, and since Romanian Lancer were all converted
from MF examples, is quite inaccurate. When compared to the Zvedza kit, the
most notable differences are: a larger tail, smaller tailplanes and a
slightly wider rear fuselage. The nose was also considered to
can only make
a bis version. The recently issued Lancer version is also a basic bis
version with added details, and since Romanian Lancer were all converted
from MF examples, is quite inaccurate. When compared to the Zvedza kit, the
most notable differences are: a larger tail, smaller tailplanes and a
slightly wider rear fuselage. The nose was also considered to
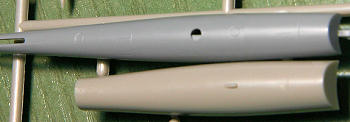 be inaccurate
for the Fujimi kit, but is a very close match to the Zvevda. I think that
when built and placed next to each other, the tailplanes would be the most
notable difference. (In the photos the Zvezda is the grey coloured plastic
while the Fujimi is a cream colour.)
be inaccurate
for the Fujimi kit, but is a very close match to the Zvevda. I think that
when built and placed next to each other, the tailplanes would be the most
notable difference. (In the photos the Zvezda is the grey coloured plastic
while the Fujimi is a cream colour.)
When a local hobby shop that had stocked up on a lot of Fujimi kits discounted them to half price and then to quarter price, I could not resist the temptation and bought several of them (along with A-4’s, F-86’s and Mig-29’s, the latter being useless as they are very wrong in shape [along with the Hasegawa MiG-29s, being designed from photographs. Ed]).
| CONSTRUCTION |
As usual with most aircraft kits,
the first step takes care of the cockpit. The kit includes a 4-piece pilot
figure which I eliminated and started with the tub and panel which is molded
in transparent plastic. There are decals provided with the kits but since
there is raised detail where there are the instruments, I did not use them.
I painted
the assembly and the interior side walls with ModelMaster
Russian interior Blue/Green (Fujimi suggests a mixture from Gunze Sangyo
colors) which seems to be correct for all of the bis versions supplied to
any country according to available photos (it seems that only the F version
got grey interiors and some PF versions). I dry brushed the instruments with
dark grey. The seat is acceptable for me, since I make all my models with a
closed canopy. It has molded seat belts. I followed the color as in the
instructions for the seat but did not glue it to the floor. As
 common with
some kits the cockpit tub has to align with the rest of the fuselage halves
so some filler and sanding may be required and retouching with paint.
common with
some kits the cockpit tub has to align with the rest of the fuselage halves
so some filler and sanding may be required and retouching with paint.
Before joining
the 2 fuselage halves together the nozzle, which is nicely done, has to be
assembled and painted. The front undercarriage bay is glued to one half. The
intake shock cone (filled with lead shot) has also to be glued and I painted
it green (Xtracolor Green for Russian a/c nose cones etc.), and the sides of
the intake gunmetal. The halves were then glued together and left to dry.
The wing are 2 pieces each and have separate flaps and ailerons and can be
placed in dropped position, however one needs to sand off the actuator
fairing on the underside to match the required angle in which they are glued
which is a very easy task. If the pylons are to be installed, their
respective holes have to be opened before the halves are glued together.
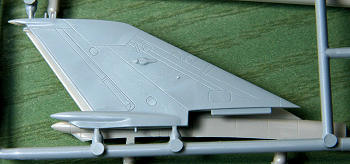
The tail is a
separate 2-piece affair and is the only real piece that needs a little
attention. If glued and placed on the fuselage halves, it is quite larger
(around 1mm) than the spine section. From the second one I built, I found
that by sanding off the 2 halves before assembling them I got to the right
size and eliminated the use of filler later on. Apart from here, I found no
need to use filler anywhere else, just some slight sanding and the fit of
this kit is really very good. Another point were a little attention is
needed is the forward wing roots. The extreme end of the wing roots is
molded on the fuselage halves and does not match perfectly with the wings,
but nothing serious here also. The tailplanes have a complete tab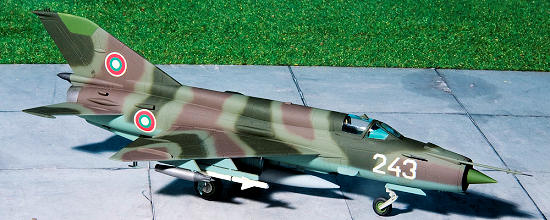 for
positioning on the fuselage halves and so can only be placed in the
horizontal position without a slight modification. I left these off since it
is much easier to paint the exhaust area and glue them on when everything is
finished.
for
positioning on the fuselage halves and so can only be placed in the
horizontal position without a slight modification. I left these off since it
is much easier to paint the exhaust area and glue them on when everything is
finished.
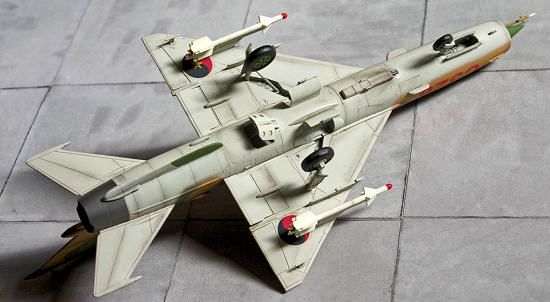
The armament and fuel tanks are also not a strong point of this kit. The fuel tank is not as slender as the real thing. I read somewhere that the main underbelly tank is larger than the wing tanks, but I am not sure that this is true. Usually I end up using the tank on the centre pylon as here it is not that obvious there, but I have never used the tanks on the outer wing pylons from the Fujimi kit (The ones with the KP kit and Condor 2-seater seem more accurately proportioned). The missiles included are also not accurate. Spares from other kits or from the ICM modern armament set can be easily substituted.
| COLORS & MARKINGS |
Whichever scheme
you decide to make, it is most likely that the radome and dielectric
surfaces need to be sprayed green together with the wheel hubs. The green
available from Xtracolour was used for this purpose, but line-ups of real
Mig-21’s indicate that either through fading, or different paint supplies,
the colour varies considerably. There are endless ways to finish off a
Mig-21, from bare metal, 2-, 3-, 4-tone camouflage to new lo-visibility
color schemes.
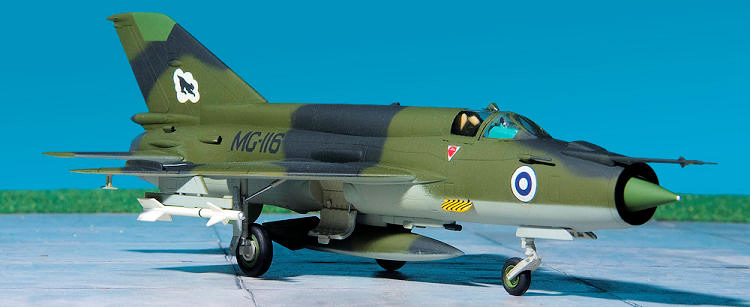
 For the first one
I finished off, I decided to make a Finnish version. Finland has always had
a mixed air force from East and West, and these were some of the aircraft
which most probably sourced some real information to the western world of
this aircraft and probably even to model manufacturers. So it is quite easy
to come across decals for this air force (Finland first bought the F-13
version which were in an all metal finish). I used the decals that came with
a Revell (Matchbox) kit which weren’t of the best quality and so took the
painting guide from the same kit. I did though mix up a very dark green
instead of the suggested black. I used Light grey for the undersides, and
sprayed the camo pattern free hand using a Badger 200 airbrush. The strakes
below the cockpit are striped in yellow and black, and I sprayed these with
yellow and cut decals for the black stripes.
For the first one
I finished off, I decided to make a Finnish version. Finland has always had
a mixed air force from East and West, and these were some of the aircraft
which most probably sourced some real information to the western world of
this aircraft and probably even to model manufacturers. So it is quite easy
to come across decals for this air force (Finland first bought the F-13
version which were in an all metal finish). I used the decals that came with
a Revell (Matchbox) kit which weren’t of the best quality and so took the
painting guide from the same kit. I did though mix up a very dark green
instead of the suggested black. I used Light grey for the undersides, and
sprayed the camo pattern free hand using a Badger 200 airbrush. The strakes
below the cockpit are striped in yellow and black, and I sprayed these with
yellow and cut decals for the black stripes.
The second one is
finished in a 3-tone Bulgarian airforce camouflage and the decals were
obtained from a Linden Hill sheet which covers some very interesting
examples from various airforces. The camouflage pattern was also painted
freehand on this one. Colors used are RLM71, Humbrol 98, Humbrol 116 and
ModelMaster Russian underside blue no.2123.
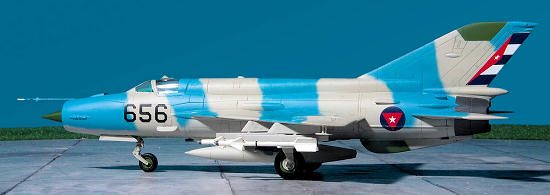
The third Mig-21
is a Cuban air force plane which came from a sheet called Latin Eagles II
from Aztec. I have the same color scheme on another decal sheet now (El
Presidente Decals, which are very interesting), and both sheets suggest
different colors for the camouflage. I used what I think is the nearest
color from available photos but I may be wrong. There are at least two
variations on this scheme with different colors and they are both given in
both decal sheet. I used Humbrol 28 (instructions suggest it as FS26622) and
Humbrol 89 lightened with white, and Humbrol 147 for the undersides.
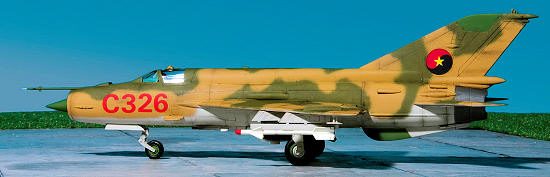
 The fourth one is
in Angolan Air Force colors, and is one of the options in the Fujimi African
Mig boxing of the Mig-21, together with some other African AF’s. However,
the demarcation between the red and black of the national roundel is
reversed in the Fujimi decal sheet (and also in some other sheets). So I
experimented with printing my own decals with an inkjet printer. The blank
sheets are provided in transparent and white. After printing, you have to
coat the decals with a lacquer based varnish (since inkjet ink is water
based) before placing in water to put them on the model. But if you print
them on the white backing you have to trim them exactly around the edge
which not only very difficult, but also exposes the edge ink to the water
causing the edge to become white once more. So the solution was to print
them on the transparent sheet and cut them a little larger, and cut a white
round from the white sheet with a hollow punch of the correct diameter and
overlay them. The result is good and they have been on the model for several
years now and do not show any negative signs yet.
The fourth one is
in Angolan Air Force colors, and is one of the options in the Fujimi African
Mig boxing of the Mig-21, together with some other African AF’s. However,
the demarcation between the red and black of the national roundel is
reversed in the Fujimi decal sheet (and also in some other sheets). So I
experimented with printing my own decals with an inkjet printer. The blank
sheets are provided in transparent and white. After printing, you have to
coat the decals with a lacquer based varnish (since inkjet ink is water
based) before placing in water to put them on the model. But if you print
them on the white backing you have to trim them exactly around the edge
which not only very difficult, but also exposes the edge ink to the water
causing the edge to become white once more. So the solution was to print
them on the transparent sheet and cut them a little larger, and cut a white
round from the white sheet with a hollow punch of the correct diameter and
overlay them. The result is good and they have been on the model for several
years now and do not show any negative signs yet.
 The last 2 were
the ones I finished recently. These are finished as a natural metal USSR
example. This is the second time I have used Alclad, and I tried to get
different shades on the panels by painting the panels in different shades of
grey. Although the result is not bad, the difference in shades of the
aluminum varies with the light direction. Next time I will try using
different shades of Alclad.
The last 2 were
the ones I finished recently. These are finished as a natural metal USSR
example. This is the second time I have used Alclad, and I tried to get
different shades on the panels by painting the panels in different shades of
grey. Although the result is not bad, the difference in shades of the
aluminum varies with the light direction. Next time I will try using
different shades of Alclad.
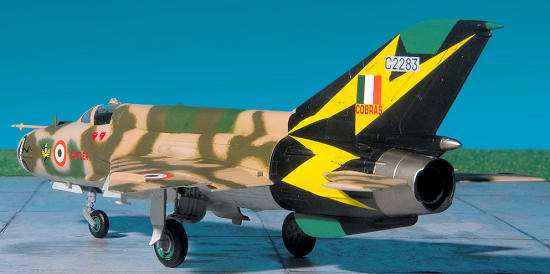
The last example is an Indian Air Force Adversary squadron, which has an interesting colour scheme. Although it seems to have the spine as being replaced with that of a different camouflaged aircraft, the same green colour is repeated around the nose roundels, and the olive green colour of the camouflage pattern seems to continue over it. I found a photo of this aircraft on a recently issued book and the instructions on the sheet look to be accurate, so I followed the instructions for the pattern. Colour used here are White Ensign Modern Russian Tan, Humbrol 105, Model Master 1711 and Humbrol 147. As you can see from the photos, the yellow lightning decals fit perfectly on the tail of the Fujimi model, so if used on the Zvezda kit it would have to be trimmed down!
| CONCLUSIONS |
As now we have more choice for the 1/72nd scale Mig-21bis, we might eliminate the Fujimi from the top spot, but I still consider the Fujimi to be a good kit. I still haven’t built the single Zvezda example I bought and it would be interesting to see how it will look next to a Fujimi bis, but I still have two more Fujimi unbuilt examples, and they surely be built as well as I have dozens of options left from the decal sheets I have for the Fishbed.
| REFERENCES |
Mig-21 4+
Publications
Mig-21 in action
Squadron/Signal no.1131
www.mig-21.de/english/default.htm
The Complete Encyclopedia of Aircraft
If you would like your product reviewed fairly and quickly, please contact the editor or see other details in the Note to Contributors.