|
KIT: |
Monogram 1/48 TF-104G |
|
KIT # |
5409 |
|
PRICE: |
£ |
|
DECALS: |
See review |
|
REVIEWER: |
|
|
NOTES: |
Maintrack TF-104 Conversion |
|
HISTORY |

I still hate doing this bit, what am I, a modeller or a historian? I’m sure most people know the Starfighter, it’s got a long and well documented history and an unfortunate reputation in various parts of Europe. Try here:http://members.home.nl/noor.luijkx/history/ for a pretty comprehensive history (that page is part of this site: http://www.starfighters.nl/ which looks good, wish I had found it before I made the kit, I could have got the serial number right:-) or here for a set of songs about it (actually an excellent album, if you like that kind of thing, and I do. I never got to see Bob Calvert do them but I’ve seen Hawkwind do most of them over the years :-): http://www.starfarer.net/captlock.html
|
THE KIT |
 nasty), it might be age, it might not be. This release was in
silver plastic, you get the a/c, pilot figure, wing tip tanks, two things
I think are supposed to be Sidewinders and a recon pod (I think it’s a
Orpheus?) that is basically a blob. Though I’ve never seen the real
thing, so maybe it’s an accurate blob....
nasty), it might be age, it might not be. This release was in
silver plastic, you get the a/c, pilot figure, wing tip tanks, two things
I think are supposed to be Sidewinders and a recon pod (I think it’s a
Orpheus?) that is basically a blob. Though I’ve never seen the real
thing, so maybe it’s an accurate blob....
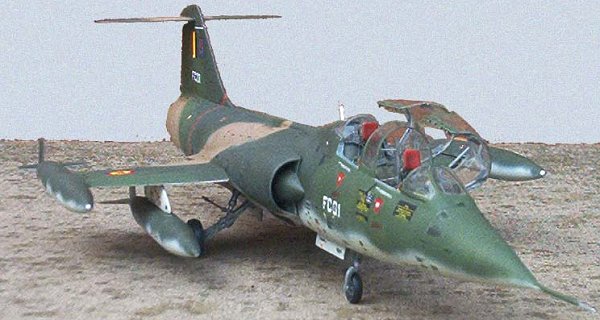
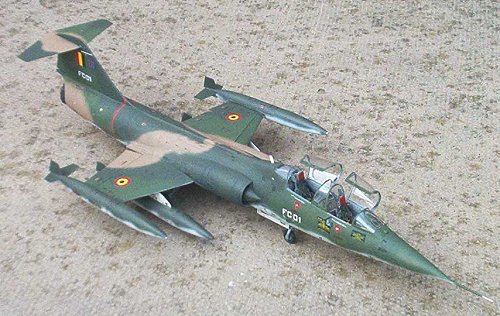
To sum up? Since the release of the Hasegawa kit, this kit is swap meet bound, if it doesn’t hit the bin first. But I wasn’t going to cut up a nice Hasegawa Starfighter to stick Maintracks unpleasant resin bits on so for a fiver ($7.50) I can live with it. The Maintrack conversion really isn’t up to even the Monogram plastic, there’s a faint attempt at detail, the fit sucks and the interior and seats are a laugh. But I bought it years ago and figured if I didn’t make it before Hasegawa sort their molds out and do it properly it would just go to waste... And Scott had this contest, see. So I had spare underwing tanks from the Black Box cockpit (used in the Hase F-104S), various bits of the Eduard set (used on the other mono F-104G) and a Daco stencil sheet I’ve been saving for this conversion (if in doubt I do Belgian markings. Dunno why, just become a habit). Oh, and a nice set of Aires Lockheed C2 seats (which the Belgians used, while most air forces fitted the Martin Baker GQ-7A seats which is what the Maintrack set (tries to) represent). So off we go!
|
CONSTRUCTION |
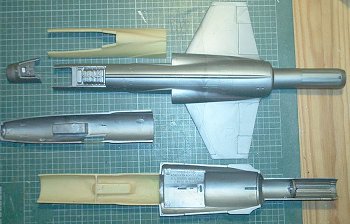 Just for fun we
started not with the cockpit but with the saw, removing the front
fuselage. This was done in easy stages, cutting the bottom off first and
gluing the Maintrack part to it while using the upper fuselage as a guide
to make sure it was properly lined up. Lots of superglue! When that was
well cured, I took off the top fuselage and attached the resin part using
the bottom section as the guide this time.
Just for fun we
started not with the cockpit but with the saw, removing the front
fuselage. This was done in easy stages, cutting the bottom off first and
gluing the Maintrack part to it while using the upper fuselage as a guide
to make sure it was properly lined up. Lots of superglue! When that was
well cured, I took off the top fuselage and attached the resin part using
the bottom section as the guide this time.
 ires seats. The Eduard set has four different sets of
instrument panels for various models of F-104, I had already used the
right one in the F-104G so I used another couple in this a/c without
worrying too much that they weren’t “quite” right, certainly better then
the kit bits. Also used Eduard side panels as well. The area between
the cockpits has some structure to mount the seat on and the rest is
covered by a canvas sheet affair, this was built from some bits of
plastic rod and channel section and the cover simulated using humbrol
putty. The rest of the a/c is a pretty simple build, not many parts,
close the airbrakes, add the tail section, attach the u/c (not the wheels
at this stage), filler, filler and a bit more filler for the nose to
resin to resin to main fuselage areas.
ires seats. The Eduard set has four different sets of
instrument panels for various models of F-104, I had already used the
right one in the F-104G so I used another couple in this a/c without
worrying too much that they weren’t “quite” right, certainly better then
the kit bits. Also used Eduard side panels as well. The area between
the cockpits has some structure to mount the seat on and the rest is
covered by a canvas sheet affair, this was built from some bits of
plastic rod and channel section and the cover simulated using humbrol
putty. The rest of the a/c is a pretty simple build, not many parts,
close the airbrakes, add the tail section, attach the u/c (not the wheels
at this stage), filler, filler and a bit more filler for the nose to
resin to resin to main fuselage areas.
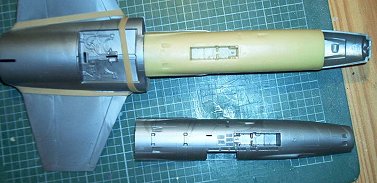
 Then it was time to
put the canopy in place to protect the interior from the spray job. It
was at this point it turned out that either I had too much original nose
(don’t think so, it was as per instructions and any less and the sections
wouldn’t have matched and there really would have been a LOT of filler
needed to blend them together) or the canopy supplied is WAAAY too
short. And very flimsy. And not very good quality. And I’m moaning
again.... Anyway, this meant I was going to have to fix the (for me)
unfixable and make a new one or compensate for it. So I decided I was
going to have to open the canopies (less obvious that t
Then it was time to
put the canopy in place to protect the interior from the spray job. It
was at this point it turned out that either I had too much original nose
(don’t think so, it was as per instructions and any less and the sections
wouldn’t have matched and there really would have been a LOT of filler
needed to blend them together) or the canopy supplied is WAAAY too
short. And very flimsy. And not very good quality. And I’m moaning
again.... Anyway, this meant I was going to have to fix the (for me)
unfixable and make a new one or compensate for it. So I decided I was
going to have to open the canopies (less obvious that t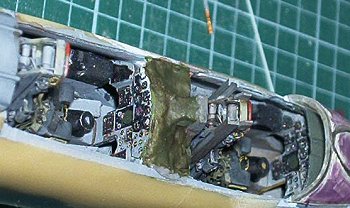 hey don’t fit,
spread the gaps out) and move the windshield part of the canopy back a
bit, which involved raising it slightly to clear the HUD and filling the
gap at the front, bits of plastic card and filler did the job, quite
subtle I think.
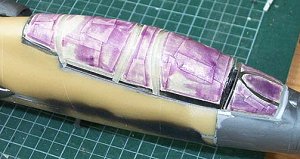
And a bathe in
Future improved the canopy to the point where I began to think it might
be useable! I masked the canopy outside and then NEARLY cut all the
sections out, just leaving them partially attached and then masked the
inside. The reason for nearly cutting them out was I didn’t want to
handle them too much after painting, as flexible as they were I could see
the paint flaking off. Then the canopy was held in place with white-tack
(like Blu-tack but, duh, white) and it’s onto:
hey don’t fit,
spread the gaps out) and move the windshield part of the canopy back a
bit, which involved raising it slightly to clear the HUD and filling the
gap at the front, bits of plastic card and filler did the job, quite
subtle I think.
And a bathe in
Future improved the canopy to the point where I began to think it might
be useable! I masked the canopy outside and then NEARLY cut all the
sections out, just leaving them partially attached and then masked the
inside. The reason for nearly cutting them out was I didn’t want to
handle them too much after painting, as flexible as they were I could see
the paint flaking off. Then the canopy was held in place with white-tack
(like Blu-tack but, duh, white) and it’s onto:|
CAMOUFLAGE & MARKINGS |
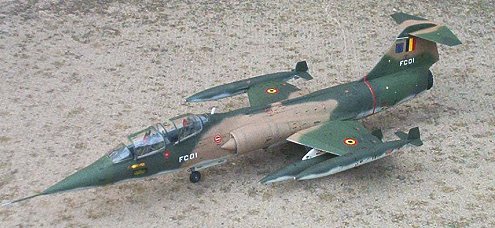 I’ve had the Daco
sheet for years, intending to do the two seater Belgian scheme. I think
it looks kinda pretty. It was painted using a mixture of Humbrol (Green
117 (FS 34102)) and Xtracolor (Green X110 (FS 14079), Tan X102 (FS 10219)
and Grey X140 (FS 16622)) paints and as I hadn’t the bottle to rescribe
the thing I tried preshading the raised panels lines first and then with
the real colours I took it slowly and tried to avoid painting the
preshaded lines at all and then when the main paint job was done, where
the panel lines were too wide or too obvious, I misted over them lightly
to tone them down. I know I should have masked it to get a sharp
demarcation but I prefer doing it freehand. Just impatient I guess. If
I could get a better line out of my Badger I would be happy... So the
edges are a bit soft and the scale overspray is grossly large but I think
it looks OK. Personal choice..... As I’ve had several recent experiences
with decals silvering (despite Xtracolor being glossy to start with) and
with the Humbrol being a satin finish I gave the whole thing a coat of
Xtracolor Gloss and so onto the bit I (usually) enjoy most, the decals!
Decals
The Daco sheet is
..... comprehensive? Nearly 200 numbered decals (often two or more of
each number), good clear instructions, details of the differences between
the single seater and the two seater, the camo a/c and the bare metal
ones, very nice job, wish I had scanned it before I cut it up. But then
I came to use them, and they have the grey goo. I hate that, is there
ANYTHING you can do about it? And they silvered. Well, some of them
did. And to be fair, with repeated applications of SuperSol and a sharp
scalpel most of the silvering went away. But not all, a
I’ve had the Daco
sheet for years, intending to do the two seater Belgian scheme. I think
it looks kinda pretty. It was painted using a mixture of Humbrol (Green
117 (FS 34102)) and Xtracolor (Green X110 (FS 14079), Tan X102 (FS 10219)
and Grey X140 (FS 16622)) paints and as I hadn’t the bottle to rescribe
the thing I tried preshading the raised panels lines first and then with
the real colours I took it slowly and tried to avoid painting the
preshaded lines at all and then when the main paint job was done, where
the panel lines were too wide or too obvious, I misted over them lightly
to tone them down. I know I should have masked it to get a sharp
demarcation but I prefer doing it freehand. Just impatient I guess. If
I could get a better line out of my Badger I would be happy... So the
edges are a bit soft and the scale overspray is grossly large but I think
it looks OK. Personal choice..... As I’ve had several recent experiences
with decals silvering (despite Xtracolor being glossy to start with) and
with the Humbrol being a satin finish I gave the whole thing a coat of
Xtracolor Gloss and so onto the bit I (usually) enjoy most, the decals!
Decals
The Daco sheet is
..... comprehensive? Nearly 200 numbered decals (often two or more of
each number), good clear instructions, details of the differences between
the single seater and the two seater, the camo a/c and the bare metal
ones, very nice job, wish I had scanned it before I cut it up. But then
I came to use them, and they have the grey goo. I hate that, is there
ANYTHING you can do about it? And they silvered. Well, some of them
did. And to be fair, with repeated applications of SuperSol and a sharp
scalpel most of the silvering went away. But not all, a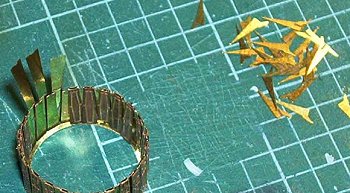 nd it did
increase the already significant time needed to apply all the decals.
With an even glossier finish and maybe an application of future on the
multilayer decals I might not have had that problem. But who knows?
Anyway, two or three days saw the decals applied and having decided I was
going to have to live with the silvering they were then sealed with a
coat of Xtracolor Matt varnish. The final bits of construction consisted
of the canopies being removed, unmasked, separated, detailed and
installed (that quick sentence covers most of an evening!), wheels, Eduard burner can (we won’t talk about the time taken building THAT
particular item, something like 90 small fiddly bits of brass there!) and
underwing tanks attached and we’re done. The day before club night. And
I only had to stay up till gone 3am twice in the days running up to it
:-)
nd it did
increase the already significant time needed to apply all the decals.
With an even glossier finish and maybe an application of future on the
multilayer decals I might not have had that problem. But who knows?
Anyway, two or three days saw the decals applied and having decided I was
going to have to live with the silvering they were then sealed with a
coat of Xtracolor Matt varnish. The final bits of construction consisted
of the canopies being removed, unmasked, separated, detailed and
installed (that quick sentence covers most of an evening!), wheels, Eduard burner can (we won’t talk about the time taken building THAT
particular item, something like 90 small fiddly bits of brass there!) and
underwing tanks attached and we’re done. The day before club night. And
I only had to stay up till gone 3am twice in the days running up to it
:-)
|
CONCLUSIONS |
The Monogram kit is
still viable in these days of the Hasegawa kit only if you’re after a
quick, cheap build and something to stick markings on. Or to cut up like
this one. And the Maintrack conversion is a starting point, nothing more
(I haven’t seen 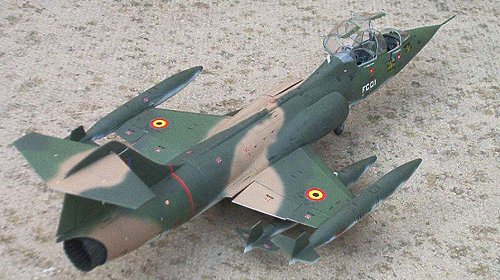 more than a picture of it but the TF conversion from
Gerry Asher at FOX 3 Studios can only be an improvement). The Daco sheet
is nice and comprehensive but has some application issues leaving the
Aires seats as the best part of this sorry tale. But it looks pretty,
and until Hasegawa get their finger out it’s still a rarity in 48th.
more than a picture of it but the TF conversion from
Gerry Asher at FOX 3 Studios can only be an improvement). The Daco sheet
is nice and comprehensive but has some application issues leaving the
Aires seats as the best part of this sorry tale. But it looks pretty,
and until Hasegawa get their finger out it’s still a rarity in 48th.
|
REFERENCES |
July 2003
If you would like your product reviewed fairly and quickly by a site that has over 200,000 visitors a month, please contact me or see other details in the Note to Contributors.