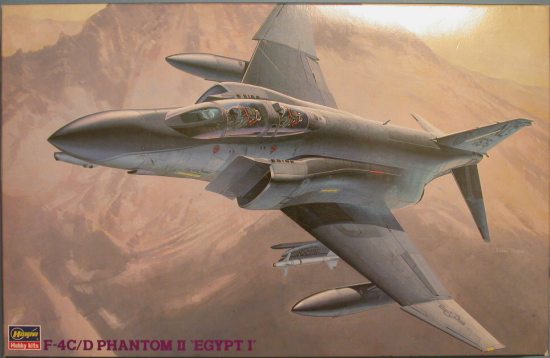
Hasegawa 1/48 F-4C/D Phantom II
|
KIT # |
7211 'Egypt 1' |
|
PRICE: |
$49.98 MSRP |
|
DECALS: |
Two aircraft in Hill Grey II scheme |
|
REVIEWER: |
|
|
NOTES: |
Ordnance from Hasegawa Weapons set A&B |
|
HISTORY |
The F-4D Phantom II was the Air Force’s refinement of the earlier F-4C, mostly through improved avionics equipment. Introduced into service in early 1967, the D model Phantom bore the brunt of air-to-air as well as ground attack missions during the middle phase of the Vietnam War. At first equipped with the reviled AIM-4 Falcon missile, capability to utilize the AIM-9 Sidewinder was restored, resulting in the destruction of 45 enemy aircraft in air-to-air combat, with 42 of those kills coming from use of the AIM-9. As the E model came on line in the early 1970s, F-4Ds were rotated into Air National Guard units where they remained in service for another two decades.
SS Mayaquez Rescue
On 12 May 1975, the Cambodian Navy seized the container ship SS Mayaguez and its crew of 39 men as it was sailing near the contested border island of Koh Tang. Fearing a repeat of the drawn-out saga of the USS Pueblo, president Gerald Ford ordered an immediate military response to the situation, with the Air Force being given the task of preventing the Mayaguez crew from leaving the island, as well as supporting a helicopter rescue by the Marines. The island was the subject of a border dispute between Cambodia and Vietnam, so it was fortified with 150 to 200 veteran Khmer Rouge troops. In a fierce battle on the 15th, a Marine assault force of over 200 men was severely mauled by the dug in Cambodian troops on Koh Tang Island. Three large CH-53 helicopters were almost immediately shot down with two others heavily damaged. The Marines that did manage to land were pinned down by withering fire.
 A small commando force was inserted on the Mayaquez itself and
reclaimed the ship after finding no one on board. At the same time the battle
was engaged, Cambodian leaders decided to release the Mayaguez crew,
who had been taken to a small nearby island, so the Marines were recalled. A
Cambodian gunboat approached the destroyer USS Henry B. Wilson under
white flags and turned over the crew. Unfortunately back on Koh Tang, the
Cambodian force under local command either did not get or refused to comply
with the message of the crew surrender and continued their aggressive and
almost fanatical attacks on the pinned down Marines. Air Force F-4s, A-7s,
AC-130s, F-111s, and OV-10s, flying from bases in Thailand provided around the
clock close air support, staying to the absolute limits of their ammunition
and fuel. Through the heroic actions of the Air Force helicopter pilots, the
Marine force was finally extracted after dark, with a total loss of 15 killed
and 50 wounded (compounded by an earlier helicopter crash tragedy during the
staging for the assault that took the lives of an additional 23 Air Force
personnel). There is some evidence that three Marines were accidentally left
on the island, all of who later died.
A small commando force was inserted on the Mayaquez itself and
reclaimed the ship after finding no one on board. At the same time the battle
was engaged, Cambodian leaders decided to release the Mayaguez crew,
who had been taken to a small nearby island, so the Marines were recalled. A
Cambodian gunboat approached the destroyer USS Henry B. Wilson under
white flags and turned over the crew. Unfortunately back on Koh Tang, the
Cambodian force under local command either did not get or refused to comply
with the message of the crew surrender and continued their aggressive and
almost fanatical attacks on the pinned down Marines. Air Force F-4s, A-7s,
AC-130s, F-111s, and OV-10s, flying from bases in Thailand provided around the
clock close air support, staying to the absolute limits of their ammunition
and fuel. Through the heroic actions of the Air Force helicopter pilots, the
Marine force was finally extracted after dark, with a total loss of 15 killed
and 50 wounded (compounded by an earlier helicopter crash tragedy during the
staging for the assault that took the lives of an additional 23 Air Force
personnel). There is some evidence that three Marines were accidentally left
on the island, all of who later died.
The entire event has been regarded as generally successful as the Mayaguez crew was freed without harm, but a lot of mixed emotions remain from those who participated in the operation. Under consideration is the method of the attack (a direct assault on the main defensive force instead of a flanking action), the surprising strength of the Khmer Rouge soldiers (an intelligence failure), and the fact that there is the belief that Mayaguez crew may have been already on their way to being freed through diplomatic channels, all lead to very interesting analyses and conjecture by military historians.
|
THE KIT |
The Hasegawa F-4C/D kit represents an early entry into a series of 1/48 scale kits that are considered to be the standard for Phantoms in this scale. First appearing in the mid-1980s, this model features raised panel lines, but they are very finely rendered. Molded in the usual Hasegawa light gray styrene, two thin and crystal clear canopy sets are provided, one with individual sections to depict the canopies in the open position, and a single piece unit to depict the canopies closed. The cockpit is fairly well detailed, but both the front and rear compartments are missing throttles and the pilot’s side panels are incorrectly rendered, being level with the ground instead of angled inward towards the ejection seats. The instrumentation configuration is also inaccurate. A resin replacement of the cockpit from Black Box would not be an unwise investment. The Martin Baker ejection seats need the addition of harnesses to make passable representations of the real thing. Two pilot figures are included.
 The wheel wells are nicely detailed and the speedbrakes, which are usually
open slightly when the plane is on the ground, are separate pieces that can be
positioned accordingly. The air intakes are problematic as they are on every
other F-4 kit on the market. They end in a blanking plate with no attempt to
convey the seamless nature of the real thing. Unusual for a Hasegawa jet
release, quite a bit of ordnance is provided. You get a complete set of
underwing fuel tanks, including both the early "Royal Jet" and later "High
Speed" 600-gallon centerline tanks. AIM-7 Sparrow and AIM-9P Sidewinder
air-to-air missiles are also included. These particular Sidewinders are only
appropriate for the F-4 after 1979.
The wheel wells are nicely detailed and the speedbrakes, which are usually
open slightly when the plane is on the ground, are separate pieces that can be
positioned accordingly. The air intakes are problematic as they are on every
other F-4 kit on the market. They end in a blanking plate with no attempt to
convey the seamless nature of the real thing. Unusual for a Hasegawa jet
release, quite a bit of ordnance is provided. You get a complete set of
underwing fuel tanks, including both the early "Royal Jet" and later "High
Speed" 600-gallon centerline tanks. AIM-7 Sparrow and AIM-9P Sidewinder
air-to-air missiles are also included. These particular Sidewinders are only
appropriate for the F-4 after 1979.
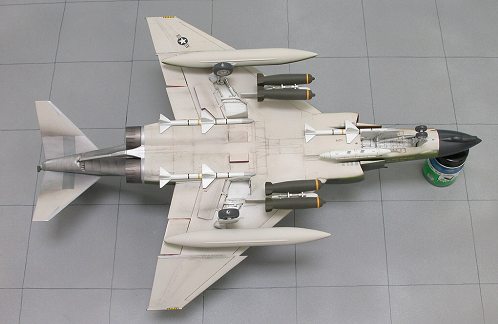
The radome on the nose is molded in modern F-4D configuration, which includes the AN/ALR-69(V)-2 RHAW "herpes mod" nodules. To make an early F-4D, the modeler is instructed to cut off the bumps and smooth out the bulge to depict the less angular lines of the APR-25/26 RHAW system. The kit provides the antenna fairing on the top rear of the vertical stabilizer for the F-4C radar warning and homing system only. To depict a F-4D, the modeler needs to do some minor reshaping by making the fairing shorter lengthwise and less pointed in profile. The kit instructs the modeler to remove various bumps and antenna blades that were only used on Navy Phantoms, a concession to the universal molds used by Hasegawa for the entire F-4 line of kits. This unfortunately cannot be done without wiping out a lot of complex panel line detail on the top of each wing that is difficult to restore by rescribing.
A classic characteristic of the Phantom is the drooping of both ailerons and the speedbrakes while the aircraft is parked due to lack of pressure in the hydraulic system. Hasegawa molds the ailerons integral to the wing in the in-flight position, so more surgery is required on the modeler’s part to cut them out of the wing and reposition them. Lastly, the angle of attack indicator is incorrectly molded on both sides of the forward fuselage. It should be only located on the port side, but fixing this is as simple as nipping off the AOA indicator on the starboard side and cleaning it up with a few quick swipes of sandpaper.
|
THE PROJECT |
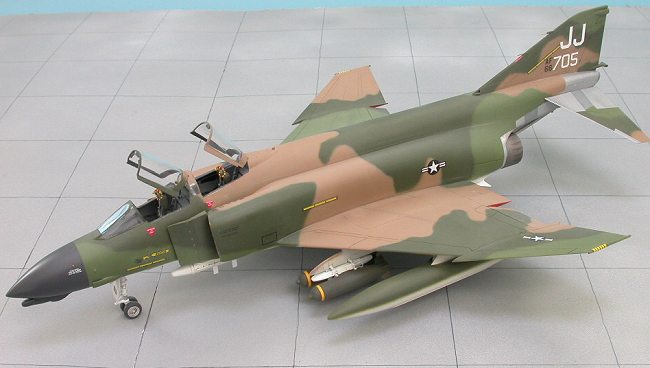
 I was asked to make a model of F-4D 66-8705, in honor of Lt. Colonel Alan
Fitzwater, who flew as the RIO during the Mayaquez rescue mission of 15
May 1975. I get involved in these kinds of requests occasionally, and am
usually happy to oblige as I feel that building a model specifically for
someone who will appreciate it is the one of the most rewarding things that
can be done in our hobby. Seeing a veteran’s eyes light up as he is presented
with a miniature of the aircraft that he flew in is a very moving and
emotional experience.
I was asked to make a model of F-4D 66-8705, in honor of Lt. Colonel Alan
Fitzwater, who flew as the RIO during the Mayaquez rescue mission of 15
May 1975. I get involved in these kinds of requests occasionally, and am
usually happy to oblige as I feel that building a model specifically for
someone who will appreciate it is the one of the most rewarding things that
can be done in our hobby. Seeing a veteran’s eyes light up as he is presented
with a miniature of the aircraft that he flew in is a very moving and
emotional experience.
My approach to building presentation models is something I call "9/10ths modeling". What that means is that I apply all of my skills towards getting the look and feel of the model correct without going overboard worrying about things like seamless air intakes or 100% accuracy in the cockpit. This means the model is generally built out of the box with minimal aftermarket input. I spend a lot of time researching the markings of the particular airplane, as this is vitally important to the recipient. It makes all the difference in the world to see personalization and attention to little details. I had a pretty good photograph of Col. Fitzwater’s Phantom, which allowed me to see the tail markings and more importantly, the ordnance carried on the mission. After obtaining the Hasegawa kit and researching the required changes to make it a representative F-4D, I was ready to start.
|
CONSTRUCTION |
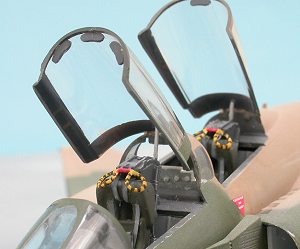 In the cockpit, I painted everything overall Dark Gull Gray FS26321 with
flat black side consoles and instrument bezels. Drybrushing with light gray
and picking out the knobs and dials with a white Berol colored pencil nicely
highlighted the details. I put a drop of Micro Crystal Clear in each
instrument face to simulate the glass cover. The Martin Baker ejection seats
were painted flat black with dark green cushions. The ejection seat handles
were painted yellow and a black fine point Sharpie marker was used to draw in
the black rings. The highlights were drybrushed with silver to simulate the
wear and tear that the seats are exposed to in everyday use. I fashioned
simple harnesses from slivers of paper and painted them medium gray. The
buckles were drawn on with a silver pencil. The fuselage halves were glued
together and the seams
In the cockpit, I painted everything overall Dark Gull Gray FS26321 with
flat black side consoles and instrument bezels. Drybrushing with light gray
and picking out the knobs and dials with a white Berol colored pencil nicely
highlighted the details. I put a drop of Micro Crystal Clear in each
instrument face to simulate the glass cover. The Martin Baker ejection seats
were painted flat black with dark green cushions. The ejection seat handles
were painted yellow and a black fine point Sharpie marker was used to draw in
the black rings. The highlights were drybrushed with silver to simulate the
wear and tear that the seats are exposed to in everyday use. I fashioned
simple harnesses from slivers of paper and painted them medium gray. The
buckles were drawn on with a silver pencil. The fuselage halves were glued
together and the seams 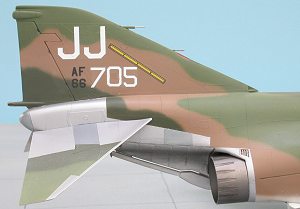 were filled with gap-filling CA glue. The canopy
decking was painted with Polly Scale Scale Black, then the middle canopy
bridge piece attached and faired in with CA glue. I masked off the clear
portions with Scotch Magic brand tape. I made the necessary modifications to
the RHAW antenna fairings under the nose and to the top of the vertical
stabilizer to depict an early F-4D. I placed a piece of clear red styrene into
the location of the anti-collision beacon at the front of the vertical
stabilizer and sanded it to match the contours of the leading edge. It was
then polished with a tri-grit file to restore the clarity of the plastic. The
pitot tubes were replaced with pieces of stainless steel wire, as I always end
up knocking off the plastic ones while working on the model.
were filled with gap-filling CA glue. The canopy
decking was painted with Polly Scale Scale Black, then the middle canopy
bridge piece attached and faired in with CA glue. I masked off the clear
portions with Scotch Magic brand tape. I made the necessary modifications to
the RHAW antenna fairings under the nose and to the top of the vertical
stabilizer to depict an early F-4D. I placed a piece of clear red styrene into
the location of the anti-collision beacon at the front of the vertical
stabilizer and sanded it to match the contours of the leading edge. It was
then polished with a tri-grit file to restore the clarity of the plastic. The
pitot tubes were replaced with pieces of stainless steel wire, as I always end
up knocking off the plastic ones while working on the model.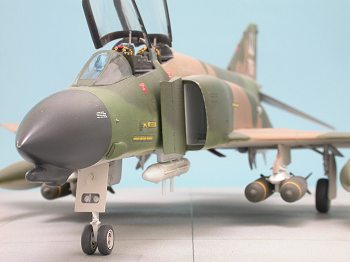
Turning my attention to the air intakes, I first painted everything gloss white. Masking off the first ¼ inch or so of the intake, I sprayed the outer camouflage color as it wraps around the intake lip, tan for the starboard side and dark green for the port side. The intakes were attached to the fuselage and the resultant prominent gaps filled and sanded. The wings were next, with the Navy F-4B/N landing strut bumps on the top of each wing being sanded off. After gluing the top wing pieces to the single bottom piece, I cut out each aileron by making repeated passes with a knife over each recessed outline until I could snap them out. This removes a bit of plastic, so I added shims made of plastic sheet to side of each aileron. The gaps in the wing were filled with more pieces of styrene and smoothed with CA glue.
Attaching the wing assembly to the fuselage, I encountered large gaps on
the underside of the fuselage near the air intakes. My usual repetitive method
of 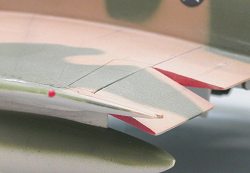 filling the seam with CA glue, setting it with accelerator, wet sanding,
and priming with paint to check progress was employed. It took a number of
iterations before the seams were done. Fortunately, the top wing-to-fuselage
joint was pretty good, requiring filling in only a few small areas.
filling the seam with CA glue, setting it with accelerator, wet sanding,
and priming with paint to check progress was employed. It took a number of
iterations before the seams were done. Fortunately, the top wing-to-fuselage
joint was pretty good, requiring filling in only a few small areas.
Even though this is a raised panel line model, I rescribed only those lines that had been obliterated by the seam filling process. The rescribed lines are obviously recessed, but my 9/10ths modeling policy said that this was good enough for my purposes. The model was cleaned with warm water and dishwashing soap and left to air-dry before being moved to the paint shop.
|
PAINT & DECALS |
The afterburner cans were painted with Testor Metalizer in the Burnt Metal
shade. A drybrushing with flat black and some dusting with pastels made them
look suitably sooty. The metallic areas of the rear fuselage and stabilators
were masked painted with Floquil Old Silver, with various panels being
highlighted with Testors Metalizer shades Steel and Stainless Steel. When dry,
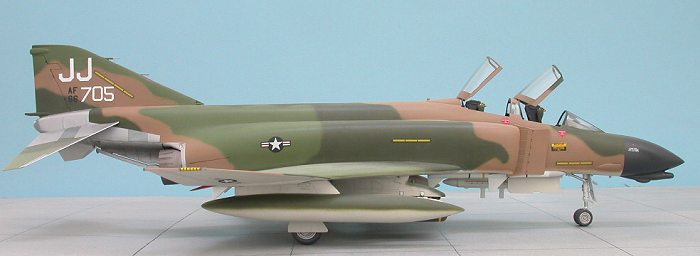
these areas were masked off and the main camouflage scheme was painted. A
variation of the standard South East Asia T.O. 1-1-4 scheme was applied
freehand using Testor Model Master Acryl paints. First, the undersides were
painted with Camouflage Gray FS36622. Then Tan FS30219 (always too dark out of
the bottle – I lightened it with 20% flat white) was sprayed on the topside. I
then drew with a pencil the lines of the camouflage demarcations to use as a
guide for application of Medium Green FS34102 (also too dark out of the bottle
and lightened) and Dark Green FS34079. It usually takes me a dozen or so
passes with the four colors before I’m happy with the results. I aim to
produce a soft demarcation line
 that is believable in its overspray pattern,
considering the scale that I’m working in. The radome was painted with Scale
Black. I masked off the wheel and speedbrake wells and painted them gloss
white. The interior sides of the engine auxiliary air doors and speedbrakes
were painted with Insignia Red. This was also used to outline the drooping
ailerons. A couple of coats of Future floor polish prepared the models for
decals.
that is believable in its overspray pattern,
considering the scale that I’m working in. The radome was painted with Scale
Black. I masked off the wheel and speedbrake wells and painted them gloss
white. The interior sides of the engine auxiliary air doors and speedbrakes
were painted with Insignia Red. This was also used to outline the drooping
ailerons. A couple of coats of Future floor polish prepared the models for
decals.
Col. Fitzwater’s Phantom was very plainly marked with no nose art. I used some decals from an AeroMaster F-4E sheet for the tail markings and stencils, the national insignia came from a Monogram F-105 kit sheet, and the Hasegawa F-4C/D kit sheet supplied the slime lights and some of the tail markings. The slime lights are printed in a bright yellow color that I’m not too happy with as they should lighter and greener, but I didn’t have any alternatives in my decal spares box.
Weathering was achieved through the use of a #2 pencil to reinforce the raised panel lines. A wash of Payne’s Gray and Burnt Umber oil paint thinned with Turpenoid was used to outline the control surfaces and dirty up the wheel wells. I used chalk pastels to add more grunge to the control surfaces and the belly of the aircraft. Jet exhaust staining was liberally applied to the rear fuselage section and both stabilators using Tamiya Smoke and more dark gray pastels. A light coat of Polly Scale Dust added a sense of paint fading and blended all the weathering together. A few light stabs of Chromate Yellow primer and silver pencil was used to depict the paint wear almost always seen on the lip of Phantom air intakes. A coat of AeroMaster acrylic clear flat was used as the final sealant, with semi-gloss clear being used on the radome.
|
FINAL ASSEMBLY |
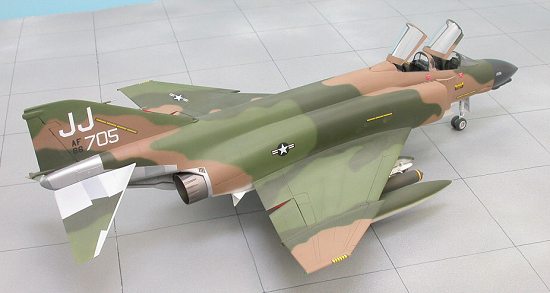
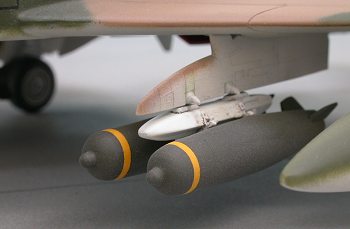 The ordnance load of 4 SUU-30B/B cluster bombs, 3 AIM-7E Sparrow missiles,
and one ALQ-87 ECM pod was confirmed through photographs and conversations
with Colonel Fitzwater. I was able to use the kit supplied Sparrows and
grabbed two TERs and the ECM pod and pylon from Hasegawa Aircraft Weapons set
B. These were all painted gloss white. The SUU-30B/Bs were more difficult to
fabricate. Although SUU-30s are included in Aircraft Weapons set A, these are
the earlier SUU-30As, whereas the B model was being used extensively in 1975.
To my knowledge, no aftermarket SUU-30B/Bs exist in 1/48 scale, so I had to
fabricate some of my own. Cutting off the front third off the Hasegawa A
models, I grafted on some layers of thick sheet styrene and sanded the nose
down to the distinctively blunt shape. Fuses were made from appropriately
sized pieces of excess sprue. The bombs were painted Olive Drab with a yellow
ring. These were attached to the TERs using short lengths of brass rod to
reinforce the attachment point. The TER itself was also pinned to the inner
pylon, again for strength.
The ordnance load of 4 SUU-30B/B cluster bombs, 3 AIM-7E Sparrow missiles,
and one ALQ-87 ECM pod was confirmed through photographs and conversations
with Colonel Fitzwater. I was able to use the kit supplied Sparrows and
grabbed two TERs and the ECM pod and pylon from Hasegawa Aircraft Weapons set
B. These were all painted gloss white. The SUU-30B/Bs were more difficult to
fabricate. Although SUU-30s are included in Aircraft Weapons set A, these are
the earlier SUU-30As, whereas the B model was being used extensively in 1975.
To my knowledge, no aftermarket SUU-30B/Bs exist in 1/48 scale, so I had to
fabricate some of my own. Cutting off the front third off the Hasegawa A
models, I grafted on some layers of thick sheet styrene and sanded the nose
down to the distinctively blunt shape. Fuses were made from appropriately
sized pieces of excess sprue. The bombs were painted Olive Drab with a yellow
ring. These were attached to the TERs using short lengths of brass rod to
reinforce the attachment point. The TER itself was also pinned to the inner
pylon, again for strength.
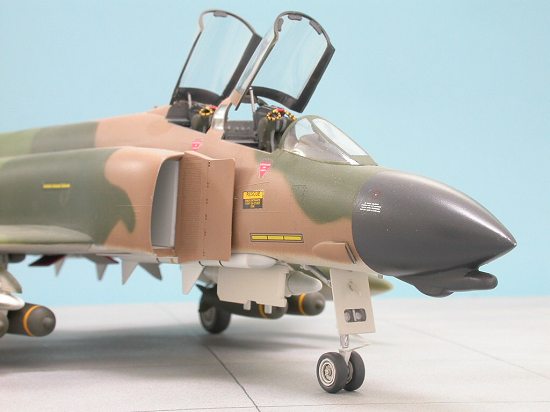
The landing gear was glued to the model and the oleo struts were painted
with Testor Chrome Silver. The canopy pieces were glued in the open position
with five-minute epoxy, which is stronger than CA glue and gives more
resistance to the accidental knocks that will happen over the model’s
lifetime. The speedbrakes were glued in a slightly open position, but not
fully deployed. This is the typical position seen when the jet was powered
down and hydraulic pressure was lost. The wheels, wheel well doors, and the
stabilators were all glued on in the final step of the aircraft model phase of
the project.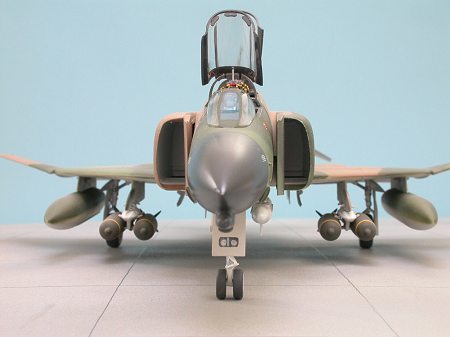
A simple base was made for display, with the tarmac being simulated by painting the top of a wood plaque I picked up at the local crafts store. The concrete was simulated with a swirl of white and light gray paints, and the expansion strips were drawn in with a pencil. I dribbled some dirty thinner onto the base to replicate the ubiquitous staining seen on operational flight ramps. I made a simple dedication plaque using Microsoft Powerpoint and printed it on high-gloss paper. This was then glued to a thin strip of sheet styrene for rigidity and attached to the base. The aircraft itself was secured to the base after drilling holes in the wood and inserting small cut lengths of a paper clip, which were matched up with corresponding holes that had been drilled in the aircraft wheels. I didn’t glue the model down, but made sure that it was firmly attached enough to withstand tipping of the base at angles up to almost ninety degrees.
|
CONCLUSIONS |
Overall, the Hasegawa F-4C/D is pretty good kit. The surface detail is nice, albeit with raised panel lines (which don’t scare me), and a reasonable selection of fuel tanks and air-to-air ordnance is provided. Large seams were present in the air intake and wing to fuselage joints, but they did not present an insurmountable task to correct. The cockpit is inaccurate and should be replaced by an aftermarket set. The ailerons are not molded as separate pieces, which require some work on the part of the modeler to correct. This throws the relatively high price of the kit into question, especially when compared to the much cheaper but out of production F-4C/D kit from Monogram. The Monogram offering also has raised panel lines, but it has a more accurate cockpit and separate ailerons. It is still readily available at swap meets and should be considered a viable alternative to the Hasegawa kit.
I heartily recommend that modelers explore the gratifying experience of building a model as a tribute for a local veteran. I can safely say that I find no modeling project more rewarding and suggest that you too will experience a similar sense of gratification.
|
REFERENCES |
Kinzey, Bert: F-4C, F-4D, and RF-4C Phantom II in Detail & Scale
Kinzey, Bert: US Aircraft and Armament of Operation Desert Storm, Detail and Scale Volume 40
Lake, Jon: McDonnell F-4 Phantom: Sprit in the Sky
Hunter, Ric: "The Last Battle of Vietnam", The Best of Flight Journal, Winter 2002
US Maritime Service Veterans website: Capture and Release of the SS Mayaquez by Khmer Rouge forces in May 1975: http://www.usmm.org/mayaguez.html
Campbell, Michael: Air Force documentation material for SUU-30B/B cluster bomb container
Special thanks to Scott Wilson for proofreading the draft review.
Copyright ModelingMadness.com. All rights reserved. No
reproduction without express permission. If you would like your product reviewed fairly and
fairly quickly, please contact
the editor or see other details in the Note to
Contributors.