|
KIT: |
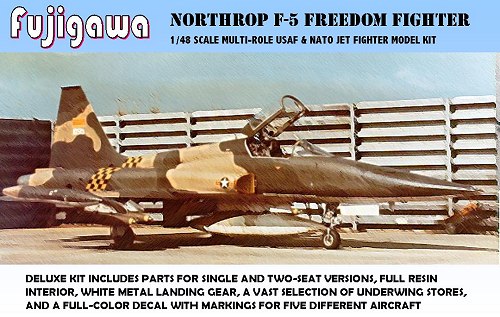
Fujigawa 1/48 F-5C Freedom Fighter |
|
KIT # |
U8IT2 |
|
PRICE: |
$27.00 |
|
DECALS: |
Five options |
|
REVIEWER: |
Roger Jackson |
|
NOTES: |
Multiple Versions Possible |
|
HISTORY |
Northrop’s first-generation F-5 series was intended to provide America’s allies with an inexpensive alternative to the increasingly complex and costly tactical combat aircraft offered from rival companies in the United States and Europe. Though Lockheed had paved the way with its prolific F-104 program, many foreign air forces found the Starfighter’s excessive attrition rate more than a little disconcerting. Meanwhile, the French enjoyed a modest marketing success with the delta-winged Mirage as did the British to a lesser extent with the Folland Gnat. The emerging trend in the export arena clearly indicated that the less-is-more philosophy would likely carry the day.
Accordingly, Northrop’s diminutive F-5 was developed and produced at the behest of the Department Of Defense’s Foreign Military Sales/Military Assistance Program proponents. Though it had no real champion in the U.S. Air Force’s staunchly parochial fighter community, a small number of F-5s were procured by the USAF in an attempt to legitimize the aircraft to potential foreign customers. Logistically, it was a good fit as many F-5 components—including engines—shared commonality with the Northrop T-38 trainer which the Air Force had recently adopted.
The aircraft became popular with both pilots and ground
crews and, due primarily to enthusiastic lobbying efforts by the US State
Department coupled with attractive pricing subsidies and co-production
agreements negotiated by the Defense Department, customers around the
world flocked to Northrop’s doorstep. Ultimately, the air forces of
Canada, Norway, the Netherlands, Greece, Turkey, Spain, Taiwan, Thailand,
the Philippines, South Korea, Ethiopia, Morocco, Iran, and Libya would
find favor with the F-5. The Pentagon, eager to validate the
lightweight/low-cost fighter concept for its overseas markets, directed
the USAF to conduct a combat e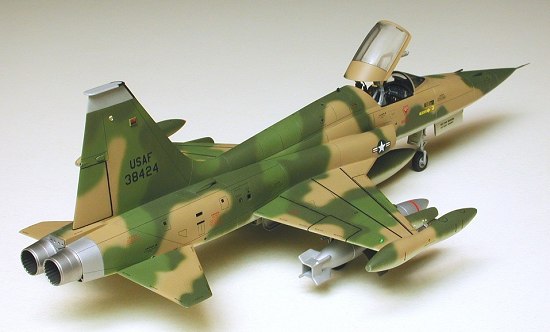 valuation in July of 1965.
The provisionally-designated 4503rd Tactical Fighter Squadron arrived at Danang Air Base, RVN in October, its aircraft equipped with a fixed in-flight refueling probe and other enhancements deemed necessary for combat operations over Southeast Asia. During the specified four-month evaluation the aircraft performed well though the limited payload capability was acknowledged by all involved with the program as a mission-critical detriment. Sorties included close air support, light strike and interdiction, armed reconnaissance, and MIGCAP escort for ECM aircraft transiting the southern route packs over North Vietnam (though no air-to-air engagements actually occurred).
This combat test was named Operation Skoshi Tiger and the aircraft so assigned were re-designated as the F-5C due to the modifications performed prior to the overseas deployment. At the conclusion of the evaluation the unit was re-flagged as the 10th Fighter Commando Squadron and continued intermittent operations until April of 1967 when it was disbanded and the surviving aircraft were handed over to the South Vietnamese Air Force (VNAF). Subsequently the VNAF became an F-5 customer in its own right, receiving a total of 137 aircraft including F-5As, two-seat F-5Bs, and RF-5A photo-reconnaissance versions.
Many first-generation F-5 operators purchased the improved F-5E when it became available in the fall of 1972, passing their older models on to international arms brokers—some with a cavalier attitude regarding legitimate end-user export certificates. Some of these trade-ins were cannibalized into spare parts which were ultimately sold to North Vietnam, whose forces had “inherited” a large number of F-5s after the fall of Saigon in April of 1975. Most F-5As and Bs have now been replaced by newer, more capable aircraft such as the F-16 and F/A-18, BAE’s Jaguar, the Mirage F-1, and other types though several hundred remain in service with the air forces of many western and non-aligned nations. It is likely that first-generation F-5s will still be serving somewhere as a frontline combat aircraft until well into the 21st century.
|
THE KIT |
Fujigawa’s F-5 Freedom Fighter kit consists of 129 parts molded in silver, a clear sprue with nine pieces, a 27-part resin interior, resin tires, three white-metal gear struts, two frets of photo-etched stainless steel bits, a small bag containing 8 MV-style colored and clear lenses, three pieces of stainless steel tubing to be fashioned into 20-mm guns and a pitot tube, two large decal sheets with markings for five different aircraft, and a well-illustrated assembly and finishing manual featuring a detailed history of the prototype and comprehensive painting instructions. The packaging is reminiscent of the original AM style, with all sprues bagged separately, the resin, metal, and PE parts segregated in the box’s false bottom, and the decals protected by a paper sleeve.
 Those familiar with the
original Hawk F-5 will find no surprises here. The one-piece wing
containing the gear wells attaches to the bottom of the fuselage while
the stabilizers are of the plug-in style. The fuselage itself is broken
down horizontally into four parts with separate noses for either single
or two-seat versions. The two-piece intake ducts seem sufficiently deep
to preclude the need for FOD covers. Surface detail is fully recessed,
with the engraved panel lines easily rivaling the best from any Tamiya or
Hasegawa tool-and-die cutter.
Those familiar with the
original Hawk F-5 will find no surprises here. The one-piece wing
containing the gear wells attaches to the bottom of the fuselage while
the stabilizers are of the plug-in style. The fuselage itself is broken
down horizontally into four parts with separate noses for either single
or two-seat versions. The two-piece intake ducts seem sufficiently deep
to preclude the need for FOD covers. Surface detail is fully recessed,
with the engraved panel lines easily rivaling the best from any Tamiya or
Hasegawa tool-and-die cutter.
The resin interior parts consist of separate cockpit tubs, seats, seat rails, instrument panels, rudder pedals, and canopy actuators while the photo-etched bits are used to provide buckles for the lap and shoulder belts, canopy mirrors, and other cockpit details. No figures are furnished though I did test-fit a Monogram pilot into each seat to ensure that they could be used, although with some minor adjustments to the figure’s posterior. A three-piece boarding ladder is included for diorama use.
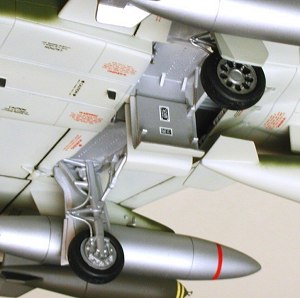
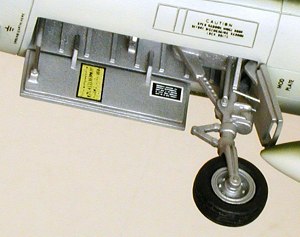
The landing gear is fully detailed with resin wheels thankfully lacking the unsightly bulge of the TD products, and white-metal struts. Parts are provided for the up-lock latches in all three wells, along with the actuators for each door. The speedbrakes may be displayed open if desired and are well-appointed with inlet casting on both the interior of the brakes and the well itself, and separate multi-piece pneumatic actuators. Two different in-flight refueling probes are furnished, one to mount on the left side for the F-C version and the other presumably to be installed on the right for the Canadian aircraft (the latter an enigma since the two-seat CF-5Ds are not IFR capable).
 The clear parts are adequate
to the task though they could be thinner by half. Along with the
separate windscreen and canopies, transparencies are used for the gunsight reflector, the fuselage sight glass windows for the hydraulic
gauges, the navigation lights at the front of the wingtip fuel tanks and
vertical fin, and the position lights aft of the cockpit. The
aforementioned colored lenses fit into depressions molded on the wings,
vertical fin, and lower fuselage.
The clear parts are adequate
to the task though they could be thinner by half. Along with the
separate windscreen and canopies, transparencies are used for the gunsight reflector, the fuselage sight glass windows for the hydraulic
gauges, the navigation lights at the front of the wingtip fuel tanks and
vertical fin, and the position lights aft of the cockpit. The
aforementioned colored lenses fit into depressions molded on the wings,
vertical fin, and lower fuselage.
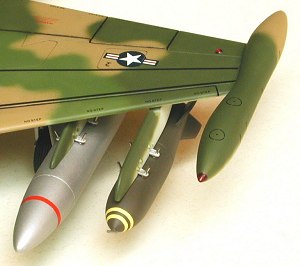
External stores are extensive and occupy nearly two full sprues. Options here include either wingtip tanks or missile rails with a pair of early AIM-9B Sidewinders and three 215-gallon fuel tanks to be used singly on the centerline pylon, in pairs on the inboard wing pylons, or in triplicate on all three. Air-to-ground ordnance consists of four Mk82 500-pounders (with optional ‘daisy cutter’ fuse extenders), four Mk82 Snakeyes, five M117 750-pounders, three Mk-83 1000-pounders, a pair of BLU-27 napalm canisters, and a NATO-style practice bomb dispenser. Photo-etched sway braces are provided for all wing and fuselage pylons.
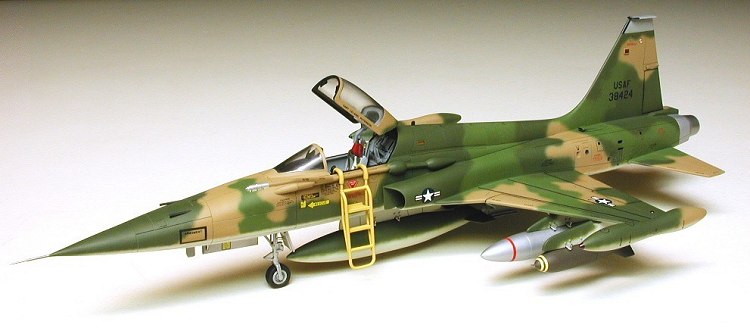
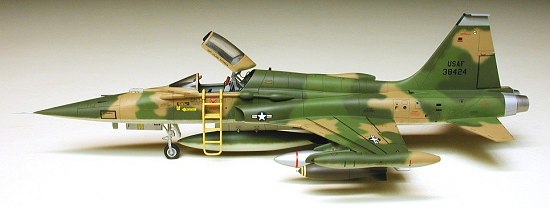
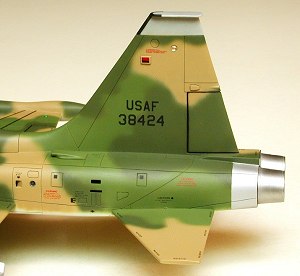
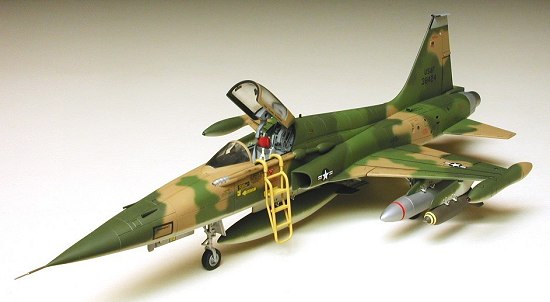
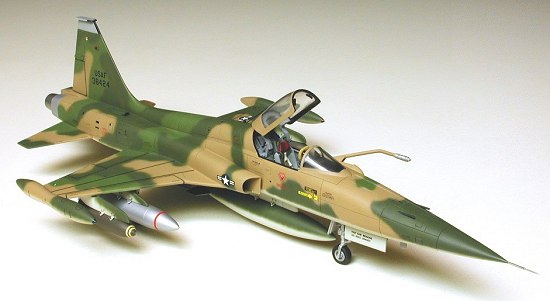
The decal sheets are of aftermarket quality and provide complete markings and service stenciling for five different aircraft, specifically: 59-4989, a silver-lacquered USAF F-5A with the early “buzz numbers”; 61-0529, a VNAF F-5A in standard SEA camouflage belonging to the 522nd Fighter Squadron; K-4002, a Dutch NF-5B in green/gray NATO camouflage assigned to 313 Squadron at Twenthe RNAFB in the Netherlands; 63-8424, a USAF Skoshi Tiger aircraft in standard SEA warpaint and assigned to the 10th Fighter Commando Squadron at Danang, RVN; and 116826, a Canadian Forces CF-5D belonging to 434 Squadron and painted in the lacquered aluminum finish.
(note: the Canadian and Dutch markings are incorrect for this model as both countries ordered their F-5s equipped with auxiliary air doors on the aft fuselage, two-position nosewheel struts, and LE maneuvering flaps all of which were the result of R&D during the design phase of the later F-5E. Also, most of these Canadair-built aircraft were equipped with intake anti-icing systems and retrofitted with arresting hooks. For total accuracy the modeler should add these details as appropriate.)
|
CONSTRUCTION |
 Basic assembly posed no unforeseen
surprises as I followed the detailed instructions verbatim. After
assembling the resin cockpit and painting it in the appropriate colors,
strips of paper were threaded onto the photo-etched seat harness hardware
then attached to the seat with diluted white glue.
Basic assembly posed no unforeseen
surprises as I followed the detailed instructions verbatim. After
assembling the resin cockpit and painting it in the appropriate colors,
strips of paper were threaded onto the photo-etched seat harness hardware
then attached to the seat with diluted white glue.
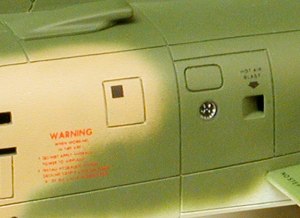 Next the aft fuselage was
assembled after first gluing in the sight glass windows at the waist.
Fujigawa thoughtfully provides a pair of gauge decals to be applied to
the insides of the windows with convincing effect. Likewise, the
formation lights were added to the spine with directions to paint the
inside of the bezels mustard yellow or dull orange.
Next the aft fuselage was
assembled after first gluing in the sight glass windows at the waist.
Fujigawa thoughtfully provides a pair of gauge decals to be applied to
the insides of the windows with convincing effect. Likewise, the
formation lights were added to the spine with directions to paint the
inside of the bezels mustard yellow or dull orange.
The resin shelf area behind the cockpit was snapped into position at the front spine with a sufficiently snug fit that no adhesive was required. At this juncture I glued both nose sub-assemblies together though I’d already decided that this first effort would be a single-seater. Nevertheless, the B model nose looked good and I’m certain that the next time I’ll build the F-5B and use the VNAF decals on it.
 After gluing the nose gear
well into the A nose I painted the cockpit sidewalls and slid the
interior into position. Again, the fit was tight enough to dispense with
the customary cement or glue. Mating the front and rear fuselage
assemblies proved to be a bit more of a challenge, requiring some
repeated filling and sanding to achieve a seamless joint.
After gluing the nose gear
well into the A nose I painted the cockpit sidewalls and slid the
interior into position. Again, the fit was tight enough to dispense with
the customary cement or glue. Mating the front and rear fuselage
assemblies proved to be a bit more of a challenge, requiring some
repeated filling and sanding to achieve a seamless joint.
After putting the intake
ducts together these were glued into position then I rescribed some panel
lines lost during the filling and sanding process. A test-fit of the
stabilizers revealed a somewhat loose tolerance between the molded pegs
and the receptacles so I drilled a hole into each of the stabilizers’
mounting pins and used a length of brass wire to reinforce and stiffen
the fit. After adding the afterburner
 cooling scoops (parts 88 & 89) I
set the fuselage aside and moved to the wing.
cooling scoops (parts 88 & 89) I
set the fuselage aside and moved to the wing.
I opted for the tip tanks and assembled them but I replaced the kit’s clear position lights with red and blue bits of Lexan. After sanding the new lights to shape they were polished out then I glued the tanks to the wing tips. Next up were the wing pylons, which fit relatively poorly compared to the rest of the kit. Much filling and sanding later, the pylons were finished and I turned my attention to the ordnance.
After a careful study of my
references I settled on the prototypical Skoshi Tiger load-out consisting
of napalm on the inboard wing pylons, Mk117s outboard, and a 215-gallon
gas bag on the centerline. These stores were attached with my usual
friction-fit steel pin method. The ordnance was carefully removed then
painted, decaled and set aside to dry.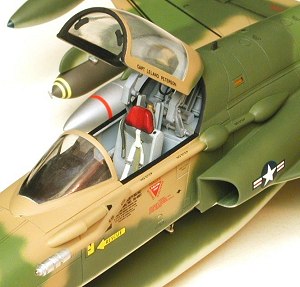
Moving back to the fuselage, the pitot tube and guns were installed with CA then I prepared to attach the IFR probe. Somehow I managed to break it while removing it from the sprue (stoopid ham-handed dumb-ass redneck!) so I replicated the piece using aluminum tubing. Once the probe was fitted it was time to mate fuselage to wing.
A modest amount of CA filler was required especially around the wing root leading edge extensions. Sanding at the roots meant some rescribing as well but once the joints were cleaned up the F-5’s elegantly simple lines began to emerge. Some smaller details were addressed when I added the gunsight reflector then white-glued the windscreen into position. The kit-provided clear bezel for the fin-mounted anti-collision beacon was supplanted by a chunk of transparent red styrene then sanded flush and polished.
 The landing gear was next
and though the white metal struts were well cast, they also had quite a
bit of molding flash which necessitated a tedious clean-up. After
fitting the wheels to the spindles, I glued the struts into place then
added all the detail parts to the gear wells. The wheels were painted
and cemented to the struts then I attacked the doors and actuators.
These parts proved fiddly and Testors liquid cement was used here since
it sets up slowly and allows for minute adjustments.
The landing gear was next
and though the white metal struts were well cast, they also had quite a
bit of molding flash which necessitated a tedious clean-up. After
fitting the wheels to the spindles, I glued the struts into place then
added all the detail parts to the gear wells. The wheels were painted
and cemented to the struts then I attacked the doors and actuators.
These parts proved fiddly and Testors liquid cement was used here since
it sets up slowly and allows for minute adjustments.
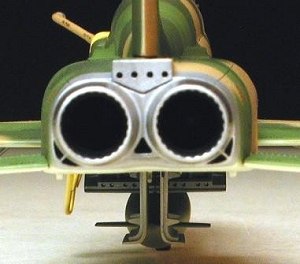 The tailpipes consist of a
pair of burner cans molded integrally with the drag chute door with two
afterburner sleeves which attach to the inside of the piece. After
assembling the three parts I test-fitted the unit to the rear of the
fuselage. Good shimmy-free contact was observed though I then discovered
that Fujigawa had omitted the triangular relief vents at the lower rear
corners of the rear end and between the tailpipes themselves. These were
drilled out and gently shaped with an X-acto knife.
The tailpipes consist of a
pair of burner cans molded integrally with the drag chute door with two
afterburner sleeves which attach to the inside of the piece. After
assembling the three parts I test-fitted the unit to the rear of the
fuselage. Good shimmy-free contact was observed though I then discovered
that Fujigawa had omitted the triangular relief vents at the lower rear
corners of the rear end and between the tailpipes themselves. These were
drilled out and gently shaped with an X-acto knife.
 The final operation was
assembling the intricate and delicate canopy actuator and frankly it was
a royal PITA, spread over three or four evenings. If not for the
soothing, dulcet tones of Art Bell’s baritone voice on the radio I
probably would’ve heaved the entire model into the FOD barrel or elected
to close the canopy. In the end I did manage to lose two of the
photo-etched bits but they weren’t showstoppers as their designated
location would’ve rendered them nearly invisible anyway.
The final operation was
assembling the intricate and delicate canopy actuator and frankly it was
a royal PITA, spread over three or four evenings. If not for the
soothing, dulcet tones of Art Bell’s baritone voice on the radio I
probably would’ve heaved the entire model into the FOD barrel or elected
to close the canopy. In the end I did manage to lose two of the
photo-etched bits but they weren’t showstoppers as their designated
location would’ve rendered them nearly invisible anyway.
Gluing on the various blade antennas was almost anticlimactic and after a final inspection and some light sanding, I swabbed the model down with Testors lacquer thinner and a clean T-shirt then wiped the model overall with a tack cloth. Time to mix some paint……
|
COLORS AND MARKINGS |
The standard SEA 4-color camouflage scheme was used on this model but not before a knock-down/drag-out fight between my own opinions and the instruction sheet's interpretations of the specified colors in the Modelmaster line of enamels. All the upper colors seem too dark, with the 30219 Tan and the 34102 Medium Green the worst offenders. In addition, the tan seems too “pinkish” while the medium green appears too “floral”. Ultimately I cut both of these colors by 10%, using the FS 36622 Camouflage gray as the catalyst. The 34079 Dark Green was cut 5% with the same shade. This brought the spectral intensity somewhere near the saturation required for 1:48th scale. Then I changed the hues of the medium green and tan by adding approximately 5% insignia yellow. The dark green was tuned up with 5% FS 34159 SAC Bomber Green to tilt the overall shade toward the blue I’ve always observed with this color.
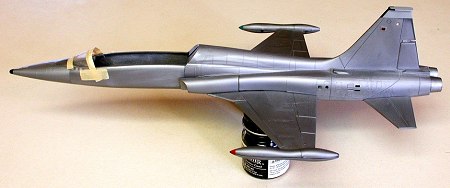
 Armed with suitable paints,
I primed the model overall with two coats of FS 36375 Light Ghost Gray
then applied the camo colors in stages, spanning a five or six-day
shoot. The bare metal area on the aft fuselage was finished with
non-buffing Testors aluminum Metalizer. Upon completion the model was
primed for decals with several heavy applications of Testors Glosscote.
After allowing a two-week period for the lacquer to cure, I applied the
decals using the “Micro System”. A couple of the decals, notable the
bomb stripes, required something a little more hardy so I used Solvaset
for these items.
Armed with suitable paints,
I primed the model overall with two coats of FS 36375 Light Ghost Gray
then applied the camo colors in stages, spanning a five or six-day
shoot. The bare metal area on the aft fuselage was finished with
non-buffing Testors aluminum Metalizer. Upon completion the model was
primed for decals with several heavy applications of Testors Glosscote.
After allowing a two-week period for the lacquer to cure, I applied the
decals using the “Micro System”. A couple of the decals, notable the
bomb stripes, required something a little more hardy so I used Solvaset
for these items.
After a few days I cleaned the model thoroughly with distilled water and Q-tips then sealed the decals with multiple coats of Testors flat lacquer. Minimum weathering was used as these ships were fairly well-maintained during their tenure with the 10th FCS. Once I was satisfied with the overall impact the ordnance was hung on the pylons and the canopy installed.
The tailpipes were painted inside with flat black, while the exteriors were shot initially with Liqui-Plate’s magnesium shade to be followed with a light coat of burnt metal from the Testors Metalizer line. When that had dried I buffed the exteriors to a mil-spec shine with a Q-tip, dusted the insides with some powdered graphite, then glued them to the model using Testors liquid cement.
It’s rare that any start-up model company would dare to embark on such an ambitious endeavor by releasing a truly deluxe kit such as this, rarer still that the retail price will not require a supplemental appropriations bill from Congress in order to afford it. Couple that with the fact that modelers have been clamoring for a proper early F-5 series for years and it’s evident that Fujigawa is gunning for a grand slam here.
|
CONCLUSIONS |
 It’s all here, folks: state-of-the-art tooling,
beautifully-executed resin, white metal goodies, photo-etched widgets,
quality decals, multiple versions……all this for less than thirty Yankee
dollars! Frankly, a modeler can’t go wrong on this deal and any fans of
the Freedom Fighter specifically or modern jets in general will not be
disappointed. Novices will find few vices during assembly while veterans
will appreciate the out-of-the-box level of detail.
It’s all here, folks: state-of-the-art tooling,
beautifully-executed resin, white metal goodies, photo-etched widgets,
quality decals, multiple versions……all this for less than thirty Yankee
dollars! Frankly, a modeler can’t go wrong on this deal and any fans of
the Freedom Fighter specifically or modern jets in general will not be
disappointed. Novices will find few vices during assembly while veterans
will appreciate the out-of-the-box level of detail.
As an aside, I made some calculations by measuring the outside diameter of the single-seat fuselage at the nose cone panel line and it appears that the photo-recon nose included in Monogram’s F-5E kit will be a virtual bolt-on. That will certainly be welcome news to those modelers who enjoy building recce aircraft, making this release that much more versatile. That said, I can see at least three or four more of these F-5s in my display case in the not-too-distant future.
Hokay, hokay man……don’t like, have a cow dude! What day izzit?
IT’S FREAKIN’ APRIL FOOL’S DAY, HOPE Y’ALL ENJOYED THE GAG!
For those still hornswoggled and/or bewildered, this is indeed the old (copyright 1967) Hawk F-5A……one of the final original John Anderson designs before the company was absorbed by the Testors Corporation in the early 1970s. It’s been crash-bashed with bits and pieces from Monogram’s F-5E and numerous other unidentifiable donors whose leftover parts have been homesteading in my spares box for over two decades.
 The two-seat nose depicted is a
re-engineering exercise using the equally-antiquated Fujimi F-5B forward
fuselage and stretching the dimensions from an alleged 1:50 to fit the
quarter-scale paradigm. I built it back in 1981 then grew dismayed with
the effort and tossed it back in the box where it remained with the Hawk
parts until last summer. Recently I realized that it had been quite some
time since I had last visited the airwar over Southeast Asia as a
modeling subject and also built a “modern” jet so out it came, ready to
provide ample hours of genuine model-building.
The two-seat nose depicted is a
re-engineering exercise using the equally-antiquated Fujimi F-5B forward
fuselage and stretching the dimensions from an alleged 1:50 to fit the
quarter-scale paradigm. I built it back in 1981 then grew dismayed with
the effort and tossed it back in the box where it remained with the Hawk
parts until last summer. Recently I realized that it had been quite some
time since I had last visited the airwar over Southeast Asia as a
modeling subject and also built a “modern” jet so out it came, ready to
provide ample hours of genuine model-building.
As can be seen by this effort, there is still some life left in this nearly four decades-old kit for a modeler so inclined. Shape, scale, and overall proportions remain despite its age—it requires only “a leetle TLC” and some motivation to bring it up to contemporary standards. Better still, the aftermarket products now available make it much easier to update and detail one of these geriatric warhorses with resin, photo-etch, and white-metal goodies galore.
But a ever-brighter future awaits for fans of the ubiquitous Freedom Fighter. Soon there will be (finally!) a new-tool early F-5 series from Classic Airframes. Judging from previously released kits, this model promises all that you see here and more with less aggravation than, say, an hour-long visit with your dentist or mother-in-law. Every new release from Classic Airframes raises the bar over the company’s previous effort and I can see several of these new kits in my modeling future.
|
REFERENCES |
F5: Warplane For The World – Robbie Shaw; Airlife Publishing Ltd
F-5 In Action – Lou Drendel; Squadron-Signal Publishing
Air War Over Southeast Asia – Lou Drendel; Squadron-Signal Publishing
Aircraft of the Vietnam War – Lou Drendel; Squadron-Signal Publishing
TAC: A Pictorial History – Lou Drendel; Squadron-Signal Publishing
VNAF: South Vietnamese Air Force – Jim Mesko; Squadron-Signal Publishing
Vietnam: The War In The Air – René J. Francillon; Arch Cape Press
The Encyclopedia of World Air Power – Bill Gunston, Editor; Crescent Publishing
Planes, Names & Dames, Vol. III -- Larry Davis; Squadron-Signal Publishing
The History Of The US Air Force – Bill Yenne; Exeter Books
SPECIAL THANKS
For technical assistance – Triet Cam
For logistic support – David O. Garcia, John Doerr, Wayne Sharp
For cosmic inspiration – Scott Murphy, John Greiner, Rick Brownlee
Cheerleading squad – Jonathan Primm, John P. Myers, Ed ‘Dusty’ Rhodes
Review kit courtesy of Fujigawa Plastic Model Mfg Co., Shizuoka City, Japan
April 2004
If you would like your product reviewed fairly and quickly by a site that has nearly 250,000 visitors a month, please contact me or see other details in the Note to Contributors.