|
KIT: |
Monogram 1/48 F-4C/D Phantom II |
|
KIT # |
5800 |
|
PRICE: |
$5.50 when first issued |
|
DECALS: |
3 Aircraft |
|
REVIEWER: |
|
|
NOTES: |
1979 issue |
|
HISTORY |
The McDonnell-Douglas F-4D was an evolutionary variant of the basic Phantom II design, featuring an avionics package more specifically tailored for USAF requirements. While the ‘C’ model was fundamentally an off-the-shelf purchase of the Navy’s F-4B with only minimal changes to render the design suitable for Air Force service, the F-4D refined the multi-role concept with improved air-to-air and air-to-ground capabilities.
The F-4D, with its upgraded systems, was fully validated during seemingly endless combat operations over the skies of Southeast Asia. The first of a new breed of laser-guided smart munitions were delivered by F-4Ds and all of the Air Force’s acknowledged aces including Steve Ritchie, Chuck DeBellevue and Jeffrey Feinstein flew the aircraft on several of their MiG-killing sorties.
 Following the end of the war and Richard Nixon’s “peace with honor” proclamation
large numbers of F-4Ds were transferred to Reserve and ANG units. They served
well into the 1980s until sufficient numbers of F-15s and F-16s were available
to permit their retirement. Many of these aircraft would ultimately be
converted into pilotless drones, to be destroyed in missile tests at China Lake
NWTC and White Sands SMR. Others performed as targets at the annual William
Tell competitions in Florida. (Editor's note: nearly all drone conversions of
USAF Phantoms are E and G models with a handful of RF-4Cs being droned. No
regular C or D models have ever undergone this conversion. Even today the vast
majority of USAF F-4s in the boneyard are E models with very few C's or
D's remaining.)
Following the end of the war and Richard Nixon’s “peace with honor” proclamation
large numbers of F-4Ds were transferred to Reserve and ANG units. They served
well into the 1980s until sufficient numbers of F-15s and F-16s were available
to permit their retirement. Many of these aircraft would ultimately be
converted into pilotless drones, to be destroyed in missile tests at China Lake
NWTC and White Sands SMR. Others performed as targets at the annual William
Tell competitions in Florida. (Editor's note: nearly all drone conversions of
USAF Phantoms are E and G models with a handful of RF-4Cs being droned. No
regular C or D models have ever undergone this conversion. Even today the vast
majority of USAF F-4s in the boneyard are E models with very few C's or
D's remaining.)
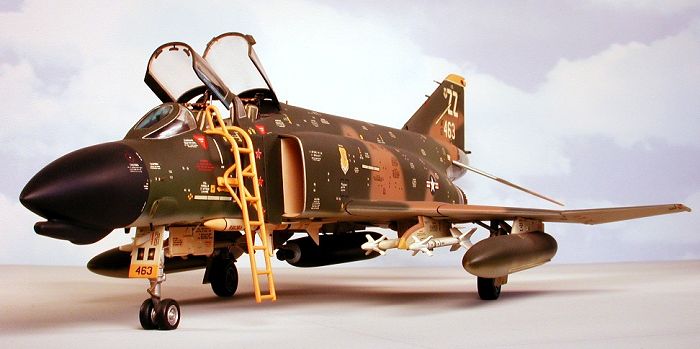
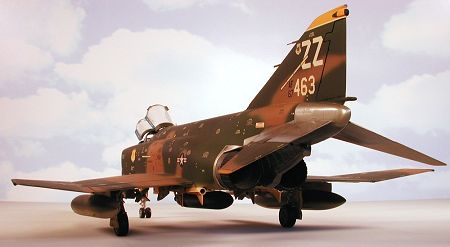
66-7463, credited with at least five confirmed MiG kills, was spared this ignominious indignity. After her combat tour in Thailand she was assigned to several different regular Air Force units during the following decade, including the 8th TFW in Korea and the 18th TFW on Okinawa. Her last tactical service was with the 31st TFW at Homestead AFB in Florida, and on 24 November 1986 she was retired and flown to Peterson AFB, Colorado to be permanently enshrined at the Air Force Academy in Colorado Springs.
|
THE KIT |
For a preview of this kit go HERE
|
CONSTRUCTION |
Predictably, I began this model with the wing. After installing position lights front and rear at the wingtips, the three pieces were assembled with Crazy Glue. I glued aluminum tubing sockets into each of the five hardpoints then attached the speedbrakes and ailerons in the up position. The bottoms of the intake trunks were removed with a razor saw (more on this later), then I set the wing aside and moved to the cockpit.
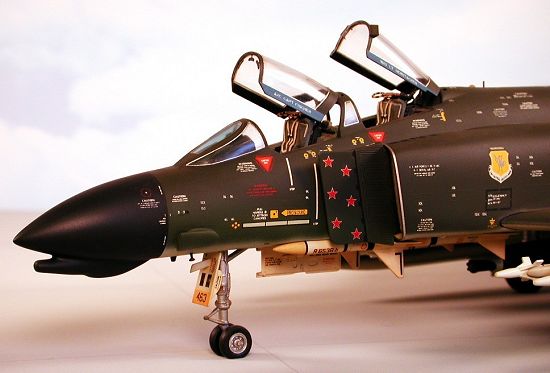 Here I added throttles to the left consoles and some missing knobs to the
seats. I used a large green MV lens to animate the pilot’s radarscope and added
a sunshade to the WSO’s panel. After painting and assembling the interior
components the entire unit was attached to the right fuselage half. Some
fiddling was necessary to keep the cockpit square with the centerline of the
model.
Here I added throttles to the left consoles and some missing knobs to the
seats. I used a large green MV lens to animate the pilot’s radarscope and added
a sunshade to the WSO’s panel. After painting and assembling the interior
components the entire unit was attached to the right fuselage half. Some
fiddling was necessary to keep the cockpit square with the centerline of the
model.
Once the cockpit was centered I glued the fuselage together and refined some of the smaller exterior details. Forward of the windscreen I drilled out and squared up a small hole to replicate the rain removal vent. New cockpit air conditioning ducts were fabricated from squashed aluminum tubing and faired to the nose with gap-filling Hot Stuff, replacing the anemically-molded kit parts.
At the rear I installed an anti-collision beacon and rear position light on the fin, then built a new pitot tube and stability augmentation sensor from stainless steel tubing and a straight pin. The fuel dump mast was broken when I bought the kit and rather than attempt to repair this fragile piece, I made a new one from bits of aluminum tubing and attached it with CA.
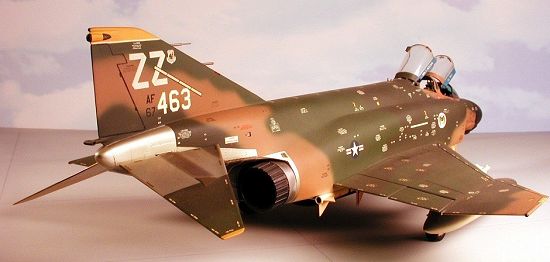
I drilled out the bellmouth scoop at the base of the fin and made a new diffuser vane out of .005” brass shim stock. After opening up the exhaust vents below the stabilators I added a pair of up-lock latches to each side of the arresting hook claw, made from re-shaped pin heads.
A sight glass window for the nitrogen fill indicator on the right rear of the fuselage was added and after polishing both sides of the transparency, I applied a decal ‘gauge’ to the inside. The RHAW antenna fairing on the fincap was bobbed since the F-4D used a shorter housing.
 A test-fit of the tailplanes revealed a very loose installation so I reinforced
the fit by creating a box-beam assembly within the aft fuselage to hold the tabs
rigid. After enlarging the slots I used .010” sheet styrene strips attached
with Testor’s liquid cement and sanded flush to the exterior. After some
adjustment to the stabilators’ mounting tabs they plugged right into the
re-engineered slots with a snug friction fit.
A test-fit of the tailplanes revealed a very loose installation so I reinforced
the fit by creating a box-beam assembly within the aft fuselage to hold the tabs
rigid. After enlarging the slots I used .010” sheet styrene strips attached
with Testor’s liquid cement and sanded flush to the exterior. After some
adjustment to the stabilators’ mounting tabs they plugged right into the
re-engineered slots with a snug friction fit.
After rescribing the wing, fuselage, and tailplanes I turned to the most aggravating aspect of this kit—the intakes. As originally designed, an assembly seam bisects the highly visible upper BLC vents, ruining their appearance. Re-engineering the kit parts would be necessary to correct this gaff. Using masking tape, I mocked up each duct using the removed items from the wing bottom, the kit ducts, and the backing plates. The bottom pieces were carefully glued to the duct parts then the tape was removed.
I slid the backing plates out then filled and sanded these seams from the inside. Next, I replaced the poorly depicted upper BLC vents using pieces sectioned from two spare lower wings. Once these new vents were properly positioned they were glued from the inside with CA. A slight modification to the backing plates was needed to allow them to fit the corrected ducts. After sanding the insides of the new vents flush to the adjacent areas, the interiors of the ducts and splitter plates were sprayed gloss white.
After the paint had dried the ducts were assembled conventionally using gap-filling CA to level the seams. After sanding them smooth I made baffles from black sheet styrene, polished them to a high gloss, then installed them from the backside of each duct—not as realistic as a pair of Seamless Suckers but convincing nonetheless.
The canopy bridge section was attached and sanded flush to the rails then the intakes were installed. After rescribing the ducts the wing was mated to the fuselage. I used .010” sheet styrene to shim gaps at the front of the wing where I had removed the bottoms of the intakes and after gluing, I sanded the seams smooth and rescribed the area.
 Subsequent to a few test hops around the studio I installed the landing gear
struts, after first correcting the main gear pieces. The bottom edge of the
large door should be parallel to the ground so I modified the strut mounting
tabs to achieve the necessary forward cant. The gear wells were sprayed gloss
white while the struts and wheels were painted flat aluminum.
Subsequent to a few test hops around the studio I installed the landing gear
struts, after first correcting the main gear pieces. The bottom edge of the
large door should be parallel to the ground so I modified the strut mounting
tabs to achieve the necessary forward cant. The gear wells were sprayed gloss
white while the struts and wheels were painted flat aluminum.
The tailpipes are rather lackluster and fit very loosely so I combined the Monogram afterburner ‘feathers’ with the smooth sections of the Italieri RF-4C parts. This composite assembly was glued to the Italieri inserts which have detailed interiors. The new tailpipes fit much better than the unmodified Monogram pieces and after painting them, they were set aside for later, permanent installation.
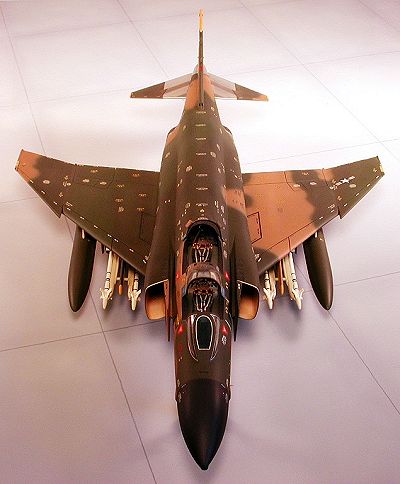
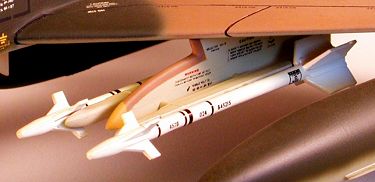
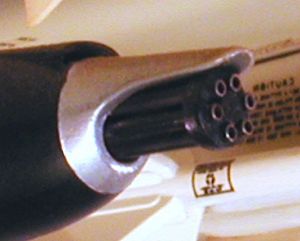 The ordnance,
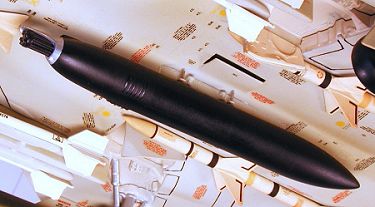 fuel tanks,
and pylons were assembled after I corrected the mounts for the Aero 3B
Sidewinder rails and detailed the SUU-23A gunpod. The kit’s AIM-9Bs were
replaced by the –9Js from Monogram’s F-104G kit and the Aero 27A centerline
pylon received a set of scratch-built sway braces. After installing brass
mounting pins in each piece to fit into the sockets installed in the wing
earlier, they were painted and decaled then set aside to dry.
fuel tanks,
and pylons were assembled after I corrected the mounts for the Aero 3B
Sidewinder rails and detailed the SUU-23A gunpod. The kit’s AIM-9Bs were
replaced by the –9Js from Monogram’s F-104G kit and the Aero 27A centerline
pylon received a set of scratch-built sway braces. After installing brass
mounting pins in each piece to fit into the sockets installed in the wing
earlier, they were painted and decaled then set aside to dry.
 This aircraft had a tinted center panel in the windscreen so I carefully scribed
around the pane from the inside and used a single large drop of Pactra candy
blue enamel to accomplish this, relying on the capillary action of the paint to
fill the designated area. When it was dry I attached the windscreen to the
model with a small bead of white glue. A new AOA transducer and a temperature
probe were made from straight pins and installed in pre-drilled holes.
This aircraft had a tinted center panel in the windscreen so I carefully scribed
around the pane from the inside and used a single large drop of Pactra candy
blue enamel to accomplish this, relying on the capillary action of the paint to
fill the designated area. When it was dry I attached the windscreen to the
model with a small bead of white glue. A new AOA transducer and a temperature
probe were made from straight pins and installed in pre-drilled holes.
To replicate the landing/taxi lights I removed
the molded housing from the inside of the nose gear door, then drilled out the
windows and installed 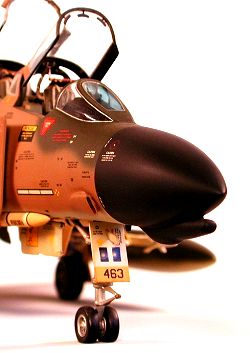 clear
styrene there. Using the separate housing from the Italieri kit, I drilled out
the window portions and white glued MV lenses into the holes. This piece was
then centered over the windows in the Monogram door and carefully glued with
Testor’s liquid cement. After painting the interior portion of the completed
door flat black to create depth and maintain opacity when viewed from the front
it was sprayed gloss white to match the gear well.
clear
styrene there. Using the separate housing from the Italieri kit, I drilled out
the window portions and white glued MV lenses into the holes. This piece was
then centered over the windows in the Monogram door and carefully glued with
Testor’s liquid cement. After painting the interior portion of the completed
door flat black to create depth and maintain opacity when viewed from the front
it was sprayed gloss white to match the gear well.
After test-fitting the canopies I scratch-built a pair of actuators then added a set of Model Technologies photo-etched rearview mirrors. With the basic assembly complete, the finished areas were masked and the model sent to the paint shop.
|
PAINT & DECALS |
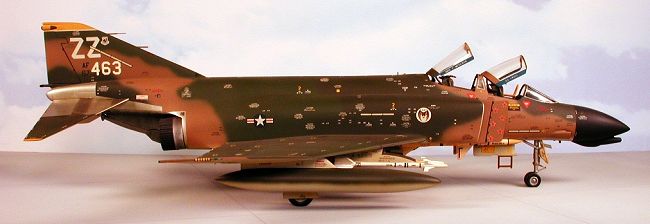
Using the photographs in the March 1980 Koku-Fan as reference, I painted the model in the modified (tan areas reduced by 15%) four-color SEA camouflage scheme using Modelmaster enamels. Spectral intensity was corrected by adding a little black to the dark green and white to the tan. Unpainted areas on the rear fuselage and stabilators were simulated with various shades of Spray ‘n’ Plate while the tailpipes were finished with a combination of silver Rub ‘n’ Buff and flat black paint burnished with powdered graphite. After painting the blue and yellow trim colors I sprayed the model overall several times with Testor’s Glosscote to prep the surface for decals.
 I had decided to
depict 66-7463 as she appeared in 1980 while assigned to the 44th TFS,
18th TFW and based at Kadena Air Force Base on Okinawa. Although the
photos indicated a recent re-paint following a depot-level IRAN at Ogden AMA,
her intake ramps were still marked with six red stars on each side, denoting her
air-to-air combat victories while assigned to the 432nd TRW at Udorn
RTAFB in Thailand during the Vietnam War. Despite her age, the pictures showed
an aircraft looking as new as the day she made her first flight in 1967 from
Lambert Field in St. Louis.
I had decided to
depict 66-7463 as she appeared in 1980 while assigned to the 44th TFS,
18th TFW and based at Kadena Air Force Base on Okinawa. Although the
photos indicated a recent re-paint following a depot-level IRAN at Ogden AMA,
her intake ramps were still marked with six red stars on each side, denoting her
air-to-air combat victories while assigned to the 432nd TRW at Udorn
RTAFB in Thailand during the Vietnam War. Despite her age, the pictures showed
an aircraft looking as new as the day she made her first flight in 1967 from
Lambert Field in St. Louis.
The time frame depicted was the Air Force’s swan song for large amounts of multi-colored service stenciling, with white data on the green surfaces and black lettering on the tan areas. Subsequent to this era, aircraft would display minimal information, most of it in black or dark gray. MicroScale’s F-4 data sheets were used, 48-67 for the black items and 48-76 for the white. This operation is not for the faint of heart as each sheet contains some 1500 individual items. Even so it was still necessary to create some stenciling from my spares box as neither release includes any data for the missiles, gunpod or other ordnance.
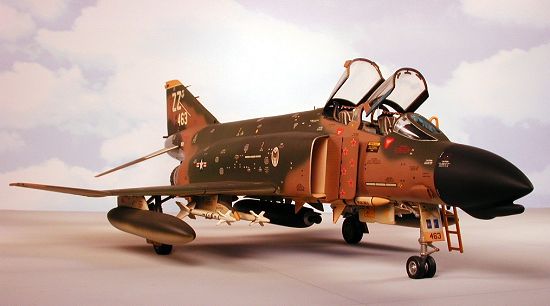 All stripes for the Sparrows
and Sidewinders were cut from solid color MicroScale decal while the serial
numbers and tail codes were taken from individual lettering sheets. The common
markings are courtesy of my spares box. The squadron and wing insignia are also
MicroScale items while the slime lights came from ScaleMaster. In total, about
3000 individual pieces were applied and my therapist said I’d make a full
recovery after about six years of R & R.
All stripes for the Sparrows
and Sidewinders were cut from solid color MicroScale decal while the serial
numbers and tail codes were taken from individual lettering sheets. The common
markings are courtesy of my spares box. The squadron and wing insignia are also
MicroScale items while the slime lights came from ScaleMaster. In total, about
3000 individual pieces were applied and my therapist said I’d make a full
recovery after about six years of R & R.
The decals were sealed with several layers of Testor’s Dullcote then I used a black watercolor wash to highlight the recessed vents and movable control surfaces. After a final blast of Dullcote to seal the weathering I painted the tires and attached them to the struts. The eight gear doors and actuators were next, followed by the missiles and external stores. The tailpipes were glued into position with small drops of Crazy Glue then I added the canopies, press-fitting them to their actuators and tacking them at the hinges with white glue. A final gesture was hanging a boarding ladder on the left canopy rail.
|
CONCLUSIONS |
 Monogram has
gotten almost as much mileage out of this tooling as the USAF got out of their
real F-4s and although the molds are approaching a quarter century in age,
there’s still quite a bit of value in the box. True, the Hasegawa kit offers
superior ease of assembly and a less awkward method of molding the intake ducts
but at 2 to 3 times the retail price, economy and value must be considered as
legitimate factors.
Monogram has
gotten almost as much mileage out of this tooling as the USAF got out of their
real F-4s and although the molds are approaching a quarter century in age,
there’s still quite a bit of value in the box. True, the Hasegawa kit offers
superior ease of assembly and a less awkward method of molding the intake ducts
but at 2 to 3 times the retail price, economy and value must be considered as
legitimate factors.
This model has been re-released several times, molded in gray and with different decals. One issue included a fret of photo-etched detail pieces from Model Technologies as part of Monogram’s “High-Tech” series of kits. In each case however the styrene parts are identical. With careful assembly and skillful painting either of these kits builds into an attractive representation of the prototype.
|
ADDENDUM |
 This model was first built as a conversion to a Navy F-4J, wearing the
multi-toned gray “Ferris” scheme. After a couple of years I tired of looking at
it and stripped the finish off then re-converted it back to an F-4C, in
ADC ‘Interceptor Gray’ overall with “Happy Hooligan” markings. Several years
later I decided to repaint it yet again, this time as an F-4D in SEA
camouflage. Still looks pretty fresh……for a 22-year old model!
This model was first built as a conversion to a Navy F-4J, wearing the
multi-toned gray “Ferris” scheme. After a couple of years I tired of looking at
it and stripped the finish off then re-converted it back to an F-4C, in
ADC ‘Interceptor Gray’ overall with “Happy Hooligan” markings. Several years
later I decided to repaint it yet again, this time as an F-4D in SEA
camouflage. Still looks pretty fresh……for a 22-year old model!
B & W photograph courtesy of Tom Dunbar, IPMS Washington D.C.
|
REFERENCES |
1. Koku-Fan: March 1980, Bunrin-Do Publishing, LTD
2. Koku-Fan: Illustrated – F-4 Phantom II, Bunrin-Do Publishing, LTD
3. Phantom II: A Pictorial History – Lou Drendel, Squadron/Signal Publications
4. …And Kill Migs – Lou Drendel, Squadron/Signal Publications
5. F-4 Phantom II: In Action – Lou Drendel, Squadron/Signal Publications
6. T.O. 1F-4C –1: USAF Technical Order – Government Printing Office, 1979
7. MiG Kill Markings From The Vietnam War – Bert Kinzey & Ray Leader, Airlife
8. F-4 Phantom II: In Detail & Scale (Part I) – Bert Kinzey, Airlife
Ó May 2002 by Roger M. Jackson
First Time North American Rights To Scott Van Aken and ‘Modeling Madness’
If you would like your product reviewed fairly and quickly by a site that has well over 100,000 visitors a month, please contact me or see other details in the Note to Contributors.