|
KIT: |
Tamiya 1/48 A-1H Skyraider |
|
KIT # |
61058 |
|
PRICE: |
$60.00 AUD |
|
DECALS: |
See Review |
|
REVIEWER: |
|
|
NOTES: |
Aftermarket: Cuttng
Edge Decals 48-096, 48-099 Cutting Edge 48-103 cockpit set Eduard 48-245 Etched set. Back Magic Masks |
|
HISTORY |
The Skyraider came about as a result of the US Bureau of Aeronautics consideration to combine the tasks of the torpedo bomber with the dive-bomber during 1943. Several large aircraft manufacturers were asked to develop a large single-seat attack aircraft and Douglas Aircraft Company produced the Skyraider. This development commenced during mid 1944 and the first prototype flew on March 18, 1945. Initial flight test showed that the aircraft had satisfactory flight characteristics and was deemed very favourable. In May of the same year a letter of intent was signed for an initial 598 production aircraft and, during February of 1946 the name “Skyraider” was officially approved. The distribution of production aircraft commenced towards the end of that year.
The “Able Dog” was regarded as one of the most versatile aircraft ever to serve with the US Navy. It remained in front line service well into the late 60’s, although it was the earlier Korean conflict that allowed this aircraft to survive and not pass into obscurity with the advent of the jet age. Over 3,000 aircraft were produced over its twelve-year run and undertook a variety of roles.
The Skyraider was extremely robust and comprised an all-metal frame. It had three airbrakes, on each side as well as a ventral one. Powered by a big two-row R-3350 cyclone engine that drove a four-blade variable pitch 13ft 6-inch propeller, giving a power output of 2,800 hp the Skyraider had a maximum speed of 322 mph at 18,000 ft (A-1H). It had an oil cooler intake located below and immediately aft of the cowling and a carburettor air intake situated on top of the engine immediately forward of the windscreen. The wings were designed to fold upwards for ease of stowage. The wheels had a single disc brake with three piston calipers (my Celica has one piston per brake, even if the discs are ventilated, and it is at least thirty years younger in design!) and were rotated through ninety degrees to the rear when retracted.
The AD-1 had a single 20-mm cannon in each wing and subsequent models had this increased to two per wing firing 200 rounds apiece. The ordinance of this amazing aircraft eventually increased to be accommodated on a total of 15 hard points. Such weapons as 500 lb napalm tanks, 2,000 lb HE bombs, 500 lb bombs, 250 lb low-drag bombs, rocket packs with 19 2.75 inch folding fin rockets, SUU-11A rocket launchers with four five inch folding fin rockets and five inch folding fin air-to-ground rockets. It could also carry three auxiliary fuel tanks, two beneath the wings and one on the underside of the fuselage. These tanks had approximately 300-gallon capacity and raised the ferry range to 3,000 miles!
 As a result of the American Defense Department altering its aircraft
designation policy in 1962, a new tri-service system was introduced. This
resulted in the Skyraider having its designation changed from AD to A. This
impacted on all variants except the AD-1 to AD-4 aircraft, which were relegated
to second-line duties by 1962 and were exempted. The AD-6 became the A-1H, the
subject of this review.
As a result of the American Defense Department altering its aircraft
designation policy in 1962, a new tri-service system was introduced. This
resulted in the Skyraider having its designation changed from AD to A. This
impacted on all variants except the AD-1 to AD-4 aircraft, which were relegated
to second-line duties by 1962 and were exempted. The AD-6 became the A-1H, the
subject of this review.
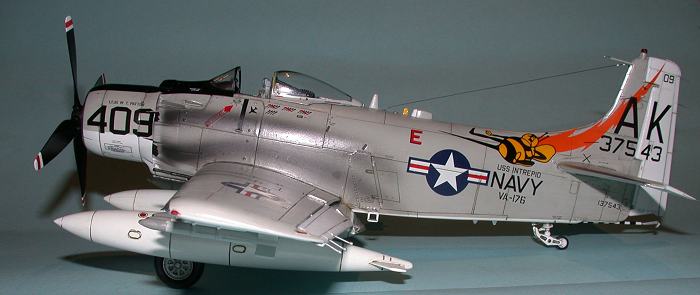
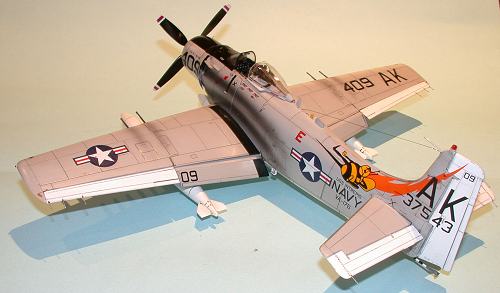
The Skyraider had a very impressive combat record and a few of its members would shoot down enemy jets in combat. One particular incident involved an A-1H off the USS Intrepid, 137543:409-AK of the VA-176. Lt. Jg W. Thomas Patton piloted the aircraft and shot down a North Vietnamese MiG-17 over Vietnam on November 1, 1966, almost twenty years after the aircraft had commenced its production life! This was not the first instance of such actions. On 20 June 1965 four Skyraiders from VA-25 of the USS Midway, took on two Russian-built MiG-17’s and, in a running battle, one MiG was shot down and the second had to leave the scene damaged.
Able to absorb incredible damage this aircraft gained the respect of its pilots and ground crew alike. The Navy finally retired their Skyraider fleet during 1971; just over three years after four-seat EA-1Fs of Detachment 11 (US Navy squadron VAQ-33) flew the last counter-measure mission.
The USAAF had sought a replacement for the Douglas B-26 Invaders and converted North American T-28 trainers. It was found in the Skyraider, especially the A-1E, A-1H and A-1J versions. The nickname “Spad” was quickly adopted for these aircraft as much due to the respect its counterpart had earned in a war some fifty years earlier for its robust airframe. The Spad was tough, simple to maintain, easy to fly and able to hang around the battle zone with a respectable weapons load for quite some time. They were also able to operate out of some pretty ordinary airstrips, even with a heavy load, and this made them extremely versatile. The Spads were in operation as late as June 1972, conducting “Sandy” operations where the Skyraider flew as escort to a rescue helicopter. At the end of 1972 the Vought A-7 Corsair had replaced the Skyraider and the main user of the Spad became the Vietnamese Air Force.
|
THE KIT |
Nice box art, separate plastic bags, nice crisp moldings, excellent instructions. Of course, this must be a Tamiya kit! It is true; the kit is well presented with separate plastic bags for various components, which includes little black plastic lugs for bombs and auxiliary fuel tanks as well as the propeller. The instructions sheet contains ten pages of concise, easy to follow steps with an additional sheet showing the three models that may be built out of this kit, including Va-176, the review subject. The decals are crisp although the colour rendering of the chosen subject is a little too red and prompted some aftermarket decals from Cutting Edge.
 Tamiya
seems to be a little light on in the cockpit area for my tastes, although later
kits are an improvement. I could detail with scratch building but tend to go for
aftermarket goodies as they do a much better job of it than my meager skills
could produce. Hence I opted for the Cutting Edge Super detailed cockpit
set for the Skyraider, although it does sometimes pay to check references
before embarking on such substitutions. In my case the model I was depicting was
an A-1H from USS Intrepid and was responsible for shooting down a MiG-17 in a
dogfight. Tamiya had the correct seat for the model, an aluminium bucket
seat and not the Yankee seat as given in the aftermarket resin set. My problem
was that I discovered my oversight well after the cockpit had been constructed
and glued into place. I should have read the aftermarket instructions more
closely, although it is mentioned on the decal sheet and NOT the resin
instructions! Nonetheless it was used, especially after going to the extra
trouble of painting up a complicated ejection seat and mechanism! My apologies
to the purists as, although it is historically incorrect, it is there and looks
good.
Tamiya
seems to be a little light on in the cockpit area for my tastes, although later
kits are an improvement. I could detail with scratch building but tend to go for
aftermarket goodies as they do a much better job of it than my meager skills
could produce. Hence I opted for the Cutting Edge Super detailed cockpit
set for the Skyraider, although it does sometimes pay to check references
before embarking on such substitutions. In my case the model I was depicting was
an A-1H from USS Intrepid and was responsible for shooting down a MiG-17 in a
dogfight. Tamiya had the correct seat for the model, an aluminium bucket
seat and not the Yankee seat as given in the aftermarket resin set. My problem
was that I discovered my oversight well after the cockpit had been constructed
and glued into place. I should have read the aftermarket instructions more
closely, although it is mentioned on the decal sheet and NOT the resin
instructions! Nonetheless it was used, especially after going to the extra
trouble of painting up a complicated ejection seat and mechanism! My apologies
to the purists as, although it is historically incorrect, it is there and looks
good.
Tamiya paints are referred to throughout, no real surprise, although it does irk me that they can’t refer to the correct FS numbers, which are readily available. Still, it presents no great problem for someone with Internet access to people and information – My thanks to Roger Jackson for confirming the correct colours for these Naval birds. I did suspect that USAF Light Gray was somehow not the colour to use, besides it is enamel and I was going to use acrylic in the majority of cases.
Tamiya also have supplied two different wheel hubs as separate from the wheels. This is a very neat idea and makes painting the wheels much easier. The clear parts are very crisp, as are the panel lines, something that is taken for granted from a manufacturer of this caliber, although I do wonder why the ejector pin marks are sometimes in positions so difficult that it requires micro surgery to fix the problem. This is certainly the case with the inside of the front wheel bay doors. Still it is a minor gripe on an otherwise great kit.
|
CONSTRUCTION |
The Cockpit
 As
mentioned above the cockpit was consigned to the spares box with the
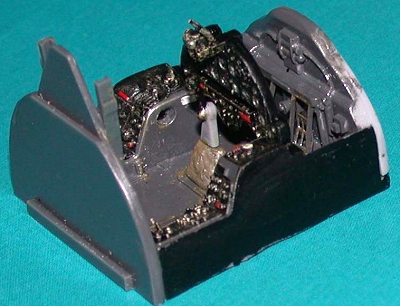
substitution of a Cutting Edge Super detailed resin set. The resin
set contains the cockpit tub, aforementioned Yankee ejection seat, instrument
panel and a covered and uncovered canopy/ejection mechanism. The latter is a
direct replacement for the kit part as the Yankee mechanism replaced the roll
over bar behind the cockpit, supplied in the kit.
As
mentioned above the cockpit was consigned to the spares box with the
substitution of a Cutting Edge Super detailed resin set. The resin
set contains the cockpit tub, aforementioned Yankee ejection seat, instrument
panel and a covered and uncovered canopy/ejection mechanism. The latter is a
direct replacement for the kit part as the Yankee mechanism replaced the roll
over bar behind the cockpit, supplied in the kit.
With resin the first trick is to clean the parts
with a soapy solution to remove any mold releasing agent and then, very
carefully remove the casting blocks from the parts. Cutting Edge resin is
quite easy to work with and I usually have no problems. This case was no
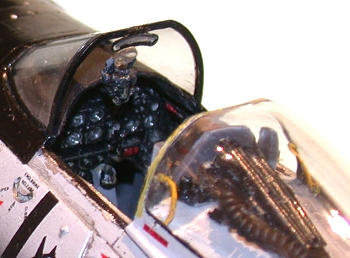
exception. The cockpit tub and sidewalls were painted in Tamiya XF24 and
the consoles and instrument panel painted in Tamiya X18, Semi gloss
Black. The instruments dials were painted flat black and the details dry brushed
with white. Individual control knobs and levers were painted in Tamiya red and
yellow and white as found in my photo references. The dials were then given a
drop of Testors Clear to simulate the glass.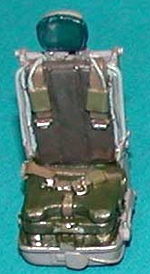
The Yankee seat was painted as per my photo references with the seat frame being painted the same colour as the cockpit, XF24 and the cushions being a mix of Olive Green and Olive Drab. The headrest was painted in a metallic green to simulate what appears to be vinyl or very odd coloured leather. Details were dry brushed with aluminium and the seat buckles were painted in X11 Chrome Silver. The “O” shaped pull ring and the “L” shaped handle on the right hand side of the seat were painted yellow with black stripes. The whole arrangement slides down into the ejector rails on little spigots and was glued into position.
The gun sight required a little paring before fitting comfortably under the instrument fairing and was painted semi gloss black and given a dry brush with a mixture of enamel silver and artists oil burnt sienna. This imparts a “bronze” finish and gives a well-worn look. The reflector glass was round and not rectangular, as displayed in the kit, and was punched out of clear acetate using a Waldron punch and die set.
 The rudder pedals are supplied as photo etch in
the resin kit and were shaped by rolling them over some brass pipe and then
securing them to the forward bulkhead. The sidewalls were attached to either
fuselage half, after sanding away the kit details. Some care was needed to align
the sidewalls and the cockpit tub to ensure that the rear bulkhead had the
correct alignment. Everything was dry fitted before using the good old glue your
fingers together cyanoacrylate!
The rudder pedals are supplied as photo etch in
the resin kit and were shaped by rolling them over some brass pipe and then
securing them to the forward bulkhead. The sidewalls were attached to either
fuselage half, after sanding away the kit details. Some care was needed to align
the sidewalls and the cockpit tub to ensure that the rear bulkhead had the
correct alignment. Everything was dry fitted before using the good old glue your
fingers together cyanoacrylate!
Once all the cockpit details had been completed the fuselage halves were glued together and put aside to set. I went away and had a nice little lie down.
The Fuselage and Wings
I normally cut the control surfaces to give some dynamics to the model. This usually involves the rudder being offset to the right, the tailerons being depressed and the ailerons being offset to follow the rudder. This kit involved the same thought processes and resulted in these surfaces being removed from the whole once the relevant parts had been cemented together. Now in the case of all surfaces it was necessary to fill the gaps left from the surgery. This was also the case for the wings, tailplanes and fin. It was also necessary to add bits of plastic card where the connections were accidentally removed. This proved to be a boon as these surfaces were all to be painted the underside colour of Gloss White and made the need to mask off these areas unnecessary. Always knew this anal activity would prove useful one day!
 I had elected not to display the three speed
brakes in the open position so glued the side panels onto the fuselage and the
lower brake into its recessed panel. It is a shame as the internal detail is
quite good, but unless these brakes were being tested they were normally closed
once on the ground, or deck. I also connected all the Aero 14 pylons to the
wings and the centerline pylon prior to painting the model. This would make it
easier for painting later, at least that was the thought.
I had elected not to display the three speed
brakes in the open position so glued the side panels onto the fuselage and the
lower brake into its recessed panel. It is a shame as the internal detail is
quite good, but unless these brakes were being tested they were normally closed
once on the ground, or deck. I also connected all the Aero 14 pylons to the
wings and the centerline pylon prior to painting the model. This would make it
easier for painting later, at least that was the thought.
The wings require that the wheel bays be attached before the halves are glued. Eduard photo etch was substituted for the wheel door hinges as well as details inside each well. It was also necessary to remove the dorsal antennae to clean up the seam, aft of the lower speed brake.
The engine, the R-3350 twin bank radial
Cyclone, is quite well presented in the kit. I painted the cylinder rows
Tamiya XF56 Metallic Grey and the pushrods silver. I attached the twin spark
plug leads to each of the cylinders using fine wire coated with black plastic.
It was necessary to choose whether the cowl flaps were to be displayed open or
closed and this impacted on the inner cowling flaps as the two operated
together. I elected to have the cowling flaps open and the inner ones were
likewise presented as open, allowing the engine to be viewed. The inner flaps
and cowling were painted with Gloss White. The
 two magnetos and the oil cooler,
the latter occupying the 6 o’clock position, were painted the same Metallic Grey
and the crankcase cover plate was painted in Silver. A propeller governor
control linkage was added from the Eduard photo etch set and painted black. It
was glued to the bellcrank housing directly behind the propeller boss.
two magnetos and the oil cooler,
the latter occupying the 6 o’clock position, were painted the same Metallic Grey
and the crankcase cover plate was painted in Silver. A propeller governor
control linkage was added from the Eduard photo etch set and painted black. It
was glued to the bellcrank housing directly behind the propeller boss.
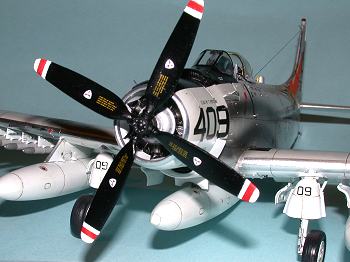
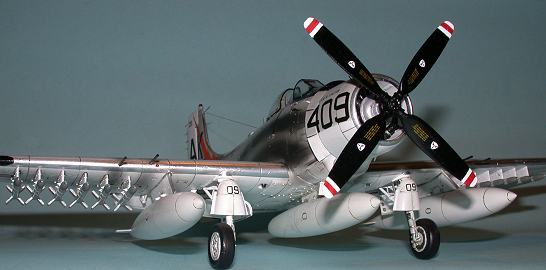
The kit propeller was substituted using the resin parts, which come as separate blades and boss. It locates onto the poly cap given in the kit. The blades and the boss were painted with semi gloss black and the propeller tips painted white with a red stripe. These colours are given as decals in both the kit and aftermarket decal sets, however they didn’t quite extend across the blade width, hence the painting.
The exhaust pipes were painted with Gunze Sangyo Burnt Iron and each tube was given a little drill treatment to extend the pipe depth. The exhausts were added to the engine/cowling sub assembly after the fuselage had been painted.
Undercarriage
The main undercarriage of the Able Dog is very well presented in the kit, with the tyre being attached to the inner hub, complete with disc and three-piston caliper, and the outer hub separate. This makes it very easy to paint the parts. Tamiya have engineered a positive location for each wheel in the form of a vertical tab on the hub of the strut. All that is required is to ensure the caliper is set towards the rear of the hub. The main struts and the rear wheel were painted in Gloss White, with the oleos being painted with enamel Chrome Silver.
The tyres were painted with Gunze Sangyo Tire Black and the rear wheel was augmented with Eduard photo etch. In addition this part was upgraded by removing some of the plastic on the lower block, which the kit part shows as solid.
All the wheel bays were painted with Gloss White, although Tamiya calls for these parts to be painted with Flat White. They were given the weathering treatment with water colour washes after all the aircraft had been painted.
|
PAINT & DECALS |
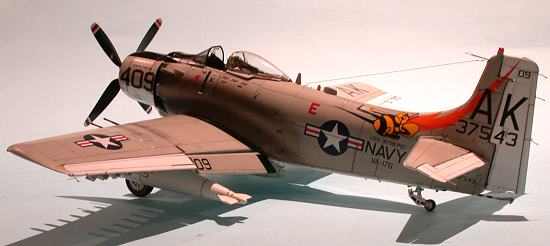
Aside from the little bits and pieces that require separate painting this aircraft is relatively easy to paint. The first thing that was carried out was a pre shade. Something that I rarely do as I have had little success with the final product. As this aircraft would be painted in light gull grey I figured it would show the shading quite well. I believe the final effect was worth the extra effort, although it is almost impossible to see from the photographs. Please note that only the upper surfaces and sides of the aircraft were shaded as these would have been more prone to the effects of the sun. The lower surfaces were left untouched and got the weathered treatment after painting.
 I used Aeromaster Acrylic Gloss White on the lower surfaces and up the
side of the engine cowls, which were depicted as open. The insides of the engine
had been previously sprayed with gloss white and were masked off for the
fuselage painting. The engine sub assembly was tacked onto the fuselage and the
engine opening stuffed with tissue until after everything had been sprayed.
I used Aeromaster Acrylic Gloss White on the lower surfaces and up the
side of the engine cowls, which were depicted as open. The insides of the engine
had been previously sprayed with gloss white and were masked off for the
fuselage painting. The engine sub assembly was tacked onto the fuselage and the
engine opening stuffed with tissue until after everything had been sprayed.
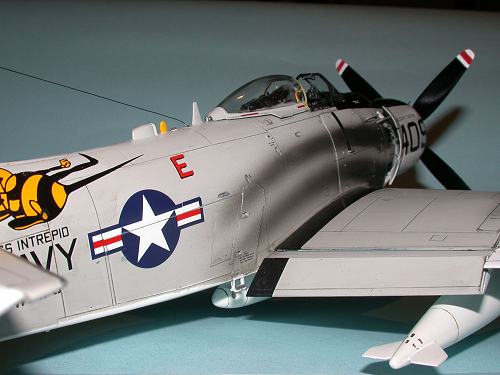
Once the Gunze Sangyo acrylic FS26440, Light Gull Grey had been sprayed the forward canopy was attached to the fuselage and masked with the BlackMagic masks. The area forward of the cockpit was masked in preparation for the semi gloss black, which extends forward to the leading edge of the engine cowl. This is the first time I have used these masks and can say that they are easy to use and work well. I had no paint bleeding under them and the surfaces were relatively complex, especially the canopy hood.
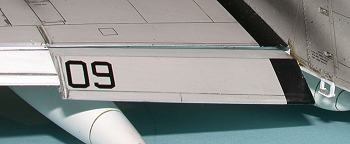
Once the paint had dried the leading edges of the engine cowl, tail fin, tail plane, wing pylon leading edges and wings were covered with Bare Metal Foil Aluminium. For once I had no problems with this operation other than an edge lifting up every so often. As I spray clear over the model once the decals and weathering has been applied this was not going to be an issue – fingers are now crossed!
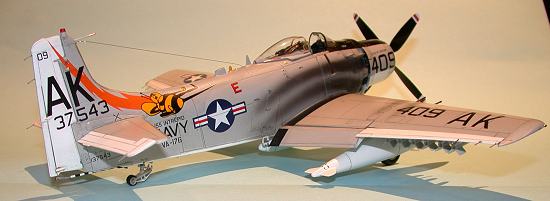
Having all the painting completed it was time to apply the decals. I had opted to use the aftermarket Cutting Edge Skyraider set that contains the VA-176 “Thunderbolts” AK409, the MiG killing Able Dog. These decals are superb and the instructions are very clear. I also used the stencil set form the same company. I would like to point out here that the kit does come with these decals and are quite comprehensive. It is only that the colours for the lightning bolt behind the bee are incorrect in the kit, being too red, that caused me to use the aftermarket stuff. Seems a little anal in the final analysis, especially as I ended up using the Yankee seat not fitted to this aircraft at the time of the shooting down of the MiG!
Once the decals were on and the setting solution cleaned off the model was then weathered with watercolours.
The final act of painting this aircraft was to apply the exhaust smoke so prevalent on these propeller driven aircraft. This was done by the application of thinned Tamiya Smoke in successive coats. Gunze Sangyo Oil was also thinned and dribbled down across the centerline auxiliary fuel tank and back along the undersides of the fuselage behind the oil cooler.
 I am not all that sure about the extent of the weathering I ended up achieving,
it looks a little overdone. However, having read quite a bit about these birds
and discussing the grimy appearance of the operational aircraft, it would appear
to be OK. Be the judge and if you think it’s overdone let me know. I am always
happy to receive “constructive criticism”!
I am not all that sure about the extent of the weathering I ended up achieving,
it looks a little overdone. However, having read quite a bit about these birds
and discussing the grimy appearance of the operational aircraft, it would appear
to be OK. Be the judge and if you think it’s overdone let me know. I am always
happy to receive “constructive criticism”!
Armament
The particular aircraft I chose to depict had a variety of stores that could be carried. Tamiya present most, if not all of them and in a fairly unique manner, with the fuel tanks and the AN-M66A2 2,000 lb bombs having poly caps located internally allowing them to be removed for different posing. I had elected to use all the fuel tanks on the centerline and two inner pylons and use the 5-in (127-mm) HVAR (High Velocity Aircraft Rockets) unguided air-to-ground rockets on the Aero 14 pylons. This configuration was the state of the aircraft when it shot the MiG down, although the rockets were not successfully employed. In addition to the stores already mentioned the Skyraider also had four M3 20-mm cannons located between the inner pylon and the Aero 14 pylons on both wings. Each cannon had 200 rounds of ammunition.
Other stores that could be carried by this versatile aircraft were Mk 82 500 lb bombs, Mk 81 250 lb low drag bombs, Suu-11A rocket launcher each containing 4 x 5-in folding fin rockets and 5-in folding fin air-to-ground rockets. It is also known that the Spad was also capable of delivering a toilet bomb! The honour (?) went to an A-1H of VA-25 aboard the USS Midway during 1965, and it was dropped on an enemy target in Vietnam, along with the other more conventional ordinance. A shitty job but someone had to do it!
|
CONCLUSIONS |
 This kit was fairly easy to build with few problems
arising and none to difficult as to cause the author further loss of hair! There
was no flash in the kit and the only gripe was some ejector pin marks in the
inside of the front wheel well covers. I managed to get these covered with few
hassles. Other areas of the aircraft were easy to construct, as one would expect
with a Tamigawa product.
This kit was fairly easy to build with few problems
arising and none to difficult as to cause the author further loss of hair! There
was no flash in the kit and the only gripe was some ejector pin marks in the
inside of the front wheel well covers. I managed to get these covered with few
hassles. Other areas of the aircraft were easy to construct, as one would expect
with a Tamigawa product.
The use of the aftermarket decals may seem a little extravagant as this particular kit does contain the markings for the aircraft I wished to build. My choice of the Cutting Edge set was that they seem to be very accurate in most cases, especially with the colours of the lightning bolt. They were also spot-on with regards the kill markings on the side. If you chose not to use this set then the kit decals are more than adequate and you will end up with a great rendition of a famous Spad.
I thoroughly enjoyed the build and highly recommend having a go at doing one, even if the Spad is not your favourite aircraft.
|
REFERENCES |
Death From Above, Nicholls, M. Tamiya Model Magazine International Issue 80, June/July 2000
Douglas Skyraider, Wixey, K., Warpaint Series No. 18, Hall Park Books ISSN 1363-0369
Douglas AD/A-1 Skyraider, World Military Aircraft, File 087 – Series in progress
Walk Around A-1 Skyraider ,Barthelmes, E. and Dann, R. S., Squadron/ Signal Publications, Walk Around No. 27
If you would like your product reviewed fairly and quickly where it will be seen by well over 150,000 visitors a month, please contact me or see other details in the Note to Contributors.
Back to Reviews Page
Back to Main Page