| KIT #: | K48040 |
| PRICE: | $60-70.00 by the time you get it to your door. |
| DECALS: | Ten options |
| REVIEWER: | Tom Cleaver |
| NOTES: |
| HISTORY |
The Harrier, informally referred to as the Harrier Jump Jet, is a family of jet-powered attack aircraft capable of vertical/short takeoff and landing operations (V/STOL). Originally developed by UK manufacturer Hawker Siddeley in the 1960s, the Harrier emerged as the only truly successful V/STOL design of the many attempted during that era, despite being a subsonic aircraft, unlike most of its competitors. It was conceived to operate from improvised bases, such as car parks or forest clearings, without requiring large and vulnerable air bases. Later, the design was adapted for use from aircraft carriers.
 Aviation pioneer Thomas Sopwith, who lived to see the Harrier, remarked:
"I still don't believe the Harrier. Think of the millions that have been spent
on VTO in America and Russia, and quite a bit in Europe, and yet the only
vertical take-off aircraft which you can call a success is the Harrier. When I
saw the Harrier hovering and flying backwards under control, I reckoned I'd seen
everything. It's not difficult to fly."
Aviation pioneer Thomas Sopwith, who lived to see the Harrier, remarked:
"I still don't believe the Harrier. Think of the millions that have been spent
on VTO in America and Russia, and quite a bit in Europe, and yet the only
vertical take-off aircraft which you can call a success is the Harrier. When I
saw the Harrier hovering and flying backwards under control, I reckoned I'd seen
everything. It's not difficult to fly."
Despite what Sopwith said, the Harrier has been described by pilots as "unforgiving". It is capable of both forward flight (where it behaves in the manner of a typical fixed-wing aircraft above its stall speed), as well as VTOL and STOL maneuvers (where the traditional lift and control surfaces are useless) requiring skills and technical knowledge usually associated with helicopters. Most services demand great aptitude and extensive training for Harrier pilots, as well as experience in piloting both types of aircraft. Trainee pilots are often drawn from highly experienced and skilled helicopter pilots.
Two-seat Harriers were operated for training purposes; the body was stretched and a taller tail fin added. The RAF trained in the T.2 and T.4 versions, while T.4N and T.8 were training versions the Navy's Sea Harrier, with appropriate fittings. The US and Spain flew the TAV-8A and TAV-8S, respectively.
 The Harrier T.2, T.2A, T.4, and T.4A were used by the RAF, with the T.4
and T.4A equipped with the laser tracking nose of the GR 3; 25 were built. The
Harrier T.4N, T.8, were used by the Royal Navy while the T.60 was used by the
Indian Navy; avionics were based on the Sea Harrier. The USMC operated the
TAV-8A, powered by a Pegasus Mk 103.The Spanish Navy and later the Thai Navy
flew the TAV-8S Matador
The Harrier T.2, T.2A, T.4, and T.4A were used by the RAF, with the T.4
and T.4A equipped with the laser tracking nose of the GR 3; 25 were built. The
Harrier T.4N, T.8, were used by the Royal Navy while the T.60 was used by the
Indian Navy; avionics were based on the Sea Harrier. The USMC operated the
TAV-8A, powered by a Pegasus Mk 103.The Spanish Navy and later the Thai Navy
flew the TAV-8S Matador
The Spanish Navy, Thai Navy, Royal Air Force, and U.S. Marine Corps have all retired their first-generation Harriers. Spain sold seven single-seat and two twin-seat Harriers to Thailand in 1998, which were delivered as part of the air wing deployed on the new light aircraft carrier HTMS Chakri Naruebet. The Thai Navy had significant logistical problems keeping the Harriers operational due to a shortage of funds for spare parts and equipment. By 1999, two years after being delivered, only one airframe was in airworthy condition. The last first-generation Harriers were retired by Thailand in 2006.
| THE KIT |
Kinetic’s Harrier trainer is the first 1/48 injection-molded kit of the
trainer version and follows Kinetic’s release of the other first-generation
single-seat Harriers. As such, it is very similar to the other kits, with the
main differences being separate sprues for the longer fuselage and other
equipment. Other t han the sprue for the earlier fuselage, all the plastic parts
of the earlier kit are included here including the underwing ordnance, all of
which could be used by the Harrier trainer.
han the sprue for the earlier fuselage, all the plastic parts
of the earlier kit are included here including the underwing ordnance, all of
which could be used by the Harrier trainer.
The kit provides two separate noses, the original pointed nose for the T.2, T.4, T.8, TAV-8A and TAV-8S, and the laser nose from the GR 3 used on the T.4.
Decals include markings for three all-black FAA and a Sea Grey T.8, twp RAF T.4s and one T.4A. A USMC TAV-8A, and one Spanish and one Thai TAV-8S. There are stencils in white for the black FAA T.8s and black stencils for the other aircraft. These are done by Cartograph and are excellent.
| CONSTRUCTION |
At the outset, one admonition is necessary: when searching for parts, be certain to determine the sprue identification as well as the part number, since the sprues also include parts for the single-seat Harriers that are not right for the two-seater. In particular, be certain to use the correct wing - for some reason the single-seater wing is included, which differs from the two-seater wing in small but very important details.
 I started by assembling the wing. The control surfaces are separate, and
I put the flaps down. Since most of the photos I had of the T.8 I wanted to do
showed it with only the inboard pylons, I glued the outer pylon cover plate in
position at this time.
I started by assembling the wing. The control surfaces are separate, and
I put the flaps down. Since most of the photos I had of the T.8 I wanted to do
showed it with only the inboard pylons, I glued the outer pylon cover plate in
position at this time.
After pre-painting the cockpit parts, I proceeded with assembly. The cockpit is fairly simple, while photos of the cockpit show it quite busy. If anyone ever produced a more detailed resin cockpit for this kit, I would highly recommend it, since out of the box it is pretty Spartan. I solved the problem by finishing the model with the canopies closed, which also preserves the aircraft’s lines.
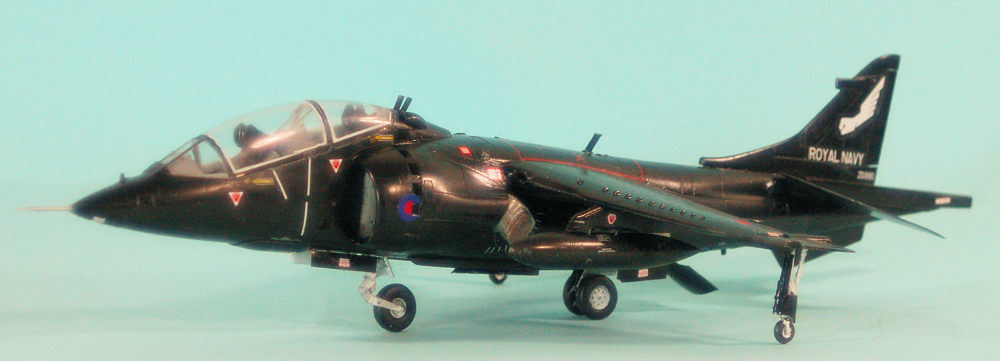
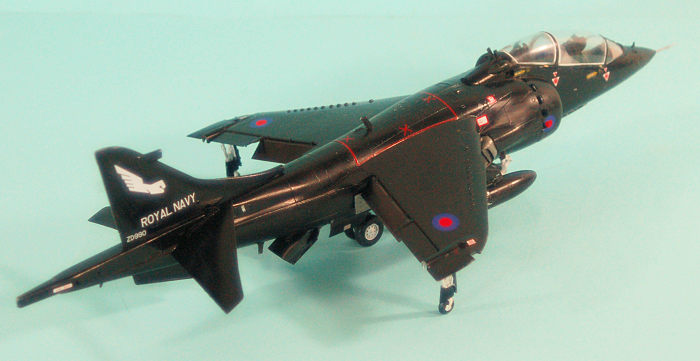
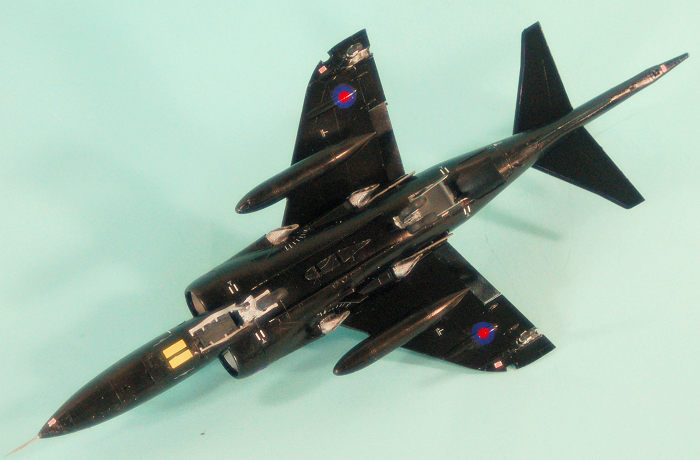
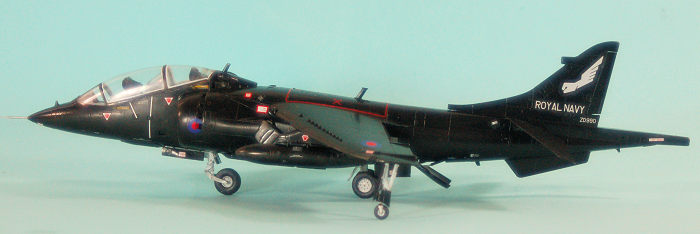
The cockpit sub-assembly and the wheel wells fit the fuselage without problem, and I closed everything up. I opted for the intake cover with the open blow-in doors and glued those in position. Fit was close enough that with care in assembly, I did not need to use any filler. The wing also fit to the fuselage without difficulty. I finished off by attaching the various antennas, and turned the horizontal stabilizers “up,” the position they take when the Harrier is fully shut down. I then attached the canopies after painting them on the interior.
| COLORS & MARKINGS |
 I first masked off the canopies and then painted white for the sealer,
which I then masked off. The wheel wells were painted Tamiya Gloss White, while
the rest of the airframe was painted overall Tamiya Gloss Black.
I first masked off the canopies and then painted white for the sealer,
which I then masked off. The wheel wells were painted Tamiya Gloss White, while
the rest of the airframe was painted overall Tamiya Gloss Black.
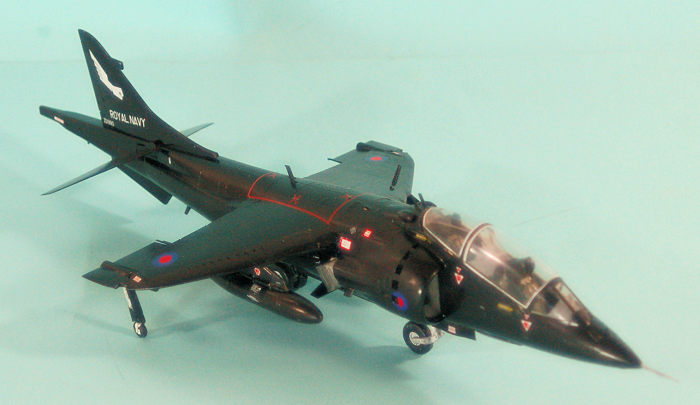
I decided to do T.8 ZD990, the airplane on the boxart. All the decals went down without problem with Micro-Sol. All the white areas are sufficiently solid that applying them over a dark color is not a problem.
I assembled and attached the landing gear and gear doors, then painted the entire model with satin-gloss clear, which is a good “scale approximation” of overall gloss on the full-scale airplane. I then unmasked the canopies.
| CONCLUSIONS |
Having seen a TAV-8A perform some 35 years ago at MCAS El Toro, I have always thought the trainer version was very interesting. I kitbashed a trainer with two Monogram AV-8A kits, but this kit by Kinetic is far superior. If the Harrier interests you, you’ll want one of these in your collection. It’s not difficult to build and the result is very nice.
26 January 2018
Copyright ModelingMadness.com
Thanks to Kinetic
for the review kit. If you would like your product reviewed fairly and fairly quickly, please
contact the editor or see other details in the
Note to
Contributors.
Back to the Main Page
Back to the Review Index Page
Back to the Previews Index Page