|
KIT: |
Hasegawa 1/48 F-104G Starfighter |
|
KIT # |
07220 (Pt 20) |
|
PRICE: |
$26.98 MSRP |
|
DECALS: |
Three options |
|
REVIEWER: |
Andrew Garcia |
|
NOTES: |
Victory Productions decals and CMK resin used |
|
HISTORY |
There are some excellent kit reviews and F-104 Starfighter information sources that you already have or have seen. Since this kit has been out for several years and extensively reviewed, my focus here is sharing the kit building experience with some resin bits added and not dwelling on the historical aspects of the subject. For the history lesson I would recommend these excellent texts for the F-104 in general:
One of the most significant differences a modeler must be aware of when building the F-104 is the variation in ejection seat versions used by F-104 operators. I found the best explanation of Starfighter ejection seats in the Crowoood Book by Martin Bowman. To assist myself in this building project and for the many other Hasegawa F-104’s I will be building, I created a Starfighter Ejection Seat Matrix finding much of the required information in the Bowman (Crowood) book on page 20. (see References)
Lockheed “C-1” Downward Firing Seats used by the USAF in early F-104A’s. This seat can be found in a resin version from Meteor Productions - Cutting Edge Modelworks ( CEC48261) Lockheed C-1 Ejection Seat WITH Belts for F-104A. If you want to use etched seat belts or your own paper and wire belts there is CEC48262 from Cutting Edge Modelworks Lockheed C-1 Ejection Seat WITHOUT Belts for F-104A.
 Lockheed “C-2” Upward Firing Seats found in F-104A/C and some “G”
aircraft – was used by the USAF, Belgium, Norway, Dutch, Turkey, Taiwan,
Jordan, Canada, Japan, Pakistan and early German aircraft. Some of the
resin “C-2” sources are Aires Resin # AI484102 Lockheed C2 Seats (early
F-104) , CEC48254 Cutting Edge Modelworks Lockheed C-2 Ejection Seat WITH
Belts for F-104/TF-104/CF-104 1/48, CEC48255 Cutting Edge Modelworks
Lockheed C-2 Ejection Seat WITHOUT Belts for F-104/TF-104 /CF-104 1/48. CMK
does not sell the seat as a separate product but does provide it in their
F-104 detail set.
Lockheed “C-2” Upward Firing Seats found in F-104A/C and some “G”
aircraft – was used by the USAF, Belgium, Norway, Dutch, Turkey, Taiwan,
Jordan, Canada, Japan, Pakistan and early German aircraft. Some of the
resin “C-2” sources are Aires Resin # AI484102 Lockheed C2 Seats (early
F-104) , CEC48254 Cutting Edge Modelworks Lockheed C-2 Ejection Seat WITH
Belts for F-104/TF-104/CF-104 1/48, CEC48255 Cutting Edge Modelworks
Lockheed C-2 Ejection Seat WITHOUT Belts for F-104/TF-104 /CF-104 1/48. CMK
does not sell the seat as a separate product but does provide it in their
F-104 detail set.
The Martin Baker GQ-7A Ejection Seat was used by the German AF and Marineflieger , Danish AF, AMI Italy, and Greece operators. The Hasegawa F-104G kit comes with the C-2 and MB GQ-7A seats. Resin aftermarket can be had from Aires Resin AI484111 MB GQ-7A Seats, CEC48256 Cutting Edge Modelworks Martin Baker GQ7 Ejection Seat WITH Belts for F-104G/TF-104G 1/48, and CEC48257 Cutting Edge Modelworks Martin Baker GQ7 Ejection Seat WITHOUT Belts for F-104G/TF-104G in 1/48th.
I am going out on a limb in this area since I have found conflicting statements in a variety of trusted publications. The Verlinden Lock-On #1 has color photos and technical drawings of the C-2 seat inside a Belgian F-104G on pages 14, 33, 34, and 35. The In Detail and Scale Vol. #38 books states on page 44 Belgium used the MB Q5. Also, some early German F-104’s used the C-2 seat and were later changed out for MB Q5 or MB GQ-7A seats so I am doing the best I can to sort out the issues.
For F-104G/J modeling detail purposes I found the Verlinden book to be the absolute best single reference. When working with the CMK resin parts it was a perfect combination answering all my “what does it really look like IN COLOR”! So the must have text for a modeler building the Hasegawa kit I would say is make sure you have the LOCK-ON # 1 'F-104G/J STARFIGHTER' authored by Hans Wilms, Francois Verlinden and Willy Peeters, published by Verlinden Publications, Lier, Belgium , ISBN : 90-70932-01-6 released in 1983 containing about 68 pages all in color!
|
THE KIT |
Out
of the box this kit gives you a nicely detailed cockpit with C2 or Martin
Baker GQ-7A ejection seats & boxed in wheel wells along with optional
position flaps, ailerons, leading edge flaps & speed brakes. Kit decals
provide markings for two
 West German AF, One Italian AF & One Royal
Netherlands AF - all in camouflage. There are several versions of the F-104
available from Hasegawa featuring the “C, G, J, S and CF” versions. My only
disappointment is the lack of underwing pylons and stores for those pylons.
Small details such as the extra fuel tanks with different tail fins
compared to the wing fuel tanks are also missing. Hasegawa, your kits are
wonderful but I can’t understand this oversight! Hopefully future releases
will have a small extra sprue with the Two or Four wing pylons and some
extra underwing tanks (note – they have different fins compared to the
asymmetrical wing tip tanks)!
West German AF, One Italian AF & One Royal
Netherlands AF - all in camouflage. There are several versions of the F-104
available from Hasegawa featuring the “C, G, J, S and CF” versions. My only
disappointment is the lack of underwing pylons and stores for those pylons.
Small details such as the extra fuel tanks with different tail fins
compared to the wing fuel tanks are also missing. Hasegawa, your kits are
wonderful but I can’t understand this oversight! Hopefully future releases
will have a small extra sprue with the Two or Four wing pylons and some
extra underwing tanks (note – they have different fins compared to the
asymmetrical wing tip tanks)!
If you look closely at the leading edge of this kit it looks like the red felt pad used on stationary F-104’s (due to the very sharp leading edge) is moulded onto the kits leading edge. My advice is paint this area red or use a thin decal strip to get a straight line! If you build one wheels up and in flight you should sand off this edge. I will be adding the Victory Productions Product ID: VPR48001 , 1/48 Kormoran AS Missile Set with pylons to really finish this aircraft in the future.
F-104G changes from other F-104 versions:
1. Larger vertical tail
2. Additional hard-point under each wing. See Bowman book for photo on pg. 83.
3. Lockheed C2 upward firing ejection seat for most versions (except see # 6 below).
4. Larger main landing gear and wheels-tires requiring bulged wheel covers.
5. Full span combat flaps added to the wing leading edge.
6. Martin Baker, MB MK.GQ-7A ejection seats installed in German versions in 1967. Some GQ-5 versions also used by Germany. Italy also used the MB GQ-7A seats.
7. Note - Belgium, Norway, Holland, and Turkey ONLY used the Lockheed C2 seat with their “G” versions.
8. Add a red anti-collision beacon to the top and bottom of the fuselage on German F-104G’s. The “G” used by other operators did not have this feature since it was a retrofit and late production manufacturing change order for German aircraft.
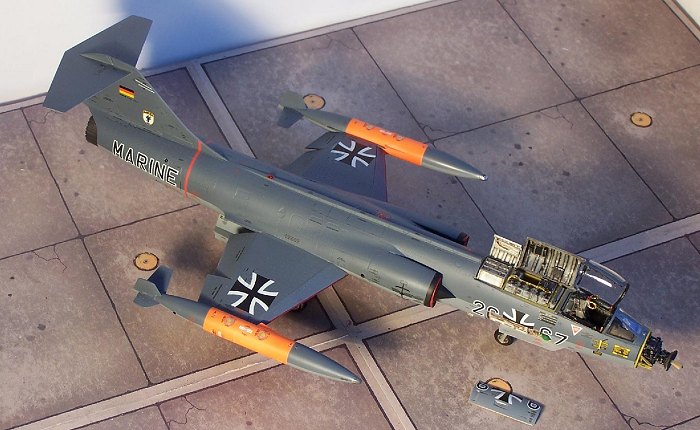
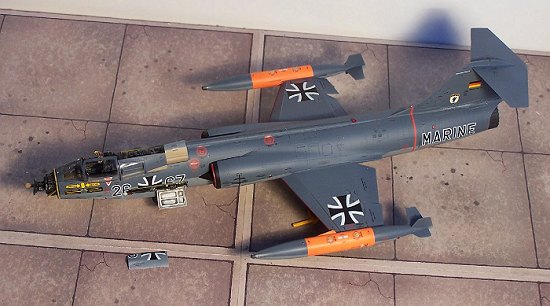
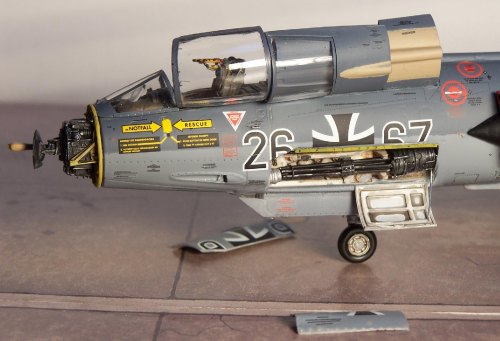
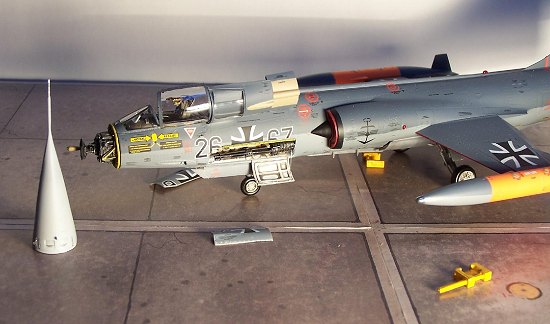
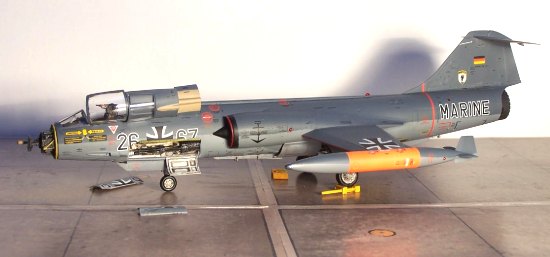 Along
with the Hasegawa kit # 07220 F-104G, I used the Victory Productions
48-003 decal, item # 3 “26-67” , a Marineflieger aircraft from MFG1
Schleswig-Jagel . I incorporated the CMK Detail Set # 4098 – featuring a
Radar Array, circuit breaker and oxygen tank bay, with Lockheed C-2
Ejection seat. It also includes the Electronic “black boxes” bay , the
20mm M61A1 gun ammo box behind the ejection seat, and etched metal
instrument panel with clear plastic film for instrument dials. I also
added CMK Detail Set # 4099 which has a resin cockpit tub, C-2 Ejection
seat, opened (lower) dorsal J-79 engine bay with dropped cover, an open
20mm M61A1 Gatling gun bay, resin nose cone, resin landing gear bays.
Since the CMK sets had the C2 seats ( ie the wrong seats for a German “G”
version) I used Cutting Edge # CEC48256 Cutting Edge Modelworks Martin
Baker GQ-7A Ejection Seat with Belts for F-104G/TF-104G. This was a great
choice of a resin aftermarket ejection seat.
Along
with the Hasegawa kit # 07220 F-104G, I used the Victory Productions
48-003 decal, item # 3 “26-67” , a Marineflieger aircraft from MFG1
Schleswig-Jagel . I incorporated the CMK Detail Set # 4098 – featuring a
Radar Array, circuit breaker and oxygen tank bay, with Lockheed C-2
Ejection seat. It also includes the Electronic “black boxes” bay , the
20mm M61A1 gun ammo box behind the ejection seat, and etched metal
instrument panel with clear plastic film for instrument dials. I also
added CMK Detail Set # 4099 which has a resin cockpit tub, C-2 Ejection
seat, opened (lower) dorsal J-79 engine bay with dropped cover, an open
20mm M61A1 Gatling gun bay, resin nose cone, resin landing gear bays.
Since the CMK sets had the C2 seats ( ie the wrong seats for a German “G”
version) I used Cutting Edge # CEC48256 Cutting Edge Modelworks Martin
Baker GQ-7A Ejection Seat with Belts for F-104G/TF-104G. This was a great
choice of a resin aftermarket ejection seat.
|
CONSTRUCTION |
The
Hasegawa kit goes together well without any vices. You need to be careful
with attaching the inlets and depending on your skill just a small amount
of sanding should fix the slight alignment problems associated with this
area. The big question you are asking is – “So, what about the CMK resin
parts?” Yes, we all know this is the big challenge. Thanks to others
sharing their experience and knowledge in resin detailing I found by
careful constant dry fitting, careful cutting and wet sanding of resin and
kit plastic and a bit of Dremel motor tool grinding, everything went
together splendidly. At one time I thought my poor modeling skills resulted
in poorly fitting resin cockpits and detail sets. The truth is, since they
are precision castings with close tolerances to raise the detail standard
you must do a lot of sanding to make them work. They are not “drop in out
of the package” replacement parts. Remember, these are highly detailed
precision parts built to scale so the tolerance between items is very tight
reflecting the care in 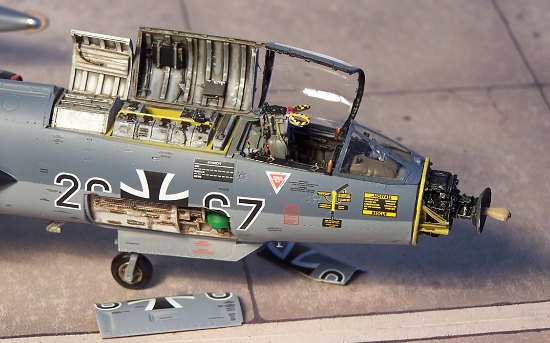 research and accurate dimensional modeling we now
enjoy. So… sand, dry fit and grind carefully and an average modeler like me
can come up with some nice results (or at least you feel you do!).
research and accurate dimensional modeling we now
enjoy. So… sand, dry fit and grind carefully and an average modeler like me
can come up with some nice results (or at least you feel you do!).
The CMK 20mm gun features metal rods for the gun barrels. This avoids the warping problem found with most thin and long resin parts. If you drill into the rear electrical motor area where the barrels are inserted, this assembly falls into place very smoothly without any frustration. You just need to increase the depth of the already existing hole with about five twists of a pin vise drill. Test fit the assembly to ensure the depth does not change the dimensions and the gun drops into place! If you don’t do this and just glue the gun parts together it will be a tough build and not fit in the gun box. Add a bit of light silver dry brushing as one of the final finishing steps and you will be a happy modeler with the results.
I must
admit I love to build resin cockpits and use Eduard etched parts , “when it
makes sense”. Some cockpits are wide open and they look great (because you
can look into them) when properly painted and weathered. I am not the type
of modeler who will spend hours detailing an interior if it cannot be seen.
Why not? I learned a lesson at a local IPMS club meeting which had a
monthly competition years ago. I took a 2nd place to a great
modeler who used the kit supplied decal along with some drybrushing
highlights to complete his cockpit. When I looked inside his cockpit by
borrowing a flashlight from one of those modelers who look for faults
(instead of admiring overall results) and the cockpit instrument dials and
 other details looked very nice! At my age I may not have many years of
modeling left so I frequently opt for using the kit decal overlaid on resin
tub parts rather than painting the cockpit instruments. With patience and
some decal softener to get the decal to wrap onto the parts the results are
fine.
other details looked very nice! At my age I may not have many years of
modeling left so I frequently opt for using the kit decal overlaid on resin
tub parts rather than painting the cockpit instruments. With patience and
some decal softener to get the decal to wrap onto the parts the results are
fine.
I once spent two months on a beautiful Jaguar Typhoon resin and etched cockpit using the etched and film instrument panel backing, painting and drybrushing individual instruments, knobs and dials. I got a lot of personal satisfaction from the cockpit construction and detailing, which turned out to be a kit in itself (and I would do this one again!). Once I installed the cockpit I felt let down that most of that effort was hidden from view. I have since migrated towards using decals over the resin cockpit parts or even over the kit plastic console and instrument panel, if they are well done mouldings, for most of my builds. Currently my approach is to use a resin seat “with” the resin belts which is a very visible component, and invest the time in other areas.
|
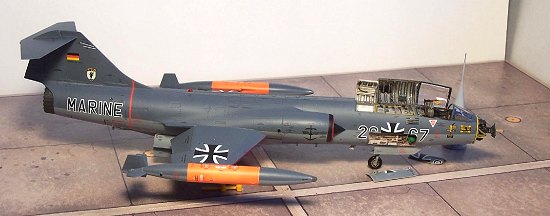
COLORS AND MARKINGS |
Painting:
I used a mixture of Gunze Sangyo acrylic paints # H42 and H337 Blue Gray on the topside with some H307 Dark Ghost Gray on the bottom to match color photos. The Hi-Viz wing tanks were my biggest color match success. I used Gunze H11 Flat White as a base coat. When it was totally dry I sprayed them with Gunze H98 Fluorescent Orange. After a few days of drying time I used Testors gloss coat heavily thinned which had the effect of slightly eating through the Gunze orange to give me the whitened orange effect prevalent in weathered German F-104G wing tank photos. Look at the cover of the Klaus Kropf text German Starfighters as a starting point on this coloration subject.
Decals:
I used the Victory Productions sheet 48-003 “West German Luftwaffe and Marine F-104 Starfighters" to do a Marine F-104G “26-67” of MFG1. The decal and associated stencils were amazing. The decal and stencil placement guide brought my understanding of what went where and appreciation for these decals and the Hasegawa kit moulding to a new level! Outstanding decals to say the least – very highly recommended. I was lucky to have purchased two sets of these when it was released.
|
FINAL CONSTRUCTION |
 I chose
not to drill the holes for the insertion of clear fuselage lights on this
build. I was making so many cuts and joins for the resin parts that this
seemed to be too much work for me at this time. I chose to use Testors
enamel Chrome Silver for the fuselage lights then painted them with blue,
green, orange and red Tamiya clear paint where indicated. I will use the
Hasegawa clear light parts in future builds just to make a comparison but
it will be on an OOB effort. I also added an upper fuselage and lower
fuselage red beacon light using the Cutting Edge CEC48164 clear/colored
shaped formation lights. The large fuselage anti-collision beacons are
missing from the kit but clearly visible in photographs and on page 55 of
the Detail and Scale Vol. 38 text. This was mysteriously missing from the
Hasegawa kit clear parts contents and the fuselage moulding. Since it is
mainly a German F-104G feature I understand the reluctance of putting the
beacons on the plastic fuselage parts – but it should be on the clear parts
tree.
I chose
not to drill the holes for the insertion of clear fuselage lights on this
build. I was making so many cuts and joins for the resin parts that this
seemed to be too much work for me at this time. I chose to use Testors
enamel Chrome Silver for the fuselage lights then painted them with blue,
green, orange and red Tamiya clear paint where indicated. I will use the
Hasegawa clear light parts in future builds just to make a comparison but
it will be on an OOB effort. I also added an upper fuselage and lower
fuselage red beacon light using the Cutting Edge CEC48164 clear/colored
shaped formation lights. The large fuselage anti-collision beacons are
missing from the kit but clearly visible in photographs and on page 55 of
the Detail and Scale Vol. 38 text. This was mysteriously missing from the
Hasegawa kit clear parts contents and the fuselage moulding. Since it is
mainly a German F-104G feature I understand the reluctance of putting the
beacons on the plastic fuselage parts – but it should be on the clear parts
tree.
|
CONCLUSIONS |
Hasegawa’s F-104 Starfighter series are a very enjoyable build. Whether you build them OOB or take the path I did on this build and add some of the resin bits available from aftermarket providers you will be delighted with your final results. I have used products from all the major resin providers and want to recognize CMK for their outstanding detail provided at affordable prices. They seem to know what parts are best produced in resin and where to use etched metal for stunning detail since they include both in their sets.
An
example with this kit would be the gun barrels for the 20mm gun. They are
metal rods – not resin. In the past I have found components like these
provided by other suppliers to be in resin which warps or etched metal that
you have to roll and shape on a thin rod or wire. That’s the kind of
challenge I find a waste of time that ends up with poor results. CMK did it
100% right. It was a small effort to assemble and not at all unachievable.
With the last years decline in dollar based currency
 values versus Euro
manufactured products these European sourced resin bits will turn out to be
good investments if you purchased them before the last 12 months! CMK’s
price still makes it a bargain worth getting today!
values versus Euro
manufactured products these European sourced resin bits will turn out to be
good investments if you purchased them before the last 12 months! CMK’s
price still makes it a bargain worth getting today!
If there were an award to be given for decals, I would nominate the Victory Productions F-104 sheet for choice in subject matter, research, color profiles and excellent decal quality. While it seemed a bit expensive when I first bought it, after using the sheet it too was great value for the price and worth the MSRP. I am looking forward to Victory Productions doing a similar job with the F-104C/G and S versions of other countries as well – Paul Cotcher - please and thank you if you do this for us!
An imminent release from Victory Productions , Product ID: VPD48005 is an F-104 USAF, USN and NASA Starfighters decal sheet that is “Coming soon!”. Markings for nearly every US operated Starfighter including all ADC, ANG and TAC units - featuring all four squadrons of the 479th TFW will be on this sheet! I will be getting a few of these!
Note, the CMK resin set has the duck-bill shaped radar emitter very well done. I also have the Verlinden resin set for another F-104 build and that set seems to have the AN/ASG-14T-1 fire control system radar which features a shorter rod shaped emitter. Reference photos for the radar arrays can be found in Lock-On #1 page 44 and 45 (awesome all angles color photos) which match the CMK resin perfectly! The radar in the Verlinden resin set looks like the three color photos in Detail and Scale Vol. #38 page 35 “Radar Colors” of the AN/ASG-14T-1 used in early F-104’s and trainer versions. So many F-104’s to build and so little time!
|
REFERENCES |
1) Lockheed F-104 Starfighter in the Crowood Series authored by Martin W. Bowman with Matthias Vogelsang , published by The Crowood Press , ISBN: 1 82126 314 7 costing $49.95 USD or $ 37.50 at Roll Models, published in 2000 in English and sometimes found under Specialty Press product # SP131513 Lockheed F-104 Starfighter.
2) The two F-104 In Action books by Squadron Signal Publications: # 1027 F-104 Starfighter In Action Authored by Lou Drendel , ISBN : 0-89747-026-5 containing about 50 pages published in 1976 and the second release # 1135 F-104 Starfighter In Action by Phillip Friddell ISBN : 0-89747-299-3 also about 50 pages published in 1993 which has more information on the foreign ( non–USA) operators than the first release.
3) In Detail & Scale No. 38 'Lockheed F104 Starfighter' authored by Bert Kinzey and now reissued by Squadron Books ISBN : 0-8306-5051-1-2 with 72 pages of facts, figures and detail photographs published in 1991.
4) For this particular project the text, German Starfighters – The F-104 in German Air Force and Naval air Service authored by Klaus Kropf and published by Midland Counties Publications (book # MC124 at Roll Models for $25.50) in 2002 was invaluable. This English language text was just what I needed to get a background in German F-104’s to complement the Victory Productions decal sheet used in this project. The text is a highly illustrated and authoritative study by a former German F-104 pilot. It includes technical details, bases, individual aircraft notes, lists of pilots, losses and much more with 85 color and 298 black/white photos in 176 pages. I initially did not buy the book after seeing some reviews and forum comments that were saying in effect “it was an OK text but” it did not have many “new” photos or information. So much for “experts” - that was my mistake. I am very pleased I bought it and regretted the delay in buying it!
June 2004
Review kit , resin and decals courtesy of my large stash.
If you would like your product reviewed fairly and quickly by a site that has over 250,000 visitors a month, please contact me or see other details in the Note to Contributors.