|
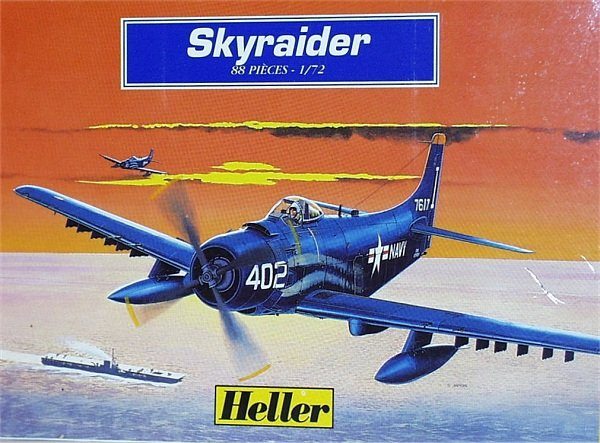
KIT: |
Heller 1/72 A-1 Skyraider |
|
KIT # |
71037 |
|
PRICE: |
$6.00 NZD |
|
DECALS: |
One aircraft |
|
REVIEW & |
Mark Fordham |
|
NOTES: |
Kit includes paint and glue |
|
HISTORY |

The prototype of the Skyraider was first flown on 18 March 1945 and was designed
as a multi-role attack aircraft for the US Navy, the carrier-based Skyraider was
able to carry a wide variety of weapons on its numerous wing hardpoints.
The Skyraider first saw combat in the Korean War, where its ability to carry
almost anything in the US aircraft weapons arsenal and deliver it with pinpoint
accuracy gave it an advantage over the fast new jets that were just entering
into service. The Skyraider could absorb almost anything that could be
thrown against it. An ability that was necessary for a ground attack aircraft
Various versions were developed over the years; the most numerous types being:
AD-1 ( With 2500hp R-3350 engine); AD-2 (Improved AD-1 with wheelwell covers and
increased fuel load, etc.); AD-3 (Redesigned canopy, improved propeller, etc.);
AD-4 (2700hp R-3350 engine, further canopy improvements, etc.); AD-4W (3-seat
Early Warning version); AD-5 (4-seat multirole version. AD-6 (Single-seat attack
version)
There were many nicknames of the Skyraider during it’s career, and was
affectionately known as Able Dog, Sandy, Spad, Hobo, Zorro, The Big Gun, Firefly
Old, Fat Face (AD-5 version), Guppy (AD-5W version), Q-Bird (AD-1Q/AD-5Q
versions) and my personal favourite The Flying Dumptruck (A-1E).
|
THE KIT |
Why oh why…Is he even bothering with such an
ancient kit when better and more modern ones are available, do I hear you ask?
Well for a couple of reasons, this is such a basic kit even for it’s age that
most people wouldn’t even consider buying one
So there’s very little information or reviews out there on the Heller
offering. (Methinks that verily, this be the Airfix kit in a boxing of the
French variety. Ed)
 After all, Heller's Rapid kits are targeted at the first time modeller (And we
wonder why modellers are small in numbers), even my 6 year old son who has ten
or so models under his belt, turned his nose up at this one… oh dear! And
Secondly, I’m not one to turn away from any model and could see the
opportunity to practice almost all the modelling skills one needs to improve
their expertise without stuffing up that $30 Tamiya Masterpiece. So let’s have
another look at it.
After all, Heller's Rapid kits are targeted at the first time modeller (And we
wonder why modellers are small in numbers), even my 6 year old son who has ten
or so models under his belt, turned his nose up at this one… oh dear! And
Secondly, I’m not one to turn away from any model and could see the
opportunity to practice almost all the modelling skills one needs to improve
their expertise without stuffing up that $30 Tamiya Masterpiece. So let’s have
another look at it.
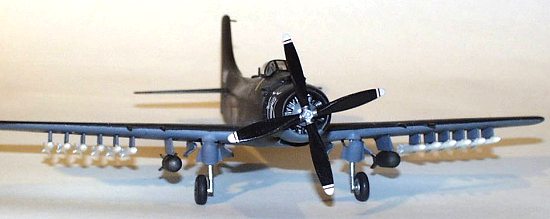
The kit has 88 parts of very hard and very brittle silver plastic - circa late
1960’s Airfix, raised detail lines and rivets the size of dinner plates …oh
I LOVE those. No interior detail apart from a seat so covered in ejector pin
marks it looked like it has been chewed by the dog and a pilot that has 1/48th
Scale Head. Toy wheels and Working folding wings and a very thick canopy.
Oh boy this is going to be a doozy, oh but you do get the tube glue, brush, dark
blue and black paint thrown in as a bonus.
|
CONSTRUCTION |
 First step was to cut all the major components off the sprue, then viscously
attack the entire airframe with 360 grit to remove the raised panel lines and
dinner plates, progress to 600 grit and then finally finished off with a little
trick that I use to remove the fine sanding marks. I use the leg of my Denim
Jeans as a buffing cloth !
First step was to cut all the major components off the sprue, then viscously
attack the entire airframe with 360 grit to remove the raised panel lines and
dinner plates, progress to 600 grit and then finally finished off with a little
trick that I use to remove the fine sanding marks. I use the leg of my Denim
Jeans as a buffing cloth !
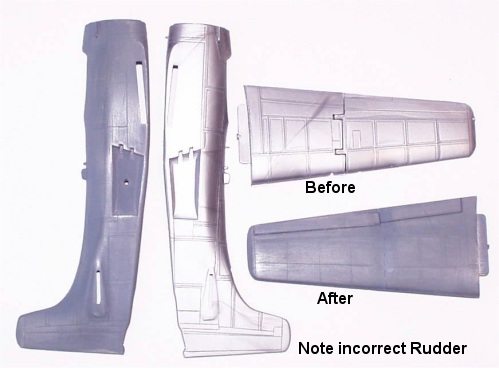
Then with consultation with three plan drawings used a combination of a steel
rule, modelling knife and razor saw to re-scribe the panel lines and fix the
incorrect rudder.
The Wings were glued in the down position and the sloppy fit was filled, sanded
and re-scribed. Some rudimentary detailing was added to the wheel wells using
sprue and plastic card, I aim for the look of detail rather that 100 % accuracy.
As you can see from the before and after photos a fair amount of work is needed
to lose the “toy” look of this kit.
Hellers Skyraider come with a very nicely moulded engine, in fact it is probably
the best feature of this kit. It’s a pity that it
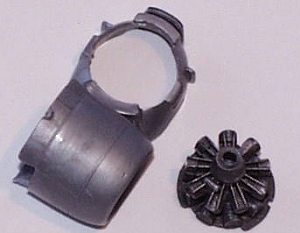 is inaccurate as it
doesn’t have the gearbox cowling or the retractable cooling air baffles.
Looking in the spares box produced no suitable replacements, not surprising really as I normally model Luft46 Aircraft and very few of them were fitted with
Wright R3350 radial engines. Out with the plastic card again and hope that big
prop hides most of the mess!
is inaccurate as it
doesn’t have the gearbox cowling or the retractable cooling air baffles.
Looking in the spares box produced no suitable replacements, not surprising really as I normally model Luft46 Aircraft and very few of them were fitted with
Wright R3350 radial engines. Out with the plastic card again and hope that big
prop hides most of the mess!
Fuselage was glued together next, along with the wings and tailplanes, then out
with the filler and lots of it. The starboard fuselage required lots of filler
to smooth it in. In fact most joints require some filler, sigh! I’m starting to get a complex
about this kit, Two days of work later, the basic airframe was finished and it
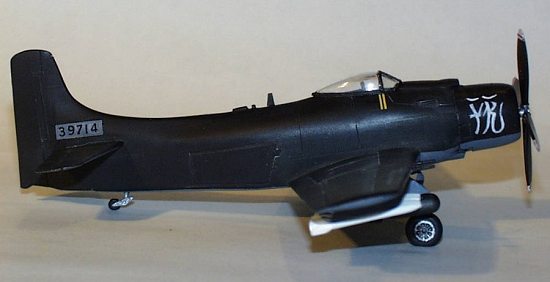
was time for the undercarriage, The kit wheels needed a fair amount of cleaning
up to be useable
and with the addition of some black wash and highlighting the
undercarriage struts lo were used.
Hard points were cleaned up, thinned to about half their thickness then attached
to the undersides.
The Skyraider comes with two under scale Drop tanks and twelve 5-in HVAR
air-to-ground rockets that are a bit on the heavy side, The drop tanks were
ditched but the rockets were cleaned up and after the fins were thinned down
painted white and added to the hardpoints. Two bombs were added from the spares
box in place of the tanks.
|
PAINT & MARKINGS |
The Kit comes with one set of marking for an overall blue VA-42 402 Navy bird.
Now what I know about Post WWII US Navy aircraft can be written on a postage
stamp and I wanted to add something different to my motley collection of
odd-balls.
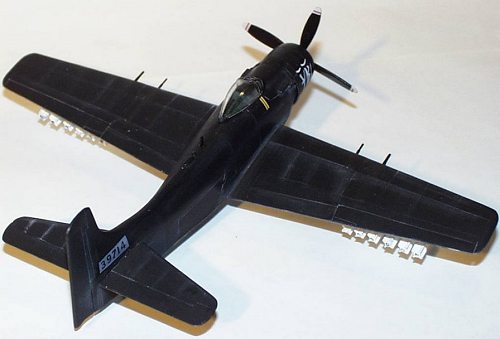 After flicking through various photos of the A-1 I came across a matt
black/grey A-1H of 83rd Special Operations Group based at Tan Son Nhut in 1966
almost devoid of markings apart from tail codes and elaborate symbols on
the cowling. These symbols are based on the Vietnamese card game of Co-Bai-Bat,
played in the North. Only people from the North understood the meaning of them.
If anybody can tell me the meaning of them please feel free to e-mail me. As no
decals were available it was a perfect chance to practice the art of hand
painting.
After flicking through various photos of the A-1 I came across a matt
black/grey A-1H of 83rd Special Operations Group based at Tan Son Nhut in 1966
almost devoid of markings apart from tail codes and elaborate symbols on
the cowling. These symbols are based on the Vietnamese card game of Co-Bai-Bat,
played in the North. Only people from the North understood the meaning of them.
If anybody can tell me the meaning of them please feel free to e-mail me. As no
decals were available it was a perfect chance to practice the art of hand
painting.
As these aircraft were passed on from the US Navy the undersides and wheel wells
are painted in the standard US Navy colours, Grey undersides and white
wheel-wells.
The upper surface of this aircraft was painted matt black that showed lots of
weathering. I used various shades of pastel chalks for this. Finally a light
cost of matt varnish was misted over to seal in the pastels and fingerprints.
The only photo of this aircraft (39714) that I could find was a side shot
showing no insignia on the fuselage. After researching as much as I could find
about the A-1’s of 83rd SOQ the six or so photos showing flying A-1’s
didn’t show any insignia on the upper wings, so I’m picking that this bird
is without them as well.
After applying the tail codes the only other marking needed were two small
yellow stripes below the cockpit and the nose symbols, these were hand painted
using a 00 brush. As these marking were roughly applied in the field, mine were
applied in the same spirit.
|
CONCLUSIONS |
 I would recommend this model if you, like me, fall into the mediocre class of
modeller who wants a practice kit that needs lots of work just to make an
average model. It is on par with the very early Airfix offerings but with worse
fitting parts.
I would recommend this model if you, like me, fall into the mediocre class of
modeller who wants a practice kit that needs lots of work just to make an
average model. It is on par with the very early Airfix offerings but with worse
fitting parts.
I’m not happy about the “look” of the Heller's A-1 Skyraider, I’m not a
modeller that fusses with total accuracy at this scale as long as it “looks”
right. But this kit just doesn’t look right, maybe some of you US Navy
guru’s could point me in the right direction.
To add a decent A-1 to your collection go for the Tamiya 1/48 Skyraider.
All paints used in this review were Tamiya enamels.
|
REFERENCES |
AirPlane Part 105 “Great Aircraft A-1 Skyraider Super Spad” http://vnaf.net
and various WWW sites
Terry Miesle’s wonderful M2 Review on the Tamiya 1/48 AD-4
If you would like your product reviewed fairly and quickly by a site that averages over 2,800 visits a day, please contact me or see other details in the Note to Contributors.