Revell 1/139 KC-135A Stratotanker
|
KIT # |
4523 |
|
PRICE: |
$? |
|
DECALS: |
One aircraft |
|
REVIEW : |
|
|
NOTES: |
|
HISTORY |
The first KC-135 rolled off the Boeing assembly line in 1956. According to the company’s online history of the aircraft, it was the only jet designed specifically for aerial refueling, and for 15 years was the only tanker the Strategic Air Command flew. The "Stratotanker," as the plane was called, replaced piston-engined KC-97 aircraft, which could not keep up with the ever-faster jet fighters and bombers being fielded in the 1950s. During the Vietnam War, KC-135s made 813,000 aerial refuelings of combat aircraft. The tanker also starred in the Gulf War, making nearly 18,700 hookups and transferring 278 million pounds of fuel.
Boeing built 732 KC-135s as aerial tankers. The original model KC-135A was powered by four J57 turbojets. As later models (the E and R turbofan versions) came into Air Force service, the "As" were transferred to Air National Guard units.
|
THE KIT |
 With a copyright date of 1957
stamped on the horizontal stabilizer, I knew the kit wasn’t going to be
exactly state-of-the-art! Yet despite its age, Revell’s Stratotanker is
reasonably accurate and significantly less expensive on the secondhand market
than the current Welsh 1/144 vacuform model. All the parts are molded in silver
plastic. For an old mold, there was little flash evident. The biggest drawback
of this kit is the golf ball-sized rivets -- hundreds of them -- that cover the
fuselage and wings. I’ve read that the fuselage also is too long, the result
of being derived from Revell’s 707/720 kit. The upper wing surfaces near the
fuselage lack prominent bulges seen on the real aircraft.
With a copyright date of 1957
stamped on the horizontal stabilizer, I knew the kit wasn’t going to be
exactly state-of-the-art! Yet despite its age, Revell’s Stratotanker is
reasonably accurate and significantly less expensive on the secondhand market
than the current Welsh 1/144 vacuform model. All the parts are molded in silver
plastic. For an old mold, there was little flash evident. The biggest drawback
of this kit is the golf ball-sized rivets -- hundreds of them -- that cover the
fuselage and wings. I’ve read that the fuselage also is too long, the result
of being derived from Revell’s 707/720 kit. The upper wing surfaces near the
fuselage lack prominent bulges seen on the real aircraft.
Revell’s KC-135 has some curious engineering -- even for 1957 -- particularly a top/bottom wing half joint that runs right through the upper surface of the engraved flaps and spoilers! The front and rear parts of the engine nacelles, which are natural metal on the full-size aircraft, are delineated by engraved panel lines. The port cargo door is a separate piece, allowing the option of displaying it in the open position so that the cargo "net" can be seen. Of the control surfaces, only the rudder is a separate part. The main and nose gears are simplified compared to the real thing, and only the main wheel wells have (bogus) detail. No clear parts for the windshield or boom operator’s window are included.
|
CONSTRUCTION |
I started by sanding all the major parts with 220-, 400-, and finally, 600-grit sandpaper to expunge those $%#&*^@ rivets and smooth out the surfaces. This proved harder than it looked. Every time I thought I’d gotten rid of them all, I noticed a few I’d missed. Of course, this also removed all the other raised details including panel lines, but I wasn’t worried about scribing them on a 1/144 airliner-type model.
 Fit of the fuselage halves
wasn’t too bad, but I did use a narrow line of CA glue as filler along the
entire length of the seam. I glued the cargo and crew doors on the port side
closed and filled their edges, since I intended to use a homemade decal for the
cargo door and the crew hatch is delineated by a kit decal. By far, the worst
fitting parts of the kit were the upper and lower wing halves. No matter how
much I sanded the pieces to refine the joints, both wings still suffered from
steps and gaps. I tried filling the seams with CA glue, but ended up
slathering the stuff over the entire wing section aft of the seams. It took
multiple sand-and fill sessions to eliminate pinholes and achieve an acceptably
smooth surface. I then re-engraved all the flaps and spoilers using a scribing
tool. The wing-to-fuselage fit also required considerable attention. I was able
to seal the upper joints with CA glue, but the lower joints needed thin sheet
plastic shims before receiving the fill-and-sand treatment.
Fit of the fuselage halves
wasn’t too bad, but I did use a narrow line of CA glue as filler along the
entire length of the seam. I glued the cargo and crew doors on the port side
closed and filled their edges, since I intended to use a homemade decal for the
cargo door and the crew hatch is delineated by a kit decal. By far, the worst
fitting parts of the kit were the upper and lower wing halves. No matter how
much I sanded the pieces to refine the joints, both wings still suffered from
steps and gaps. I tried filling the seams with CA glue, but ended up
slathering the stuff over the entire wing section aft of the seams. It took
multiple sand-and fill sessions to eliminate pinholes and achieve an acceptably
smooth surface. I then re-engraved all the flaps and spoilers using a scribing
tool. The wing-to-fuselage fit also required considerable attention. I was able
to seal the upper joints with CA glue, but the lower joints needed thin sheet
plastic shims before receiving the fill-and-sand treatment.
The horizontal stabilizer itself mounted to its cutout fine, but the lower fuselage part that traps it in place left yet another huge step at its joint. After all the other mismatches, the fit of the engine nacelle halves around the engine/pylon parts was surprisingly good, and I only used a tiny bit of filler.
Most of the kit gear doors were unacceptably thick. I scrounged in my spares box for some marginally better nose gear doors from an Airfix 707-400. I posed them open, because I was able to document that position in at least one photo. Apparently, it also was common for the doors to be closed on the ground. I used the kit parts for the inner main gear doors, but scratchbuilt scale-thickness outer doors. I left the main and nose gear and wheels off until I’d painted the entire model. The backs of several main wheels needed sanding to remove some of the hub thickness.
|
PAINT & DECALS |
The kit instructions are somewhat confusing on paint and decal placement unless you’ve done some homework. In one step, they would have you paint the nacelle forward sections red. In the final assembly diagram, silver is specified. The instructions also don’t mention an overall color; presumably, Revell intended for the plane to be the dull silver color of the parts. The instructions make no mention of several decals that go on the starboard side of the plane. Only the port side is depicted.
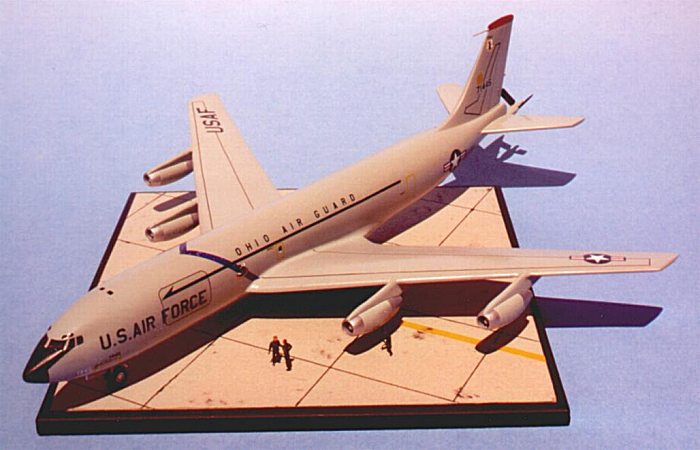
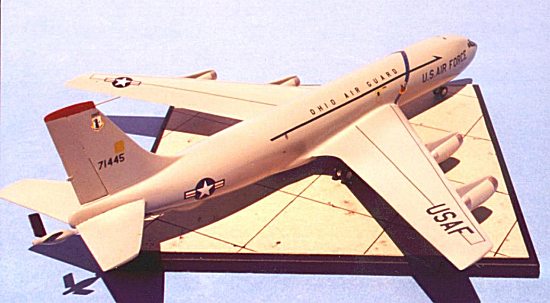
The kit markings represent an Ohio Air National Guard KC-135A of early 80s vintage. Based on my research, I decided to paint the aircraft overall Testors Model Master (MM) Aircraft Gray lightened with about 20 percent MM Insignia White. The gear wells, landing gear and interior gear door surfaces were painted flat white, then given a coat of Future. To tone down the too-glossy look of the paint job, I gave the model a couple airbrushed coats of MM Semi-Gloss.
 The decals themselves went on
with relatively few problems, but all of them were backed with milky adhesive
that I removed with gentle strokes of a large, soft paintbrush. Placed according
to the instructions, the blue SAC bands didn’t meet at the top of the
fuselage. I filled in with some decal bits from a British Airways Boeing 737
sheet, and daubed pinpoints of white paint as "stars" on the blue
background. Before putting on the large "Ohio Air Guard" markings with
their associated black stripes, I cut each into three parts for easier
placement. All the decals responded well to Micro-Sol.
The decals themselves went on
with relatively few problems, but all of them were backed with milky adhesive
that I removed with gentle strokes of a large, soft paintbrush. Placed according
to the instructions, the blue SAC bands didn’t meet at the top of the
fuselage. I filled in with some decal bits from a British Airways Boeing 737
sheet, and daubed pinpoints of white paint as "stars" on the blue
background. Before putting on the large "Ohio Air Guard" markings with
their associated black stripes, I cut each into three parts for easier
placement. All the decals responded well to Micro-Sol.
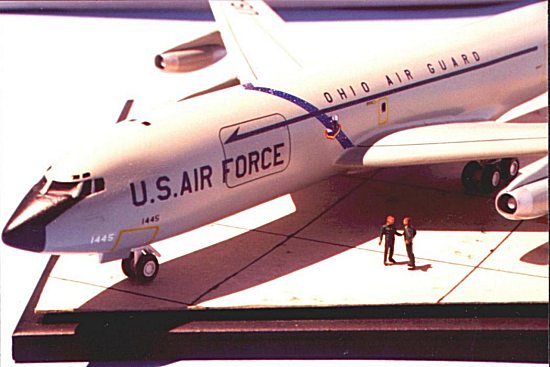
The kit does not include the black wingwalk striping that appears in almost every KC-135 photo I’ve seen. Although I couldn’t document that this particular tanker had such markings, I decided to add them using a combination of homemade laser-printed stripes and decals from a DML 1/200 B-52, which matched perfectly. I ran off a black-outline door on a laser printer and used it on the cargo hatch. I also painted the top of the vertical stabilizer MM Insignia Red.
I filled in the main cockpit windows with gap-filling CA glue, and then painted them MM Aircraft Interior Black. I used spare 707 window decals for the upper cockpit windows. Small squares of black decal film represented the windows over the galley area, the boom operator’s viewport and the openings in the mid-fuselage emergency doors.
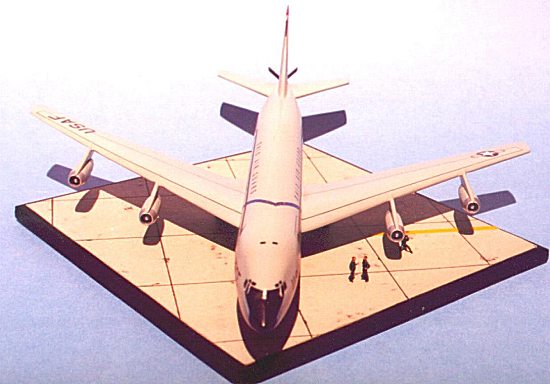
Since airplanes are flown and maintained by people, I include crew figures in my displays whenever possible. The three figures I used are from Preiser’s well detailed but hard-to-find 1/144 German/NATO pilot and ground crew set. The concrete surface that my Stratotanker sits on is cut from the back of a model box lid, suitably decked out with inked tar lines and spotted with drybrushed "oil stains."
|
CONCLUSIONS |
OK, so the model is a bit off in length and it’s pretty sparse on details. Not having seen the Welsh kit, I can’t say how the Revell version compares. I can say that, after a good bit of work, my model sure *looks* like a KC-135A – and that’s what counts for me!
|
REFERENCES |
Kinzey, Bert, Boeing 707 Detail & Scale, Kalmbach Publishing Co.
Boeing website, www.boeing.com/defense-space/military/kc135-strat
Federation of American Scientists website, http://www.fas.org/nuke/guide/usa/bomber/kc-135.htm
Copyright ModelingMadness.com.
If you would like your product reviewed fairly and fairly quickly, pleasecontact the editor or see other details in the Note to Contributors.