Revell/Matchbox 1/72 DHC-6 Twin Otter
| KIT #: | ? |
| PRICE: | €10.00 |
| DECALS: | Two options |
| REVIEWER: | Gordon Zammit |
| NOTES: | Matchbox mold. |
| HISTORY |
 After
producing a series of excellent short take-off and landing piston engined
aircraft, DeHavilland Canada, came out with the designs of
two twin engined turboprop powered
aircraft, first the
After
producing a series of excellent short take-off and landing piston engined
aircraft, DeHavilland Canada, came out with the designs of
two twin engined turboprop powered
aircraft, first the
| THE KIT |
The Twin Otter was first issued by Matchbox in
the early eighties. It was one of their later issues before their demise, and
thankfully is not one of those trench covered kits. It has since been reissued
first by Modelcraft of 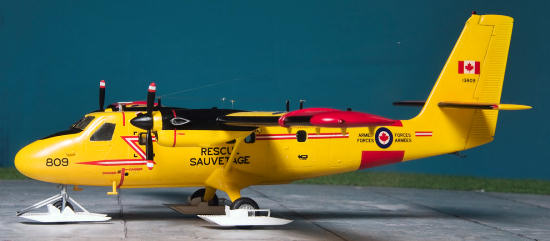 the ski
version or the floatplane version. What the kit is missing are the larger tyres
that are mostly fitted to military Twin Otters. As yet I haven’t found a source
for these, either by using the wheels from another kit or from an aftermarket
company. If anybody reading this knows from where to get these, I would very
grateful if you let me know! Also the kit does not include the masts on top of
the fuselage for the aerials on the CAF version: still the Revell instructions
shows them and suggests the use of thread for the aerials on the painting and
decal placement 4-view diagrams.
the ski
version or the floatplane version. What the kit is missing are the larger tyres
that are mostly fitted to military Twin Otters. As yet I haven’t found a source
for these, either by using the wheels from another kit or from an aftermarket
company. If anybody reading this knows from where to get these, I would very
grateful if you let me know! Also the kit does not include the masts on top of
the fuselage for the aerials on the CAF version: still the Revell instructions
shows them and suggests the use of thread for the aerials on the painting and
decal placement 4-view diagrams.
Otherwise the kit seems to be quite good
(although rather basic) start for a model of the DHC-6. Surprisingly, there
aren’t aftermarket decal sheets covering military Twin Otters although there is
a wide variety for civil operators. The Modelcraft offering did (I think it is
no longer available) have the decals for a British Antarctic Survey and
| CONSTRUCTION |
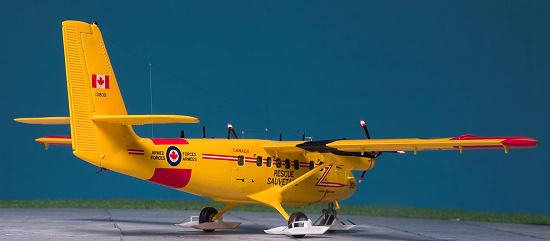
The Revell instructions start by showing 4 side
views of the aircraft: A: short nose land plane in Canadian Armed forces
markings, B: long nose land plane in Aurigny Air Service markings, (Both options
being provided with the kit), C: short nosed ski plane with no markings and D:
floatplane with no markings as well. Pictures on
www.airliners.net and other on-line
aviation website show that the Canadian Armed planes were sometimes configured
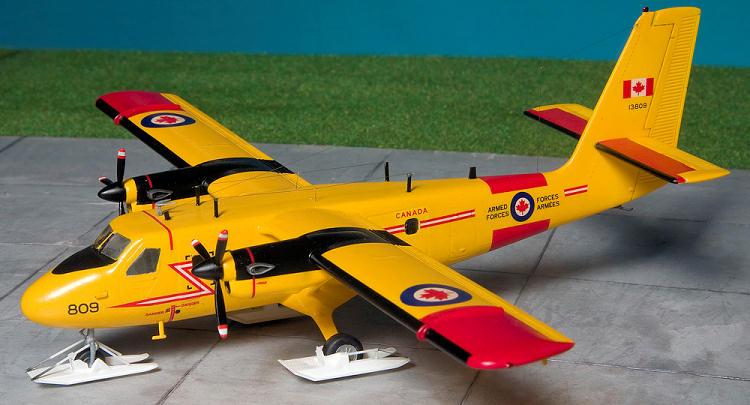
as both the C and D versions. I did not find number 809 which comes on the decal
sheet with either floats or skis, but I assume that sometime in its lifetime if
must have been so
 configured
especially with skis (well for me it’s no big deal if it never wasn’t, but at
least the option was there and it could have been). So I chose to model the CAF
version with skis on.
configured
especially with skis (well for me it’s no big deal if it never wasn’t, but at
least the option was there and it could have been). So I chose to model the CAF
version with skis on.
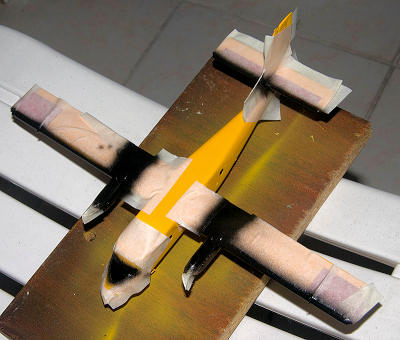
Step 1 starts as usual with the cockpit, which
is well catered for as not much will be visible when the kit is done. It has a
floor and two seats and the twin control column which is well done when compared
to the real thing. This is glued to the bulkhead, and the rest of the interior
is completely blank. If keeping all the doors closed, this is no big deal as
nothing will be visible. If doing the float version you should open the holes
for these, otherwise place the windows and close the fuselage halves. I did not
put the small square windows preferring to fill them with Krystal Klear when the
kit is finished. The nose section is also a two part assembly. Revell suggests
placing a 20g weight in the nose for all versions, but I can’t imagine the
floatplane being a tail sitter! I placed as much as I could in the short nose,
and it was just enough. Next the wings are assembled with the flaps and ailerons
actuator fairings and engine nacelles. I did not glue the propellers but just
placed the engine fronts. Matchbox moulded the propellers in a “running”
position and not feathered as they are automatically set on the
 Some
filling and sanding is required in the area around the engines, but nothing too
serious. I left the exhausts off to be placed in the final step after they are
sprayed separately. Here I did not follow the instructions as these suggest you
first glue the wings and then the undercarriage and afterwards the wing strut. I
first glued the undercarriage and after this dried I glued the wings and struts
together to get them meet perfectly while the glue still hasn’t cured. This way
seems a more reasonable way I think. Next went the tailplanes which are just
glued in and set at a perfectly flat position. I glued the wheels halves
together and tried to test how the skis fit over them. They wouldn’t fit as the
place where the wheels should go through is filled with plastic! It might be
that Matchbox did mould them to be so as the C diagram at the start of the
instructions does not show the wheels coming through the skis as in photos, but
I started to cut this part out to get the wheels coming out of the middle of the
skis. The shape and size of the skis however seems to be very close to the real
ones, so I don’t know if it was a mistake in the mould or not originally. The
pitot tubes were glued on, the windscreen masked and glued in place, and it was
time for the painting.
Some
filling and sanding is required in the area around the engines, but nothing too
serious. I left the exhausts off to be placed in the final step after they are
sprayed separately. Here I did not follow the instructions as these suggest you
first glue the wings and then the undercarriage and afterwards the wing strut. I
first glued the undercarriage and after this dried I glued the wings and struts
together to get them meet perfectly while the glue still hasn’t cured. This way
seems a more reasonable way I think. Next went the tailplanes which are just
glued in and set at a perfectly flat position. I glued the wheels halves
together and tried to test how the skis fit over them. They wouldn’t fit as the
place where the wheels should go through is filled with plastic! It might be
that Matchbox did mould them to be so as the C diagram at the start of the
instructions does not show the wheels coming through the skis as in photos, but
I started to cut this part out to get the wheels coming out of the middle of the
skis. The shape and size of the skis however seems to be very close to the real
ones, so I don’t know if it was a mistake in the mould or not originally. The
pitot tubes were glued on, the windscreen masked and glued in place, and it was
time for the painting.
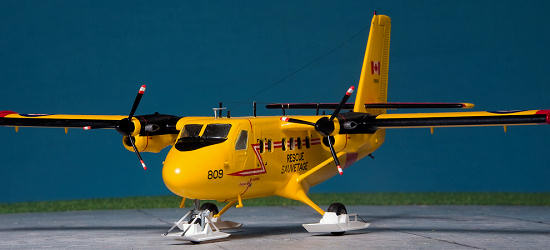
| COLORS & MARKINGS |
As this is a yellow paint job, it is usual to
call for some primer, but since the plastic was all white and I only used white
putty, I tried applying Humbrol 69 directly. It took several coats to get a good
cover and next time I will first apply some flat white before as it will save
time and yellow coats for sure. After it was coated overall in yellow and drying
for a couple of days, the red areas on the
 wing tips
and tailplanes were masked off and I applied some red which I had mixed for a
French CL-415. I had lightened some Humbrol 19 red with H69 yellow to match the
red on the decal sheet of the Heller CL-415 water bomber in Securite Civile
markings that come with that kit. The red band on the decal sheet of this Twin
Otter seems quite close to the red painted areas on the CL-415, so I decided to
try to use it. At one point I was thinking to mask and spray the band too, but
looking at the finished CL-415 I was convinced that in the end it is very
difficult to tell where there is paint and where there are decals (and probably
it was because I knew that I was seeing any difference). So after another couple
of days of drying time, some more masking was made to airbrush the matt black
areas. Meanwhile the propeller tips were first airbrushed in white and then
masked to apply some red to get red-white-red tips.
wing tips
and tailplanes were masked off and I applied some red which I had mixed for a
French CL-415. I had lightened some Humbrol 19 red with H69 yellow to match the
red on the decal sheet of the Heller CL-415 water bomber in Securite Civile
markings that come with that kit. The red band on the decal sheet of this Twin
Otter seems quite close to the red painted areas on the CL-415, so I decided to
try to use it. At one point I was thinking to mask and spray the band too, but
looking at the finished CL-415 I was convinced that in the end it is very
difficult to tell where there is paint and where there are decals (and probably
it was because I knew that I was seeing any difference). So after another couple
of days of drying time, some more masking was made to airbrush the matt black
areas. Meanwhile the propeller tips were first airbrushed in white and then
masked to apply some red to get red-white-red tips.
The colour scheme in the kit is the older
(1981) one before the propellers were painted in the black and white with one
blade opposite the other two painting scheme similar to RAF Tucanos and
Bulldogs. They should be in red-white-red and not white-red-white as the
instructions suggest (although the b&w diagrams have a shaded area on the
outside and white in the middle). These were then masked off to be painted black
with the other parts on the aircraft. Humbrol satin black (85) was airbrushed
and after drying the masking was removed. After some days, I airbrushed Johnsons
Klear, and this is something I cannot get right yet! I ended up with the orange
peel finish, and was very disgusted as until now most of the process was going
very well. I later decided to apply another coat by brush but the original
orange peel effect still persisted. Not know anything else to try, I decided to
continue the build and live with it. I applied the decals which although a
little on the thick side, did not perform badly. The same
 Klear was
used as a setting solution and helped where there are larger decals on compound
curves such as the red band around the fuselage, although some wrinkling is
still visible. The decals are also not very opaque, and after applying the
roundels, the white portion still looked yellowish. I turned to the decals in my
second copy of the kit, and applied these over the first, but as you can see
from the photos they are still not white. I wish that some kit maker, or even at
least the decal makers, would start providing us with a set of white decals the
same size as the other decals for overlaying these on some bright or dark
coloured schemes.
Klear was
used as a setting solution and helped where there are larger decals on compound
curves such as the red band around the fuselage, although some wrinkling is
still visible. The decals are also not very opaque, and after applying the
roundels, the white portion still looked yellowish. I turned to the decals in my
second copy of the kit, and applied these over the first, but as you can see
from the photos they are still not white. I wish that some kit maker, or even at
least the decal makers, would start providing us with a set of white decals the
same size as the other decals for overlaying these on some bright or dark
coloured schemes.
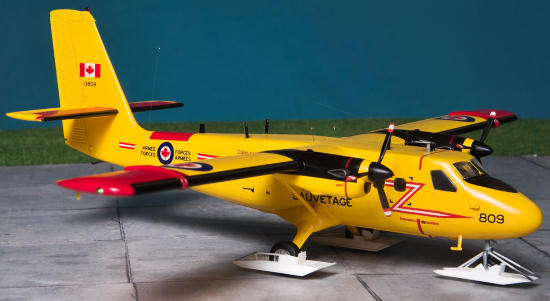
As you might notice in photos when comparing
these to the real aircraft, the cheat lines are a little short of the roundel. I
made a mistake here as I first applied the red band decals, which are separate
upper and lower part, then applied the cheat line decal which is divided in 4
sections, and the part that comes up to the roundel also covers the last 2
windows, thus having to be placed over them to get the correct position. After
these had dried, I applied the roundel decal and this ended up not in line with
middle of the fuselage band. I left this to dry and put the model aside for a
couple of days, then I decided to turn to the second decal sheet of which I had
already used the wind roundels. I sanded away the misplaced decal with a 1200
grit sandpaper and water so as not to damage the yellow paint. Very slowly I
managed to remove the decals on both sides with only a hint of white showing,
but a little touch up hid everything, and this was also covered by the decal
later on. I then lined up the roundel with the middle of the band and applied a
strip of the cheat lines from the second sheet of decals as well. It’s still not
perfect if you look at the real CAF Twin Otters carrying the scheme, but looking
at the model it’s not very obvious. Should I redo this scheme, I would start by
placing the roundel first, then lining up the other decals with it, although I’m
sure it will still be problematic.
| FINAL CONSTRUCTION |
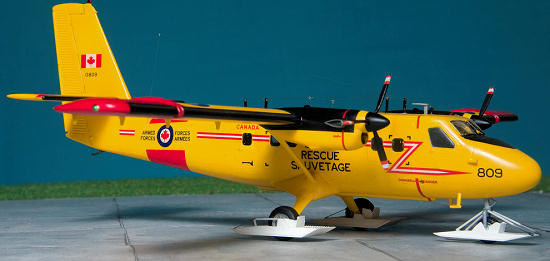 After
several days, I sprayed the model with a coat of Humbrol satin varnish and after
another few days, I started to attach the aerial masts on top of the aircraft.
These were all painted black before attaching, and super glue was used to fix
them in place. Fishing line was used to make the aerials and was painted
afterwards with Model master metalizer paint. The wheels were then attached, and
the skis, which had already been painted white, were also glued in place. As I
stated earlier, some trimming is required to get a better shape. Some struts
holding the skis were made from evergreen plastic and thick paintbrush bristles.
The bumper on the lower tail was also fixed in place. The masking was removed
from the windscreen, and the side windows were filled in with Krystal Klear
after removing the excess carrier film of the cheat line decals. The exhaust
pipes were also attached to the engines and the propeller pushed in place with a
small drop of white glue so in case the need arises, they can be easily removed.
Wipers were made from evergreen stips, painted black and than white glued to the
windscreen.
After
several days, I sprayed the model with a coat of Humbrol satin varnish and after
another few days, I started to attach the aerial masts on top of the aircraft.
These were all painted black before attaching, and super glue was used to fix
them in place. Fishing line was used to make the aerials and was painted
afterwards with Model master metalizer paint. The wheels were then attached, and
the skis, which had already been painted white, were also glued in place. As I
stated earlier, some trimming is required to get a better shape. Some struts
holding the skis were made from evergreen plastic and thick paintbrush bristles.
The bumper on the lower tail was also fixed in place. The masking was removed
from the windscreen, and the side windows were filled in with Krystal Klear
after removing the excess carrier film of the cheat line decals. The exhaust
pipes were also attached to the engines and the propeller pushed in place with a
small drop of white glue so in case the need arises, they can be easily removed.
Wipers were made from evergreen stips, painted black and than white glued to the
windscreen.
| CONCLUSIONS |
| REFERENCES |
The Complete Encyclopedia of Aircraft
Photos on www.airliners.net.
May 2010
Copyright ModelingMadness.com
If you would like your product reviewed fairly and quickly, please contact the editor or see other details in the Note to Contributors.