| KIT #: | HC 1659 |
| PRICE: | $45.00 |
| DECALS: | One option |
| REVIEWER: | Grant Lehman |
| NOTES: | This is the latest tooling for this kit. |
| HISTORY |
 The Canadian Air Defense was
looking for an aircraft that could intercept Soviet bombers coming from the
north. They had a set of specs established that other manufacturers, such as
Boeing, and Lockheed said was impossible to achieve. The little group at Avro
Aviation put their heads together and felt they could meet the requirements. Not
only did they meet them, but they exceeded them all. A documentary was released
in 1997 called “The Arrow”. It starred Dan Aykroyd and touched on what
challenges the project encountered and how this aircrafts life was prematurely
terminated. It is an enjoyable watch. This aircraft would have been Canada’s
greatest aviation achievement.
The Canadian Air Defense was
looking for an aircraft that could intercept Soviet bombers coming from the
north. They had a set of specs established that other manufacturers, such as
Boeing, and Lockheed said was impossible to achieve. The little group at Avro
Aviation put their heads together and felt they could meet the requirements. Not
only did they meet them, but they exceeded them all. A documentary was released
in 1997 called “The Arrow”. It starred Dan Aykroyd and touched on what
challenges the project encountered and how this aircrafts life was prematurely
terminated. It is an enjoyable watch. This aircraft would have been Canada’s
greatest aviation achievement.
| THE KIT |
 First glance out of the box, I
was impressed by the was it was packed in there. Not too much room to slide
around. The main fuselage body has elastic bands on them to hold them together
to minimize warping as they are rather long. The recessed detail is not as sharp
as I’m use too, but it is there, and you can work with it. The plastic was
molded in grey with 2 clear canopies. The canopies were crisp and clear with
frosted areas to identify the areas to be painted. The optional canopy is to be
used is you wish to have an open cockpit. The cockpit is a vast improvement from
the previous version while still being a little simplistic. My kits did not come
with the previously released fuel tank and missiles. This is just he bird
herself.
First glance out of the box, I
was impressed by the was it was packed in there. Not too much room to slide
around. The main fuselage body has elastic bands on them to hold them together
to minimize warping as they are rather long. The recessed detail is not as sharp
as I’m use too, but it is there, and you can work with it. The plastic was
molded in grey with 2 clear canopies. The canopies were crisp and clear with
frosted areas to identify the areas to be painted. The optional canopy is to be
used is you wish to have an open cockpit. The cockpit is a vast improvement from
the previous version while still being a little simplistic. My kits did not come
with the previously released fuel tank and missiles. This is just he bird
herself.
| CONSTRUCTION |
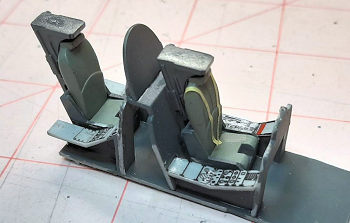 You start of in the cockpit… It
goes together very well. I ended up adding some little extra bits just because I
can’t leave well enough alone. Colour references for the interior were tough to
find, so I ended up going with a couple shades of grey that I thought looked ok.
The instrument panel and side controls had decals to install. It adds a little
more detail and they went down nicely. You don’t really see much of the office
once the canopy is in place. The cockpit sits in the nose cone which fits
together quite well. The instructions recommend approximately 50 grams of nose
weight to keep it from sitting on its tail. I used some 5 minute epoxy to anchor
the weight in place.
You start of in the cockpit… It
goes together very well. I ended up adding some little extra bits just because I
can’t leave well enough alone. Colour references for the interior were tough to
find, so I ended up going with a couple shades of grey that I thought looked ok.
The instrument panel and side controls had decals to install. It adds a little
more detail and they went down nicely. You don’t really see much of the office
once the canopy is in place. The cockpit sits in the nose cone which fits
together quite well. The instructions recommend approximately 50 grams of nose
weight to keep it from sitting on its tail. I used some 5 minute epoxy to anchor
the weight in place.
I went on to the fuselage. As previously mentioned, the fuselage is long… it is a top and bottom half assembly. While the seams were pretty good, I did use putty on the long joints to minimize what ends up being a primary focal point of the finished model.
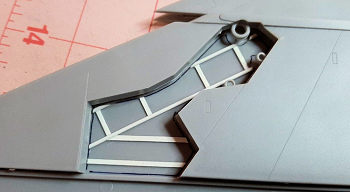 The wings went together nicely
with little fuss. There is no wheel well detail in the wings and looks out of
place. I ended up adding a little wheel well detail. They mount to the fuselage
really well. You quickly realize this is a pretty big aircraft… was starting to
take up a lot of table space.
The wings went together nicely
with little fuss. There is no wheel well detail in the wings and looks out of
place. I ended up adding a little wheel well detail. They mount to the fuselage
really well. You quickly realize this is a pretty big aircraft… was starting to
take up a lot of table space.
The under carriage is really delicate. The mounting points are the weakest area of this model… I feel this kit was meant to be shown in flight and the landing gear was an after thought. I ended up using 5 minute epoxy to help reinforce the mounting points.
Last but not least was the spine of the back and the tail. These also fit very well.
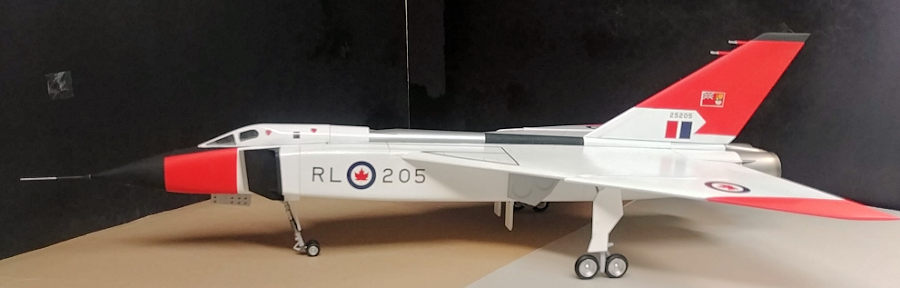
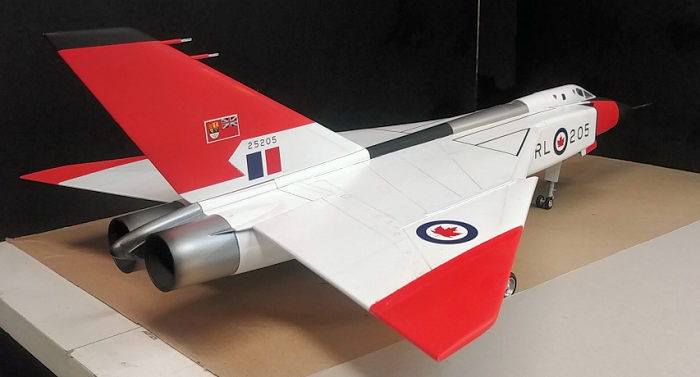
| COLORS & MARKINGS |
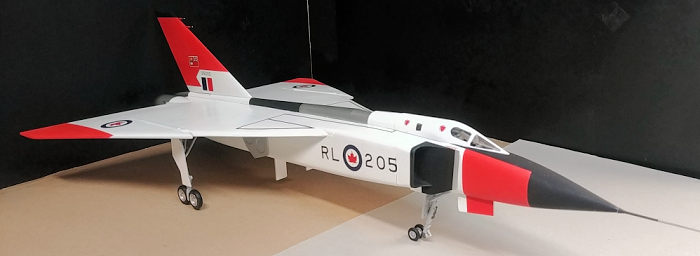 If this kit is on
your to do list, you will need to stock up on some paint. There is a lot of area
to cover. I used the Tamiya White fine surface primer as my base. I use Tamiya
gloss white out of the rattle can. I let this cure a good 5 days as I wanted it
to be cured so as not to mare the finish during the masking process. The day glo
red colour I ended up mixing my own batch up. I used Tamiya flat red and flat
yellow acrylics and shot them from the air brush. Accent colours are flat black
metallic grey and chrome silver on the gear. Take you time on the painting … use
good masking tape. My tape of choice is the Frog Yellow Painter tape.. It’s just
like the Tamiya tape, just way more for less money.
If this kit is on
your to do list, you will need to stock up on some paint. There is a lot of area
to cover. I used the Tamiya White fine surface primer as my base. I use Tamiya
gloss white out of the rattle can. I let this cure a good 5 days as I wanted it
to be cured so as not to mare the finish during the masking process. The day glo
red colour I ended up mixing my own batch up. I used Tamiya flat red and flat
yellow acrylics and shot them from the air brush. Accent colours are flat black
metallic grey and chrome silver on the gear. Take you time on the painting … use
good masking tape. My tape of choice is the Frog Yellow Painter tape.. It’s just
like the Tamiya tape, just way more for less money.
I really liked the quality of the decals. They were crisp and sharp on the images. They were also delicate. They laid down nicely with the help of MicroSet solutions.
| CONCLUSIONS |
I really enjoyed this kit. It was a challenge at times. I highly recommend this kit to an intermediate skill set if you want a decent result. The key on this kit is to take your time. Plan out your steps. I had the plane painted and decaled prior to placing the undercarriage and tailfin. Remember if you are looking for the wheels down look you will need about 50 grams of ballast in the nose. The decals again are wonderful. If the CF-105 is a plane you want o have in your collection in 1/48 scale then I say give it a go. Remember in 1/48 scale it is a big aircraft. It’s almost as long as a B-17. I hope I was able to identify key points on this build that may help fellow builders.
| REFERENCES |
My main reference material was the internet and the 1997 documentary. I didn’t know a lot about this plane prior to the build. I know quite a bit more now which is always good. I also got some tidbits of info from the display at the Canadian Warplane Heritage Museum in Hamilton ON, Canada.
14 June 2021
Copyright ModelingMadness.com. All rights reserved. No reproduction without express permission.
If you would like your product reviewed fairly and fairly quickly, please contact the editor or see other details in the Note to Contributors.