|
KIT: |
Fujimi 1/50 F-5A Freedom Fighter |
|
KIT # |
P 11 |
|
PRICE: |
$10.79 |
|
DECALS: |
Three options |
|
REVIEWER: |
Triet Cam |
|
NOTES: |
Much work required!! |
|
HISTORY |
 At the beginning of the
Cold War, many of the United States allies were ill equipped to stand on
their own in the case of Communist aggression. Northrop Corporation
recognized this and quickly sent a team of representatives to tour Europe
and Asia. The intent was to study and determined the needs of a
potentially new fighter aircraft. One thing was clear, in order to match
the capabilities of the Soviet allies, not only supersonic was the top of
the priority, but the affordability and easy to maintain and service the
aircraft as well. With these considerations in mind, the team set out to
proceed a small lightweight fighter program – the N-156 single seat and
the N-156F double seat. Company funding continued to keep N-156 program
going until suitable customers began to order. It wasn’t until 1964 that
Norway became the first customer; by then the project was re-designated
as the F-5A Freedom Fighter. The Freedom Fighter wasted no time sitting
around out of the production line, and was pressed into action in Vietnam
in late 1965 under the “Skoshi Tiger” evaluation program. After the
successful evaluation, the remaining F-5As were sent to the South
Vietnamese Air Force (VNAF), which became one of the largest users, with
189 F-5A.
At the beginning of the
Cold War, many of the United States allies were ill equipped to stand on
their own in the case of Communist aggression. Northrop Corporation
recognized this and quickly sent a team of representatives to tour Europe
and Asia. The intent was to study and determined the needs of a
potentially new fighter aircraft. One thing was clear, in order to match
the capabilities of the Soviet allies, not only supersonic was the top of
the priority, but the affordability and easy to maintain and service the
aircraft as well. With these considerations in mind, the team set out to
proceed a small lightweight fighter program – the N-156 single seat and
the N-156F double seat. Company funding continued to keep N-156 program
going until suitable customers began to order. It wasn’t until 1964 that
Norway became the first customer; by then the project was re-designated
as the F-5A Freedom Fighter. The Freedom Fighter wasted no time sitting
around out of the production line, and was pressed into action in Vietnam
in late 1965 under the “Skoshi Tiger” evaluation program. After the
successful evaluation, the remaining F-5As were sent to the South
Vietnamese Air Force (VNAF), which became one of the largest users, with
189 F-5A.
 South Vietnam Air
Force, up until 1967, had five fighter squadrons supporting all four cor.
regions using the aging A-1 Skyraider. After the Skoshi Tiger program
completed, training for VNAF pilots took place in the United States.
After the training completed in 1968, the 23rd Tactical Wing,
Squadron 522 in Bien Hoa was selected as the first VNAF jet fighter
squadron. The 522nd squadron was part of the 83rd
“Than Phong” (SOG to the American), commanded by General Nguyen Cao Ky
from 1964-67. The unit had the top pilots of the VNAF, often escorting
C-47 carrying US Army Ranger and special agents into the North and across
the border into Laos for covert operations. When Ky was forced to disband
the 83rd SOG in 1967, some Skyraider pilots were pressed into
other squadrons, and the remainder became part of the 522nd
fighter squadron operating the Freedom Fighter until the end of the war.
South Vietnam Air
Force, up until 1967, had five fighter squadrons supporting all four cor.
regions using the aging A-1 Skyraider. After the Skoshi Tiger program
completed, training for VNAF pilots took place in the United States.
After the training completed in 1968, the 23rd Tactical Wing,
Squadron 522 in Bien Hoa was selected as the first VNAF jet fighter
squadron. The 522nd squadron was part of the 83rd
“Than Phong” (SOG to the American), commanded by General Nguyen Cao Ky
from 1964-67. The unit had the top pilots of the VNAF, often escorting
C-47 carrying US Army Ranger and special agents into the North and across
the border into Laos for covert operations. When Ky was forced to disband
the 83rd SOG in 1967, some Skyraider pilots were pressed into
other squadrons, and the remainder became part of the 522nd
fighter squadron operating the Freedom Fighter until the end of the war.
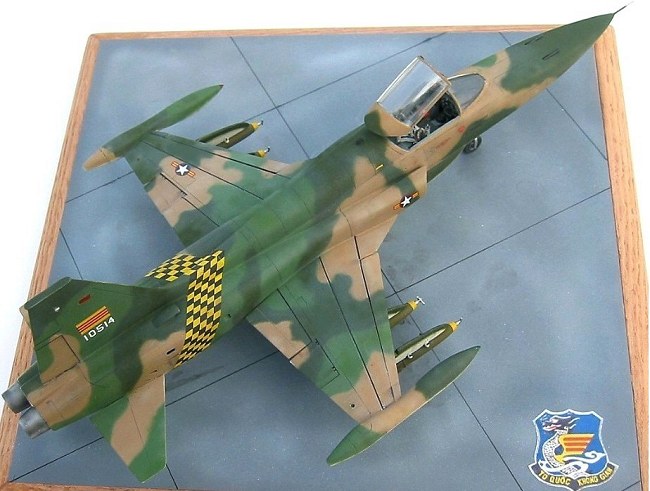
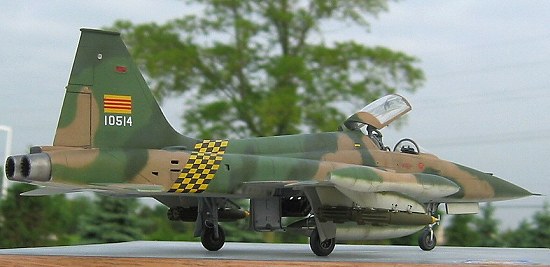
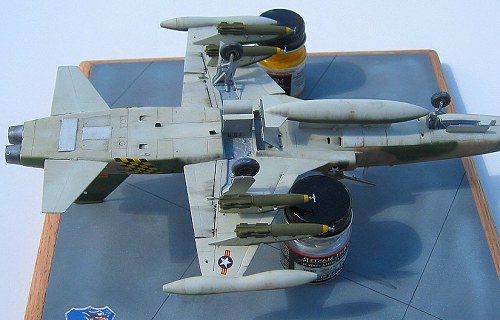
This model depicted the F-5A of the VNAF 522nd Squadron in the late 60’s. The serial number indicated the original Skoski Tiger plane.
|
THE KIT |
 There are many problems
with this kit. To start out, the box cover said 1/48th scale –
wrong! Opinions around modeling forum threads mentioned it being 1/50th
scale, which is also wrong. If it is 1/50th, then the kit is
14mm short in length, and 7mm short in wingspan. After checking around
the internet for plan drawings of the F-5A, it is in my opinion that this
is a 1/52nd scale. The plastic material was very glossy and
brittle. Except for the recessed trenches of the control flaps, panel
lines and rivets were all raised. Ventral holes and inlets were
non-existent. Cockpit and interior consisted of a square bench seat and a
pilot that resembled a monkey’s face. Decals consisted of 3 options: USAF
prototype F-5A, Canadian Air Force, and Taiwanese Air Force.
There are many problems
with this kit. To start out, the box cover said 1/48th scale –
wrong! Opinions around modeling forum threads mentioned it being 1/50th
scale, which is also wrong. If it is 1/50th, then the kit is
14mm short in length, and 7mm short in wingspan. After checking around
the internet for plan drawings of the F-5A, it is in my opinion that this
is a 1/52nd scale. The plastic material was very glossy and
brittle. Except for the recessed trenches of the control flaps, panel
lines and rivets were all raised. Ventral holes and inlets were
non-existent. Cockpit and interior consisted of a square bench seat and a
pilot that resembled a monkey’s face. Decals consisted of 3 options: USAF
prototype F-5A, Canadian Air Force, and Taiwanese Air Force.
All in all, this kit reflected the ancient standard where details were not important. Bringing it to the modern standard build would require a monumental task.
|
CONSTRUCTION |
 This kit was started
about 8 months ago when the only large scale F-5A available was either
the Testor/Hawk/Italeri kit, or the Fujimi kit. I picked this kit because
it offered the wing tip tanks, which were commonly used in Vietnam over
the AIM-9B sidewinders. Had I searched thoroughly, there is an after
market set of resin tanks available. The Hawk kit is better choice, with
much more details.
This kit was started
about 8 months ago when the only large scale F-5A available was either
the Testor/Hawk/Italeri kit, or the Fujimi kit. I picked this kit because
it offered the wing tip tanks, which were commonly used in Vietnam over
the AIM-9B sidewinders. Had I searched thoroughly, there is an after
market set of resin tanks available. The Hawk kit is better choice, with
much more details.
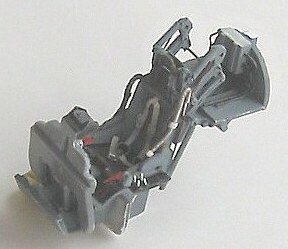
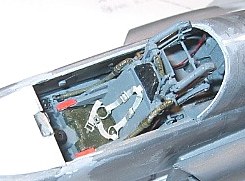
The construction started
with a Monogram F-5E cockpit, and modified into the F-5A cockpit. Since I
planned to display the model with open canopy, all the canopy riser
linkages were scratched built at this time. Reference materials were
obtained from
www.gustav.x-y.net website. The site has many pictures of the ROKAF
F-5A that was extremely useful for adding details the kit lacked, which
was almost everywhere. The linkages proved to be very difficult to
replicate. My own version had lots of short falls compared to the
references. Next task was to devise a plan to fit the cockpit in
pos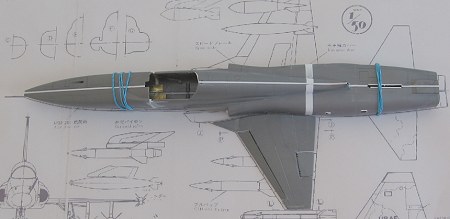 ition, which was the most difficult task of the built. The cockpit
being a true 1/48 scale, coupled with the undersized 1/50 kit, would be
too small to fit in the allowed space. Therefore, I made plans to stretch
and widen the fuselage length and wingspan to the corrected 1/50th
scale.
ition, which was the most difficult task of the built. The cockpit
being a true 1/48 scale, coupled with the undersized 1/50 kit, would be
too small to fit in the allowed space. Therefore, I made plans to stretch
and widen the fuselage length and wingspan to the corrected 1/50th
scale.
Before the fuselage is stretched, all ventral, shell ejectors, gun ports, and tail light holes were carved out at appropriate places, all 25 of them. The F-5A has many oval vents in the fuselage; this kit did not provide any of these details, and had to be drilled out by hand. I broke 5 drill bits in the process. All the drilled holes were done with drill bits and micro files.
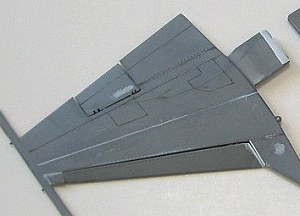
Next step was to
lengthen the fuselage and wings. The main fuselage was widened at
centerline by adding a 1.5x1.5mm styrene strips around the fuselage. This
would require precision alignment when gluing the two halves latter. The
fore/aft length was stretched at two locations; 6mm just in front of the
tail, and 8mm at the cockpit entrance – see photo. This made
 the seat
seemed more proportional to scale. This would also mean that the canopy
now seemed to short. But since the canopy will be display opened, it’s
not that noticeable.
the seat
seemed more proportional to scale. This would also mean that the canopy
now seemed to short. But since the canopy will be display opened, it’s
not that noticeable. 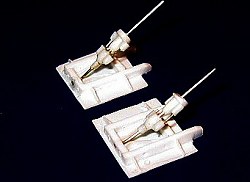
Before the fuselage halves were glued on, I cut out the opening for the air brake wells. The air brake and landing gear wells were taken from a spare F-5E. All the main landing gear doors and airbrake doors were built from scratch. Note the outside gear doors have a separated triangular door bent outward about 20 degrees, and the airbrake doors are two separated parts. The front gear well was also cut from the F-5E as well.
The gooseneck air inlets above the fuselage were scratched built. I cut a small brass strip and wrapped around the end so the ends would look hollow.
 The cockpit is now ready
to go into the fuselage. Dry fit was done over, and over to make sure
proper fit before the fuselage halves glued together. Once the fuselage
went together, the tail was glued in next. I had to trim the long
locating tab so that the engine could be installed latter without
interference.
The cockpit is now ready
to go into the fuselage. Dry fit was done over, and over to make sure
proper fit before the fuselage halves glued together. Once the fuselage
went together, the tail was glued in next. I had to trim the long
locating tab so that the engine could be installed latter without
interference.
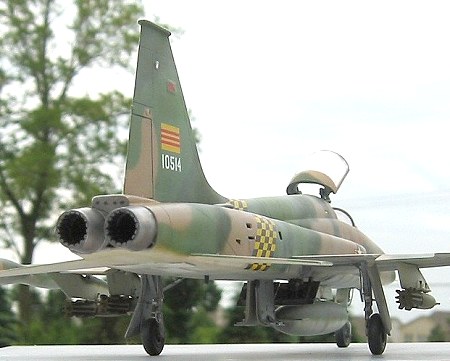
The next step was to
create the engine. I used a 5/16-inch tube cut to size. The fake engine
served two purposes; one was to act as a wall barrier to prevent from
seeing through the vents from one side, and they also looked more
realistic rather than using blanking walls at
 the exhaust ends. The
exhaust cones were fitted with half-moon strips around the inner walls.
The assembly is done and left out until after painting is done.
the exhaust ends. The
exhaust cones were fitted with half-moon strips around the inner walls.
The assembly is done and left out until after painting is done.
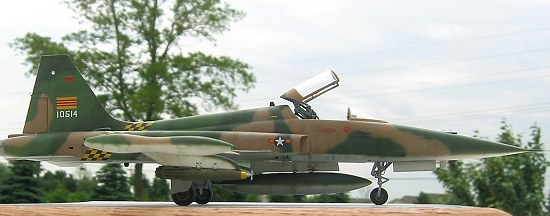
The wings also got some dimension upgrades. I split the wing in half and added 2.0 mm to take them closer to a true 1/50. The flaps were also dropped as well as the slats. All Vietnam F-5A pictures had these features, so I included them as well. I added about 3mm in length to the wing tips, and installed the tip tanks at the extensions. I also made sure the tanks were pointed down about 5 degree off the horizontal.
 All Freedom Fighters in
Vietnam wore armor. They were located at under belly cockpit, and under
belly just in front of the exhausts. A thin piece of styrene .005 inch
thick was used for the armor plates.
All Freedom Fighters in
Vietnam wore armor. They were located at under belly cockpit, and under
belly just in front of the exhausts. A thin piece of styrene .005 inch
thick was used for the armor plates.
Next task is the sanding, and filler, and sanding, and filler until all surgery scars disappeared. The model is now a 1/50 scale; the length is actually 2.0mm longer than a 1/50 length.
Landing gears were from kit. Not that they’re decent, there just weren’t any suitable replacement. They were highlighted with brake lines for better details. The front wheel was from the F-5E, which was the right size compare to the kit’s wheel.
|
COLORS & MARKINGS |
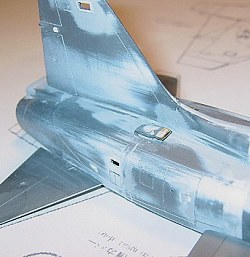
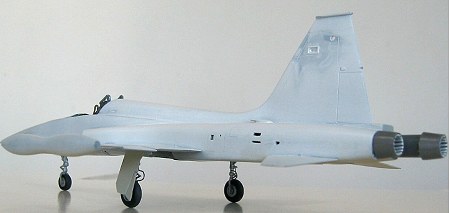
This model is painted
with Model Master enamel. The wheel and airbrake wells, as well as all
door insides were sprayed with Model Master steel metalizer. Next was to
spray insignia yellow where the fuselage band and the fin flag is. The
reason to paint the yellow was Micro scale decal had no white background,
and dark color would bleed through. The fuselage bottom was aircraft gray
FS36622 mixed with 50% insignia white. I painted the armor white for
better contrast underneath against the light gray. The dark tan,
 FS30219, was too dark;
this was lightened with 30% white and 5% insignia yellow. Medium green,
FS34102, was lightened with 10% aircraft gray, FS36622. The SEA
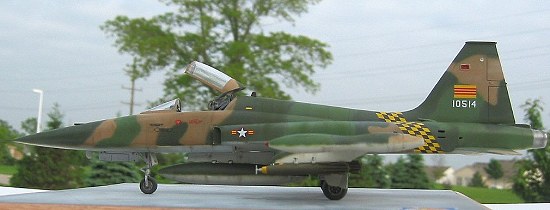
camouflage pattern was painted free hand with a Badger XF100. The
three-tone paint on the Freedom Fighter show hard demarcation when new.
But under heavy weathered, it became soft, due to paint fading. For me,
combat aircraft should be dirty, and so this plane would get weathered
condition. I masked out the yellow fuselage band and fin flag, and
proceeded to paint the three tones
FS30219, was too dark;
this was lightened with 30% white and 5% insignia yellow. Medium green,
FS34102, was lightened with 10% aircraft gray, FS36622. The SEA
camouflage pattern was painted free hand with a Badger XF100. The
three-tone paint on the Freedom Fighter show hard demarcation when new.
But under heavy weathered, it became soft, due to paint fading. For me,
combat aircraft should be dirty, and so this plane would get weathered
condition. I masked out the yellow fuselage band and fin flag, and
proceeded to paint the three tones
After the paint was dried, a Polyscale gloss coat went on next before decals. The checker band and insignias came from the Microscale F-5A 1/72 scale sheet. Though in 1/72, they were the appropriate size for this model. The fin flags were painted on, since I did not have decals with the correct size. As I suspect, the fuselage band decal did not match the masked area. I had to mask the fuselage band decals and repainted the over shoot to flush in with the checker band. After the decals were done, I applied a dark gray wash. Finally, a flat coat of Polyscale was applied last, followed by some pastel for heavy weathering. I post shaded the aircraft with very diluted aircraft gray to simulate paint fade on the wings and fuselage top.
|
FINAL CONSTRUCTION |
 The wing pylons were
taken from the F-5E, and sanded down to smaller size. The sway braces
were made from styrene stock and metal pins represented the bolts. The
bombs and tank were attached with brass wires. The landing gears were
painted Model master flat aluminum. Doors were attached to gears via
brass wires. The engines were added in the last construction. The cones
were painted burnt steel and gunmetal metalizers, followed by some
buffing to bring out the natural metal look.
The wing pylons were
taken from the F-5E, and sanded down to smaller size. The sway braces
were made from styrene stock and metal pins represented the bolts. The
bombs and tank were attached with brass wires. The landing gears were
painted Model master flat aluminum. Doors were attached to gears via
brass wires. The engines were added in the last construction. The cones
were painted burnt steel and gunmetal metalizers, followed by some
buffing to bring out the natural metal look.
|
CONCLUSIONS |
Recommendation? Not with the new tooling of the F(RF)-5A now released. This should make the build much easier than what I went through. With some patience, thorough research, and work, however, I managed to build an accurate Freedom Fighter as it appeared in Vietnam. This kit is not for beginner or anyone not into scratch building. This is my most satisfied result because of the hard work went into building the kit. If only I had waited another eight months.
June 2004
|
REFERENCES |
 “Flying Dragon: The
South Vietnamese Air Force” by Robert Mikesh. Osprey Pub.
“Flying Dragon: The
South Vietnamese Air Force” by Robert Mikesh. Osprey Pub.
“F-5 Tigers Over Vietnam” Anthony Tambini. Branden Pub.
“VNAF: South Vietnamese Air Force 1945-1975” by Jim Mesko. Squadron Pub.
“F-5 In Action” Lou Drendel, Squadron Pub.
If you would like your product reviewed fairly and quickly by a site that has over 250,000 visitors a month, please contact me or see other details in the Note to Contributors.