Hasegawa 1/72 A-1H Skyraider
|
KIT # |
51463 |
|
PRICE: |
$15.00 |
|
DECALS: |
Two VNAF aircraft |
|
REVIEWER: |
Triet Cam |
|
NOTES: |
Carpena and Microscale decals used as well as Hasegawa weapons set I |
|
HISTORY |
The VNAF 516th fighter squadron was based in Da Nang, Republic of Vietnam. It is city is located in the Central Highland, at the northern post of South Vietnam, Military Region Cor 1. It was here and Hue that ferocious fighting often broke out during the Vietnam War. The cities were often under siege during the Tet offensive, as the Communist was determined to capture the cities. The worst battle occurred during the Red Summer of 1972, as Communist forces of 40000 launch an attack at Da Nang during Easter. The invasion scale was far beyond the Tet Offensive in 68. Like the Tet Offensive, no cities in South Vietnam were safe. Only through massive air assault from the US and VNAF that thwarted off the attack. Enemy suffered heavy casualties, but not before 90% of the city was destroyed. The ruins can still be seen today.
 The 516th was the
second VNAF fighter squadron established, in 1962 at Nha Trang. This was the
original squadron participated in operation Farm Gate, where the Vietnamese
trained by the USAF Air Commando, and flew in combat alongside. These were
valuable lessons to gain combat experience, and the experience would enable them
to fight effectively on their own later. Throughout its violent life, this
squadron suffered horrendous casualties, at least 50% KIA. The average pilot
flew four to five sorties per day; the surviving chance of long term combat
exposure was not high. They did not have the luxury of one-year tour of duty and
returned home. That was home, and they fought until no longer physically
possible.
The 516th was the
second VNAF fighter squadron established, in 1962 at Nha Trang. This was the
original squadron participated in operation Farm Gate, where the Vietnamese
trained by the USAF Air Commando, and flew in combat alongside. These were
valuable lessons to gain combat experience, and the experience would enable them
to fight effectively on their own later. Throughout its violent life, this
squadron suffered horrendous casualties, at least 50% KIA. The average pilot
flew four to five sorties per day; the surviving chance of long term combat
exposure was not high. They did not have the luxury of one-year tour of duty and
returned home. That was home, and they fought until no longer physically
possible.
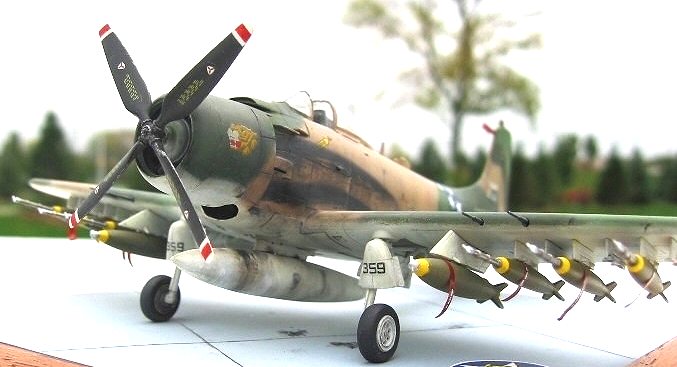
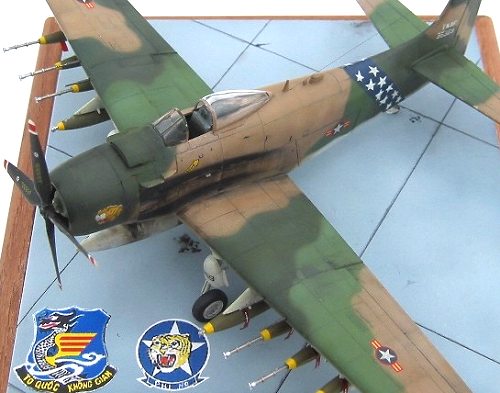
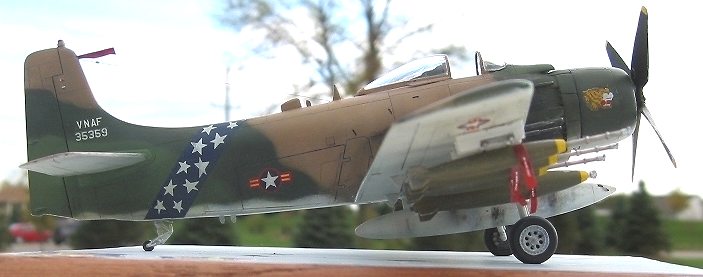
This model depicted the A-1H of the 516th VNAF fighter squadron as it appeared standing alert at Da Nang in 1968.
|
THE KIT |
There are Hobby Craft, Heller,
Fujimi, Testor, and Airfix that offered the A-1H in 1/72 scale (I suspect some
re-boxing), and can be found at some hobby shops today; Hasegawa kit is superior
by far. Hasegawa is well known for stretching their molds to the limit with many
versions of the aircraft with the same mold. This is no difference; there are
least seven versions of the A-1H that I am aware of. Copyright marked 1997, so
this is a relatively new molding. Inside the box, there are five gray sprues,
the clear parts and decals in separate bags. The kit has fine recess panel
lines, and excellent surface details, for 1:72 scale. There are no flashes or
pin marks that are visible on the outside. I observed some inaccuracies; the
propeller 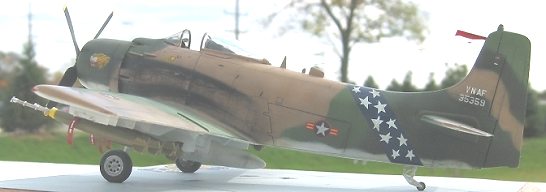 shape is off, and the cowl flaps are molded in closed position. I have
never seen one closed while on the ground. The exhaust pipes are molded in the
fuselage; it would looked much better as a separate piece. The landing gear
lacked some details, but can be easily overcome with some scratch building.
shape is off, and the cowl flaps are molded in closed position. I have
never seen one closed while on the ground. The exhaust pipes are molded in the
fuselage; it would looked much better as a separate piece. The landing gear
lacked some details, but can be easily overcome with some scratch building.
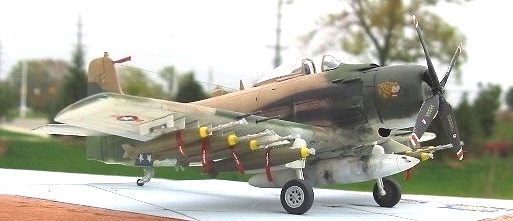
This kit doesn’t get reviewed often, as evident of no reviews around, and I am not sure the reason why. Perhaps it is because of the scale, or very simplified cockpit, or even lack of ordinance, a feature well known by Hasegawa. For weapons, the kit has four cluster bombs tube dispensers, and three external fuel tanks, not an image of the Skyraiders familiar to us. Decals provided for two versions, and appeared to be very well printed and registered. Instructions are simple to follow with painting instructions called for Gunze or Mr. Color.
|
CONSTRUCTION |
I built this model about two years ago, back into modeling after a long absence. But I kept a log file to remember what I did. This was my second model completed. It was built out of the box, as I did not know much about after market, or I would’ve upgrade the cockpit with resin. I did know about after market decals though.
The constructions started at
the cockpit. A very plain cockpit it was, with just the basic necessities. After
the assembly, a coat of gloss dark gull gray was painted, and the seat cushion
was painted olive drab with a brush, the decals went on the
 instrument panel and
consoles. A coat of Polyscale flat was spray after before attaching to the
fuselage. After the fuselage went on, it is difficult to see the inside cockpit.
So maybe it was not necessary to get too detailed there after all.
instrument panel and
consoles. A coat of Polyscale flat was spray after before attaching to the
fuselage. After the fuselage went on, it is difficult to see the inside cockpit.
So maybe it was not necessary to get too detailed there after all.
The wing assembly was next. I cut out the guns and drilled out the gun holes. After the wings were glued to the fuselage, the cowl flaps was attached next. I separated the flaps into three pieces and glued them in the open positions. Looking back, I should have left the flaps out for the last step, after the exhaust is painted.
The landing gears were next. First, I drilled out holes in the wheel spokes for added realism. The legs lacked the actuator tubes in front. That was added by gluing a .015 brass rod with super glue and cut to lengths. The gear assemblies were done and left off the wings until the end.
Because the fit was superb, I did not use filler to fill joints. Just some wet sanding with 800 grade and the model was ready for paint. Overall, the constructions were simple. I completed constructions in four hours.
|
PAINT & DECALS |
I used Model Master enamel for
the SEA scheme, with Federal Number, FS34102 medium green, 34079 dark green,
30219 dark tan, and 36622 aircraft gray. I did darken the dark green with a
little olive drab, and lighten the aircraft gray with 50/50 white. The results
showed similar to reference photos, but however, they are over thirty year old
photos. A white coat went on the model first to check for flaws and
imperfections. I did break the cardinal rule of painting regarding going from
light to darkest shade in order. Dark tan, medium green, dark green and finally
gray for under aircraft went in order. I always have problems with demarcation
lines between upper and lower; they don’t blend in naturally. Painting
underneath last simplified the masking task, and does not disrupt the continuing
pattern flow, but does require more coats. I did attempt to break up
 the upper
and lower pattern at the cowl, to show alignment mismatch based on some photos
of the real aircraft, probably cannibalized parts from another aircraft, looked
cool, I thought.
the upper
and lower pattern at the cowl, to show alignment mismatch based on some photos
of the real aircraft, probably cannibalized parts from another aircraft, looked
cool, I thought.
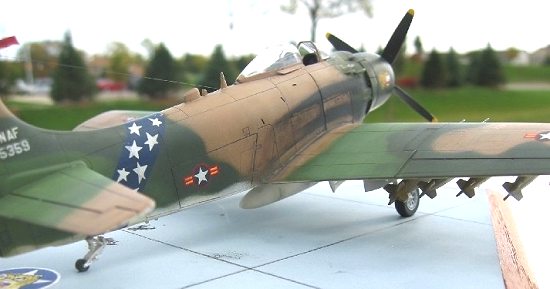
Tamiya clear coat went on before decal. The decal job took me five months to do mainly because I had to do a lot of searching on the net to get all the necessary decals. There are not too many VNAF subjects around. In the end, I found all the necessary items. The blue fuselage band came from Microscale 72-477 sheet, through a trade. It was the only useable thing from the sheet, as far as accuracy went. The VNAF stars and bars were from Decal Carpena “Indo China 1946-1975”. These decals are too thick. I nearly gave up searching for the nose art until Monogram re-release the 1/48 Skyraider. Despite being 1/48 scale, it fit perfectly. Finally, I had enough to proceed the project again. The tail code came from spare stencils, and the letter V was an inverted A.
A dark gray wash went on the panel lines, but maybe a little too dark. Flat Polyscale coat went on to sealed everything. The next step was the exhaust stains. This, in my opinion, is the hardest part of all; either they come out looking right, or like spray paint. The four stain streaks was done one at a time by masking out the pattern with Handi-Tac. I sprayed black along the sides and feathered out as I go toward the end. After that, I applied black and gray pastels over the streaks to simulate smoke splotches. This took me quite a few practices before I was comfortable enough to try on this model. A final flat coat was put on before the final constructions.
|
FINAL CONSTRUCTION |
 The landing gears were glued in
next. I used Minimeca tubings for the cannons, and brass rod for pitot tube. The
Mk 82’s and Mk 83’s came from Hasegawa weapon set 1. It wasn’t until five months
later that I bought this set. It arrived at a good time, as the model was
sitting without ordinances. “Remove before flight” labels and pitot tube covers
were painted blank Jetcal decal. I applied stencils on the tags from spare
decals. I think it says “no hand hold”, but at that scale, I doubt anyone can
read them.
The landing gears were glued in
next. I used Minimeca tubings for the cannons, and brass rod for pitot tube. The
Mk 82’s and Mk 83’s came from Hasegawa weapon set 1. It wasn’t until five months
later that I bought this set. It arrived at a good time, as the model was
sitting without ordinances. “Remove before flight” labels and pitot tube covers
were painted blank Jetcal decal. I applied stencils on the tags from spare
decals. I think it says “no hand hold”, but at that scale, I doubt anyone can
read them.
|
CONCLUSIONS |
This project almost did not happened because of decal availability, but I did manage to complete it after a year. In the end, I was very satisfied with result. It looked like a ragged rugged warrior I remembered.
As for the kit, the only complain is the incorrect propeller shape and a simplified exhaust pipes. One other annoyance is the lack of weapons in this kit. It is almost necessary to buy a set in order to complete any of the Hasegawa kit, at the cost of a kit itself, good for Hasegawa marketing, bad for us.
Overall, this kit can be recommended to all skill levels, because it is a “shake and bake kit”. It is hard to go wrong, unless that is your intention. The photos were taken with the Cannon S30 digital camera out door.
Dedicate to those who fought and died flying the Skyraiders over Vietnam.
|
REFERENCES |
“Flying Dragon: The South Vietnamese Air Force” by Robert Mikesh. Osprey Pub.
http://www.vnaf.net web page. Devoted for VNAF subjects, have many A-1H and E pictures
http://skyraider.org web page. Have many USAF and NAVY and some VNAF A-1H pictures.
“VNAF: South Vietnamese Air Force 1945-1975” by Jim Mesko. Squadron Pub.
“Douglas A-1 Skyraider” by Frederick Johnsen.. Schiffer Pub.
And my dad, a former Skyraider pilot.
Triet Cam
Nov 2002.
If you would like your product reviewed fairly and fairly quickly, please contact the editor or see other details in the Note to Contributors.