Uncle Les 1/72 CAC CA-31
| KIT #: | SW 48008 |
| PRICE: | @$40.00 |
| DECALS: | Three options |
| REVIEWER: | Peter Burstow |
| NOTES: | Resin, metal and vacuform parts. |
| HISTORY |
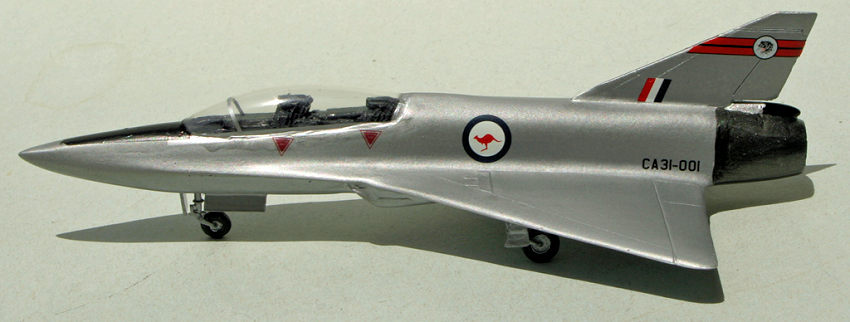
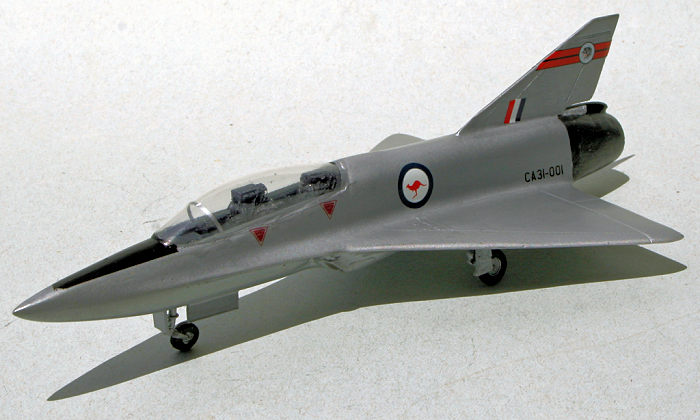
Not much history for this little aeroplane. In the mid 1960's CAC proposed a supersonic trainer, powered by a Rolls Royce Adour. Looking somewhat like a 2/3 scale Mirage, it only made it to the mock up stage. The Australian government was not interested. The mock up still exists at the Moorabbin aircraft museum
| THE KIT |
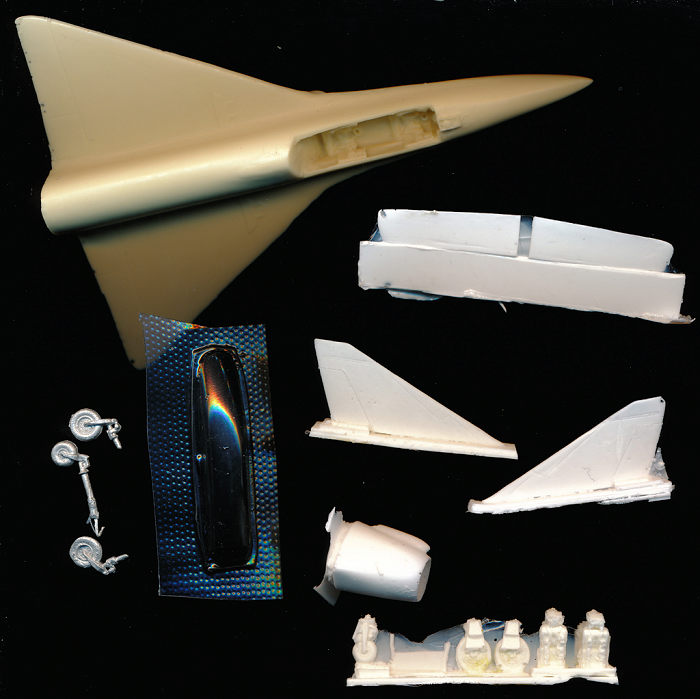 To match the
history, there are not a lot of parts here either, the fuselage and wing are one
piece, there are two fins supplied, one with a large bubble, and a jet exhaust.
Smaller resin parts include two elevons, supplied to replace those moulded into
the wing, ejector seats and some undercarriage gear. Three white metal
undercarriage legs with wheels are included, with a vac-formed canopy.
To match the
history, there are not a lot of parts here either, the fuselage and wing are one
piece, there are two fins supplied, one with a large bubble, and a jet exhaust.
Smaller resin parts include two elevons, supplied to replace those moulded into
the wing, ejector seats and some undercarriage gear. Three white metal
undercarriage legs with wheels are included, with a vac-formed canopy.
The small laser-printed decal sheet has six kangaroo roundels, fin flashes, several fictious serials and an assortment of stencils. The decals don't have any white, as they are printed on clear decal stock. The instructions are a twelve page A5 booklet, with lots of colour photos, drawings and notes. They are excellent and a great reference.
| CONSTRUCTION |
 The first task with a
resin kit is cleaning up the parts, a small job here, with only three main
parts. Saw, cut or file away the pouring stubs, then sand the remnants smooth.
Sanding is best done wet to reduce dust. Fortunately, Les has changed his resin
to something that is easily workable, one of his early kits needed a bench
grinder to shape the parts. After shaping, a good wash in warm soapy water to
remove any mould release wax and then I left the parts to air dry overnight.
The first task with a
resin kit is cleaning up the parts, a small job here, with only three main
parts. Saw, cut or file away the pouring stubs, then sand the remnants smooth.
Sanding is best done wet to reduce dust. Fortunately, Les has changed his resin
to something that is easily workable, one of his early kits needed a bench
grinder to shape the parts. After shaping, a good wash in warm soapy water to
remove any mould release wax and then I left the parts to air dry overnight.
I added the exhaust and
the better of the two supplied fins to the fuselage and main construction was
done. There is really very little work with some resin kits. The joints needed a
little filling, I used a thick superglue. At the same time I dealt with a few
bubbles on the
 wing trailing edge and on the exhaust. I also added the seats to
the cockpit. There is a slight error in the instructions here, I think the seat
with the instrument panel on the back is the front seat. I added a pair of
control sticks made from stretched sprue.
wing trailing edge and on the exhaust. I also added the seats to
the cockpit. There is a slight error in the instructions here, I think the seat
with the instrument panel on the back is the front seat. I added a pair of
control sticks made from stretched sprue.
I decided not to use the alternate elevons, as they had around the same number of bubbles as the main part. Went over the joints, and some of the minor glitches with Mr Surfacer, then after a few days hardening, more wet sanding until I was happy with the finish.
I made some card undercarriage bay doors, to replace the resin ones which were very thick. These were superglued into position. While the kit was on it's back I drilled some holes for the white metal legs and fitted them. I probably drilled a little deep as the model has a tail down stance. There was just enough room under the front instrument panel for a little weight, and it sits well on the nose gear.
| COLORS & MARKINGS |
After another wash and dry, I gave the kit a coat of gloss black enamel primer, this showed up a few more bubbles and glitches which were fixed. Another prime, then a coat of gloss enamel “Bright Chrome” which is a metallic grey colour, not too bright and shiny.
 I then hand painted the
jet exhaust with Tamiya acrylic gunmetal, and did a little detail painting with
flat aluminium and black. The cockpit got a heavy wash with thinned black
acrylic, which settled in the low spots, and left various brighter details.
I then hand painted the
jet exhaust with Tamiya acrylic gunmetal, and did a little detail painting with
flat aluminium and black. The cockpit got a heavy wash with thinned black
acrylic, which settled in the low spots, and left various brighter details.
Last bit was the vacformed canopy, which was very clear. There was very little in the way of frame marks so it needed a lot of trimming, dry fitting and more trimming. Eventually I had a good fit, and fixed it with Micro Kristal Klear.
I used the kit serial numbers and ejector warning decals. The kangaroo roundels, fin flash and a 76 squadron tail stripe were in the spares box. I used some Xtradecal silver coloured stripes to do the canopy frame and hide the joints.
| CONCLUSIONS |
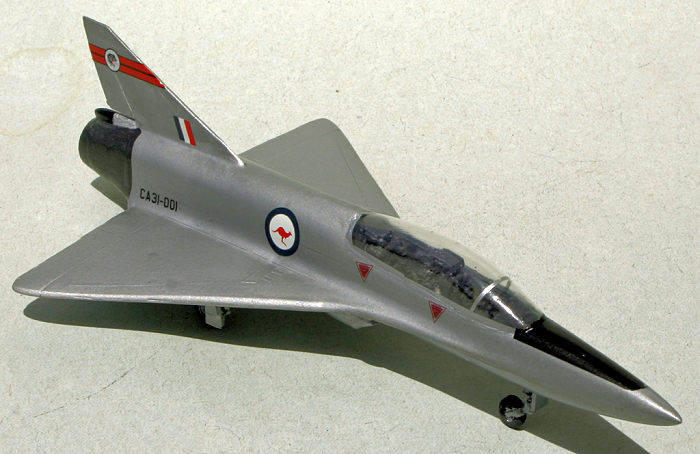
A very easily built resin kit, needing just basic skills of cutting, sanding and filling. Great fun and looks good between the Macchi and the Vampire in the display case.
Recommended for everybody, a good first resin kit for beginners, and a basis for a great model for more advanced modellers.
10 August 2017
Copyright ModelingMadness.com
If you would like your product reviewed fairly and fairly quickly, please contact the editor or see other details in the Note to Contributors.
Back to the Main Page Back to the Review Index Page Back to the Previews Index Page