Heller 1/72 SBC-4 Helldiver
| KIT #: | 285 |
| PRICE: | @$5.00 when newish |
| DECALS: | One option (French) |
| REVIEWER: | Joel Hamm |
| NOTES: | OOP but not impossible to find. |
| HISTORY |
Ever since as a kid I had an
Aurora 1/48 (?) unpainted, unrigged SBC on my dresser, the Helldiver has been
one of my favorite aircraft. Its coloration and brawniness epitomize the “Yellow
Wing ‘Twe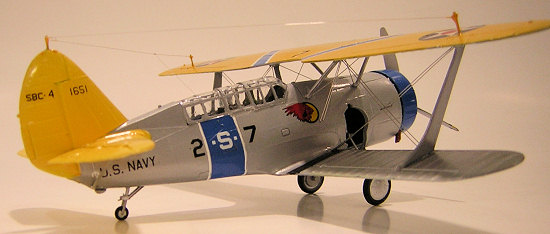 ener” era. Unfortunately, its limited performance in all roles to which it was assigned also
exemplify the lackadaisical level of combat preparedness at which many US
weapons systems between the world wars were procured .
ener” era. Unfortunately, its limited performance in all roles to which it was assigned also
exemplify the lackadaisical level of combat preparedness at which many US
weapons systems between the world wars were procured .
Printed and Web Site accounts differ on the details of the Helldiver’s service record, so the reader may select his own authority. Probably the most accurate, certainly the most exhaustive, is Squadron/Signal Publications’ “Helldiver In Action softcover, which is out of print but fairly findable.
The Helldiver was produced in two major variants: the under- powered SBC-3 and the not-quite-so-under-powered SBC-4. Externally they are distinguishable by the latter’s larger, scooped cowl, straighter underbelly, and slightly taller fin.
| THE KIT |
Like the Azur Co., Heller generally
concentrates on aircraft flown by French forces. Their kits are simple, cleanly
molded, with no flash, sink holes, or ejector marks. Fit is pretty near
perfect. Transparencies are clear, but thick and heavily framed. The SBC-4 is
 characteristic in all
respects. The landing gear struts and retraction webs are exceptionally petite
and realistic, though fragile and difficult to affix.
characteristic in all
respects. The landing gear struts and retraction webs are exceptionally petite
and realistic, though fragile and difficult to affix.
Heller often induces inaccuracies as a result of simplification (check my P-47N review). Just two very minor ones showed up. The windshield has a too prominent “forehead”. Its thickness permitted an easy re-sanding to a more “Neanderthal” slope. The propeller, while shapely and sharply molded, has an improper hub. A correct one, sporting the heavy triangular prop boss and 3 prominent bolts, emerged from the spares box; possibly from a wrecked Airfix Devastator.
The only engineering complaint concerns the lower wing to fuselage joint. The wing is a single piece affair with a beavertail extension, which forms part of the trailing edge fairings and aft belly. Getting a good fit requires careful taping in place. The part here is very this so a tad toomuch glue can (and did) melt the fairing edges. This is a good place for CA or epoxy.
| INITIAL CONSTRUCTION |
To facilitate the fuselage to wing join, I deferred installation of the cockpit floor and interior. Once the basic airframe was together, sans top wing, holes had to be drilled for rigging wires. Next stop: paint booth.
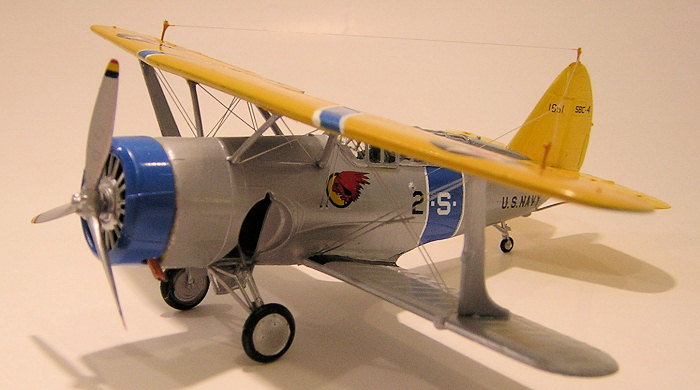
| COLORS & MARKINGS |
Two shades of yellow, two
of silver, one of blue, with white pinstriping, made painting a protracted
affair fraught with multiple opportunities for major or minor booger-ups. None
really materialized. The first step was an overall white gloss enamel primer.
Testor’s square bottle yellow lightened with white produced an acceptable
lemon-yellow tail color. The fuselage band and wing chevrons are supposed to be
True Blue, but the official Model Master FSN stuff ends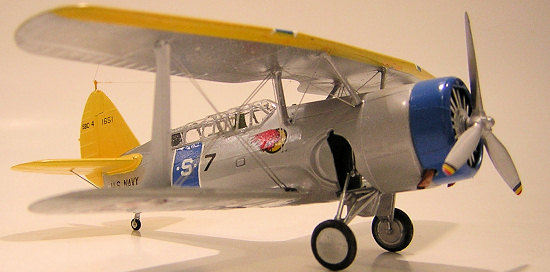 up on the shelf looking too gray-purple. Light Blue, except in ultra bright
light, results in a more proper shade.
up on the shelf looking too gray-purple. Light Blue, except in ultra bright
light, results in a more proper shade.
These stripes were masked over and the overspray covered in more white. Pinstripe outlines were formed by additional masking with thin tape strips. To simulate the aluminum lacquer used on metal surfaces, I added a dollop of gloss white to Floquil’s silver. Doped fabric surfaces were sprayed with unadulterated Floquil. The contrast is subtle, but that’s how it appeared in real life.
The upper wing surface was treated to MM’s chrome yellow, which according to photos, might not be quite as orange as it should be. When all the masking came off, the fuselage and wing bands seemed a smidgeon too wide – but that’s life. When the masking came off the canopy, all the framing had to be drastically touched up by hand. At the risk of being repetitive – that’s life!
All decals came from the spares box. The tail codes are bogus. I’m not such a stickler for historical accuracy that I would cut and assemble sub-microscopic numerals from a Superscale sheet. A light schpritz of Future covered everything.
| CONSTRUCTION CONTINUES |
Heller’s cockpit
furnishings are simplistic, but adequate for the degree of visibility through
the thick “glass”. My only embellishment was a “radio box” and wire DF loop.
Mating a bipe’s two wings is always a dicey affair, no matter what assists are
 engineeried into the kit. In
constructing the Matchbox Helldiver, I had cut away the molded-in cabane
struts and replaced them with strip stock after joining the wings with the
interplanes. The Heller version also had pre-assembled cabane struts but I
used the opposite tack, joining the wings by the cabane struts then adding the
interplanes. It worked – but only because the engineering was perfect. All
struts were the right size, and the lower wing was a single piece –
eliminating any uncertainty in the dihedral. I still think the earlier
procedure is better advised and plan to use it for all future biplanes.
engineeried into the kit. In
constructing the Matchbox Helldiver, I had cut away the molded-in cabane
struts and replaced them with strip stock after joining the wings with the
interplanes. The Heller version also had pre-assembled cabane struts but I
used the opposite tack, joining the wings by the cabane struts then adding the
interplanes. It worked – but only because the engineering was perfect. All
struts were the right size, and the lower wing was a single piece –
eliminating any uncertainty in the dihedral. I still think the earlier
procedure is better advised and plan to use it for all future biplanes.
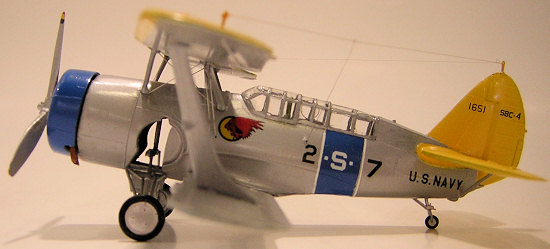
Rigging was done with 32
gauge stainless steel surgical suture. It has the proper diameter and compromise
between stiffness and malleability. It also shines just like the real thing. If
you don’t share my good fortune of having a close family member in the surgical
profession, .05mm bead stringing wire, available at the artsy-craftsy counter,
is a suitable second choice. Both beat by light years the monofilament
“invisible thread” I had previously used. That stuff was used for the radio
antennae. The wing has integral masts, but these were too short, so I replaced
them with piano wire – actually high E guitar string. I gave up on trying to
learn how 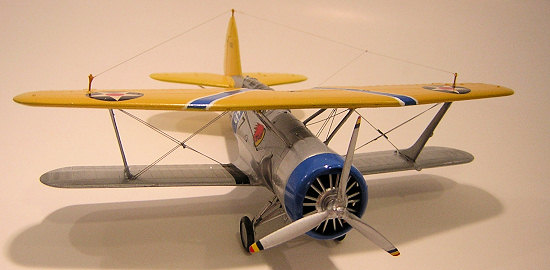 to play the damn
thing, so at least I got some use out of it. Speaking of thread and wire, a
Readers Forum thread ran awhile ago seeking methods for straightening wire.
Here’s the secret: Take out major kinks by pulling it through your fingers
without inducing too much curl. Cut to rough lengths and roll the piece between
two perfectly flat surfaces, such as squares of glass plate or glazed tiles.
For measuring precise distances between anchoring points a draftsman’s dividers
is the perfect tool.
to play the damn
thing, so at least I got some use out of it. Speaking of thread and wire, a
Readers Forum thread ran awhile ago seeking methods for straightening wire.
Here’s the secret: Take out major kinks by pulling it through your fingers
without inducing too much curl. Cut to rough lengths and roll the piece between
two perfectly flat surfaces, such as squares of glass plate or glazed tiles.
For measuring precise distances between anchoring points a draftsman’s dividers
is the perfect tool.
The radial engine is a bogus looking affair but it sits far enough back in the cowl so no one will complain, particularly when dolled up with the spider representing the wiring harness ring and push rod tubes. Those spokes are too wide, but I wasn’t in the mood to dice up any more guitar strings for replacements. As noted, the prop had to be rplaced with an Airfix or whatever-it-is. The blades on the replacement looked more like bludgeons and had to be thinned down. I omitted the underbelly tank, as photos of A/C in the subject livery indicate it was not hung.
| CONCLUSIONS |
Both the Matchbox and Heller kits rate about equal. The latter has a better canopy; the former a proper prop. For the ease and price at which they can be found at swap meets and even stores where stock moves slowly, both can readily be built.
February 2008
Copyright ModelingMadness.com
If you would like your product reviewed fairly and fairly quickly, please contact the editor or see other details in the Note to Contributors.