Special Hobby 1/72 B-18 Bolo “Pre-War Service”
| KIT #: | 72095 |
| PRICE: | $51.29 |
| DECALS: | Four options |
| REVIEWER: | Mark Joyce |
| NOTES: | Short run with photo etch and resin parts |
| HISTORY |
“Ninety, eighty-five, seventy-eight, seventy-eight, seventy-eight”
I was on the final approach to the Don Q Rum Company airstrip just outside of Ponce, Puerto Rico, and the copilot was calling out the airspeed. I went over the fence at about six feet, hanging on the props. I cut the throttles and landed slightly tailwheel first, straight out of the glide with no flare. We rolled about 900 feet. The dirt strip was 1,200 feet long.
The time was early 1941, and the airplane was a B-18A. The B-18 was a bomber manufactured by Douglas, most of them in 1938. The wings, empennage, and the landing gear were similar to those of the DC-2. It had a wing span of eight-seven feet, an over-all length of fifty-seven feet, a height of fifteen feet, and a wing area of 965 square feet. The book said that its gross weight was 28,000 pounds. But the book said a lot of things that we didn’t buy. For example, its cruising speed. Contrary to what the book said, the B-18 flew at 135 miles per hour indicated. It is not much of an exaggeration to say that the B-18 embraced that speed with complete indifference to altitude, gross weight, or power setting. The fact of the matter was that it simply liked to fly at 135; it did not like to fly at any other airspeed.
The B-18 was not an exciting airplane, but it was reliable. It looked sturdy and squatty, and was. It had an honest stall with a polite amount of warning. In 1,000 hours, I never lost an engine. The two engines were Wright 1820s developing 1,000 horsepower each, and except that they were always a little oily on the outside, they were great. They did not, however, provide us with breath-taking performance. But on the other hand, we were not sure that the airframe was up to a breathtaking performance, anyway, so it all came out even.
 The test pilot, who
in describing the performance of a new airplane, said, “It takes off like a
scalded cat and climbs like a homesick angel,” was not describing the B-18. On
the contrary, the B-18 seemed to have a strong affection for the ground. When we
took off with a heavy load from a short strip, we would stick its tail between
the fence posts, hold the brakes, and open the throttles wide. When all the
parts seemed to be shaking at the right frequency, and all the noises were at
the proper resonance, and the two seemed to be in a reasonable harmonious
relationship, we would release the brakes. Nothing would happen for a while. But
then, pretty soon, the aircraft would start to move.
The test pilot, who
in describing the performance of a new airplane, said, “It takes off like a
scalded cat and climbs like a homesick angel,” was not describing the B-18. On
the contrary, the B-18 seemed to have a strong affection for the ground. When we
took off with a heavy load from a short strip, we would stick its tail between
the fence posts, hold the brakes, and open the throttles wide. When all the
parts seemed to be shaking at the right frequency, and all the noises were at
the proper resonance, and the two seemed to be in a reasonable harmonious
relationship, we would release the brakes. Nothing would happen for a while. But
then, pretty soon, the aircraft would start to move.
This performance, or lack of it, tended to alarm passengers not familiar with the plane. But it didn’t alarm us because we knew that no matter what, it would get off the ground in time to clear the trees at the far end of the strip. It always had, and it always would. It simply would bump slowly down the field, and then at the last possible moment, when those of little faith would be looking somewhat drawn it would lurch into the air and soar triumphantly over the trees, not without, I may add, a certain grace.
The B-18’s affection for the ground was demonstrated again when it landed. As it touched the ground, transferring its weight from its wings to its landing gear, it would emit an audible little sigh, much like a fat lady sitting down in a soft chair.
We didn’t pay any attention to the max gross weight listed in the tech order. As a matter of fact, I don’t think we knew that it was. We simply loaded the aircraft with anything we wanted to, having regard only for a proper center of gravity. The way we established the proper center of gravity was by saying, “Chief, better move some of those cases farther forward.”
The B-18 always
climbed at the same rate—350 feet per minute—and there was nothing we could do
about that either. Once we had leveled off at cruising altitude, we could trim
it so that it would fly almost hands-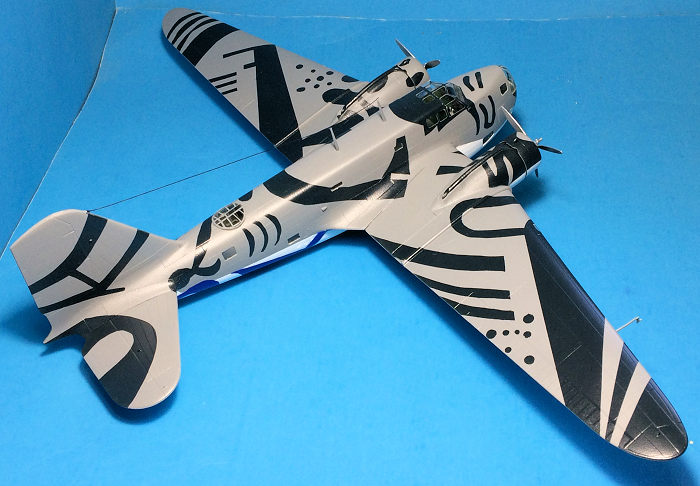 off. That was nice, because the auto pilot
never worked properly anyway. The armament people to whom this problem would be
referred would always blame the whole thing on “dirty dashpots.” We apparently
accepted this explanation and never thought to pursue the subject farther. To
this day, I am not quite up on dashpots or why they couldn’t be kept clean.
off. That was nice, because the auto pilot
never worked properly anyway. The armament people to whom this problem would be
referred would always blame the whole thing on “dirty dashpots.” We apparently
accepted this explanation and never thought to pursue the subject farther. To
this day, I am not quite up on dashpots or why they couldn’t be kept clean.
Wikipedia is a popular, although usually dry and sometimes unreliable, source of information, and I thought the above passage by Winton R. Close from the book, “Flying American Combat Aircraft of WWII 1939-45” was more fitting for the history of the B-18. Winton Close flew not only the B-18 but many other of the “heavy” bombers of the 1940s and 50s, retiring as a Major General. He passed away in 2008. For those interested, there’s more to his reminisces of flying the B-18 in the book.
Also, did you know that Jimmy Doolittle considered the B-18 for his famous raid? I didn’t think so! It only lost out to the B-25 because its wingspan was too great to safely clear the deck. I’m sort of paraphrasing, but for you doubters out there, check “The Doolittle Raid” by Carroll Glines (pages 19-20). One can only imagine how history would have changed for the B-18 had it been flown on that mission!
| THE KIT |
A preview of this kit can be found here.
| CONSTRUCTION |
Unfortunately I started this kit several years ago, building it off and on as I had time and/or motivation, and since I have no notes or “in progress” photos need to go by memory regarding much of the earlier construction—and this from a guy who can forget what he had for breakfast later that same day.
Looking over the
instructions to assist with recalling the build process, these have you starting
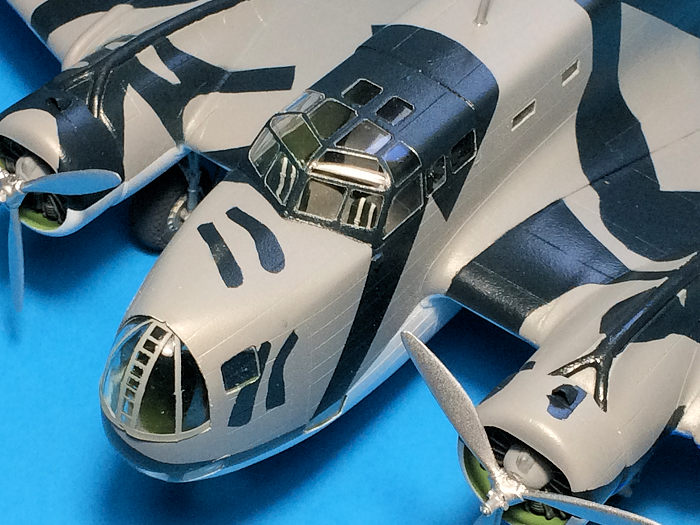
the construction with, not surprisingly, the interior. There is quite a bit of
photo-etch detailing including seatbelts, knobs and levers, and an instrument
panel, providing for a nicely detailed cockpit. I don’t recall any specific
issues with the interior in general, with the possible exception of losing one
or two of the teeny tiny levers, and going by both the kit instructions and
photographs painted the interior a co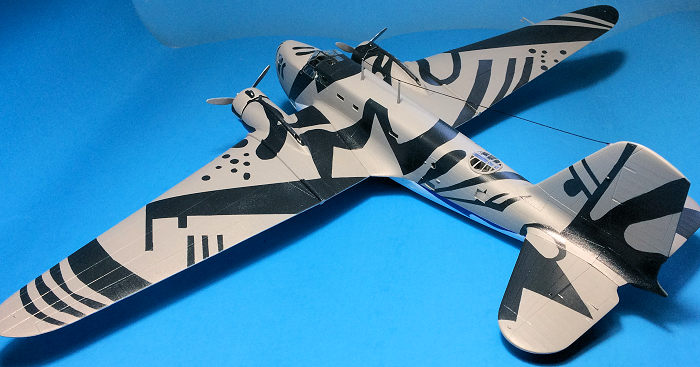 mbination of Interior Green and Aluminum.
The canopy is quite clear and has a number of windows, so the cockpit area
especially is quite visible, and as a result you can actually appreciate the
photo-etch details.
mbination of Interior Green and Aluminum.
The canopy is quite clear and has a number of windows, so the cockpit area
especially is quite visible, and as a result you can actually appreciate the
photo-etch details.
Before closing up the fuselage, you need to install most of the clear windows from the inside. I vaguely remember some of the numbers listed in the instructions for which window goes in what opening were incorrect, but perhaps it’s just my memory playing tricks with me (what was that I had for breakfast today?). The moral of this story is to test fit all the windows first to make sure you have the right ones in place; it might seem obvious what goes where, but some of these windows are quite similar but not exactly matching in size and shape. I seem to recall that these windows fit quite nicely once I figured out the what/where thing, but I didn’t take the time or effort to ensure that each was perfectly flush with the outside of the fuselage, which many modelers do. One area I did deviate from the instructions was by not installing the nose and upper fuselage turrets at this point, but waited until I had finished construction and painting the model. I had no problem with getting either turret to fit at the end so would recommend this procedure, simply to save a bit of sanity in trying to mask them off when painting the exterior of the fuselage.
Fuselage halves and
wings were next in line. Fit of these parts was adequate but definitely not
Tamiya-like, so I had to break out the gap-filling superglue, putty, and sanding
sticks to get things looking nice. But since I’ve had to do this with Tamiya
kits that’s not really saying much except about my lack of modeling ability. The
kit has two options for engine nacelles depending on the type of exhaust system,
so you need to decide which decal markings to use in advance so the proper
nacelle part is chosen. I initially chose markings that have one long exhaust
pipe, although am not sure if it’s the correct option for the paint scheme I
changed to mid-build. One little nit-pick: I’m not sure why Special Hobby
decided to mold this long pipe in the nacelle rather than having it a separate
piece, since it made painting the pipe more of a pain that it probably needed to
be. I did spend quite a bit of time and effort trying to remove the seam lines
 that occurred when the nacelle option was glued to the wing, since it appeared
these lines didn’t exist on the real aircraft.
that occurred when the nacelle option was glued to the wing, since it appeared
these lines didn’t exist on the real aircraft.
The Wright radial engines are pretty basic, consisting of the cylinders and crankcase molded unto a backing that in turn is glued to the front of the nacelle, but you don’t see much more of these parts once in the cowlings so it’s not really an issue. I painted the crankcase gray and the cylinders black, and brought out some details of the latter by dry-brushing silver. As an aside, I ended up gluing the engines inside the cowlings instead of to the nacelle. I found this gave me better control over final placement that would affect installation of the propeller.
Eduard canopy masks were used to mask off all the clear parts and were especially appreciated due to the large amount of framework on the turrets and the windscreen, (which fit quite well to the fuselage, by the way). Now off to the paint shop.
| COLORS & MARKINGS |
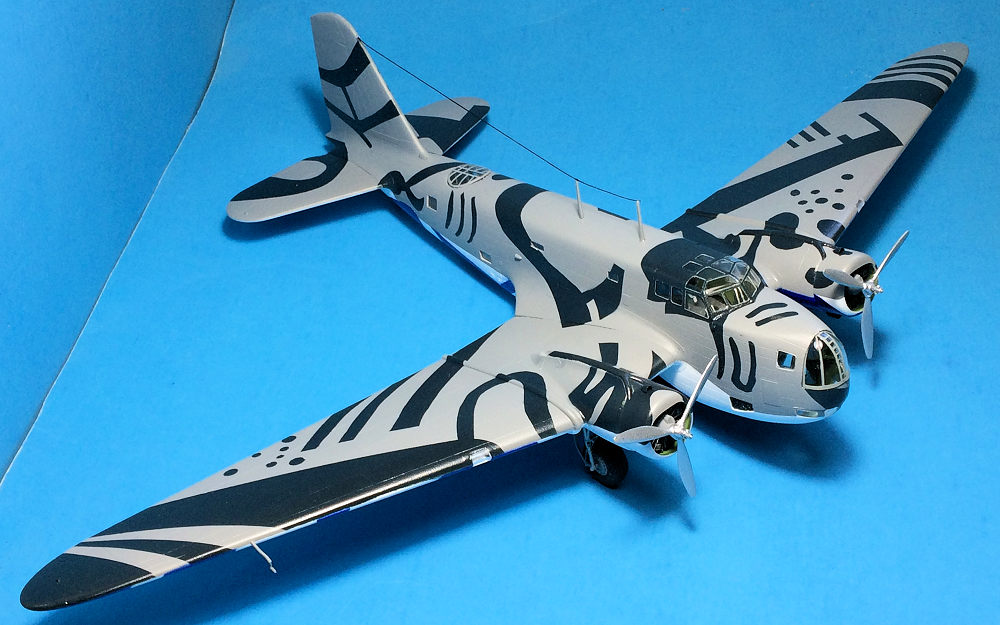
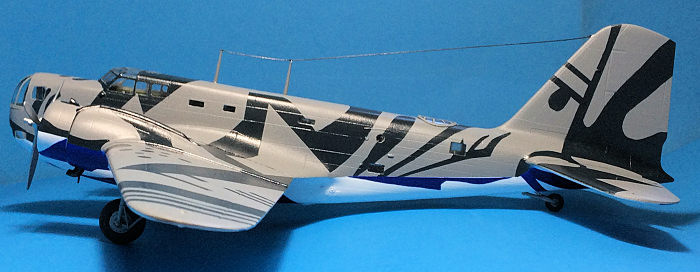
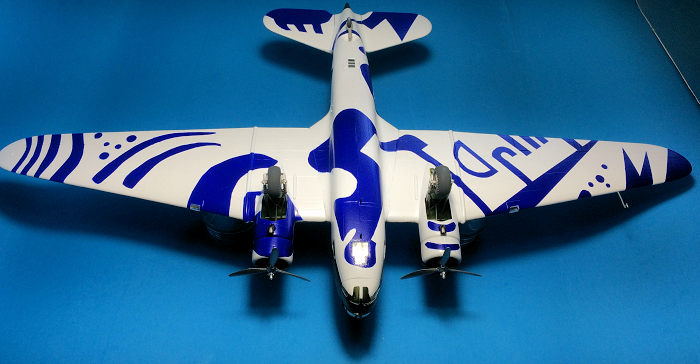
McClelland Barclay was an American illustrator who came up with some rather unusual camouflage schemes for American aircraft in the late 1930s. Some of these were experimentally applied to actual aircraft, and from what I can a few of these examples were temporarily used during war game exercises. Partway through the build process, I found a color profile of a B-18 done in one of Barclay’s schemes in the book, “The Douglas B-18 and B-23: America’s Forsaken Warriors,” by Dan Hagedorn Sr and Jr and decided I just had to model it. Unfortunately, the book only has one grainy photograph of this specific airplane, along with a drawing of the sides and top (but no bottom), so I didn’t have much to go on. Noted military aircraft color expert Dana Bell provided me with an additional photograph of the airplane that helped some. However I was left to my own imagination on the scheme for certain areas, especially when I discovered the drawings not only didn’t exactly match the photographs.
 So, having decided
on this scheme I airbrushed Alclad II Gray Primer & Microfiller on the airframe
and, after dealing with the ever-present flaws that occur in all my builds, I
decanted Tamiya white Fine Surface Primer from a rattle can and airbrushed the
whole model with it. I followed up with decanting Tamiya rattle can white
(TS-26) and airbrushed the bottom of the airframe with it, which may have been a
wasted step since I didn’t really notice a difference between this white and the
primer. Next I masked the lower airframe and airbrushed Model Master Neutral
Gray on the upper airframe. Now came the hard part, masking that fancy Barclay
scheme. I decided to do the upper pattern first, using Model Master Dark Sea
Blue, which seemed like a close-up match for Barclay’s Special Dark Blue,
whatever color that actually was. The last color called for was Ultramarine
Blue, a very pretty color, and after searching high and low for it, to my
surprise discovered that Revell of Germany offers it in enamel (and, yes, I
actually was able to get a tin delivered to the USA). Actually, masking wasn’t
too hard, just time-consuming, and even using Tamiya tape I ended up with a
little overspray and bleeding that required some touch-ups. A final coat of
Future with a touch of Tamiya flat base added for a satiny gloss coat was
airbrushed on to protect the paint job.
So, having decided
on this scheme I airbrushed Alclad II Gray Primer & Microfiller on the airframe
and, after dealing with the ever-present flaws that occur in all my builds, I
decanted Tamiya white Fine Surface Primer from a rattle can and airbrushed the
whole model with it. I followed up with decanting Tamiya rattle can white
(TS-26) and airbrushed the bottom of the airframe with it, which may have been a
wasted step since I didn’t really notice a difference between this white and the
primer. Next I masked the lower airframe and airbrushed Model Master Neutral
Gray on the upper airframe. Now came the hard part, masking that fancy Barclay
scheme. I decided to do the upper pattern first, using Model Master Dark Sea
Blue, which seemed like a close-up match for Barclay’s Special Dark Blue,
whatever color that actually was. The last color called for was Ultramarine
Blue, a very pretty color, and after searching high and low for it, to my
surprise discovered that Revell of Germany offers it in enamel (and, yes, I
actually was able to get a tin delivered to the USA). Actually, masking wasn’t
too hard, just time-consuming, and even using Tamiya tape I ended up with a
little overspray and bleeding that required some touch-ups. A final coat of
Future with a touch of Tamiya flat base added for a satiny gloss coat was
airbrushed on to protect the paint job.
I’m happy to report that decal application wasn’t an issue for me, which is never the case. Then again, no decals were used, so I’m still batting a thousand.
| FINAL CONSTRUCTION |
 The main landing
gears are truly fiddly and constructed from a myriad of plastic and photo-etch
parts, but since I built them so long ago I have no recollection of the misery
this process must have caused. That probably coincided when one of those “lack
of motivation” moments occurred and the model sat in its box for some time.
There’s nothing more than some minor indentations inside the wheel well where
the gears attach, so I used a goodly amount (“slathering” is probably the proper
word) of 5-minute epoxy to ensure they stayed put. Whether they will hold the
weight of the model intact over a period of time is another question. Same goes
for the non-retractable tail gear, which I also attached with epoxy. The props
on this specific airplane were likely in “natural metal finish” so I painted
mine Aluminum. The last items installed were the resin pitot tube and the
various antenna, and looking at it in hindsight I butchered the stretched sprue
wiring enough that I probably should have left it off. But, given time, it will
probably fall off on its own, about the time the model collapses when the
landing gear give out.
The main landing
gears are truly fiddly and constructed from a myriad of plastic and photo-etch
parts, but since I built them so long ago I have no recollection of the misery
this process must have caused. That probably coincided when one of those “lack
of motivation” moments occurred and the model sat in its box for some time.
There’s nothing more than some minor indentations inside the wheel well where
the gears attach, so I used a goodly amount (“slathering” is probably the proper
word) of 5-minute epoxy to ensure they stayed put. Whether they will hold the
weight of the model intact over a period of time is another question. Same goes
for the non-retractable tail gear, which I also attached with epoxy. The props
on this specific airplane were likely in “natural metal finish” so I painted
mine Aluminum. The last items installed were the resin pitot tube and the
various antenna, and looking at it in hindsight I butchered the stretched sprue
wiring enough that I probably should have left it off. But, given time, it will
probably fall off on its own, about the time the model collapses when the
landing gear give out.
| CONCLUSIONS |
This is really a nice kit and I’m glad Special Hobby released it. For some reason, I find the flat nose of the B-18 more attractive than the bulbous one on the B-18A, also offered by Special Hobby. Construction wasn’t overly difficult and generally speaking the photo-etch and resin details are nice additions. That being said, I’ll probably not build another. This one took long enough to complete.
| REFERENCES |
Hagedorn, Dan Sr and Dan Hagedorn Jr. The Douglas B-18 and B-23: America’s Forsaken Warriors. Manchester: Crecy Publishing Ltd., 2015.
Higham, Robin (editor). Flying American Combat Aircraft of WWII 1939-45. Mechanicsburg: Stackpole Books, 2004.
Wolf, William. Douglas B-18 Bolo The Ultimate Look: from Drawing Board to U-Boat Hunter. Atglen: Schiffer Publishing Ltd.,2007.
15 June 2018
Copyright ModelingMadness.com
If you would like your product reviewed fairly and fairly quickly, please contact the editor or see other details in the Note to Contributors.
Back to the Main Page Back to the Review Index Page Back to the Previews Index Page