Hasegawa 1/32 P-12 E
| KIT #: | ? |
| PRICE: | $34.95 MSRP |
| DECALS: | One option |
| REVIEWER: | Tom Cleaver |
| NOTES: | Re-issue |
| HISTORY |
While Boeing is today known as the world's premiere designer, builder and manufacturer of very large commercial airplanes, the company got its start in the 1920s by beating out Thomas Morse for the contract to produce the MB-3 fighter. With what they had learned from this, the first mass-produced American fighter plane, Boeing designed the XPW-8, which was a better airplane that would serve as the basis for a series of fighters designed and built in the mid-1920s for both the Army and the Navy, the first of which would be the PW-9 for the Army. With this, Boeing became locked in a struggle with Curtiss to become the military's premiere fighter company.
 By 1926, the Navy
had decided to standardize on the radial powerplants, which led to the
order of 32 F2B-1s in March 1927; a larger wing which allowed lower landing
speeds distinguished the 74 F3B-1s which reached the fleet in February
1928.
By 1926, the Navy
had decided to standardize on the radial powerplants, which led to the
order of 32 F2B-1s in March 1927; a larger wing which allowed lower landing
speeds distinguished the 74 F3B-1s which reached the fleet in February
1928.
Boeing, which faced strong competition from Curtiss' Hawk derivatives, came up with the Model 83, powered by the brand-new 500 h.p. Pratt & Whitney R-1340B. The airplane was first flown June 25, 1928, and resulted in an order by the Navy as the F4B-1 and the Army as the P-12. This series of fighters marked the last time the two services would operate the same fighter equipment until the arrival of the North American Sabre/Fury series 20 years later.
In December 1930, Boeing offered the Model 218, which was the Model 89 with an all-metal fuselage. This became the Army P-12E and the Navy F4B-3. While the Model 219 looked radically different from the Model 83, it was the exact same airplane under the metal skinning of the fuselage, other than the rollover bar installed just aft of the cockpit that led to the large headrest, and the different, larger, vertical fin and rudder.
The Army order for 135 P-12Es came on March 3, 1931, with the first flight of a production P-12E coming on October 15, 1931. There was a further change to the aircraft’s appearance with the addition of the “Panama kit conversion” to allow stowage of a life raft in the headrest. Only 110 of these aircraft were built as P-12Es, with the last 25 built as P-12Fs, which differed from the P-12Es in having a Pratt & Whitney R-1340-19 engine, which provided 600 hp on takeoff and 500 hp at 11,000 feet rather than the 8,000 feet of the P-12E. The last ten P-12Fs had a steerable tailwheel like the Navy F4B-3s and F4B-4s.
 The P-12Es and
P-12Fs were the last biplanes in major service with the U.S. Army, and
units were still equipped with them throughout the period of first-line
service of the P-26 monoplane, only being sent to second-line service when
they were replaced with Seversky P-35s and Curtiss P-36s in 1937. They
were used as fighter trainers up until late 1942.
The P-12Es and
P-12Fs were the last biplanes in major service with the U.S. Army, and
units were still equipped with them throughout the period of first-line
service of the P-26 monoplane, only being sent to second-line service when
they were replaced with Seversky P-35s and Curtiss P-36s in 1937. They
were used as fighter trainers up until late 1942.
The P-12E series were supremely maneuverable and loved by all who flew them for their tractability and performance. My father, who once flew one as a civilian after it was brought in to the Boeing School of Aeronautics for repairs, told me it was so responsive you could make it turn by putting your arm out to one side or the other. The combat performance of the type was shown by Robert Short, who flew the Model 218 prototype in combat over Shanghai and shot down two Japanese A4Ns before being shot down himself.
I saw what might be the last flight of a P-12E in 1978, when the Planes of Fame P-12E was flown during their annual airshow, making low passes down the runway in company with their P-26A. Today, the airplane would need to have its wings rebuilt with new spars to be airworthy. Another P-12E is on display at the Air Force Museum at Wright-Patterson, though only the fuselage, engine and tail surfaces are original.
| THE KIT |
Hasegawa’s 1/32 P-12E first appeared in the mid-1970s, along with the
F4B-4. The kit has been re-released over the years with several different
markings options. Most recently it was released this fall with markings
for the squadron C.O. of  the
6th Pursuit Squadron in Hawaii. These are the markings of the P-12E in the
Air Force Museum. The original airplane was heavily damaged in July 1934
at Hickam Field when a P-12B was slammed into it by high winds.
the
6th Pursuit Squadron in Hawaii. These are the markings of the P-12E in the
Air Force Museum. The original airplane was heavily damaged in July 1934
at Hickam Field when a P-12B was slammed into it by high winds.
The kit features petite raised detail with rivets on the fuselage, which is very accurate when compared with the full-size airplane. The corrugated tail surfaces are also well done, and the fabric effect on the wings is very convincing. I had forgotten that the P-12/F4B kits were released before the P-26 until I looked at the one-piece R-1340 engine, which is not as nicely detailed as the R-1340 in the P-26 kit, which has a separate face piece.
As evidence that the kit was originally conceived as an F4B-4, it comes with a tailwheel, which is incorrect for all P-12s except the last ten P-12Fs.
| CONSTRUCTION |
Overall, construction of the model was quite easy, because the fit of the parts was so good I only needed to use Mr. Surfacer for the seams where the upper forward fuselage with the cabane struts is attached to the fuselage.
 Construction is
very straight-forward. I began with the wings, and drilled out the
handgrips in the outer wingtips of the lower wings and the center section
of the upper wing. The metal ailerons, which have a corrugated surface,
are separate from the upper wing, and fit very well once the wing is
assembled. The navigation lights molded on the upper wing are for the F4B-4
and are incorrect for the P-12E. I made correct tip lights from sprue.
Construction is
very straight-forward. I began with the wings, and drilled out the
handgrips in the outer wingtips of the lower wings and the center section
of the upper wing. The metal ailerons, which have a corrugated surface,
are separate from the upper wing, and fit very well once the wing is
assembled. The navigation lights molded on the upper wing are for the F4B-4
and are incorrect for the P-12E. I made correct tip lights from sprue.
The cockpit was next. This is quite simple, with various items molded on the fuselage sides. A super-detailer could have fun with this, but for me the cockpit was sufficient for the model I wanted to create and I only sanded down the seat to make it thinner, and made lap belts with lead foil from a wine bottle. At this time, US military aircraft did not use shoulder harnesses. The interior was painted with ModelMaster Aluminum covered with Sealer, which is a convincing representation of the overall painted finish of aluminum lacquer. When this was all painted and fitted in the left fuselage half I closed up the fuselage. I was able to scrape away the seam on the lower rear fuselage without harming the raised detail, due to the overall good fit of the parts.
The upper fuselage with the cabane struts needed some cleanup of minor flash, as did the landing gear. As mentioned above, I had to use Mr. Surfacer on the seam where the upper forward fuselage was attached, and then I rescribed the missing panel lines.
I checked the fit of the tail surfaces and lower wing to the fuselage, and decided I would leave it in sub-assemblies for painting, so I didn’t have to do a lot of masking.
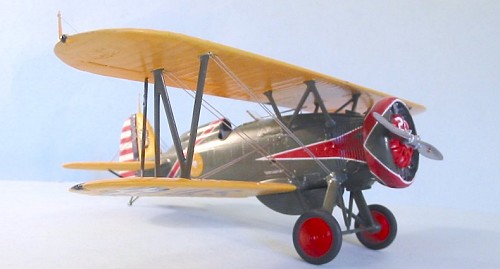
 With the engine
being one-piece, I had to paint the face red, then hand paint the cylinder
heads with ModelMaster Magnesium and Aluminum, which I then covered with a
thinned coat of Tamiya “Smoke” to pop out detail. I glued the engine
inside the Townend Ring cowling, and sanded the joints smooth.
With the engine
being one-piece, I had to paint the face red, then hand paint the cylinder
heads with ModelMaster Magnesium and Aluminum, which I then covered with a
thinned coat of Tamiya “Smoke” to pop out detail. I glued the engine
inside the Townend Ring cowling, and sanded the joints smooth.
I finished construction by paring down the mount for the tailwheel on the fuselage and replacing that with a tailskid made from Evergreen plastic rod. Since photos show that the original airplane I was doing had radio, I made antenna masts from Evergreen rod and attached these to the upper wing and vertical fin.
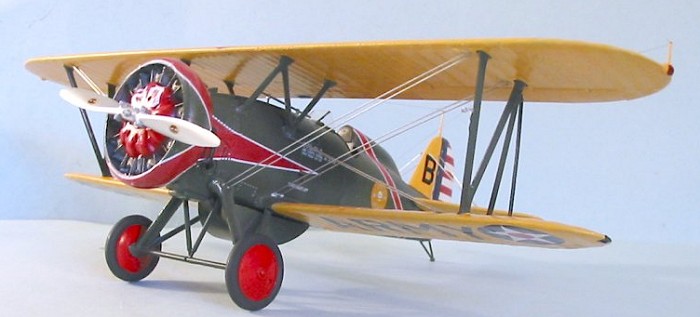
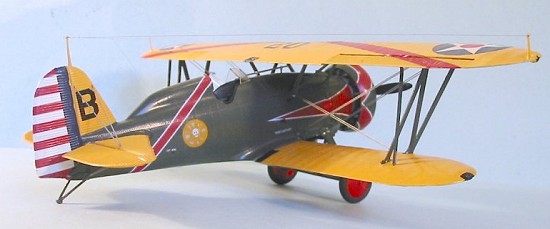
| COLORS & MARKINGS |
Painting:
The Army “Olive Drab” used between the wars was actually a Dark Olive Green
that was originally developed from British P.C.10. I used Xtracrylix
British Dark Green for the fuselage, struts, landing gear and cowling. The
wings and tail surfaces were painted with Xtracrylix “British Rescue
Yellow” which is an intense yellow that is close to the “Insignia Yellow”
used by the U.S. Army at the time. Both colors were “post shaded” slightly
by putting a few drops of white in and going back over the
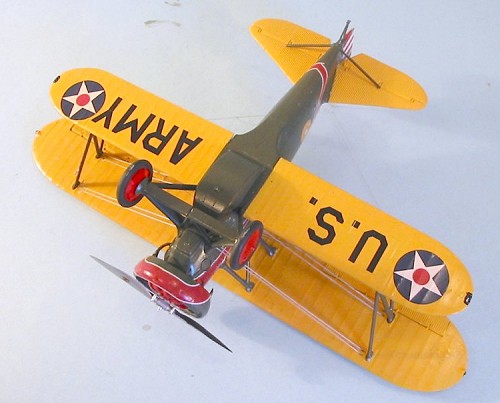 areas. This was mostly
done just to break up the monochromatic colors and was done subtly enough
it probably doesn’t show up in the photos - it only shows up in good
lighting in person. When these paints were dry, I gave the model a coat of
Future.
areas. This was mostly
done just to break up the monochromatic colors and was done subtly enough
it probably doesn’t show up in the photos - it only shows up in good
lighting in person. When these paints were dry, I gave the model a coat of
Future.
The prop was painted with SNJ Aluminum and then polished with the SNJ polishing powder.
Assembly continues:
With the model painted, I attached the tail surfaces, the lower wing, the landing gear and the drop tank. It was then time for decals.
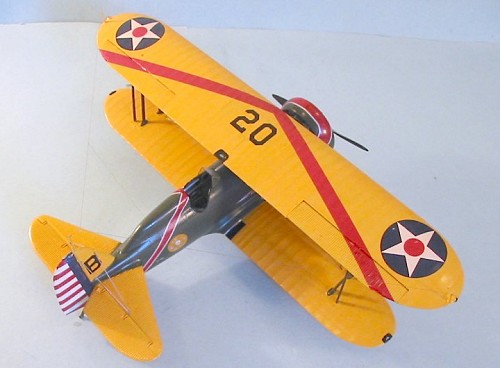
Decals:
I used the kit decals. The “B” on the rudder is correct for the Air Force Museum display airplane, but a photo in the Squadron In-Action book shows the real airplane had a slightly different font. I looked around the decal dungeon, but couldn’t find one that was close to this, so I just went with the kit decal as being “close enough.” The new Hasegawa decals have white in them, and these worked well. I found I needed quite a bit of decal solvent to get the rudder stripes and that part of the upper wing stripe that went over the ailerons to shrink down into the corrugations. Otherwise, everything went on with no problem. When all was finished, the model was washed to get rid of dried solvent, and I gave everything a coat of Xtracrylix Gloss Varnish.
| FINAL CONSTRUCTION |
I attached all the exhaust stacks to the engine, and then attached the engine to the model without problem. The upper wing was easy to mount, attaching it to the cabane struts and then gluing the outer “N” struts and aileron actuating struts in position.
I made a windscreen from plastic sheet since the clear part was too thick. This was attached with white glue. The radio antenna wires were done with nylon thread.
The interplane rigging and tail bracing wires were done with .010 steel wire attached with Cyanoacrylate glue.
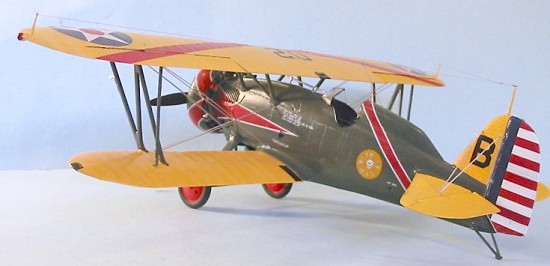
| CONCLUSIONS |
 These Hasegawa 1/32
“Golden Age” models have definitely held up over the years. The parts fit
much better than any other contemporary kits from that period, though the
plastic is more brittle than we are used to today, so care must be taken
not to break things. As 30-year-old products, each is still the best kit of
that airplane available in any scale. The P-12E is easy to assemble, while
offering room for a modeler to do some super-detailing if they so desire.
Strictly out of the box, the P-12E makes into a very nice model and the
corrections to make it a “real” P-12E are easy to do. The problem of upper
wing attachment for the “biplane-challenged” is simplified by the design of
the cabane struts as an integral part of the fuselage, while the interplane
rigging is quite simple and made easy by the molded-in attachment points
that leave nothing to guesswork.
These Hasegawa 1/32
“Golden Age” models have definitely held up over the years. The parts fit
much better than any other contemporary kits from that period, though the
plastic is more brittle than we are used to today, so care must be taken
not to break things. As 30-year-old products, each is still the best kit of
that airplane available in any scale. The P-12E is easy to assemble, while
offering room for a modeler to do some super-detailing if they so desire.
Strictly out of the box, the P-12E makes into a very nice model and the
corrections to make it a “real” P-12E are easy to do. The problem of upper
wing attachment for the “biplane-challenged” is simplified by the design of
the cabane struts as an integral part of the fuselage, while the interplane
rigging is quite simple and made easy by the molded-in attachment points
that leave nothing to guesswork.
January 2006
Kit courtesy of my wallet.
Copyright ModelingMadness.com. All rights reserved. No reproduction in part or in whole without express permission.
If you would like your product reviewed fairly and fairly quickly, please contact the editor or see other details in the Note to Contributors.