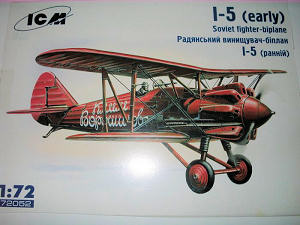
ICM 1/72 Polikarpov I-5 (early)
|
KIT #: |
72059 |
|
PRICE: |
$ |
|
DECALS: |
Two options |
|
REVIEWER: |
Brian Baker |
|
NOTES: |
My examples were purchased and built during 2006. |
The I-5
was the first Polikarpov fighter design to be produced in quantity, and came
after the more modern looking I-1 all
metal, cantilever wing monoplane fighter which was not successful
in VVS-RKKA service.
A step backwards aerodynamically, the I-5 was typical of “late twenties”
fighter designs, being a wire braced
open cockpit biplane with a fixed landing gear, powered by a 480 hp. 9
cylinder Bristol Jupiter
VII
radial engine. Production models
had the M-22 engine, a Russian copy of the Jupiter. First flight was
29 April
1930,
and a total of 800 was delivered to the Soviet Air Force between 1931 and 1934,
with the plane entering squadron service in 1933. They became the standard
Soviet fighter during the middle thirties, and were later replaced by the I-15
and I-16 from the same design bureau. A
few were still in service during the beginning of the “Great Patriotic War”, as
the Russians dubbed World War II, and many were destroyed in the air or on the
ground during the initial stages of Operation Barbarossa.
 There have
been two kits of this aircraft issued by
ICM,
one depicting the early version and first prototype, and the later representing
the production model with a circular Townend ring around the radial engine.
Different rudders were used on some of the prototypes.
There have
been two kits of this aircraft issued by
ICM,
one depicting the early version and first prototype, and the later representing
the production model with a circular Townend ring around the radial engine.
Different rudders were used on some of the prototypes.
 Cast in
bright red plastic, the kit consists of 42 parts. The mold work is some of the
best I’ve seen from any kit manufacturer, with petite forms, exquisite details,
and nearly perfect fit all around. For a biplane
with this much detail, it should be the ideal kit.
However, there is one major problem, or
at least this is true for the two kits that I have, which include one of each
type. I have never seen such
brittle plastic. When I first tried
to cut some of the smaller struts and other tiny parts off of the sprues, these
parts snapped into three or four fragments,
some sailing around the room and into oblivion, requiring scratchbuilding
of new parts as replacements. This
happened with the interplane “N” struts, and I wound up taping the struts and
pieces in place with masking tape and surgically removing them from the sprue
with a brand new Exacto blade.
However, later in the process, I managed to drop one of the fuselage halves on
the workbench, and was surprised that it shattered into three (count ‘em)
pieces. I managed to glue them together, but it was a PITA. I emailed
ICM
telling them of my experience with the kit, but they never responded.
So much for customer service.
Cast in
bright red plastic, the kit consists of 42 parts. The mold work is some of the
best I’ve seen from any kit manufacturer, with petite forms, exquisite details,
and nearly perfect fit all around. For a biplane
with this much detail, it should be the ideal kit.
However, there is one major problem, or
at least this is true for the two kits that I have, which include one of each
type. I have never seen such
brittle plastic. When I first tried
to cut some of the smaller struts and other tiny parts off of the sprues, these
parts snapped into three or four fragments,
some sailing around the room and into oblivion, requiring scratchbuilding
of new parts as replacements. This
happened with the interplane “N” struts, and I wound up taping the struts and
pieces in place with masking tape and surgically removing them from the sprue
with a brand new Exacto blade.
However, later in the process, I managed to drop one of the fuselage halves on
the workbench, and was surprised that it shattered into three (count ‘em)
pieces. I managed to glue them together, but it was a PITA. I emailed
ICM
telling them of my experience with the kit, but they never responded.
So much for customer service.
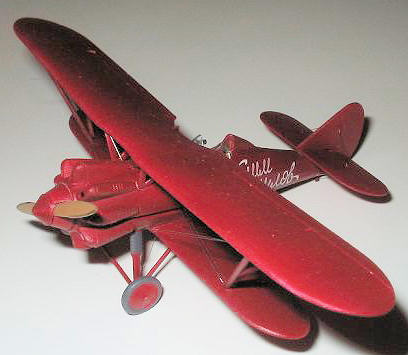
Assembly,
aside from the problems listed above, was pretty straightforward. The interior
is quite complex, with a seat, instrument panel, sidewall structure, floor,
rudder pedals, and a control stick. Note that this assembly is extremely
fragile, so don’t drop it or breathe on it too hard.
The instructions are clear about how everything goes together, and what
colors they are to be painted. I used masking tape for the seat belts, as these,
like batteries, are not included.
Once the cockpit interior is complete, the fuselage halves can be joined.
 Next,
the lower wing panels can be attached to the fuselage, and these virtually snap
into place. At this point, the cockpit interior should be masked over or filled
with tissue during the rest of the construction process.
There is no engine per se, as on this version, only the cylinder head
fairings show. The prop fits on
between a spinner face plate and tip, and turns on a small shaft that goes
through the faceplate. I then installed the elevators and horizontals, as well
as the tailskid.
Next,
the lower wing panels can be attached to the fuselage, and these virtually snap
into place. At this point, the cockpit interior should be masked over or filled
with tissue during the rest of the construction process.
There is no engine per se, as on this version, only the cylinder head
fairings show. The prop fits on
between a spinner face plate and tip, and turns on a small shaft that goes
through the faceplate. I then installed the elevators and horizontals, as well
as the tailskid.
I
would advise painting at this stage.
I did the all-red prototype, mainly because it was colorful, but also
because it was easier to paint than the second version, although the all silver
version shouldn’t present much of a challenge.
After painting, I mounted the canbane struts, making sure that they were
set at the proper angle by use of a set of dividers. At the same time, I
installed the windshield and gunsight, which would have been difficult with the
upper wing attached. I used the kit
cabane struts, but had to scratchbuild the “N” struts due to the brittleness of
the plastic. The landing gear is
also very delicate, but after repairing one strut that broke, I managed to get
the rest of it installed OK. I used
regular rod stock for the spreader bar.
At this stage, I repainted any places that needed it, and then
installed the prop, wheels, and other minor details.
One thing to remember is that this kit contains a
few interior parts that cannot be seen once the kit is assembled.
The upper part of the tailskid is invisible, as is the portion of the
control stick underneath the seat and floorboards.
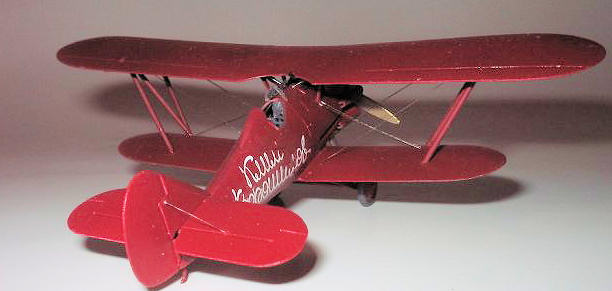
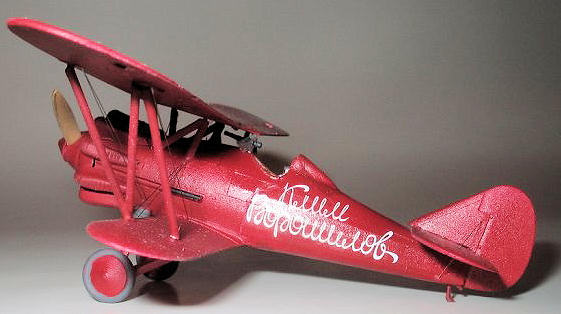
These are nice, but why bother. I painted my model in bright red, and
applied the decals to the fuselage side as shown in the drawings. This was the
aircraft of the Red Army Air Force Chief J. Alksnis, who
used it as a personal aircraft during
1931.
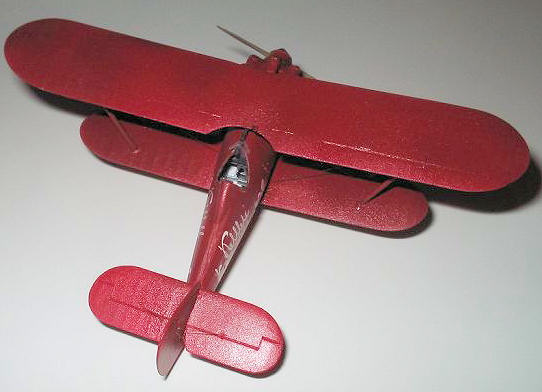
Rigging
 Rigging
details are well illustrated in the box art, and the plane is very much like a
Curtiss P-12. There are three
flying wires (2 parallel) and two parallel landing wires on each side.
Between the cabanes are two wires, and the tailplane is braced with a
single wire above and below each horizontal stabilizer. The rear struts on the
landing gear assembly should be braced, but these are not shown on the box art.
I used unstranded electronic wire, which worked out quite well. Stretched
sprue could also be used, but it would be a lot more work.
Rigging
details are well illustrated in the box art, and the plane is very much like a
Curtiss P-12. There are three
flying wires (2 parallel) and two parallel landing wires on each side.
Between the cabanes are two wires, and the tailplane is braced with a
single wire above and below each horizontal stabilizer. The rear struts on the
landing gear assembly should be braced, but these are not shown on the box art.
I used unstranded electronic wire, which worked out quite well. Stretched
sprue could also be used, but it would be a lot more work.
Second
Variant
ICM
also produces a production variant of this aircraft. This is cast in dark green
plastic, but this is just as brittle as the prototype’s red plastic.
This kit provides an engine and cowling ring, and also wheel pants.,
which the instructions say not to use. Otherwise,
the kits are very similar.
If
you want a model of this aircraft, this is the only show in town, although there
may have been a vacuform kit produced of this plane some years back.
Hopefully, later production models will
have solved the brittle plastic problem, in which case the kit will be an
excellent project. If not, I would
only recommend this kit for very experienced and tenacious modelers, as the
brittleness can lead to a lot of frustration and the creation of a lot of new
profanities and obscenities, things the wife and kiddies shouldn’t really hear.
Highly recommended subject to the above limitations.
Brian Baker
December 2009
Copyright ModelingMadness.com. All rights reserved. No reproduction in part or in whole without express permission.
If you would like your product reviewed fairly and quickly, please
contact
the editor or see other details in the
Note to
Contributors.
Back to the Main Page
Back to the Review
Index Page 2023