| KIT #: | B-45 |
| PRICE: | $10.00 second hand |
| DECALS: | Four options |
| REVIEWER: | Chris Peachment |
| NOTES: |
| HISTORY |
The RWD-8a was a Polish built trainer aircraft and was designed by the
well known Polish three man team,
Stanislaw Rogalski, Stanislaw
Wigura and Jerzy Drzewiecki, whose names I can spell though not pronounce. It
first flew in
1931 as a two seat open tandem cockpit aircraft with a high parasol wing, fixed
 long-travel
undercarriage, heavily sprung for those novice pilot landings, and tail skid.
The wings could be folded to the rear, which might make for an interesting
conversion. About 500 were built, making it the most numerous Polish aircraft at
that time. After the Nazi invasion of Poland several even went on bombing
missions armed with grenades. After that, a few were dispersed to Romania and
Latvia and two ended up in Hungary. Since I like rare and unusual aircraft, one
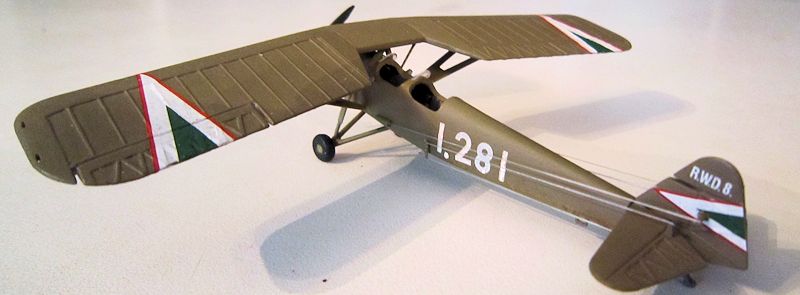
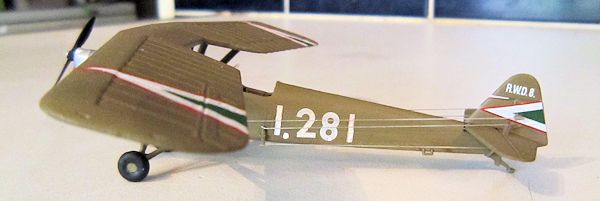
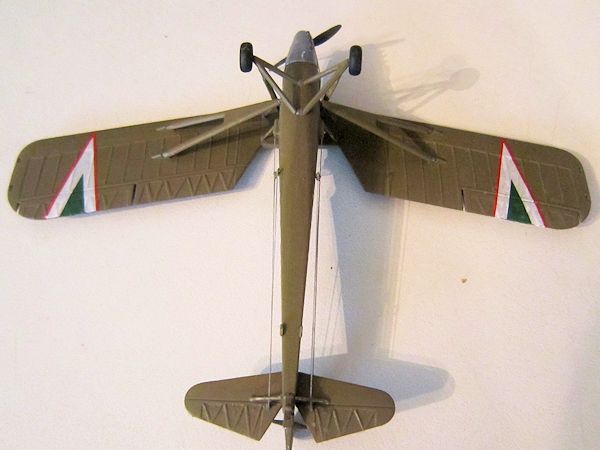
of these was what I chose to model. Those green, white and red triangle markings
are appealing.
long-travel
undercarriage, heavily sprung for those novice pilot landings, and tail skid.
The wings could be folded to the rear, which might make for an interesting
conversion. About 500 were built, making it the most numerous Polish aircraft at
that time. After the Nazi invasion of Poland several even went on bombing
missions armed with grenades. After that, a few were dispersed to Romania and
Latvia and two ended up in Hungary. Since I like rare and unusual aircraft, one
of these was what I chose to model. Those green, white and red triangle markings
are appealing.
| THE KIT |
I found this second hand under a table at an IPMS model meeting at RAF
Hendon in North London. The kit
 dates
from some time in 1990s at a guess, and is perfectly straightforward and
presents no large problems in construction. The plastic is grey and medium soft
and has no flash though some moulding seams.
dates
from some time in 1990s at a guess, and is perfectly straightforward and
presents no large problems in construction. The plastic is grey and medium soft
and has no flash though some moulding seams.
There are no etched parts, but two tiny curved clear windscreens with no
frames. The wheels are moulded in one piece with no clear wheel-hub demarcation.
Decals provide
four
options, Hungarian, Czech, Romanian Civil and Captured Luftwaffe.
| CONSTRUCTION |
Construction began as always with the interior, which has a seat for the
both cockpits, no instrument panels but two joysticks for the floor. The floor
didn't need to be sanded down to fit, which always a bonus. I painted the
interior matt silver and the seats leather. It was only after the fuselage
halves were mated that I noticed a large chunk missing from the coaming between
the cockpits, due to a moulding flaw. This was a hold up, but no great problem
as I inserted a couple of wedges of thick plastic card, and then sanded them
down once dried.
The nose was first sprayed with Humbrol silver, than masked and the rest
of the fuselage and wings painted as below.
 I
used my usual method when doing biplanes, or anything with struts, of finishing
the fuselage separately from the wings. Once all painted, joining the wings to
the fuselage is easy as the inner twin V cabane struts are chunky and have
square tabs and holes, which make for a sturdy joint. The outer cabane struts
however are moulded as too thick and square-sectioned, so these were replaced
with plastic rod. So too, with the two struts for the tailplane. The main wing
struts can now be fitted and they proved a perfect fit and good support for the
wings. Adding the undercarriage struts proved no problem either. All the
mounting holes and tabs proved impeccably well designed and strong.
I
used my usual method when doing biplanes, or anything with struts, of finishing
the fuselage separately from the wings. Once all painted, joining the wings to
the fuselage is easy as the inner twin V cabane struts are chunky and have
square tabs and holes, which make for a sturdy joint. The outer cabane struts
however are moulded as too thick and square-sectioned, so these were replaced
with plastic rod. So too, with the two struts for the tailplane. The main wing
struts can now be fitted and they proved a perfect fit and good support for the
wings. Adding the undercarriage struts proved no problem either. All the
mounting holes and tabs proved impeccably well designed and strong.
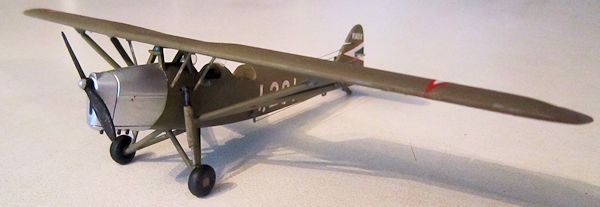
The row of exhaust stubs are tiny but well moulded into the underside of
the nose, and these can be hand painted dark rust from Vallejo.
For control lines I used elastic thread which had been pre-coloured
silver from a felt tip marker, and secured in place using a tiny drop of
superglue gel, placed with a sharpened toothpick. The rudder lines emerge from a
fairing below the front cockpit, and the elevator lines from a control horn
beneath the rear cockpit. No problems there either and they have the added
benefit of distracting from the fuselage numbers (see below). There are two
large lumps on each side of the front cockpit at about eye level, which I assume
might be rear view mirrors. I made them from scrap plastic card and painted the
rear silver.
Finally the prop was added and the windscreens glued in place using the new Humbrol Clearfix which is excellent, and much better than the old wood PVA glue I used to use.
| COLORS & MARKINGS |
The paint used all over was Tamiya Khaki, which I always use for Polish
khaki.
I painted the fuselage and wings separately before joining them, and I
am glad that I did. Having anticipated some trouble with decal silvering I gave
the fuselage a coat of Future Kleer, and dipped the fuselage codes into water.
It was then that the kit decided to fight back. The numbers were not all in one
decal, but printed separately. Gritting my teeth I fought back by sliding the
first number one in place. I should have known better. The number broke into
6 fragments. Undaunted, I staggered on, pushing all the
numbers into place and sliding them around in a puddle of water. They all broke
up. By now the kit was smirking at me. I should have known better that to pick a
fight with a Pole. My father was a pilot during WWII, and went through the
Battle of Britain. He once told me that the Poles were the best pilots he ever
saw. But not only that, their courage 'bordered on insanity'. I pressed on, and
the kit took all I could give it, and carried on fighting.
Finally, it was a case of stamping on the model just to show it who was
boss, or else stopping for a rethink. It went back in its box until I had slowed
my breathing and realised that the only way now was to brush paint the numbers.
I gave up strong drink and caffeine for three days to steady my hands, and put
on the strongest reading glasses I have. Using what little remained of the
decals as a guide, I filled the
 numbers
in with Vallejo matt off-white, and a fine brush. And I defy anyone to hand
paint a good figure of eight without much cursing.
numbers
in with Vallejo matt off-white, and a fine brush. And I defy anyone to hand
paint a good figure of eight without much cursing.
When I surveyed the results I realised I needed a stiff scotch. The
numbers looked quite good after that. In fact they still do, to the naked eye,
although the camera reveals some wonky elements to them.
It was then that I took a second look at the decal sheet and realised
that they also reproduced the numbers in black, which applied to some machines.
Crying down a plague from the gods on the wretched machine, I then wondered if I
dared sand off my efforts and chance the second lot of decals. Deciding that I
couldn't bear the possible disappointment, I called it a honourable draw and let
things stand. Polish trainer one, kit maker one.
Pictures of the real aircraft reveal that the upper end of the main
undercarriage legs was encased in a rubber tube, and this was
duly painted semi-matt black. The wheels presented a
problem in that the hub rims are not clearly defined. Here is a handy tip when
confronted with this. Take a fine felt tip black pen and run the tip around the
edge of the hubs, where they contact the tires. This will give you a good
boundary line and you can run the black tire paint up to it, but not over. It's
not perfect but there are no wheel masks for this kit, and the wheels are too
small to make some up.
No other colours were needed, apart from the seat leather and matt black
for the propeller with a silver spinner.
The other decals for wing and tail proved thick, so at least they didn't disintegrate but, despite several coats of Micro Set, they did not settle easily into the ribs or crevices of the ailerons. Eventually I slid a scalpel blade along the aileron lines and they bedded down a little better. But only after much pressing from thumbs encased in soft tissue.
| CONCLUSIONS |
I wanted this kit because I had never heard of it before, and, these
days, the more arcane the aircraft the better. And who wouldn't fall for an
obsolete trainer which took on the Nazi Blitzkrieg by flying at 90 knots over
the battlefield and lobbing grenades at the ene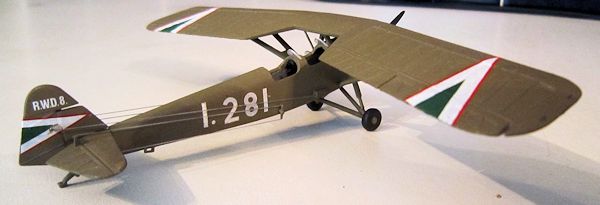 my
below.
my
below.
With hindsight the one thing that I would go back and do differently
would be deep-six those pesky fuselage decals, and find some in the spares box
or on an aftermarket sheet. I would recommend it to anyone as it is simple in
construction, pleasing to the eye, and will school beginners in patience if they
encounter the same decal problems. A coat of clear varnish over the decal sheet
might have helped. But I didn't think of that at the time.
| REFERENCES |
http://en.wikipedia.org/wiki/RWD_8
http://www.samolotypolskie.pl/samoloty/2571/126/RWD-82
http://www.jarekobi.republika.pl/rwd8.html
http://modelwork.pl/viewtopic.php?t=22297
If you would like your product reviewed fairly and fairly quickly, please contact the editor or see other details in the Note to Contributors.
2025