1/48 Vought VG-1166A
|
KIT # |
|
|
PRICE: |
$ |
|
DECALS: |
See review |
|
REVIEWER: |
Ronnie Murray |
|
NOTES: |
Testors 1/48 GeeBee R1 & Academy 1/72 F4U-1 used. |
|
HISTORY |
Navy Project: VG-1166A
In February 1938, the United States Navy published a requirement for a new, high-performance, carrier-based fighter. They were looking for an aircraft with significant abilities beyond that of the Grumman F4F Wildcat and Brewster Buffalo, which were being tested for production. The stage was set for a young designer named Rex Beisel to move in. Rex had spent the last 17 years proving his ideas and building award-winning aircraft. In 1923 he became the chief engineer of Curtis Aeroplane and Motor Company at the age of 29. His designs won the 1925 Pulitzer Race, taking first and second places. In 1929 he designed one of the first aircraft specifically built for dive-bombing, the F8C-2 Helldiver. He also designed the SBU-1 scout / dive-bomber which was the first plane of its’ type to exceed 200 mph. The breakthrough was credited to the installation of adjustable engine cowl flaps. Rex became Assistant Chief Engineer of the Chance Vought division of United Aircraft Corporation in 1931. In 1934, he received the Manley Memorial Medal and the Wright Brothers Medal for his work on the technical paper “Cowling and Cooling the Radial Air-Cooled Aircraft Engines.” Rex was promoted the following June to Chief Engineer and helped create the first monoplane scout / bomber, the SB2U Vindicator.
 During those same years the Granville
Brothers were also making aviation history. They designed and built some
of the most famous racing aircraft of the 1930’s. The highlight of their
career came when James Doolittle won the 1932 Thompson Trophy Race flying
a Gee Bee R-1 and then won the Shell Speed Dash at 296.287 mph. It was a
new world record for landplane speed. This was done using a
nine-cylinder, Pratt and Whitney T3D1 R-1340, supercharged radial engine
producing 730 hp at 2300 rpm’s. They matched the engine to a very light
aircraft with a low drag design, the Gee Bee R-1. It had a wingspan of 25
ft. and was 17 ft. 8 inches long, the gross wing area 101.9 sq. ft. and
gross weight 3,075 lbs. With the use bold, new concepts to get as much
speed as possible, the Granville brothers created the fastest aircraft in
America. The Gee Bee team was forced to liquidate in the fall of 1933 as
their race team experienced five aircraft crashes and two pilots killed,
the later being Allen Granville.
During those same years the Granville
Brothers were also making aviation history. They designed and built some
of the most famous racing aircraft of the 1930’s. The highlight of their
career came when James Doolittle won the 1932 Thompson Trophy Race flying
a Gee Bee R-1 and then won the Shell Speed Dash at 296.287 mph. It was a
new world record for landplane speed. This was done using a
nine-cylinder, Pratt and Whitney T3D1 R-1340, supercharged radial engine
producing 730 hp at 2300 rpm’s. They matched the engine to a very light
aircraft with a low drag design, the Gee Bee R-1. It had a wingspan of 25
ft. and was 17 ft. 8 inches long, the gross wing area 101.9 sq. ft. and
gross weight 3,075 lbs. With the use bold, new concepts to get as much
speed as possible, the Granville brothers created the fastest aircraft in
America. The Gee Bee team was forced to liquidate in the fall of 1933 as
their race team experienced five aircraft crashes and two pilots killed,
the later being Allen Granville.
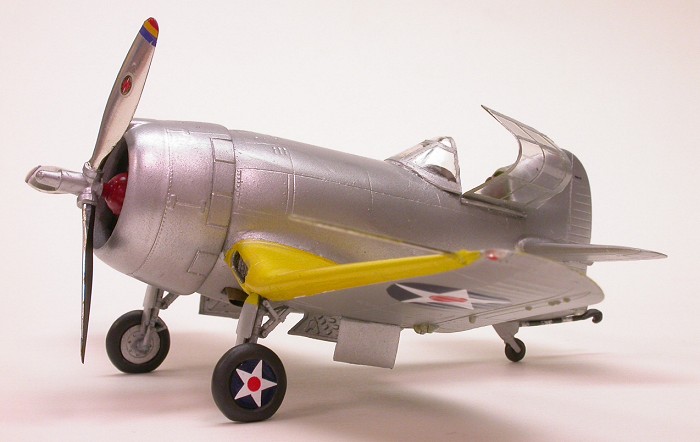
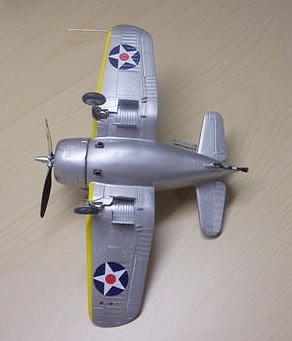
It would be difficult to assume that the accomplishments of the Gee Bee team went unnoticed by Rex who was an assistant Chief engineer in 1933. What if Mr. Beisel had telegrammed the remaining Granville brothers inviting them to develop their skills as employees of Chance Vought. If so, it might’ve been that one of the two aircraft submitted to the navy by Chance / Vought would’ve looked like this model. The benefits of this aircraft would be obvious. Weighing in at 4,020 lbs it would be 1,740 lbs lighter than the F4F Wildcat but with the same engine and horsepower. The length would be 18’ 6’’ instead of 28’ 9’’ and wingspan 30 instead of 38 feet. Its’ very compact size would allow more of them to be carried within a ship and ease handling on the deck. With the designation VG-1166A, it would carry six .30 caliber guns instead of the .50’s, helping to decrease the overall weight. Its’ projected top speed of 374 mph would be impressive but its’ design would suffer in pilot visibility and low speed handling. The navy would still choose the V-1166B with its’ .50 caliber guns, 18 cylinder engine and top speed over 400 mph, later to be known as the F4U-1 Corsair.
|
THE KITS |
 The tubby little Gee Bee R-1 is so ugly that
it’s cute and a favorite among aviation buffs for its’ larger-than-life
reputation. Who knows how old the Testors Gee Bee kit is? It’s molded
in white plastic with surprisingly crisp detail. The panel lines are
engraved and much of the plane is convincingly done in rib and fabric
detail. It provides one choice of decals that I didn’t use so I can’t
rate their quality. The assembly is very simple as the wing, engine,
prop, cowling and canopy consist of one piece each. There is literally
no cockpit and the fixed landing gear consists of four parts. The only
fit problem is the joining the wing to the fuselage. In my case, I
joined wings and horizontal stabilizers from another kit. ( the other
kit…)
The tubby little Gee Bee R-1 is so ugly that
it’s cute and a favorite among aviation buffs for its’ larger-than-life
reputation. Who knows how old the Testors Gee Bee kit is? It’s molded
in white plastic with surprisingly crisp detail. The panel lines are
engraved and much of the plane is convincingly done in rib and fabric
detail. It provides one choice of decals that I didn’t use so I can’t
rate their quality. The assembly is very simple as the wing, engine,
prop, cowling and canopy consist of one piece each. There is literally
no cockpit and the fixed landing gear consists of four parts. The only
fit problem is the joining the wing to the fuselage. In my case, I
joined wings and horizontal stabilizers from another kit. ( the other
kit…)
Academy makes a very nice Corsair that’s molded in medium blue plastic, has clean molding, recessed panel lines and balanced detail on the fabric surfaces. I chose this one after comparing it to other 72 scale F4Us’. The prop and engine have good detail, especially for this scale. The kit supplies a belly drop tank or a single 500 lb. Bomb with the Brewster bomb rack. Parts dry fit together so snug, it’s as if you don’t need any glue. Decals are provided for “Big Hog” in the classic tri-tone paint scheme with the red surround insignia and for an all blue Corsair with only the white stars and bars. They had good color and registry plus the white and red seemed to be opaque but I can only speculate since I didn’t use them. Both of these kits would be a quick and fun build straight out of the box so I recommend them to any modeler.
|
CONSTRUCTION |
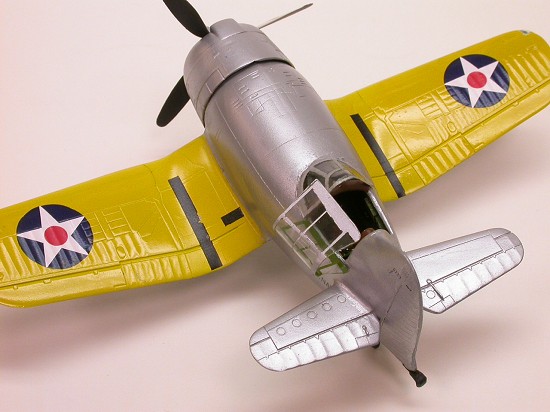
The first step joined the three pieces that make
up the Corsairs’ wings with Ambroid Proweld. The gun ports in the
leading edge of the wings and the shell ejection ports under the wings
had to be puttied and sanded flush since this aircraft was a prototype.
I used a Dremel tool to cut out the underside of the F4U fuselage so that
the two wings were separate. Step two was to sand off the rib and fabric
detail from the Gee Bees’ fuselage and rescribe the panel lines with a
#11 Exacto blade. I robbed an Otaki Corsair kit of its’ cockpit parts
then chopped and sanded them to fit the Gee Bee interior. The fuselage
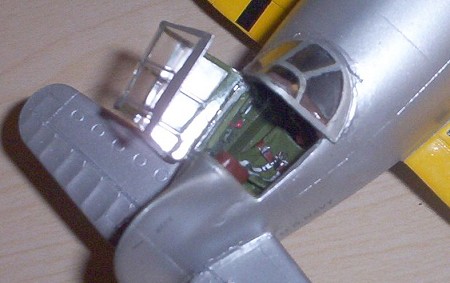 halves and cockpit was airbrushed with Model Masters “interior green”
enamel and instrument panel done in “engine black” before being joined
with C/A. Cockpit and instrument detail was accented using pencils and
paints.
halves and cockpit was airbrushed with Model Masters “interior green”
enamel and instrument panel done in “engine black” before being joined
with C/A. Cockpit and instrument detail was accented using pencils and
paints.
A pilot would enter the real Gee Bee through a door on the starboard side of the fuselage and the non-opening canopy was just large enough for his head. A dremel tool and razor saw were used to enlarge the canopy opening of the Gee Bee to allow a pilot entrance from the top of the fuselage. I was surprised at how well the 1/72 Corsair wings mated to the openings in the 1/48 Gee Bee fuselage. After a few hours of filling gaps and working the seams, the wings and horizontal surfaces from the F4U were blended to the Gee Bee fuselage. This was my first time using Milliput and if you haven’t tried it, you should.
Its’ qualities are far superior to the automotive body putty I’ve used for years. The engine from the old Monogram Devastator was painted with Testors “steel” enamel and a diluted Polyscale, “grimy black” wash. I drilled holes in each cylinder and added lead solder for spark plug wires. This enhanced the detail of what was already a good kit engine. I mounted the engine to the firewall of the Gee Bee fuselage with C/A. Now it was time to “borrow” more Monogram kit parts so the F4F Wildcat donated its’ tail wheel, cowling and prop. After more milliput and sanding they looked as though they belonged. To give the Gee Bee more Corsair appeal, I drilled two holes under the fuselage as ports for the exhaust stacks. To sub as exhaust pipes, I used a very small drinking straw and painted it with Testors enamels. Final assemblies included the landing gear and doors from the Academy F4U, TD wheels, photo etch seatbelts and the tail hook taken from the Otaki F4U were added. Since there is no fuselage aft of the cockpit for the canopy to slide on, it opens clamshell style like you’d see on the Me-109. I used a two-part epoxy to secure the Squadron canopy to the fuselage.
|
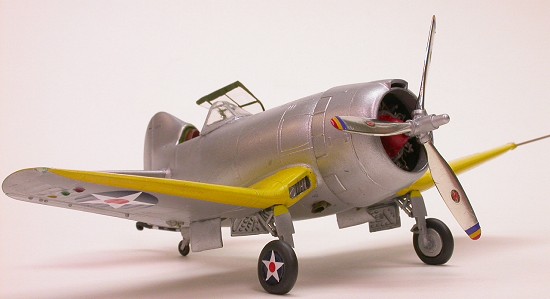
COLORS & MARKINGS |
 The prop was treated to a layer of bare metal
foil and a mixture of paint and spare decals to make up the red, yellow
and blue bands on the tips. The prop hub is done in Testors non-buffing
aluminum metalizer. Thanks to Lee Kolosna, I used Novus plastic polish
for the first time on this kit. It’s unbelievable how smooth and glossy
it makes the plastic and it makes the canopy look thinner. After washing
and drying the model, I put on the latex gloves and did the masking with
Tamiya tape. In the paint shop I sprayed white primer first and then the
tricky, prototype paint scheme. My trusty Badger 175 handled the Testors
chrome yellow enamel and the flat aluminum Polyscale acrylic with a
dependable performance. The authentic Corsair prototype had its’ engine
hub painted in gloss red for some reason so I included this detail on
mine. Black and white stripes on the landing hook were sprayed with
primer white and engine black acrylics. The decals were spares left
over from an Esoteric vacuform kit of an SB2U and the black wing walk
area was spare decal material. Lucky for me the pre-war roundels were
just the right size, even using the smaller ones for the hubs on the True
Details resin wheels designed for the F4F Wildcat. I glossed the wings
with a coat of future but not the fuselage because I thought the paint
closely duplicated the silver-dope finish. William Reece had informed me
that even the wheel wells were finished in the silver dope on these
prototype aircraft.
The prop was treated to a layer of bare metal
foil and a mixture of paint and spare decals to make up the red, yellow
and blue bands on the tips. The prop hub is done in Testors non-buffing
aluminum metalizer. Thanks to Lee Kolosna, I used Novus plastic polish
for the first time on this kit. It’s unbelievable how smooth and glossy
it makes the plastic and it makes the canopy look thinner. After washing
and drying the model, I put on the latex gloves and did the masking with
Tamiya tape. In the paint shop I sprayed white primer first and then the
tricky, prototype paint scheme. My trusty Badger 175 handled the Testors
chrome yellow enamel and the flat aluminum Polyscale acrylic with a
dependable performance. The authentic Corsair prototype had its’ engine
hub painted in gloss red for some reason so I included this detail on
mine. Black and white stripes on the landing hook were sprayed with
primer white and engine black acrylics. The decals were spares left
over from an Esoteric vacuform kit of an SB2U and the black wing walk
area was spare decal material. Lucky for me the pre-war roundels were
just the right size, even using the smaller ones for the hubs on the True
Details resin wheels designed for the F4F Wildcat. I glossed the wings
with a coat of future but not the fuselage because I thought the paint
closely duplicated the silver-dope finish. William Reece had informed me
that even the wheel wells were finished in the silver dope on these
prototype aircraft.
|
CONCLUSIONS |
I dreamed this project up about five years ago while working part-time at a Hobbytown USA. Even though this it’s very small and based on simple kits, it was not an easy build. Custom fitting the mismatch parts from different kits and scales meant using plenty of milliput and hours of sanding but I expected that. All of my modeling skills were challenged to a new level and I ended up with a one of a kind display for the shelf.
|
REFERENCES |
Chance-Vought F4U Corsair
http://www.kotfsc.com/thunderbolt/corsair.htm
The Granville Brothers Gee Bee http://www.geocities.com/CapeCanaveral/Lab/4515/index3.html
F4U Corsair History http://calebflerk.com/corsair/
b.beisel http://www.vought.com/neritage/peoplaces/html/bbeisel.html
May 2004
If you would like your product reviewed fairly and fairly quickly, please contact the editor or see other details in the Note to Contributors.