Fine Molds 1/48 Ki-10 “Perry”
| KIT #: | FB 13 |
| PRICE: | 2800 Yen from www.hlj.com |
| DECALS: | Two options |
| REVIEWER: | Dan Lee |
| NOTES: | Kit includes figures and diorama accessories |
| HISTORY |
The 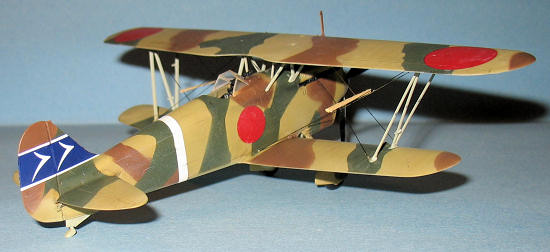 have been a
wonderful fighter in WW1!) The
plane served with the IJAAF on the front line in
have been a
wonderful fighter in WW1!) The
plane served with the IJAAF on the front line in
Designed by Takeo
Doi, who later designed the much more impressive Ki-61 Hien, this plane won a
mid 30s fighter selection by the ultra conservative IJAAF who prized
maneuverability about all else and an apparent disgust/fear of monoplanes.
The plane it beat eventually became the Ki-27 “Nate” when the IJAAF
generals finally shed their disgust/fear of the monoplane.
One can see how this WW1 maneuverability fetish carried through in the
early IJAAF WW2 fighter planes which were extremely maneuverable, underpowered,
under protected and under armed compared to other nations WW2 fighters with more
armor, heavier caliber weapons and much more powerful engines.
By 1942, most if not all Ki-10s were relegated to training duties and/or 2nd line roles.
| THE KIT |
Fine Molds 1/48
airplane kits tend to focus on Japanese subjects which are not very popular
outside of
 The kit
comes with 5 gray green injection
molded sprues for a total of 78 parts including one seated pilot figure, one
clear sprue of 3 parts and also comes with a separate sandy brown plastic sprue
of 24 parts that includes two maintenance figures plus various fueling
accessories for diorama purposes if one so chooses.
The parts are free of flash and molding defects and the panel lines are
crisp and finely done. It also has
two small decal sheets with extensive stencils and markings for two aircraft.
One thing they have provided is white background decals for the tail
markings and fuselage bands. Both
markings for the 77th Air Regiment based in
The kit
comes with 5 gray green injection
molded sprues for a total of 78 parts including one seated pilot figure, one
clear sprue of 3 parts and also comes with a separate sandy brown plastic sprue
of 24 parts that includes two maintenance figures plus various fueling
accessories for diorama purposes if one so chooses.
The parts are free of flash and molding defects and the panel lines are
crisp and finely done. It also has
two small decal sheets with extensive stencils and markings for two aircraft.
One thing they have provided is white background decals for the tail
markings and fuselage bands. Both
markings for the 77th Air Regiment based in
Two small complaints about the kit. One is that the box art does not match up with the either of two marking options supplied with the kit which may confuse some folks. The other is that there is no wiring diagram supplied so you will have to base it on the box art.
| CONSTRUCTION |
Best guide is to
follow the instructions especially on the installation order of the struts,
otherwise there could be trouble (fortunately, I followed the instructions, but
noticed the difficulty doing things out of order during test fitting.)
I begin by painting all the cockpit bits the instruction colors.
The cockpit base color is 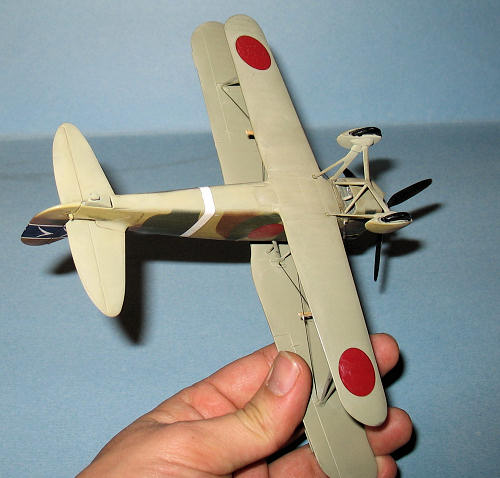 Brown) while
the other interior colors are black (instrument panel) and IJAAF grey green
(Tamiya XF-14.) The instrument
panel is a bit fiddly because of the placement and needs to be adjusted so that
it fits in the cockpit without falling apart.
Fine Molds supplies instrument decals which were easy to deal with using
micro set and Solvaset to let them really snuggle to the detail.
Brown) while
the other interior colors are black (instrument panel) and IJAAF grey green
(Tamiya XF-14.) The instrument
panel is a bit fiddly because of the placement and needs to be adjusted so that
it fits in the cockpit without falling apart.
Fine Molds supplies instrument decals which were easy to deal with using
micro set and Solvaset to let them really snuggle to the detail.
I tried to make
this a “fast” build so I opted to glue the visible fuselage seams using CA glue
and the hidden seams with Tamiya extra thin glue so as to prevent any phantom
seams. My usual technique is to let
the model sit for a week or two to allow for outgassing before filing/sanding.
Once the seams were done to my satisfaction, I glued on the wings and
stabilizers. One area that needs
some attention is the seam between the main landing gear.
Instead of doing the difficult job of filing and sanding a tiny area, I
measured and cut a piece of 10 thou plastic card to cover it up.
The wing detail
isn’t over done (at I think it isn’t) and some care is needed when filling and
sanding both sets of wings. I glued
the outside interplane struts to the upper wing as they had the
same IJAAF Grey Green color while I left the inside interplane struts
that connect the upper wing to fuselage off.
Of all the assemblies, the landing gear was the fiddliest. The spat parts required a lot of patience to do. I test fitted the landing gear and noticed that the right side was a bit higher than the left. I’m not surprised as I’ve always been cursed (by stupidity?) when it comes to getting the correct alignment on biplane landing gear. Fortunately, all I needed to do was add a shim of 10 thou plastic card to the left strut to get it to line up properly.
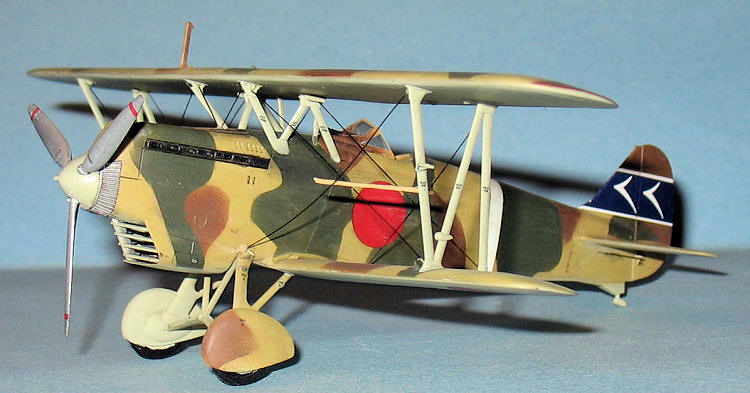
| COLORS AND MARKINGS |
Painting
The Fine Molds
comes with two options for the 77th Air Regiment.
I almost opted for super easy and bland IJAAF Grey Green all over
marking, but I happen to like the more complex dark yellow, IJAAF green and red
brown version.
I first sprayed on
IJAAF Green (Tamiya XF-14) on the interplane struts, landing gear and underside
of the fuselage. Once it was dry, I
took green painter’s tape and masked off the underside of the stabs and tail
skid before spraying on dark yellow (Tamiya
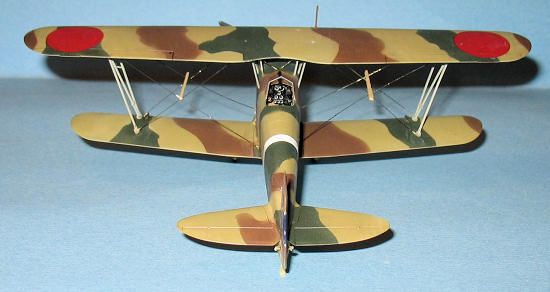 XF-60) and
then I let the plane dry overnight.
Next I cut out paper masks (soft edge) for the Red Brown (Tamiya XF-64) portions
of the camo pattern, sprayed then added pre cut paper masks for the IJAAF Green
(Tamiya XF-13) and sprayed that on.
Thanks to the complexity of the camo pattern, I need to do some touch up which
took a bit.
XF-60) and
then I let the plane dry overnight.
Next I cut out paper masks (soft edge) for the Red Brown (Tamiya XF-64) portions
of the camo pattern, sprayed then added pre cut paper masks for the IJAAF Green
(Tamiya XF-13) and sprayed that on.
Thanks to the complexity of the camo pattern, I need to do some touch up which
took a bit.
The only areas
where I need to do some more sanding was the landing gear when I noticed that I
didn’t sand that area down as well as I could.
The tires were hand painted dark grey/flat black.
I sprayed the prop
flat black and silver which was done with Tamiya X-11 Chrome silver base
coat,Talon Acrylic Aluminum for the top coat and polished with Hawkeye Polishing
powder. Next I masked off the
forward area of the engine and sprayed a thin base of Chrome Silver with Talon
Acrylic Top Coat as per instructions.
Once the paint was
dry, I sprayed on a couple of really thin coats of Future to provide a glossy
surface for the decals.
Decals
Fine Molds decals
are well done and includes a lot of stencils.
It took a while to do, but there were no issues when I used Microset for
the first application and Solvaset for the really stubborn ones.
I ended up trimming the excess film of several of the decals (tail flash
and strut stencils) after they were dry.
One little problem I had was with the fuselage band as it was a touch
short so I had to hand paint the white.
Weathering and
Final Coat
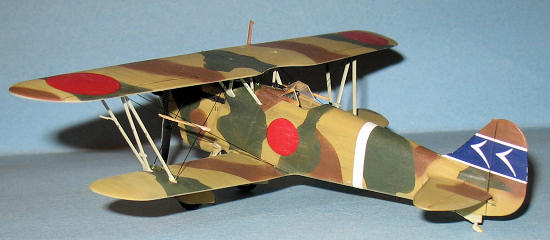
I used a watercolor wash to highlight some of the panel lines while I used charcoal applied with a micro brush for the exhaust and cordite stains. Once it was dry, I removed the excess with Q-Tips and sprayed on a couple of thin coats of Vallejo Flat Coat to seal everything in.
| FINAL BITS |
The plane itself
almost fell together as I glued the upper wing on and the landing gear.
There was none of the usual fighting to jam the struts to the wings.
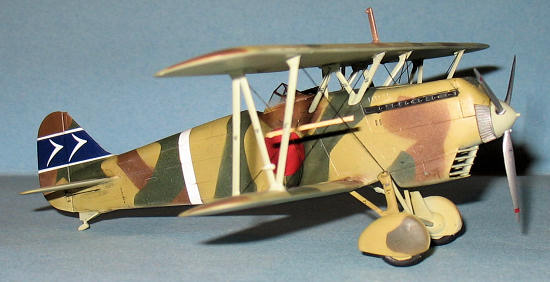 The gunsight
and canopy were painted then glued on (white glue for the canopy.)
The gunsight
and canopy were painted then glued on (white glue for the canopy.)
I think that a
biplane that is missing it is odd to look at so I bit the bullet and worked on
the rigging using fine brass wire.
I used draftsman dividers to measure the gap between each wire and then glue
them in with white glue. This
requires a lot of patience as the white glue takes a little bit of time to
stick. I gave the glue 24 hours to
dry and then I carefully painted each wire flat black.
Unfortunately, I had a couple of miscues so next time I’d like to find
pre painted brass wire or steel wire or leave it in brass.
Finally, I found the thinnest toothpicks I could find, cut them to length and glued onto the interplane wires as supports as per the box cover art.
| CONCLUSIONS |
If you like doing 1920-1930 interwar aircraft, obscure Japanese subjects and/or a modeler who wants to build a biplane with simple rigging then this is one kit that will be an interesting and rewarding build. I think this kit is almost as good as the Accurate Miniatures F3F series of planes in terms of ease of build for biplanes, but I would say that the Fine Molds kit is slightly easier only because the Ki-10 does not have have NMF which can make things more difficult than the rigging.
March 2010
Copyright Modeling Madness.com. All rights reserved. No reproduction in part or in whole without express permission.
If you would like your product reviewed fairly and quickly, please contact the editor or see other details in the Note to Contributors.