| KIT #: | ? |
| PRICE: | $ |
| DECALS: | One option |
| REVIEWER: | Mark Hiott |
| NOTES: | Rare kit of a unique subject |
| HISTORY |
 The Savoia-Marchetti S-55 was a double-hulled
flying boat produced in Italy beginning in 1924. Shortly after its introduction
it began setting records for speed, payload, altitude and range. It was one of
the first airplanes to cross the Atlantic Ocean when the
Santa Maria
under Francesco de Pinedo made the crossing between Dakar, Senegal and
Pernambuco, Brazil in February of 1927; 4 months before Charles Lindbergh's
first solo crossing.
The Savoia-Marchetti S-55 was a double-hulled
flying boat produced in Italy beginning in 1924. Shortly after its introduction
it began setting records for speed, payload, altitude and range. It was one of
the first airplanes to cross the Atlantic Ocean when the
Santa Maria
under Francesco de Pinedo made the crossing between Dakar, Senegal and
Pernambuco, Brazil in February of 1927; 4 months before Charles Lindbergh's
first solo crossing.
The
Italian Air Marshall of the time, Italo Balbo soon became famous for organizing
fleets of S.55s for Atlantic crossings, culminating in his 1933 flight with 24
aircraft to Chicago's Century of Progress International Exposition. These large
fleets of aircraft became so well known that even today a large formation is
sometimes called a "Balbo".
The aircraft went on to serve the Italian Air Force and the Luftwaffe in World War II as a long range bomber and patrol aircraft.
| THE KIT |
I found
this kit at a swap meet and had a chance to look in the box before I plopped
down my hard earned cash. Considering the subject and my love of Seaplanes, I
find it money well spent. Upon opening the box, one gets the impression of a
SMER kit; lots of flash, heavy molding and simplistic detail. The parts are cast
in a soft, gray plastic. There is 2 rather large sprues containing the
 plane and
1 large clear sprue. The model sprues contain large gates that will make the
parts difficult to remove cleanly. The clear parts are thick but well cast. The
horizonal control surfaces are molded separate, but the triple rudders are one
piece. Also included is a clear display stand and a rather simple set of
beaching gear.
plane and
1 large clear sprue. The model sprues contain large gates that will make the
parts difficult to remove cleanly. The clear parts are thick but well cast. The
horizonal control surfaces are molded separate, but the triple rudders are one
piece. Also included is a clear display stand and a rather simple set of
beaching gear.
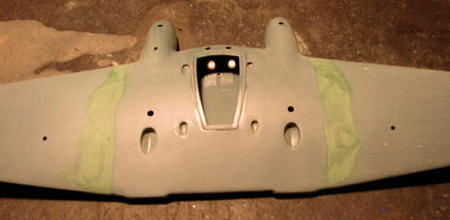
The model
itself is well molded with no panel lines. There is no internal detail to speak
of other then 2 simple seats and a crude panel. The one strange part is that a
partial decal sheet is included for Italo Balbo’s aircraft, but for some reason
it doesn’t include the the wing serials.
The instructions are a single page printed on both sides. They are all in Italian, as are the color call outs.
| CONSTRUCTION |
 What can I
say…. this kits a pig. I knew that going in, so I really wasn’t surprised. The
wing is made up of a single lower part with 3 upper parts; a center section and
then the upper wings. No matter what I tried, a large step resulted where the
outter panles met the center section. This step required a LOT of filler and
took me several applications to get it looking halfway decent. Thank God the
plane has no panel lines!
What can I
say…. this kits a pig. I knew that going in, so I really wasn’t surprised. The
wing is made up of a single lower part with 3 upper parts; a center section and
then the upper wings. No matter what I tried, a large step resulted where the
outter panles met the center section. This step required a LOT of filler and
took me several applications to get it looking halfway decent. Thank God the
plane has no panel lines!
As I had
very little in the way of reference, I left out the “cockpit” and painted the
inside of the canopy black.
The
twin-hulls are 2-piece upper and lower parts. Again, filler is needed at most of
the seams as well as a large amount at the tips, which I found were molded
short. I decided not to use the plastic windows and opted for Kristal Klear
instead. Filler was also needed where the hull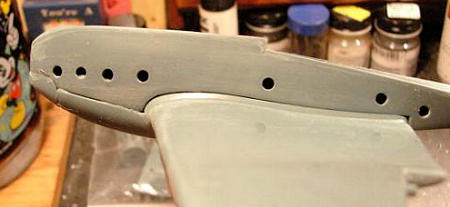 s meet the main wing. The
closeness of the hulls makes the inner seams a bit of a problem.
s meet the main wing. The
closeness of the hulls makes the inner seams a bit of a problem.
The engine
is made up of 3 parts and also requires filler (go figure). I cut off the molded
on exhaust stacks and replaced them with plastic rod. After assembly, the fit of
the engine pod to the wing is not good as the supports come in contact with the
canopy. I ended up filing down the supports just enough to get them to clear.
The tail
assembly will take a bit of care to get everything lined up correctly. There was
a bit of warpage in one of the booms, but nothing that will hinder the build.
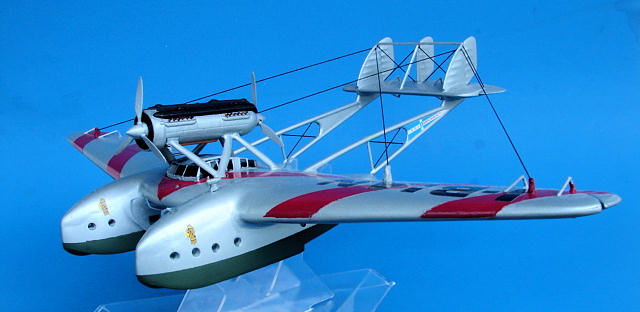
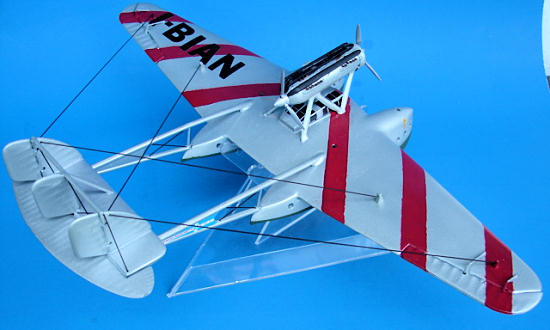
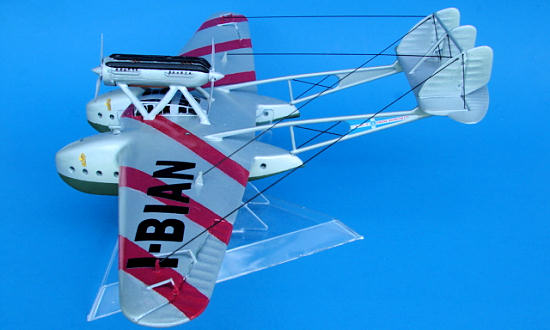
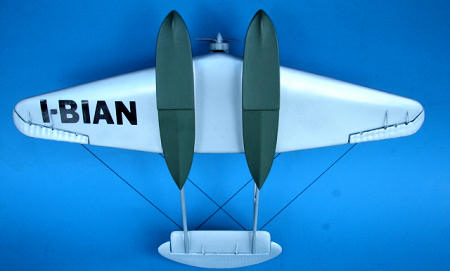
| COLORS & MARKINGS |
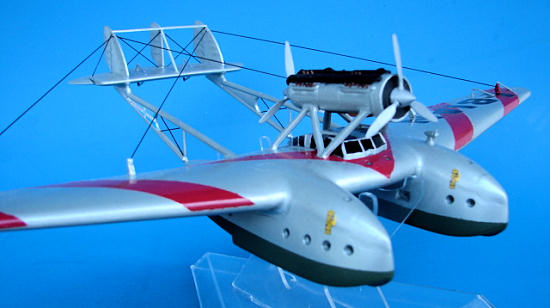 I really didn’t like the scheme shown in the
instructions and on the box, so I looked on the net for a better one. I found 1
picture showing a red-striped
S-55, so I decided to do that one
instead.
I really didn’t like the scheme shown in the
instructions and on the box, so I looked on the net for a better one. I found 1
picture showing a red-striped
S-55, so I decided to do that one
instead.
I painted
the S-55 with Model Masters “German Aluminum”. I have used it in the past and
found it a good match for doped paint that was common of the period. I do most
of my painting outside and I think it was a bit too cold when I did. The paint
went on good, layed flat but dried grainy. The red stripes were then taped off
and painted with MM “Insignia Red”. As for the wing serials, I went down to the
local Hobby Lobby and found some stick on numbers that were about the right
size. Now that it’s done, I think they may have been too thick.
The decals that did come with the kit splintered in the water but I was able to save the really important ones. They went on well and settled down with an application of Micro Set.
| RIGGING |
I used
another product I found at HL to rig the S-55. It’s called “Magic Streach” and
is an elastic used to make braclets. I got the .5mil, but I
 think I should have
used a smaller size. While it looks ok, it could have looked better.
think I should have
used a smaller size. While it looks ok, it could have looked better.
I had
drilled the rigging holes as I went along with assembly and all I had to do was
run the rigging and glue it down. CA is required to hold it in place and a
slight touch up of the paint when done.
This is not
a kit for the faint hearted and it took me several months to finish. Between
letting filler dry and such, it is a time consuming build. However, if you love
Seaplanes the way I do, it’s the only game in town. These kits show up on Ebay
once-in-a-while, but be aware, they are pricy.
I am also not too sure of the rigging pattern. I found very little on the net about the S-55 and even less in clear pictures. I did receive a very nice CD containing a wealth of information from an individual that saw my progress pics, it came to late to help with my build however as I was too far along.
| REFERENCES |
Wikipedia for the history.
September 2008
Copyright ModelingMadness.com. All rights reserved. No reproduction in any form without express permission from the editor.
If you would like your product reviewed fairly and quickly, please contact the editor or see other details in the Note to Contributors.