| KIT #: | 85-522 |
| PRICE: | $25.00 SRP at the time |
| DECALS: | Two options |
| REVIEWER: | Ken Freundt |
| NOTES: | Cutting Edge CEC48446 conversion set (good luck finding one) and CED 48238 for decals. Wasn’t bad at all…honest…hey where ya going? |
| HISTORY |
The HE-111 was originally
developed as an airliner from the record breaking HE-70. First flying in
February 1935, it would begin service with Lufthansa in 1936. However,
development of the airliner would also coincide with development of the Heinkel
as a medium bomber. The third prototype would be designated HE-111A and put into
production. After ten were manufactured, it was
 determined
to be unsuitable due to poor performance and low power and all would be sold to
determined
to be unsuitable due to poor performance and low power and all would be sold to
The Germans would continue to develop
the HE-111 in the bomber role. With more powerful engines, they would debut
during the Spanish Civil War in their full war guise and gain notoriety for
histories first noted “terror bombings” of
| THE KIT |
The Monogram kit is
a delight to build. I’ve
built 2 before this and I enjoyed both. It was a model I had wanted for a long
time in 1/48 scale. The rather large box holds four sprues in finely molded
light gray styrene along with one in clear. The instruction
 booklet
is clear and concise and this boxing has options for two torpedo bombers and a
standard bomber.
booklet
is clear and concise and this boxing has options for two torpedo bombers and a
standard bomber.
I didn’t think to take pics of the Cutting Edge conversion set before I started this. However the set consists of all the parts necessary to replace the nose from the rear cockpit bulkhead forward along with clear resin canopy parts and windows. It also contained parts to rebuild the bottom of the plane to remove the ventral gun position and replace it with the older style “dustbin” gun position, complete with flooring. And finally it contained replacement leading edges for the wings and enough parts for both the B and J variant engines. Be sure to study your references for the engines (if you can find any-they are few and far between for the early HE-111s) as it seems there are some different configurations.
| CONSTRUCTION |
With
hammer and chisel and hacksaw in hand, construction begins.
One of the early issues I ran into was a pretty serious warp in the resin
starboard nose half. I began by following Swanny’s advice by making my cut just
forward of the panel line at the
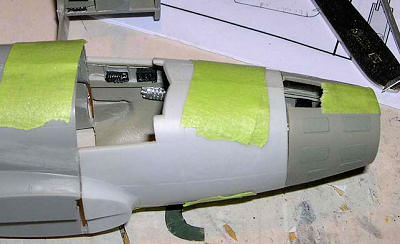 cockpit.
The opening for the glass remains along with about 1/8” of styrene forward of
it. Better here to cut too long of course. I tack glued the resin cockpit floor
with just the forward and rear bulkheads to use as a gauge in fitting the resin
nose parts. Once I had the port side where I wanted it, I secured it into place.
I use cheap gel superglue for this stuff as it gives me some time to work with
it and also fills any gaps that might come up. I
then fitted the warped piece for length, dipped it in boiling water and wrapped
it round again. It didn’t come out quite perfect but a bit of filler later
cleaned it up well.
cockpit.
The opening for the glass remains along with about 1/8” of styrene forward of
it. Better here to cut too long of course. I tack glued the resin cockpit floor
with just the forward and rear bulkheads to use as a gauge in fitting the resin
nose parts. Once I had the port side where I wanted it, I secured it into place.
I use cheap gel superglue for this stuff as it gives me some time to work with
it and also fills any gaps that might come up. I
then fitted the warped piece for length, dipped it in boiling water and wrapped
it round again. It didn’t come out quite perfect but a bit of filler later
cleaned it up well.
Now
that I had two fuselage halves for a long nosed HE-111, it was time for the
cockpit. I popped the forward bulkhead off the cockpit floor and built up the
interior. The parts were cleanly cast and the delicate parts well protected on
the stubs. Cutting Edge did a pretty nice job on the instructions here. Three
black
 and
white photographs of the cockpit show where all those fiddly bits go.
They also provided good pics of the bombardier’s tunnel and those bits
went in at the same time. Be sure to dry fit often so you don’t have things in
the way of other things
when you’re done.
and
white photographs of the cockpit show where all those fiddly bits go.
They also provided good pics of the bombardier’s tunnel and those bits
went in at the same time. Be sure to dry fit often so you don’t have things in
the way of other things
when you’re done.
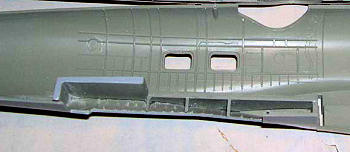
It was time for the next major surgery.
The lower aft section of fuselage had to be replaced for the dustbin gun
position. Cutting Edge made this pretty easy by making a piece that fits into a
hole that is cut along panel lines on the bottom. As usual, I cut this a bit
small and sand the opening to fit the replacement parts with the fuselage ha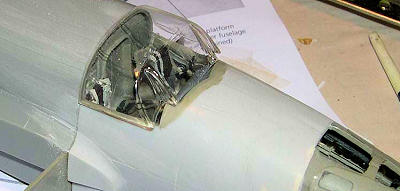 lves
taped together. Once I got a nice snug fit out of it I undid my tape, fit the
cockpit into place along with the aft bulkhead and resin flooring and glued my
fuselage together.
lves
taped together. Once I got a nice snug fit out of it I undid my tape, fit the
cockpit into place along with the aft bulkhead and resin flooring and glued my
fuselage together.
The
most interesting part of this conversion set for me was the clear resin parts.
They are notably thicker than styrene but do a very nice job of looking the part
when they’re installed. Cutting Edge provides a sheet of vinyl canopy masks
which was awful nice of them with all the windows on this thing. The sheet also
has interior masks so you can paint the inside RLM 02 as well. The only clear
part they didn’t provide for this conversion was the very tip of the nose where
the gun goes. This was to be sawed off the kit part.
Interestingly, they did not provide a
set of masks for this which was a shame. It’s a tough pa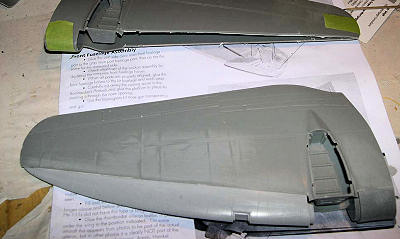 rt
to mask and I ended up touching up the frames with a brush. The one problem I
had with the clear resin in this set was the canopy. The front glass was almost
flat on mine and it should’ve peaked at the center. Again, boiling water was the
answer here but I had some concerns
about stressing the part and it could’ve been pulled out a bit farther. Also
oddly enough, the clear nose halves mated up very well with the fuselage with
very little sanding. I fitted the bombardier’s pad after the clear nose was
added, before I fitted the tip.
rt
to mask and I ended up touching up the frames with a brush. The one problem I
had with the clear resin in this set was the canopy. The front glass was almost
flat on mine and it should’ve peaked at the center. Again, boiling water was the
answer here but I had some concerns
about stressing the part and it could’ve been pulled out a bit farther. Also
oddly enough, the clear nose halves mated up very well with the fuselage with
very little sanding. I fitted the bombardier’s pad after the clear nose was
added, before I fitted the tip.
The last major surgery was done on the
wings. The entire leading edge is replaced along with the engine nacelles. One
of the replacement leading edges in the set drooped at the end but hot water
again straightened this warp out.
This is another place where cutting less material away
 than
recommended is preferred. Dry fitting the wing to the fuselage indicates where
the new part fits in, as it lines up on the wing fairing. The engine cowlings
are a direct replacement for the kit part. One of the inaccuracies I hear about
from time to time is with the trailing edge. The wing should be elliptical on
early HE-111s and this is not represented with the conversion set. The
instructions show where to sand material off the aileron and to flatten the wing
tip but it seems it would have been better to provide a replacement aileron as
well. My hackjob got a heavy coat of Squadron white putty but in the end, most
of it got sanded away as it all came together pretty well considering the extent
of the alterations. After this, the horizontal stabilizer from the kit was
fitted and I was ready for the paint booth.
than
recommended is preferred. Dry fitting the wing to the fuselage indicates where
the new part fits in, as it lines up on the wing fairing. The engine cowlings
are a direct replacement for the kit part. One of the inaccuracies I hear about
from time to time is with the trailing edge. The wing should be elliptical on
early HE-111s and this is not represented with the conversion set. The
instructions show where to sand material off the aileron and to flatten the wing
tip but it seems it would have been better to provide a replacement aileron as
well. My hackjob got a heavy coat of Squadron white putty but in the end, most
of it got sanded away as it all came together pretty well considering the extent
of the alterations. After this, the horizontal stabilizer from the kit was
fitted and I was ready for the paint booth.
| COLORS & MARKINGS |
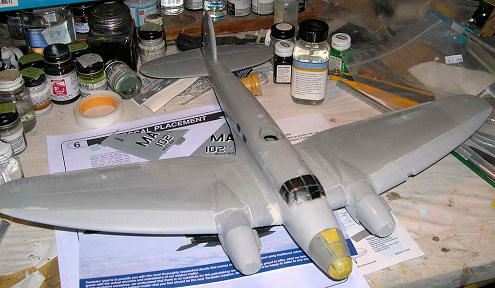
This was a rare instance
where I got away clean with an acrylic paint job. I have never had good luck
with the stuff but the closest match I could find at my LHS was Modelmaster
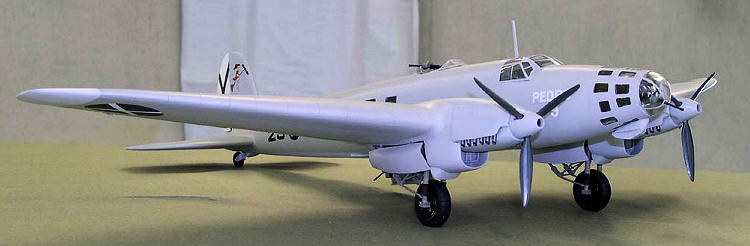
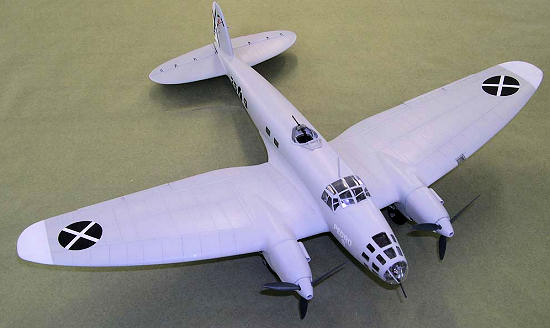
Acryl RLM 63. I wanted to do an all gray
(L40/52) HE-111 because I knew it would be instantly recognizable to the layman
as a Spanish Civil War airplane, and after all the work I didn’t want to wrap up
this build with a troublesome masking job. I painted the rudder and wingtips
white, lightened up a couple of bottles of the RLM 63 with a
 touch
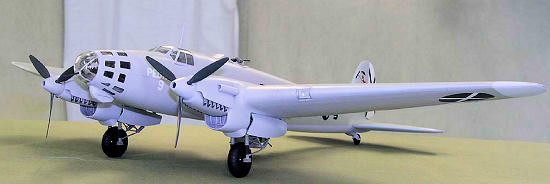
of white and sprayed 2 medium wet coats overall. After a coat of Testors lacquer
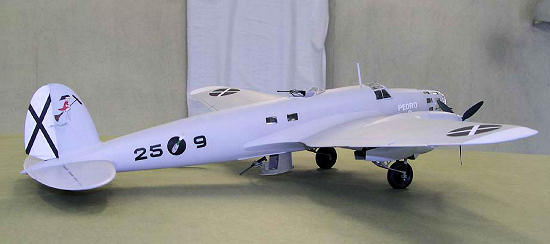
clear I was ready for decals. The Cutting Edge decals laid down with no fuss and
a coat of Microsol snuggled them down into the panel lines. Another coat of
clear and a coat of Dullcoat and we were back home-where I noticed that I put
the insignia on the fuselage backwards…
touch
of white and sprayed 2 medium wet coats overall. After a coat of Testors lacquer
clear I was ready for decals. The Cutting Edge decals laid down with no fuss and
a coat of Microsol snuggled them down into the panel lines. Another coat of
clear and a coat of Dullcoat and we were back home-where I noticed that I put
the insignia on the fuselage backwards…
I can’t get away with a build without
something going wrong and there it was. I’m still hoping someday I can find
something to replace them with. In the meantime, it’s the worst that happened
and I’ve found that I can live with that.
Final assembly wasn’t much. Landing gear, propellers and lower gun position along with a few fiddly bits. The dustbin gun was the kit part with resin mounts. I kept this one clean because I wanted to represent a new plane and it’s easy to get gray too dirty.
| CONCLUSIONS |
 Having
built Roden’s 1/72 HE-111A, this massive conversion was a welcome relief.
I have always liked the
lines of the early He-111 and having one on the shelf with the other 1/48 builds
that dominate my collection is a thrill. So much so that this one continues to
hold a place of honor in my display at my office. And I know it has an impact
too. Last summer our representative
with the Kriegsmarine was given a tour of our facilities and when he was led to
the display in my office, he “ohh”ed and went straight for this one.
Having
built Roden’s 1/72 HE-111A, this massive conversion was a welcome relief.
I have always liked the
lines of the early He-111 and having one on the shelf with the other 1/48 builds
that dominate my collection is a thrill. So much so that this one continues to
hold a place of honor in my display at my office. And I know it has an impact
too. Last summer our representative
with the Kriegsmarine was given a tour of our facilities and when he was led to
the display in my office, he “ohh”ed and went straight for this one.
This was an instance where the intimidation factor was outweighed by my desire to have one on the shelf. The “I” factor did draw this build out for about six months with all the “major surgeries” but in the end I learned that for the size of the undertaking, it wasn’t really bad at all. It will stretch your skills and give you a real feeling of accomplishment when it’s done. If you have this set collecting dust in the closet, consider making it a winter project. It’s worth it.
| REFERENCES |
http://www.swannysmodels.com/Pedro.html
http://www.historyofwar.org/articles/weapons_he111_peter.html
History Of The World Wars
Special: Bomber 1939-1945, BPC Publishing LTD.
Monogram kit instructions
Roden HE-111A kit instructions
September 2009
Copyright ModelingMadness.com. All rights reserved. No reproduction in part or in whole without express permission.
If you would like your product reviewed fairly and quickly, please contact me or see other details in the Note to Contributors.
Back to the Review Index Page 2022