Magna Models 1/72 Martin Baker MB2
|
KIT #: |
5772 |
|
PRICE: |
$24.00 |
|
DECALS: |
One option |
|
REVIEWER: |
Peter Burstow |
|
NOTES: |
Short run resin kit with
metal and vac bits |

The
second of the four Martin Baker designs to fly, the M.B.2 was a private venture
aircraft designed broadly to fit specification F5/34, for an eight gun fighter
with an air cooled engine for tropical use. First flown on 3 August 1938 by
Captain Valentine Baker, it was powered by a Napier Dagger 24 cylinder air
cooled H-type vertically opposed engine. Initial registered G-AEZD which was not
applied, instead the
 aircraft
was marked M-B-1, causing much later confusion. When acquired by the Air
Ministry it was given the serial P9594.
Some difficulty
with lateral control saw a vertical fin added, this was later extended. A
distinctive feature was the fixed undercarriage, fitted with massive trouser
fairings. The oil cooler was fitted in the port fairing. A retractable
undercarriage and a Merlin engine were proposed but never fitted, development
effort instead being concentrated on the M.B.3, which shared many structural
features with the M.B.2.
After testing by
the R.A.F. The aircraft was returned to Martin Baker in late 1939. It was still
present there in 1941, though it's subsequent fate is unknown.
Coming in
a strong, top opening box, there are 12 white resin parts, 9 white metal parts
and two vac-formed canopies. The resin parts are nicely formed, with both raised
and engraved detail, some of which is a bit misplaced. One of the fuselage
stringers has a distinct kink. The engraved lines are uneven in both width and
depth and will benefit from cleaning up. All parts have bubbles, varying from
tiny to quite large, including a large wing root bubble, which features in many
Magna kits.
There is some cockpit detail, with a
floor complete with a detailed seat, including moulded belts, and rudder pedals.
There are some moulded details on the inside of the fuse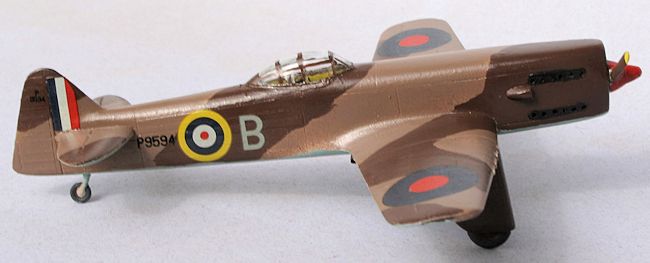 lage
halves. White metal parts, a control column, instrument panel and turn over
pylon enhance the cockpit detail. The flying surfaces have fine raised line
detailing, and engraved control surface hinge lines.
The engine cowling is supplied as a
separate casting, allowing a potential engine change, perhaps the proposed
Merlin could be fitted.
The smaller parts are all supplied as white metal, well formed with some
flash, pouring lugs and mould joints.
As
is Magna's normal practice two canopies are supplied, these are clear, but the
framing lines, though visible are not well defined and will need care.
Decals provided are just four of the serial
P9594, in black and two different styles for the rudder and rear fuselage.
The
instructions are two sheets of A4, with a parts list, three view with painting
and marking information, construction notes, a short history and references.
Side and scrap views show the original and interim vertical fin layouts, both of
which can also be built from this kit with a bit of carving.
Usual start for a
resin kit, saw, hack, file and sand to remove the pouring lugs, which were large
and thick. Then a good wash in hot soapy water to remove dust and mould release
wax. I gave the two vac-formed canopies a dip in floor polish and left them
aside for later.
Construction
starts in the cockpit, painted and detailed the walls and floor, added the white
metal instrument panel, control
 column
and two part turn over pylon. Then closed up the fuselage halves. I tried to
optimise the fit on the forward top joint, and ended up with a slight mismatch
at the trailing edge of the rudder, and a step on the underside. Ran a bead of
superglue along the joint to fill any irregularities. Later sanded the seams and
ran a layer of Mr Surfacer 1000 to check the joint, then touched up a few
places.
Added the
nacelle, wings, tailplane, wheels and pants and the major construction was done.
Filled the seams with superglue and sanded the joints. Lightly rescribed the
panel lines destroyed by the filling and sanding process. Drilled out the
exhaust ports, the guns and the cowling intakes. Added the white metal tail
wheel. Another wash in hot soapy water to remove the dust and any accelerator
and mould release agent.
Then
added the vac-formed canopy using Krystal Klear. It was far too large so needed
a lot cut off it to match the profile on the instructions. The framing lines
were to vague to mask and paint, so I masked the whole canopy with tape and
Humbrol Maskol.
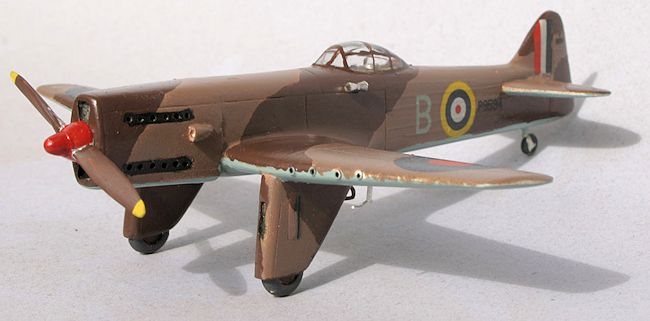
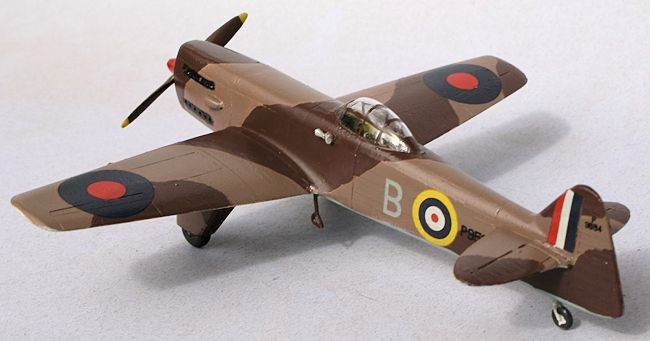
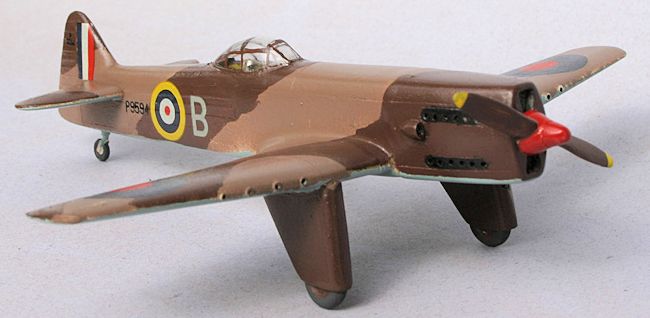
I decided to do a scheme for an
operational fighter from the North African campaign. First
a prime with an automotive spray can, trying a new one. HiChem 'all surfaces
primer'. It's matt white, and seems to stick OK to the washed and sanded resin.
Found a few
 spots that
needed more work, so another session with Mr Surfacer and another sand. Then
another coat of primer.
Dark
earth and middle stone over light blue. Used Tamiya acrylic paints with the
camouflage pattern done freehand. An overall coat of floor polish then I applied
the decals. I used the Magna serials and roundels and fin flash from a Hasegawa
Spitfire I sheet. I needed Mr Mark Softer to make the old Hasegawa decals settle
down. The Magna decals worked fine.
Added the
final white metal bits, the two bladed propeller, a pitot and a instrument
venturi. Unmasked the canopy and hand painted the framing. A little bit of touch
up and detail painting, then an overall coat of Future.
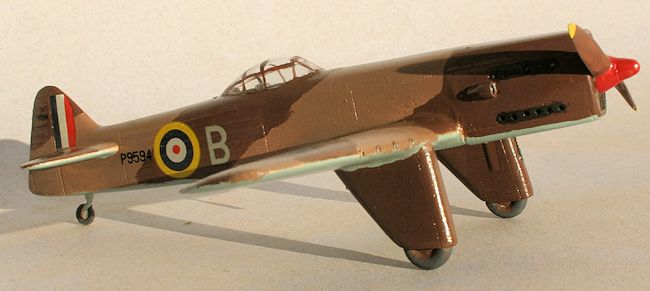
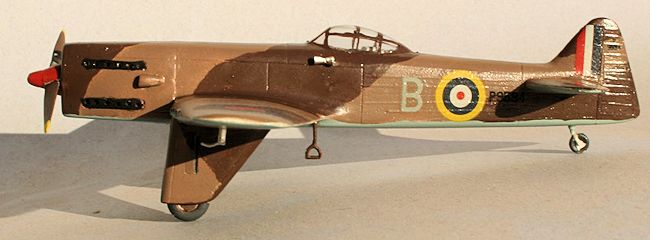 A
typical Magna Models kit, bit of work cleaning up, but a quick and easy build.
It certainly looks different, a large aircraft for a single engine fighter, with
it's huge wheel trousers and the distinctive Dagger cowling, it really stands
out. I might build another with a Merlin engine and retractable undercarriage.
A much
easier build and a more complete model then the old Airframe vac-formed kit. I
don't know of any injected models of the M.B.2 in 1/72 scale. Recommended
for all, a easy resin and white metal kit for somebody wanting to try something
different.
http://en.wikipedia.org/wiki/Martin-Baker_MB_2
http://www.martin-baker.com/about/mb1-mb5
 Peter
Burstow
September 2013
Copyright ModelingMadness.com. All rights reserved. No reproduction in part or in whole without express permission from the editor.
If you would like your product reviewed fairly and fairly quickly, please
contact
the editor
or see other details in the
Note to
Contributors.
Back to the Main Page
Back to the Review
Index Page 2023


 aircraft
was marked M-B-1, causing much later confusion. When acquired by the Air
Ministry it was given the serial P9594.
 lage
halves. White metal parts, a control column, instrument panel and turn over
pylon enhance the cockpit detail. The flying surfaces have fine raised line
detailing, and engraved control surface hinge lines.
 column
and two part turn over pylon. Then closed up the fuselage halves. I tried to
optimise the fit on the forward top joint, and ended up with a slight mismatch
at the trailing edge of the rudder, and a step on the underside. Ran a bead of
superglue along the joint to fill any irregularities. Later sanded the seams and
ran a layer of Mr Surfacer 1000 to check the joint, then touched up a few
places.
 spots that
needed more work, so another session with Mr Surfacer and another sand. Then
another coat of primer.
