Pegasus 1/72 Gloster Gamecock
| KIT #: | 007 |
| PRICE: | £3.45 about 25 years back |
| DECALS: | No options |
| REVIEWER: | Brian Baker |
| NOTES: | Short run limited production kit. Not for beginners |
| HISTORY |
The Gloster Gamecock was an
outgrowth of the 1923 Gloster Grebe, an all wood, single seat biplane fighter
intended to replace the Great War vintage Sopwith Snipe, which was still in
service at that time.
The Grebe’s origins lay with the
S.E.5 fighter, as both were designed by H.P. Folland.
However, the Grebe’s powerplant,
the 14 cylinder Jaguar engine, was
its undoing, and a redesign led to a Bristol Jupiter VI powered version, which
was originally called the Grebe II, but which was eventually built in
 small
numbers as the Gamecock.
small
numbers as the Gamecock.
Around 1925, the Gamecock was
placed in production,
and three batches of 30, 42, and 18
were ordered for the RAF, along with several pattern aircraft for
| THE KIT |
Pegasus kits are very basic, with essentially the airframe and engine parts with little else. This kit comes with a set of three view drawings as well as a set of instructions telling the assembly steps. Much of the instructions say to make a certain part from strip or card plastic, and there are no measurements or drawings telling exactly how long any of these struts are supposed to be, or the angles at which they should be installed. Molding is very basic, and a lot of trimming is required. The interior consists of a very thick seat and nothing else, so here, you are on your own.
In Pegasus' defense, this is a very early kit and so did not come with the details and extras that were part and parcel of later releases. I know that much of the same could be said about many short run companies when they started production. Ed
| CONSTRUCTION |
Cockpit walls are very thick,
although the seat does fit in between them.
I added some sidewall detail, a
floor, and an instrument panel, and painted the whole interior a wood color.
When the fuselage was assembled and
dried, I used Bondo to fill in the
 seams,
sanding this down to achieve a smooth finish.
I then made a jig to set the lower
wings with the right amount of dihedral, and after making sure that the butt
joints were perfectly flat, I installed the lower wing panels.
There
were no markings for the strut location holes, so I drilled them out in the
appropriate locations.
The tail units butt joion into
place, and are easy to line up. I used an extra set of struts from an Olimp
Curtiss Jenny kit, which fitted perfectly, for the outer wing struts.
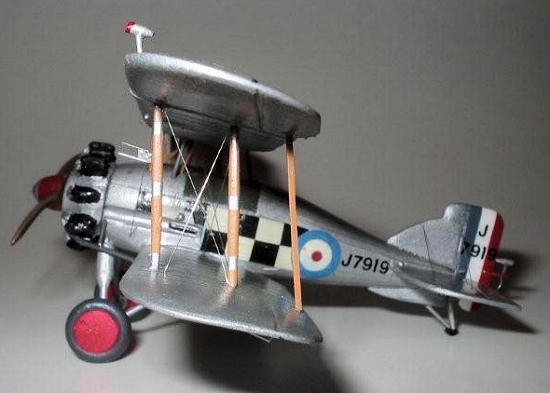
The
cabanes I made from round rod, and I wasn’t really satisfied with these,
although they look OK from a distance.
I used some kit scrap “V” strut for
the main structures, and glued these in position after painting and mounting the
upper wing on the main struts only. By the way, I painted the entire airplane
before mounting the upper wing, including the NIVO green around the cockpit. I
then installed the wing struts at the proper angles, and
mounted the upper wing in place. It
wasn’t as difficult as I thought it would be.
seams,
sanding this down to achieve a smooth finish.
I then made a jig to set the lower
wings with the right amount of dihedral, and after making sure that the butt
joints were perfectly flat, I installed the lower wing panels.
There
were no markings for the strut location holes, so I drilled them out in the
appropriate locations.
The tail units butt joion into
place, and are easy to line up. I used an extra set of struts from an Olimp
Curtiss Jenny kit, which fitted perfectly, for the outer wing struts.
The
cabanes I made from round rod, and I wasn’t really satisfied with these,
although they look OK from a distance.
I used some kit scrap “V” strut for
the main structures, and glued these in position after painting and mounting the
upper wing on the main struts only. By the way, I painted the entire airplane
before mounting the upper wing, including the NIVO green around the cockpit. I
then installed the wing struts at the proper angles, and
mounted the upper wing in place. It
wasn’t as difficult as I thought it would be.
For the landing gear, I had a set of gear struts from a modified Matchbox Hawker Fury kit, and these were just right once the rear struts were shortened somewhat. The spreader bar was the correct length, although I used the kit wheels. I should mention that all of the major parts of this kit required a bit of trimming to get them to acceptable form. But this is part of building this kind of kit.
| COLORS & MARKINGS |
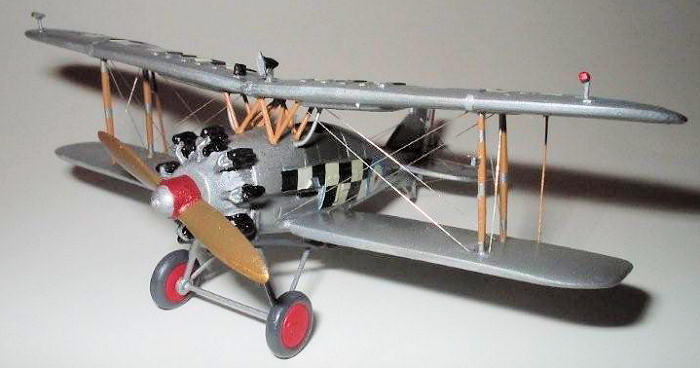
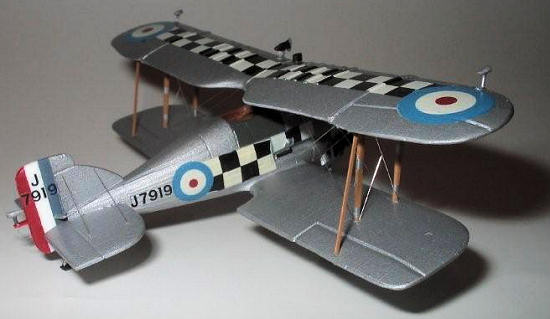
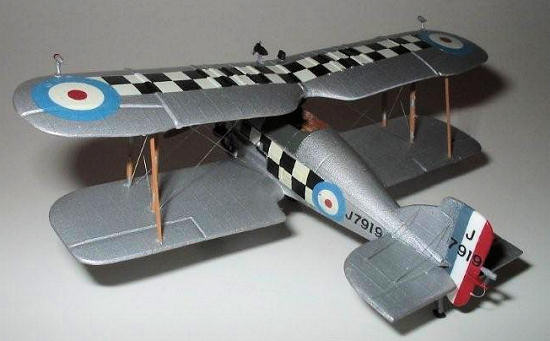
 By this
time, I had decided on what aircraft I was modeling, Gamecock I, J7919, of RAF
No. 43 Squadron operating out of RAF Tangmere in about 1926.
At this time, the wing fluttering
problem had not become acute, so the extra struts seen on later Gamecocks were
not on this aircraft.
The black and white checkerboard
squadron markings were not a problem, since the Matchbox Fury has a set of these
in its kit decals, although my old decals had somewhat deteriorated, and it took
several tries to get the decals to adhere properly.
With enough Micro-Sol and Solvaset,
the decals finally surrendered, and sat down on the surface.
Roundels were taken from the same
Hawker Fury sheets, and some of these were also aged to point of uselessness.
Fortunately, the serial numbers
came from Micro-Scale sheets, and they went on effortlessly.
By this
time, I had decided on what aircraft I was modeling, Gamecock I, J7919, of RAF
No. 43 Squadron operating out of RAF Tangmere in about 1926.
At this time, the wing fluttering
problem had not become acute, so the extra struts seen on later Gamecocks were
not on this aircraft.
The black and white checkerboard
squadron markings were not a problem, since the Matchbox Fury has a set of these
in its kit decals, although my old decals had somewhat deteriorated, and it took
several tries to get the decals to adhere properly.
With enough Micro-Sol and Solvaset,
the decals finally surrendered, and sat down on the surface.
Roundels were taken from the same
Hawker Fury sheets, and some of these were also aged to point of uselessness.
Fortunately, the serial numbers
came from Micro-Scale sheets, and they went on effortlessly.
| FINAL CONSTRUCTION |
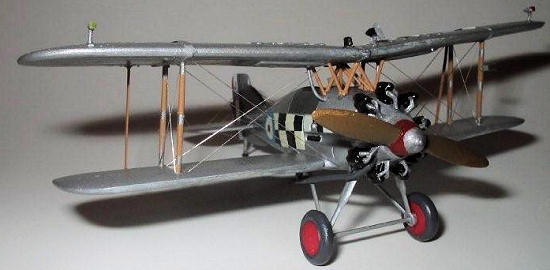
There were a lot of details to
add, including windscreen, pitot tube, running lights, and a wind driven
generator mounted on the top wing. I used the engine from the kit, but added
some parts from the Airfix Bristol Bulldog. The prop was useable with some
 trimming,
and the wheels were OK once I sanded the surfaces smooth.
The tailskid was scratch built, as
were the fuel lines that run from the bottoms of the wing tanks into the forward
fuselage.
The exhaust stacks were entirely
Bulldog, with a couple of bracing struts built from scratch. I added aileron and
rudder horns. There were none visible on the elevators, leading me to believe
that they were located inside of the rear portion of the fuselage.
trimming,
and the wheels were OK once I sanded the surfaces smooth.
The tailskid was scratch built, as
were the fuel lines that run from the bottoms of the wing tanks into the forward
fuselage.
The exhaust stacks were entirely
Bulldog, with a couple of bracing struts built from scratch. I added aileron and
rudder horns. There were none visible on the elevators, leading me to believe
that they were located inside of the rear portion of the fuselage.
I used the usual electronic wire rigging, after stripping off the insulation, cutting the wire into short lengths, rolling it flat, and cutting individual pieces to the proper length. It is tedious, but the result is worth it. A little dab of white glue holds it in place, and from a short distance, it looks like rigging wire. I used the same method for bracing struts on the tailplane, between the rear gear struts, and between the outboard wing struts. There are no wires in the cabane structure, which is helpful, as this part would have been the hardest part to get to. Once rigged, with small details added, the model is finished.
| CONCLUSIONS |
This is NOT a kit for beginners, or for someone without a pretty good stash of spare parts and reference materials. But it was fun, and that was the point. That gap in my model collection is now filled with a bright silver Gloster Gamecock. If you can find one, and want to devote the time and effort, you can build it into a fine model. I haven’t a clue as to where you would find one, but Pegasus has produced a number of unusual aircraft kits over the years, and I have several others I can’t wait to build. Now on to my Fairey Fox…….
January 2009
Copyright ModelingMadness.com. All rights reserved. No reproduction in part or in whole without express permission.
If you would like your product reviewed fairly and quickly, please contact me or see other details in the Note to Contributors.