|
KIT # |
PK-3 |
|
PRICE: |
£ |
|
DECALS: |
Two aircraft |
|
REVIEWER: |
|
|
NOTES: |
|
HISTORY |
 The best-known version of
the P-12 series was the P-12E. The P-12E had its origin in the private
venture Model 218 which flew for the first time on September 29, 1930.
The Model 218 was a company-owned aircraft intended to develop new
features for the P-12/F4B series. It was essentially a P-12B with a
semi-monocoque metal fuselage structure similar to that of the
experimental XP-9 monoplane. It had a tail wheel in place of the tail
skid of the earlier versions. A pilot's headrest was provided behind the
cockpit. The fin and rudder of the Model 218 were originally the same as
that of the P-12B, but they were soon enlarged to a more rounded form. An
experimental Army designation of XP-925 was assigned during testing with
a R-1340D engine and was changed to XP-925A when an R-1340E engine was
installed. Empty weight increased to 1954 lb, gross weight was 2694 lb.
Speed with the altitude-rated R-1340D engine was 195 mph at 8000 feet.
The Model 218 was temporarily fitted with wheel spats in an attempt to
obtain additional speed.
The best-known version of
the P-12 series was the P-12E. The P-12E had its origin in the private
venture Model 218 which flew for the first time on September 29, 1930.
The Model 218 was a company-owned aircraft intended to develop new
features for the P-12/F4B series. It was essentially a P-12B with a
semi-monocoque metal fuselage structure similar to that of the
experimental XP-9 monoplane. It had a tail wheel in place of the tail
skid of the earlier versions. A pilot's headrest was provided behind the
cockpit. The fin and rudder of the Model 218 were originally the same as
that of the P-12B, but they were soon enlarged to a more rounded form. An
experimental Army designation of XP-925 was assigned during testing with
a R-1340D engine and was changed to XP-925A when an R-1340E engine was
installed. Empty weight increased to 1954 lb, gross weight was 2694 lb.
Speed with the altitude-rated R-1340D engine was 195 mph at 8000 feet.
The Model 218 was temporarily fitted with wheel spats in an attempt to
obtain additional speed.
Note: as I have very little in the way of reference books and rely heavily on the WWW the history has been plagiarised from http://home.att.net/~jbaugher1/p12.html
|
THE KIT |
 The
little P12E comes in the traditional Matchbox’s two color plastic, this
time being olive drab and bright yellow so younger modellers could have a
colourful model without the need for painting, it also makes it easier to
paint the yellow wings as you are not trying to cover dark green plastic
with yellow paint.
The
little P12E comes in the traditional Matchbox’s two color plastic, this
time being olive drab and bright yellow so younger modellers could have a
colourful model without the need for painting, it also makes it easier to
paint the yellow wings as you are not trying to cover dark green plastic
with yellow paint.
The trench diggers that plagued Matchbox kits must have been on holiday when they released this little gem as the detail is nice and restraint with raised panel lines and rivets. Wing rib detail is a little heavy but it almost always is in this scale. Cockpit detail is basic with just a seat and floor supplied.
Instruction sheet is typical Matchbox with exploded view drawings with a short history of the aircraft and half a page of warning on the dangers of gluing styrene to various body parts. Color details are printed on the back of the box with generic colors quoted.
|
CONSTRUCTION |
First
order of the day was to add some of my home cast detail panels to the
inside of the fuselage and to try out my new instrument panels made by
drawing up an instrument panel in Paintshop Pro and printing it out onto
clear overhead transparency film using a Hp 1200 Laser printer, this has
given me a A4 sheet of generic ins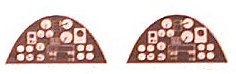 trument
panels that I can cut to shape and by adding a bit of white paint
to the back of the panel I have a passible panel for about 30 seconds of
work. It helps that you can get away with doing these sort of shortcuts
in this scale
J
trument
panels that I can cut to shape and by adding a bit of white paint
to the back of the panel I have a passible panel for about 30 seconds of
work. It helps that you can get away with doing these sort of shortcuts
in this scale
J
 Once
the cockpit was finished the fuselage was closed up with only the odd dab
of filler needed, the top deck was the trimmed slightly to get it to sit
flat and the join line hidden with a little Tamiya putty and nail polish
remover. These colourful biplanes are easier to do if you don’t assemble
everything before you begin painting. It pays to leave the top wing off
until the fuselage is painted. I glued the lower wing to the fuselage and
filled the rather large gap on the bottom. Once cleaned up Tamiya Yellow
was sprayed unto the lower wing and left to harden up, It was then masked
off and the Tamiya red was sprayed on the fuselage in preparation for the
red “racing stripe”.
Once
the cockpit was finished the fuselage was closed up with only the odd dab
of filler needed, the top deck was the trimmed slightly to get it to sit
flat and the join line hidden with a little Tamiya putty and nail polish
remover. These colourful biplanes are easier to do if you don’t assemble
everything before you begin painting. It pays to leave the top wing off
until the fuselage is painted. I glued the lower wing to the fuselage and
filled the rather large gap on the bottom. Once cleaned up Tamiya Yellow
was sprayed unto the lower wing and left to harden up, It was then masked
off and the Tamiya red was sprayed on the fuselage in preparation for the
red “racing stripe”.
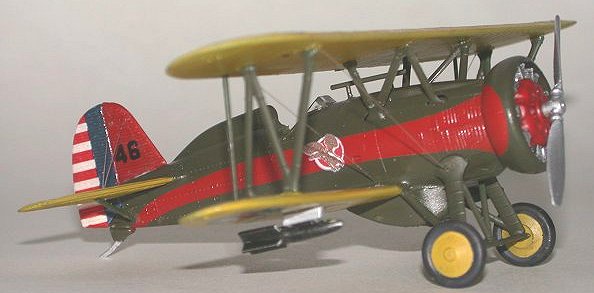
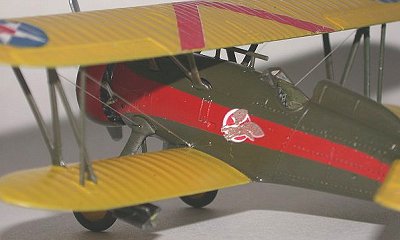
The “racing stripe was masked up by cutting 1 mm strips of the masking tape and carefully applying them to the sides, many attempts were needed to get both of them even and curving the right way, once the masking tape was in place the rest of the stripe was filled in with Maskol masking fluid. Tamiya Olive green with a dash of Humbrol 105 was airbrushed onto the fuselage to finish it off.
 Tailplane and rudders were cleaned up and painted separately before
attaching to the fuselage. Now heres were I made a rather large boo-boo,
Matchbox show the little P12E on the box art with a yellow rudder and on
the painting guide on the back of the box it is shown as being red. I
couldn’t find any color photos of this aircraft on the net so I went with
the paint guide, and painted the rudder red, only to discover after I had
applied the decals it should be yellow as per the box art. By then it was
too late to repaint it without destroying the fin stripes so I have left
it in the wrong color.
Tailplane and rudders were cleaned up and painted separately before
attaching to the fuselage. Now heres were I made a rather large boo-boo,
Matchbox show the little P12E on the box art with a yellow rudder and on
the painting guide on the back of the box it is shown as being red. I
couldn’t find any color photos of this aircraft on the net so I went with
the paint guide, and painted the rudder red, only to discover after I had
applied the decals it should be yellow as per the box art. By then it was
too late to repaint it without destroying the fin stripes so I have left
it in the wrong color.
The Undercarriage was installed next and touched up by brush painting, once dry this unit becomes very strong and is almost unbreakable which is handy if, like me you drop your models a least once during construction!. The two piece cowling gave me a few fits to start with as I had originally glued it together so I could mask up the red circles and get them even, I discovered afterwards though the cowling wouldn’t slip over the motor, so instead of breaking the cowling into two pieces again I trimmed the cylinders of the motor down until I could slide it into the cowl and rotate it to the correct alignment.
Final assembly consisted on adding the outer struts, lining the up to and attaching the upper wing. Invisible thread was used for the rigging and I didn’t even try to attempt the double wire rigging on the original, in 1/48th scale yes, but in 1/72nd scale I’m having enough trouble holding the damn model these days as the hidden damage of my profession catches up with me. (RSI, Repetitive Strain Injury). So I have left it with minimal rigging for now.
|
CAMOUFLAGE & MARKINGS |
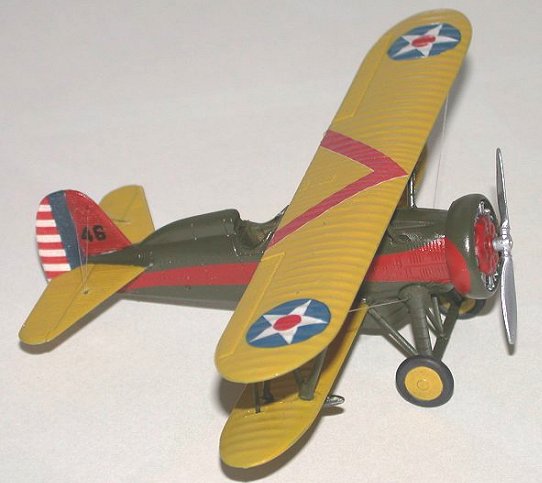
 As the
painting of this beast is best done as you assemble the kit the last
thing left to do was to apply the markings, the decal supplied by
Matchbox are pretty poor being badly printed and the colors very pale. I
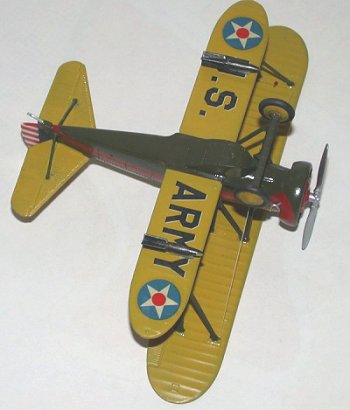
ended up replacing the US insignia on the upper wing with some leftover
ones out of my tiny decal stash and used the Matchbox supplied ones for
the lower wing, note the vast color variations between the two. The
Matchbox decals reacted well to my homemade decal softener and conformed
even on the ribbed rudder. The red chevron on the upper wing is a little
light compared to the the red on the fuselage and if I were to do this
again I would be inclined to spray the red chevron rather than using the
decals.
As the
painting of this beast is best done as you assemble the kit the last
thing left to do was to apply the markings, the decal supplied by
Matchbox are pretty poor being badly printed and the colors very pale. I
ended up replacing the US insignia on the upper wing with some leftover
ones out of my tiny decal stash and used the Matchbox supplied ones for
the lower wing, note the vast color variations between the two. The
Matchbox decals reacted well to my homemade decal softener and conformed
even on the ribbed rudder. The red chevron on the upper wing is a little
light compared to the the red on the fuselage and if I were to do this
again I would be inclined to spray the red chevron rather than using the
decals.
Once the decals had dried off the model was given a quick wash off the remove the excess decal softener and a couple of coats of future was brushed on to give it a slight sheen and seal in the decals. The bombs and bomb racks were painted up and added at this stage with the final drop of white glue to attach the tiny canopy and the P12e is done.
|
CONCLUSIONS |
Matchbox had a reputation of offering simple, basic kits aimed at the novice modeller as they were easy to assemble and didn’t need painting (!) they also did some wonderful subjects that no manufacturer would touch and I think that the modelling world in general is poorer from the demise of the plastic kitset side of Matchbox, sure Matchbox kits are turning up under the Revel AG label but there is a lot of their range that hasn’t been re-released as of yet. Kits such as these are inexpensive fun builds that can be recommended for all skill levels and with it’s green and red fuselage and bright yellow wings the P12E is a colourful and almost sporty looking addition to my collection.
|
REFERENCES |
July 2003
Copyright ModelingMadness.com
If you would like your product reviewed fairly and fairly quickly, please contact the editor or see other details in the Note to Contributors.