Airfix 1/72 Bristol Bulldog
|
KIT # |
1083 |
|
PRICE: |
$4.98 MSRP |
|
DECALS: |
Two options |
|
REVIEWER: |
Mark "Mr. Airfix" Fordham |
|
NOTES: |
|
HISTORY |
I normally bow out of histories and this one is no exception I hereby refer you to Pierre-Andre build of the 1/48th Bulldog for the service history of the Bulldog II in Republican government service http://www.modelingmadness.com/reviews/preww2/biollbull.htm
|
THE KIT |
 The Bristol
Bulldog is classic Airfix a simple no-frills kit that makes into a nice
looking if somewhat basic representation of the Bristol Bulldog II,
Tamigawa they aren’t but who else has the range of interesting subjects
that Airfix have kitted over the years? The Bulldog is one of the those
kits that you could knock together in about ½ hour and be dog fighting
your best mate, who needs full cockpit detailing or scale thickness
trailing edges, lets make the struts a little on the thick side so they
can stand up to being looped a few times, lets face it Airfix models are
meant to be played with, not sitting on some shelf gathering dust.
The Bristol
Bulldog is classic Airfix a simple no-frills kit that makes into a nice
looking if somewhat basic representation of the Bristol Bulldog II,
Tamigawa they aren’t but who else has the range of interesting subjects
that Airfix have kitted over the years? The Bulldog is one of the those
kits that you could knock together in about ½ hour and be dog fighting
your best mate, who needs full cockpit detailing or scale thickness
trailing edges, lets make the struts a little on the thick side so they
can stand up to being looped a few times, lets face it Airfix models are
meant to be played with, not sitting on some shelf gathering dust.
The decals for this rendition of the bulldog were at least printed in register and looked quite nice, normally I don’t have any problem with Airfix decals for silvering or conforming to curves and if they are in register can be made to look as good as any of the aftermarket sheets. Now normally I’m an out of the box decal guy but lately I’ve been trying to do more interesting schemes with out having to resort to aftermarket sheets which are difficult for me to get hold of.
|
CONSTRUCTION |
Like most Airfix kits construction starts with adding detail into the cockpit as most Airfix kits have at the most a floor and seat for detail and that’s about all, the rest of the detail is taken up but your pilot.
Fit of
the major components is still pretty good and very little filler is
needed with this kit, the undercarriage and struts, always a tricky point
with biplanes gave no real problems.
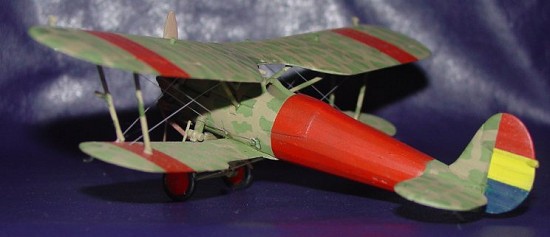
I wanted to do something a little different than the silver painted Bulldogs in the RAF, while surfing around I ran into Pierre-Andre’s build of the Spanish Republican Bulldog II, that looks more like it I thought nice and colourful. A quick google found a variation of the Republican camouflage that I could use on mine.
|
COLORS & MARKINGS |
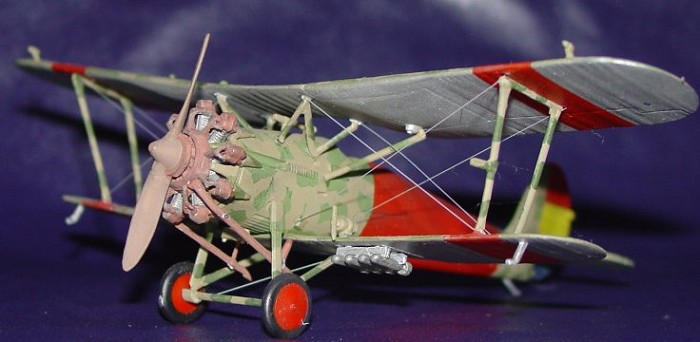
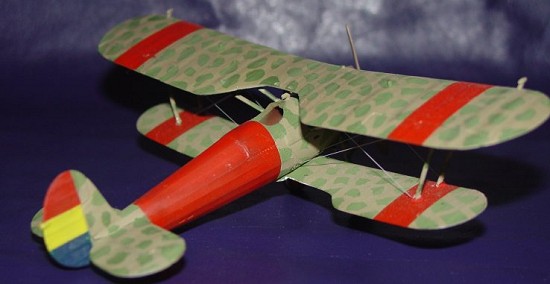
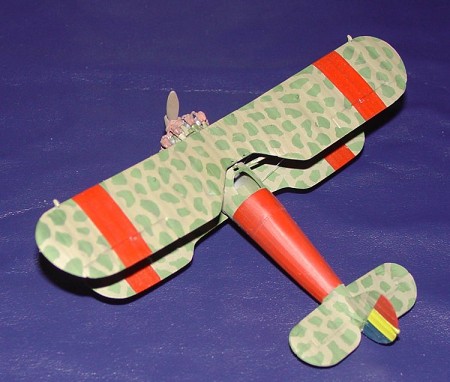
As with most biplanes you need to do the painting as you go as it is impossible to paint these little beastie when they are complete. So with the fuselage complete and the lower wing added it was time to dig out the paint. I first sprayed the fuselage and upper sides of the wings with light earth and left them to dry. With the compressor set at 14 psi and the fine needle in my Paasche VSR-90 I proceeded to drive myself nuts doing the fine green mottle over the upper areas of the plane. Of course if I had thought about it and painted and masked off the vast amounts of red that this plane has on the fuselage and wing I could have saved myself about ½ the mottling work, but I don’t think of things like that until afterwards.
 With the camo
down and dry the top was masked off and the underside sprayed silver,
according to the very scant references that are out there, remember there
was only 5 Bulldogs in Republican service and there seems to be some
dispute over the camo schemes. Some references show the mottling to be
like Pierre-Andre’s build and some to be more like the Italian Cr 42
mottling, right or wrong I chose the Cr 42 type with the separate green
mottle mainly because it looked “cool”
With the camo
down and dry the top was masked off and the underside sprayed silver,
according to the very scant references that are out there, remember there
was only 5 Bulldogs in Republican service and there seems to be some
dispute over the camo schemes. Some references show the mottling to be
like Pierre-Andre’s build and some to be more like the Italian Cr 42
mottling, right or wrong I chose the Cr 42 type with the separate green
mottle mainly because it looked “cool”
The Republican Stripes were painted onto the tail, wings and fuselage to complete the “decaling” stage and it was back to the construction.
|
FINAL CONSTRUCTION |
The top wing was added and rigging done with stretched sprue, in this scale I go for the look of rigging rather than adding every single wire that the real one has on it, quite often I find that the finished model looks too heavy with a full compliment of rigging.
Some careful work with a knife on the supplied engine will remove the mould lines and careful painting will bring out the detail of the cylinders and with the addition of the exhausts and prop the little Bulldog is finished.
|
CONCLUSIONS |
 Simple builds
these Series I Airfix kits. Sure they lack detail but they were designed
to be played with and you can always add more detail to them to bring
them up to a nice looking model. There really isn’t too much wrong with
this kit that a bit of detailing cant fix. I normally don’t bother
measuring 1/72nd scale models against plans and there may very
well be inaccuracies in the shape of these old Airfix offerings, but they
are still fun to make and equate to many a happy hour in front of the
model bench, what more can you ask of a hobby?
Simple builds
these Series I Airfix kits. Sure they lack detail but they were designed
to be played with and you can always add more detail to them to bring
them up to a nice looking model. There really isn’t too much wrong with
this kit that a bit of detailing cant fix. I normally don’t bother
measuring 1/72nd scale models against plans and there may very
well be inaccuracies in the shape of these old Airfix offerings, but they
are still fun to make and equate to many a happy hour in front of the
model bench, what more can you ask of a hobby?
|
REFERENCES |
This one line drawing is what I based my model on.http://airwar.hihome.com/airwar/ww2-europe/part1/act1-bulldog2.jpg
May 2004
Copyright ModelingMadness.com If you would like your product reviewed fairly and fairly quickly, please contact the editor or see other details in the Note to
Contributors.