
|
KIT # |
CFR 8008 |
|
PRICE: |
$59.96 |
|
DECALS: |
See Review |
|
REVIEW: |
|
|
NOTES: |
Resin Kit |
|
HISTORY |
Throughout the 1920s and 1930s, French aircraft designers were in the forefront of aviation development. In 1930, the French Air Force put forward an imaginative requirement, called the "Jockey" program, which called for fighters with significantly lighter weight, to take full advantage of the possibility of supercharging the low-powered engines then in use.
The result was a number of designs that were almost all monoplanes of one sort or another, all made from light-weight aluminum. One, the Dewoitine D.500 would emerge as the first of the low-wing single-seat fighter configuration which would dominate subsequent designs.
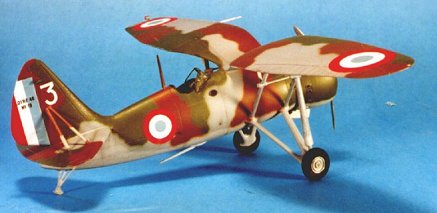
However, conservatives in the French Air Force looked for less-radical designs, as backup in case the favored design was unsuccessful. One of these was the Loire 46. The airplane featured the gull wing which had found favor in the designs of Zygmunt Pulawski of P.Z.L, who was influential at the time with French designers. His P.11c would remain in service long enough to see combat against the Luftwaffe in September 1939. Luckily, the pilots of the Loire 46 never faced such an ordeal.
The Loire 46 was first flown in September 1934, by which time its day was over technologically, as the prototypes of both the Messerschmitt Bf-109 and Hawker Hurricane also flew that year. Powered by a 930 h.p. radial, the Loire 46 was armed with four 7.62mm machine guns in the wings and had a top speed of 260 mph. The airplane had excellent handling characteristics, with a good rate of climb. However, the airplane was obsolete by the time the first of 60 ordered for the Armee de l'Air was taken on charge in 1936, and it found its main service as an advanced trainer for fighter pilots after being replaced in front line service by the M.S.406 in 1938.
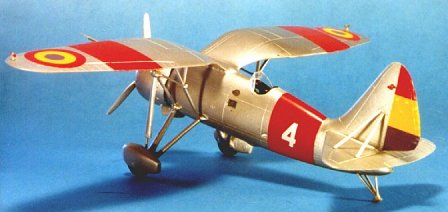
Ten examples of the airplane were sold to the Spanish Republic just before the commencement of the Spanish Civil War, and were used for awhile by the Republican Air Force during the opening of combat. The embargo on military supplies, which was only observed by those who would have supported the Republic against the fascists, resulted in a lack of spares for the airplanes and their service in the conflict was brief.
|
THE KIT |
Classic Resin Airframes is a branch of Classic Airframes, a company which has produced a number of limited-run models of aircraft from the period known as "The Golden Age" of the prewar 1930s. This kit has 37 crisp resin parts, and a decal sheet that provides markings for one French airplane and one flown by the Spanish Republican Air Force.
As far as construction goes, this is not the kit for someone doing their very first all-resin model, but it is simple enough that someone who has built several limited-run injection molded kits and one or two all-resin kits would have no problem with it. I was fortunate that a bookkeeping error at Squadron had resulted in my getting two of these, about two days apart. I felt if I "screwed the pooch" on one, I could save myself with the other. As it turned out, I ended up doing both, with the second one being about half as difficult to build, illuminated as it was in the blinding light of hindsight.
Lack of clarity with regard to the instructions for assembling the landing gear is the only real problem. The assembly of all of the rest of the model presents few problems to anyone who is following the instructions. The cockpit area could use a bit more detail, but then most of it cannot really be seen in the open cockpit; the modeler who wants more detail is confronted with the problem there are no photographs or drawings of the cockpit. I elected to make mine straight from the box and was pleased with the result.
I was fortunate to have a photograph of a Loire 46 in an older issue of "Air Enthusiast Quarterly," which gave me more information on the proper location and alignment of the landing gear than the instructions did. A lot of cutting and test-fitting will be necessary, but if one follows the method outlined below you will use far fewer "bad words" accomplishing this than I did.
|
CONSTRUCTION |
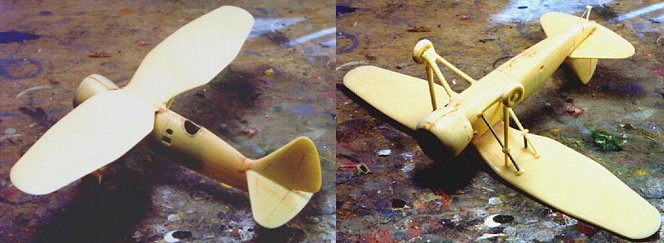
When you assemble the wing to the fuselage, be certain to check the alignment in plan view (from above), because the way the kit is engineered, it is entirely possible to get this off by a degree or two; if you miss this it won't be noticeable most of the time, but it's certain to be caught if you enter a contest. I managed to miss this the first go-around, and had to saw the wing off to re-do the alignment when I caught the problem with the second kit.
With the wing solidly glued to the completed fuselage, test fit the rear bracing struts and mount them, with the "long" section attached to the fuselage. Everything will be aligned from these. The vertical leg of the landing gear should be directly vertical, with the airplane sitting on the ground; you will need to trim to get this fit. You will know you have it right when the center brace strut between the main struts is directly horizontal between them when the airplane is in level flight position. I found I cut off about 1/8" from the upper end of the main strut. I also found it necessary to cut about 3/32" from the lower end, and about 1/8" from the main struts of the landing gear, and then bend them a bit to get the proper fit on the fuselage centerline. Once you have completely test-fitted all these parts for alignment, they can be attached with C-A glue. Once it has all set up, this is a remarkably sturdy structure.
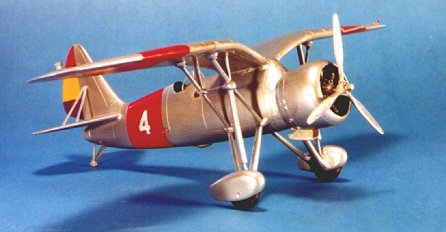
I did not use the wheel fairings on one kit, due to the fact that one side of one of them had been damaged and the broken bit lost before the damage was noticed. The airplane was flown both ways, so this is not a problem.
When mounting the multi-part engine to the front of the fuselage, remember to test-fit with the cowling half before deciding to trim the rear mount. When the engine is in the proper position, the cowling will attach to it and leave a gap about 1/16' wide all around at the rear; it does not fit directly to the fuselage. You will need to trim the cut-out in the upper rear cowling to keep it aligned with the fuselage at that point.
|
PAINT & DECALS |
The second model was done in the French markings as an advanced trainer at Cazaux in 1939, in the three-color camouflage scheme, using Gunze-Sanyo paints. Shooting around the struts was not as difficult as I thought it would be. Once the paint was dry, I shot a coat of Future.
The decals went on easily and settled down with Micro-Sol. the rudder markings for both schemes are a bit large and should be trimmed to fit before they are applied.
I used Aeroclub props from the spares box, because the resin props in the kits looked like something that would continually get broken, beyond the fact they didn't look all that good and were too small in diameter according to the two photos I had of the prototype.
The Spanish Republican airplane was given a final coat of "regular" Future overall, while I completed the French airplane with a coat of "flat" Future (Future mixed with Tamiya Flat base).
|
CONCLUSIONS |
Overall, these were easy models to create, once I figured out the landing gear strut placement. They are certainly attention-getters on the model shelves, due to the out-of-the- ordinary configuration. Modelers who enjoy aircraft from this period will be happy to add the Loire 46 to their collection.
Thanks to Squadron Mail Order (http://www.squadron.com) for providing both review copies.
|
REFERENCES |
"Fighters A La Francaise," Air Enthusiast Quarterly, #4
Copyright ModelingMadness.com. All rights reserved. No reproduction in part or in whole without express permission.