Classic Airframes 1/48 BF2C-1 Hawk
|
KIT # |
433 |
|
PRICE: |
$25.50 |
|
DECALS: |
See review |
|
REVIEW : |
|
|
NOTES: |
short run kit |
|
HISTORY |
Along with Boeing, the Curtiss-Wright Corporation was the most prolific designer and manufacturer of single-seat fighter aircraft for both the U.S. Army Air Corps and U.S. Navy between 1925 and 1935. Curtiss, however, differed fundamentally from both its then-competitor, Boeing, and its later competitor, Grumman, in its policy of creating a basic design and improving in incrementally, stretching this over as long a time period as possible. Admittedly, it was a period in which the technology was such that the same basic design could fulfill the very-different requirements of both services. The difference was that both Boeing and Grumman were interested in advancing the state of the art, and had no difficulty abandoning a proven design of something newer held the promise of superior performance. After 1935, as the U.S. Navy remained unable to decide if it would join the monoplane revolution, Curtiss went on to create its most successful fighter series, the P-36/P-40 for the USAAC, but this again was a design series that did not "push the edge of the envelope," and was known during the war as "the best second choice." It is for reasons like this that, since 1945, Curtiss has not been a factor in U.S. aircraft development.
The Curtiss "Hawk" first appeared in 1925 as the P-1 for the USAAC, and shortly thereafter as the F6C-1 for the Navy. While the Army continued to accept the in-line liquid-cooled engine, the Navy opted for the radial air-cooled engine, which was both lighter and more reliable than the current liquid-cooled powerplants, an important consideration for an aircraft with wheels flying over large bodies of water. Curtiss was able to turn the radial-engined naval fighters that came after this decision into a successful line of export fighters under the "Hawk" designation, selling the aircraft in South America and China.
 By 1935, Grumman had replaced Boeing as Curtiss' chief competitor for Navy
contracts, with its FF-1 and F2F-1, and the coming F3F-1 - all of which were
biplanes with retractable landing gear. In an attempt to compete with these more
modern designs, Curtiss modified its F11C-2 as the XF11C-3, with a deepened
forward fuselage that allowed for retractable landing gear of the kind used by
Grumman; the open cockpit was soon replaced by a heightened turtledeck on the
rear fuselage and a half-canopy, which was almost always left slid back in the
open position. When the Navy ordered the aircraft into limited production, it
was as the BF2C-1, a new designation that meant the airplane was seen primarily
as a dive bomber, with the role of fighter as a secondary requirement. The
aircraft served with VF-5B aboard the USS "Ranger" from October 1936
to November 1937, the shortest operational lifespan of any Naval aircraft of the
period. This was due to the fact that - in its attempt to modernize a ten year
old design - Curtiss had exchanged wooden wings for metal wings. Unfortunately
the vibration frequency of this structure was in harmony for the engine at
cruising speed. In flight, the airplane seemed to be shaking itself to pieces,
no matter the fixes tried by Curtiss and the Navy. Curtiss' final solution was
an offer to re-equip the airplanes with the wooden wing of the successful export
variant, the Hawk III, but the Navy considered the airplane passé in light of
coming designs, and the BF2C-1 unceremoniously left service, replaced by the
earlier F4B-4 pending re-equipment with more modern monoplanes. Thus the last
Curtiss naval fighter was cast aside, the victim of a failure to keep up with
contemporary developments in aircraft design and construction.
By 1935, Grumman had replaced Boeing as Curtiss' chief competitor for Navy
contracts, with its FF-1 and F2F-1, and the coming F3F-1 - all of which were
biplanes with retractable landing gear. In an attempt to compete with these more
modern designs, Curtiss modified its F11C-2 as the XF11C-3, with a deepened
forward fuselage that allowed for retractable landing gear of the kind used by
Grumman; the open cockpit was soon replaced by a heightened turtledeck on the
rear fuselage and a half-canopy, which was almost always left slid back in the
open position. When the Navy ordered the aircraft into limited production, it
was as the BF2C-1, a new designation that meant the airplane was seen primarily
as a dive bomber, with the role of fighter as a secondary requirement. The
aircraft served with VF-5B aboard the USS "Ranger" from October 1936
to November 1937, the shortest operational lifespan of any Naval aircraft of the
period. This was due to the fact that - in its attempt to modernize a ten year
old design - Curtiss had exchanged wooden wings for metal wings. Unfortunately
the vibration frequency of this structure was in harmony for the engine at
cruising speed. In flight, the airplane seemed to be shaking itself to pieces,
no matter the fixes tried by Curtiss and the Navy. Curtiss' final solution was
an offer to re-equip the airplanes with the wooden wing of the successful export
variant, the Hawk III, but the Navy considered the airplane passé in light of
coming designs, and the BF2C-1 unceremoniously left service, replaced by the
earlier F4B-4 pending re-equipment with more modern monoplanes. Thus the last
Curtiss naval fighter was cast aside, the victim of a failure to keep up with
contemporary developments in aircraft design and construction.
|
THE KIT |
 The BF2C-1, due to its interesting configuration, has long been of interest
to modelers who enjoy the aircraft of the between-the-wars "Golden
Age," but has only been available in kit form as a very good 1/32 injection
molded kit first released by Hasegawa 25 years ago (and still excellent), and as
a 1/48 vacuform from Sierra Scale Models four years ago. A very old 1/48 (and
very inaccurate) kit by Lindberg of the F11C-2 has been the basis over the years
for modelers so determined as to create a scratchbuilt conversion to the BF2C-1.
Thus, this kit by Classic Airframes is the first 1/48 injection-molded kit of
the last Hawk. The BF2C-1 is the first release of what may be the entire series
of Hawks back to the P-1. The export variant, the Hawk III (subject of a
different review) has been released at the same time, and will be shortly
followed by the F11C-2 "Goshawk"/Hawk II this summer.
The BF2C-1, due to its interesting configuration, has long been of interest
to modelers who enjoy the aircraft of the between-the-wars "Golden
Age," but has only been available in kit form as a very good 1/32 injection
molded kit first released by Hasegawa 25 years ago (and still excellent), and as
a 1/48 vacuform from Sierra Scale Models four years ago. A very old 1/48 (and
very inaccurate) kit by Lindberg of the F11C-2 has been the basis over the years
for modelers so determined as to create a scratchbuilt conversion to the BF2C-1.
Thus, this kit by Classic Airframes is the first 1/48 injection-molded kit of
the last Hawk. The BF2C-1 is the first release of what may be the entire series
of Hawks back to the P-1. The export variant, the Hawk III (subject of a
different review) has been released at the same time, and will be shortly
followed by the F11C-2 "Goshawk"/Hawk II this summer.
The fabric detail of the wings and tail is suitably restrained and will result in a good-looking kit under a coat of paint.
MicroScale decals are provided for two aircraft of VB-5B, the only Navy squadron to operate the BF2C-1.
The kit has many of the difficulties one associates with biplane models from Classic Airframes, with the result being an acceptable model for the more advanced modeler.
|
CONSTRUCTION |
 Construction starts with the cockpit, and here is where the difficulties
begin. MPM, who designed the kit for Classic Airframes, did not do their
research. The Hawk series had a smooth cockpit inner wall, with an aluminum
cover over the ribs; this means the first thing to be done is to sand off the
inner rib detail. The visible airframe sections for the cockpit are correct, but
are shown installed upside down! To get things right here, the modeler needs
photographs of the cockpit; unfortunately, there are none in the
otherwise-excellent "Curtiss Hawks in Action." I was fortunate to have
a 1972 issue of "Air International" which had an article on the BF2C-1
and included a Pilot Press cutaway drawing. Even with this, I would not go out
on a limb and say that the cockpit is completely correct, though I doubt there
are many critics with the right information either. It was also necessary to
sand and test-fit the resin cockpit floor for proper positioning. The resin seat
has molded-in lap belt detail (at this period, USN and USAAC aircraft did not
use shoulder belts).
Construction starts with the cockpit, and here is where the difficulties
begin. MPM, who designed the kit for Classic Airframes, did not do their
research. The Hawk series had a smooth cockpit inner wall, with an aluminum
cover over the ribs; this means the first thing to be done is to sand off the
inner rib detail. The visible airframe sections for the cockpit are correct, but
are shown installed upside down! To get things right here, the modeler needs
photographs of the cockpit; unfortunately, there are none in the
otherwise-excellent "Curtiss Hawks in Action." I was fortunate to have
a 1972 issue of "Air International" which had an article on the BF2C-1
and included a Pilot Press cutaway drawing. Even with this, I would not go out
on a limb and say that the cockpit is completely correct, though I doubt there
are many critics with the right information either. It was also necessary to
sand and test-fit the resin cockpit floor for proper positioning. The resin seat
has molded-in lap belt detail (at this period, USN and USAAC aircraft did not
use shoulder belts).
 Once the cockpit was completed and installed in the right fuselage half, the
next step was the resin wheel wells. These have to be cut off a substantial
molding block, and then sanded down almost to the point of sanding through the
back wall, to get them thin enough to fit inside the fuselage together. One also
needs to sand and test-fit these parts so they will fit with the lower fuselage
section. Once these fit, they were attached to their respective halves with
cyanoacrylate and the fuselage halves were glued together. The lower fuselage
section was difficult to fit and needed cyanoacrylate to hold it in position. A
considerable amount of putty was used to seal the seams and gaps.
Once the cockpit was completed and installed in the right fuselage half, the
next step was the resin wheel wells. These have to be cut off a substantial
molding block, and then sanded down almost to the point of sanding through the
back wall, to get them thin enough to fit inside the fuselage together. One also
needs to sand and test-fit these parts so they will fit with the lower fuselage
section. Once these fit, they were attached to their respective halves with
cyanoacrylate and the fuselage halves were glued together. The lower fuselage
section was difficult to fit and needed cyanoacrylate to hold it in position. A
considerable amount of putty was used to seal the seams and gaps.
While the fuselage was setting up, I cut the wings from their trees and assembled the upper wing. The lower wings are one piece to each side, and each was badly warped (the same problem existed in the Hawk III). I de-warped them by heating a pan of water just to boiling, and then dipping the wings in the hot water to soften them. Unlike resin, they did not want to return to an original shape, so I had to reshape them manually. The ultimate result was far better than what I started with, but also not perfect.
The next sub assembly was the engine. This is in the typical Classic Airframes/MPM assembly of resin crankcase and separate cylinders. Unlike the F4B-4, where one needs to cut off the cylinders right at the molding block, here one needs to cut them off about 3/32" from the block. I suggest you assemble the cowling, then cut off the crankcase, then eye-ball the cylinders to get the proper length. Discovering all this made this part of the construction phase the most difficult of all.
Once the fuselage had set up, the putty was sanded down, and the panel line detail lost in the process was re-scribed. The horizontal stabilizers and rudder were then attached. There are no alignment tabs or pins for this, so check alignment carefully and then set the sub assembly aside to dry. At this time, I also attached the lower wings, which also have no alignment tabs. I did drill out holes for plastic dowels and used these for alignment guides and to give the joint some strength.
As is usual with Classic Airframes biplane kits, the alignment of the upper wing is problematic. I used my standard procedure of getting the interplane struts right and then trimming the cabane struts to fit, which I have used on all Classic Airframes biplane models.
This time - unlike the F4B-4/P-12E - the interplane struts are the proper length. I therefore attached them to the lower wing so they would fit to the attachment points shown on the lower surface of the upper wing. Once the struts had set up, I tacked the upper wing to them with a drop of cyanoacrylate on each strut main point of contact. Once the cabane struts were removed from their tree and cleaned up, it was immediately clear they were not the right size. Here it was really useful to study photographs in the "In Action" book, to see where to make the trims. This "N" strut is not a classic N strut, but rather a forward "V" strut with a rear strut separated by about 1/8" from the rear attachment point of the "V." I eventually trimmed about 1/8" from either end of the struts to get them to fit to the fuselage and wing properly. This is a fiddly procedure, and I recommend you trim a bit, test fit, trim, test fit, until you get it right. Once I had found the proper length, the cabane struts were glued in position and set aside to dry.
|
PAINT & DECALS |
 Painting:
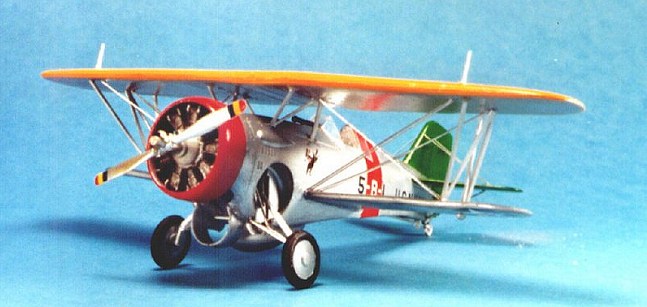
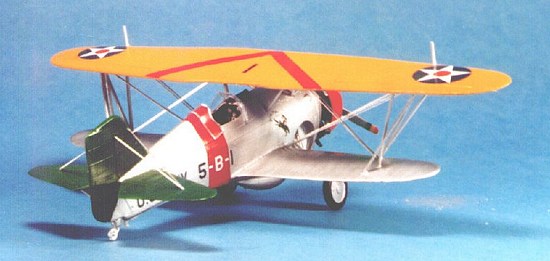
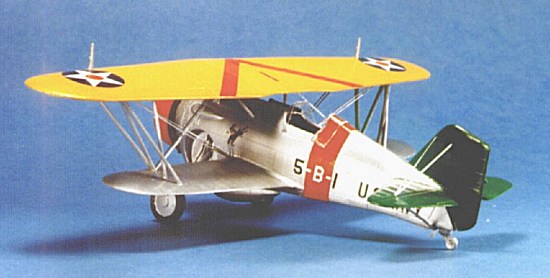
At this period of Naval aircraft markings, the tail color was not keyed to the aircraft carrier group, but rather to the individual squadron. Thus, while VF-5B flew F2F-1s from "Ranger" with blue tail surfaces, VF-5B carried willow green tails - which is confusing since the year after the BF2C-1 left the fleet, there was a reorganization which keyed tail color to air group, and the "Ranger" air group would be assigned willow green as their color; additionally they would be renumbered for the ship's hull number. The quick answer here is, follow the painting guide, which is accurate.
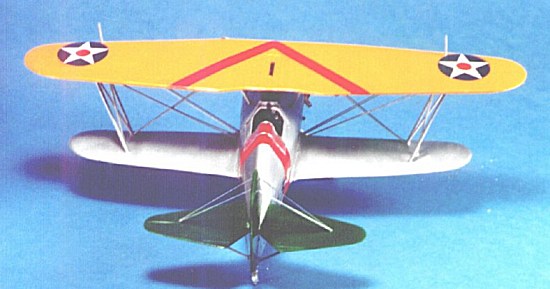
I painted the tail surfaces with Gunze Sanyo Bright Green Gloss, which is a close approximation of Willow Green. I then painted the cowling and the fuselage band with Gunze Gloss Red, and the upper wing with Gunze Orange Yellow Gloss - the correct shade for what the Navy called "chrome yellow" but which had nothing to do with the Army shade most modelers have mistakenly used.
Once all this had dried, I masked off the tail and fuselage band, and painted the lower surface of the upper wing, the lower wings, and the aft fuselage with SnJ Aluminum, since these fabric surfaces were painted with aluminum dope. When this was dry and sealed, I masked off and used the SnJ polishing powder to get the lacquer-painted metal surfaces of the forward fuselage, the wheels and landing gear parts, and the interior of the engine cowling; I sealed this with Metallizer Sealer, to approximate the look of aluminum lacquer.
Decals:
I used the decals to create 5-B-1, the Commanding Officer's aircraft. These decals go on well with MicroSol. Be careful to use the right second part of the squadron marking decal, since the knight's shield is painted in the flight color.
|
CONSTRUCTION |
aving painted the engine with Metallizer Aluminum Plate and Magnesium for the cylinders, and Stainless Steel for the crankcase, and the exhaust manifolds in Burnt Iron, I glued the exhaust manifolds in position, and then glued the engine into the cowling and the propeller to the engine. The final fiddly moment came when I needed to use a piece of one of the resin molding blocks to attach between the back of the engine and the front of the fuselage so the engine would fit properly.
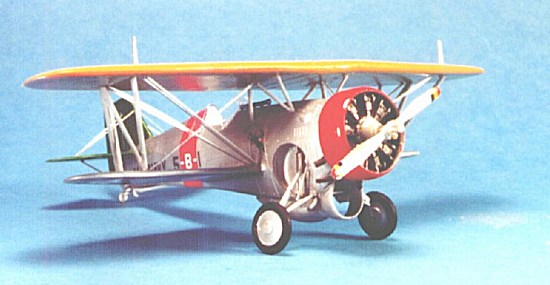
 The white metal landing gear parts were glued into position and the wheels
attached. Be sure to remember that the wheels noticeably splay outward to the
bottom when correctly positioned.
The white metal landing gear parts were glued into position and the wheels
attached. Be sure to remember that the wheels noticeably splay outward to the
bottom when correctly positioned.
I attached the telescopic sight in position, then glued the windscreen in position with white glue. I positioned the partial canopy open, its usual position on the real airplane.
Rigging:
No biplane looks right without rigging. The BF2C-1 used the streamline-section "raf" wires for its fairly-simple rigging system. I used .010 x .015 Evergreen strip for these wires, and followed the rigging diagram in the instructions to position them. I think the result looks quite accurate.
|
CONCLUSIONS |
This BF2C-1 is one of the more difficult Classic Airframes biplane kits. I would list it just behind the SBC-3/4 models in difficulty, and a modeler who takes this on should be experienced in both limited-run kits and biplane models to have any hope of creating a successful model. That said, the result is a good-looking model that fills an important blank space in any collection of U.S. Navy "Golden Age" airplanes.
|
REFERENCES |
SS1157 "Curtiss Navy Hawks In Action," Squadron-Signal Publications
Copyright ModelingMadness.com
If you would like your product reviewed fairly and fairly quickly, please contact the editor or see other details in the Note to Contributors.
Back to Reviews Page 2020