Williams Bros. 1/72 B-10B
|
KIT # |
72210 |
|
PRICE: |
$18.95 |
|
DECALS: |
See review |
|
REVIEW & |
Caz Dalton |
|
NOTES: |
|
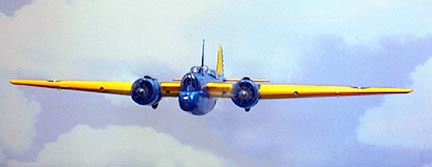
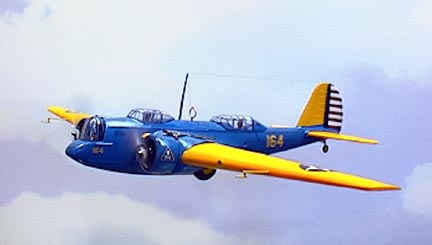
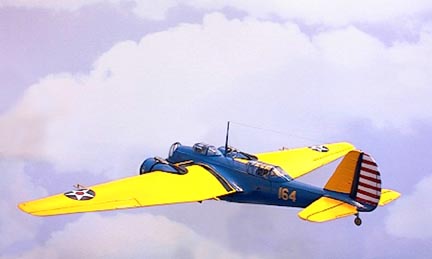
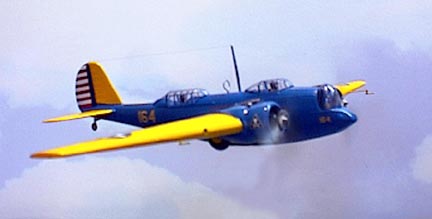
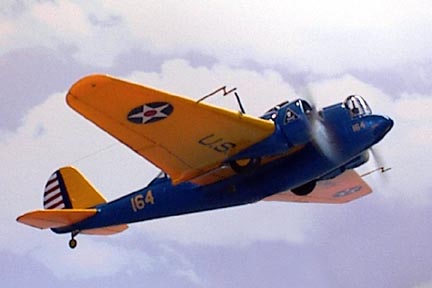
"WELL I'LL BE A MON-KEY'S UNCLE"
MARTIN B-10B
31st BOMBARDMENT SQUADRON
USAAC - 1934/36
|
HISTORY |
When the B-10 prototype, the open cockpit XB-907, made its maiden flight on February 26, 1932, the results were so poor, the project was nearly canceled. After careful evaluation the prototype was sent back to the Martin factory with recommendations from Wright Field and the USAAC to move the engine nacelle forward to eliminate interference encountered at higher angles of attack; enlarge the wing fillets and turn up the trailing edge of the wing where it blends into the fuselage; reduce the size of the rudder's trailing edge; incorporate a single strut landing gear; sweep wings back slightly to increase stability and lengthen them to 70 feet, 7 inches from the prototype's 62 feet, 2 inches. Given no choice, Martin made every one of the changes.
By October 7, 1932, all changes had been made by what was now a willing and thankful Martin engineering team. Without the B-10 contract, Martin could not have survived and the modifications had their desired effect. Although gross weight have climbed by nearly a ton, the XB-907A, preparatory to becoming the XB-10, was now stable, faster at 207 mph than any operational pursuit plane the Air Corps possessed, and had an acceptable landing speed of 71 mph, fully 20 mph less than the original prototype. Moreover, its nose gun position, originally open to the air, had been fitted with an enclosed turret for its single .30-caliber machine gun, the first of its kind. When it returned to the factory to have its single landing gear installed, its open cockpits were fitted with sliding canopies for the pilot and radioman/gunner, who could also fly the B-10 using rudimentary controls. Its four-man crew now flew in comfort, shielded from the elements, another first in military aircraft.
With the invaluable aid of Wright Field engineers, Martin had managed a number of firsts. The B-10 was the first all-metal monoplane bomber with retractable landing gear. It was also the first production warplane to be fitted with radio equipment and for all these firsts, Martin was awarded the Collier trophy in 1932 and 48 B-10s were ordered $50,840.00 apiece.
The contract saved Martin from bankruptcy for the time being. Ironically, the B-10, despite its revolutionary firsts, never reached high production numbers. In all, 155 would be procured by the USAAC, divided among B-10s, B-10Bs, and B-12s (B-10s with Pratt & Whitney engines in lieu of the Wright Cyclones). This figure was actually impressive during the Depression, but only kept the production line open for three years. The B-10 series would serve 28 squadrons in the course of a seven year operational career.
Even as production began to roll, martin filed for bankruptcy in the spring of 1934, after it lost access to deposits it had in a Baltimore bank that failed. Prospects looked bleak, but with the company employing nearly 2,000 workers and being judged vital to the national defense, a one and a half million dollar loan was granted by the government's Reconstruction Finance Corporation, with Martin putting his plant up for collateral.
Deliveries of 105 B-10Bs kept the plant going through the first half of 1936, with the last bomber being delivered in August of that year, but Martin was truly saved from financial ruin by foreign sales of the bomber. As war clouds gathered in Europe and Asia, threatened countries saddled with suddenly outdated equipment sought desperately to rearm and rising demands were made on American aviation industries for these demands.
After the B-17 prototype was chosen for the USAAC primary bomber, the B-10 orders were denied, but the government released the bomber for export. The first aircraft was sold to a USSR trading company, but it would lead to sales of 13 export versions to the Netherlands East Indies Air Force, 9 to China, 3 to Siam, 34 to Argentina, and 20 to Turkey. The Dutch were so pleased with the B-10 that they ordered another 99 and the profits for these exports models were prodigious when considered that they were sold for $212,00.00 per plane as opposed to the $72,000.00 the USAAC pay for each plane at the end of their order. By the end of 1937 backlog at Martin stood at 17.5 million dollars, quite a long way from December 1933, when the company's sales totaled less than a half million dollars.
|
CONSTRUCTION |
Interior:
All I added to the kit's interior were three figures for the bombardier/nose gunner, pilot, and radioman/gunner. I left out a navigator figure, as he would not be readily seen. I also had to add a seat for the bombardier/turret gunner, which was constructed from sheet styrene. The figures were primed in gray and hand painted using acrylics. The figures were shadowed and highlighted using inks and pastel powders respectively.
I had to cut away much of the thickness of the plastic at the nose turret in order for the clear turret piece to fit correctly. On the rest of the interior, everything needs a little sanding and dry fitting, but were otherwise no problem. The interior was painted Polly Scale SF Silver (a model RR paint). Once dried I applied some control and data placard decals from Reheat Models to the sidewalls. Instrument panels and control wheels were painted semi-gloss black with each instrument panel having instruments of Waldron punched disks of white trim film and Reheat Models Instrument Gauge decals.
When all was done the interior was assembled into the port fuselage half. Be very careful aligning the radioman/rear gunner's station. When dry the fuselage sections were joined by very carefully using a fine brush for applying Tenax. The halves fit very well indeed and sanding the seam was held at a bare minimum. This was necessary in order to save the corrugations.
Engines and landing gear:
The kit's engines are very well molded renditions of Wright Cyclones. I made a collector ring for each engine from non-flux solder. The engines were painted engine gray, with the cylinders being painted oxidized aluminum, the pushrods black, and the ignition harness silver. Exhaust collectors were paint burnt iron. Interiors of the engine cowlings were painted SF Silver, as was the landing gear bays. The engines received a wash of India ink to shadow the cooling vanes. They fit perfect into the cowlings and were on snapped into place, no glue necessary. Both the engines and cowlings were held off until final assembly.
The main landing gear pieces and tailwheel were cleaned up and painted SF Silver. The main wheels were painted AeroMaster Chrome Yellow, with the tire brushed AeroMaster Tire Black and the inside wheels painted SF Silver and Polly Scale Graphite. The tail wheel tire was paint tire black and the hub done with Waldron punched disks of Chrome Yellow Trim Film. A piece of small wire was used in each main gear strut to assist attachment of the retraction strut. Once again, with careful engineering these pieces were painted separate and installed in the final assembly.
Exterior:
I didn't like the see-through look of the wing intakes, so I enlarged the hole in each intake to accept a 2-inch section of 1/8-inch outside diameter aluminum tubing. The tubing was blocked at the rear with sheet styrene painted black. I left the interior of the tubing in its natural aluminum. The tubing was installed with the wing's leading edge using super glue and allowing a small lip to exceed beyond the leading edge. Once the super glue had set, i sanded the intakes back to the leading edges of the wings.
As the kit calls for, i made two pitot tubes from .025 wire and these were prepainted and installed in the final assembly into predrilled holes. I added a small aerial attachment to the top of the vertical tail from very fine phono wire wrapped around a needle until the size I required was reached. The kit antenna was drilled out at the top with a #80 bit in a pin vise to except aerial wiring made from smoke-colored invisible thread in the final assembly.
The wing halves were cemented together and fit as well as the fuselage halves. Once sanded, I was able to paint them separate from the fuselage and attach them in the final assembly. This makes decaling a lot simpler.
|
PAINT & DECALS |
The wings and horizontal tails were given three coats of AeroMaster Chrome Yellow. The fuselage was masked at the vertical tail and given three coats of Polly Scale Reefer White (another model RR color). I masked the rudder and paint the vertical tail with three coats of chrome yellow. The vertical tail was masked along with the wings at the rounded nacelles and the fuselage and nacelles received two coats of AeroMaster USAAC Blue. I also sprayed a 2-inch X 4-inch section of clear decal film with two coats of USAAC Blue (more on this later) and the antenna at this time.
Once all paints were dry and masking removed, I gave all subassemblies (fuselage, wings, horizontal tails, and cowling) three light coats of FUTURE for decal prep. The interiors of the clear glazings were given a brush coat of FUTURE at this time also.
Decals from Williams Brothers were used, but not the original ones in the kit. Due to the twenty plus years of storage, the old Microscale sheet had dried and cracked and proved unusable. I email Williams brothers and got a reply within thirty minutes that two new sheets would be in the post the next morning. I received the new sheets four days later. Now that's customer service! Thanks Carlo! Anyhow, I only needed one sheet, as the decals were nothing short of perfect. Excellent color registration, excellent opacity, strong, yet thins. They settled very well with MicroSet and a following light brushing of MicroSol once the decals had set for an hour. I left off the wing walks until the wings were attached to the fuselage, so that no misalignment would result.
As the weather was very wet here i let the decals dry for two days before cleaning the model and applying ink washes to the control recesses. Once the ink had dried, I gave the model another two coats of FUTURE to seal the decals.
The clear pieces were all framed in strips cut from the prepainted decal trim film. This was a laborious task and took two days to do, but the results were worth it. And it would be impossible to mask the glazings as the marking are recessed on their interiors (go ask?). To be truthful, the clear parts were the worst fitting of the kit. In order to get the pilot's canopy to fit, I had to do much dry sanding and fitting to the canopy's front and rear contour before an acceptable fit was attained. The turret piece needed no sanding, but as mentioned before, much thinning of the fuselage opening was required for it to fit properly. The rear turret made me curse the Mon-key several times. In order to get it in the closed position as shown, the rear section had to be super glued to the forward section. I also had to bravely and ever so lightly sand along the fuselage attachment locale to give me a small line of bare plastic (thank God it's the same color blue) to super glue the rear canopy in place. Why? Because you have to apply a little pressure to get the canopy in place and super glue was the only adhesive I knew would hold it in place once the pressure was removed and then only if bare plastic was attached to bare plastic. Had the paint not been sanded, it would have lifted. After I got it attached I held a hair dryer over the canopy a few seconds to soften the plastic a bit and allow for less pressure on the canopy. By far the most trouble I had with the entire build.
In finishing, I attached all subassemblies, mostly using Krystal Klear. The wings were attached using gel-type super glue, after I had sanded some non-seen areas to the bare plastic. The ever so small slits between the fuselage and wing fillets were filled with a bead of Krystal Klear and swiped clean with wet and dry Q-tips. Once the Krystal Klear sets, it forms a perfect seal that is unseen. Don't use Elmer's for this purpose as it shrinks too much after it has dried. Wing and vertical tail navigation lights were first painted silver and next treated to a brushing of clear red or clear green as required.
|
CONCLUSIONS |
This is one great kit that desperately needs some vacuform clear pieces and maybe a resin interior with just a tad more detail. The external pieces fit exceptionally and if the clear parts had been done better, I could recommend this kit for even novices. As it is some experience should be under your belt before attempting this kit, but Williams Brothers states from the onset that this kits requires more work than high run kits.
Caz Dalton