KP 1/72 Skoda D.1
| KIT #: | 29 |
| PRICE: | $ |
| DECALS: | Two options |
| REVIEWER: | Brian Baker |
| NOTES: | Injection molded |
| HISTORY |
 In the early 1920’s, the newly
formed Czechoslovak Republic began modernizing its industry, a wise precaution
since they had both Germany and Austria on their borders, not to mention
Poland. One industry that received special attention was the aviation industry,
and the development of all metal aircraft was an important goal. Since the
Czechs had no experience in this field, they turned to the French Dewoitine
firm. The Czechs were interested in the Dewoitine D.12 parasol wing fighter,
but after negotiations, decided on an improved version, the D.21C. This was a
single seat fighter, which Skoda built using a 500 hp. Skoda liquid cooled
engine rather than the 575 hp. Hispano-Suiza 12 GL.
In the early 1920’s, the newly
formed Czechoslovak Republic began modernizing its industry, a wise precaution
since they had both Germany and Austria on their borders, not to mention
Poland. One industry that received special attention was the aviation industry,
and the development of all metal aircraft was an important goal. Since the
Czechs had no experience in this field, they turned to the French Dewoitine
firm. The Czechs were interested in the Dewoitine D.12 parasol wing fighter,
but after negotiations, decided on an improved version, the D.21C. This was a
single seat fighter, which Skoda built using a 500 hp. Skoda liquid cooled
engine rather than the 575 hp. Hispano-Suiza 12 GL.
Although ordered in 1925, there were
production difficulties, since no all-metal aircraft had been built in
Czechoslovakia up to this time, and their inexperience resulted in delays, and
no aircraft were delivered until 1928 and 1929. Fifteen production models we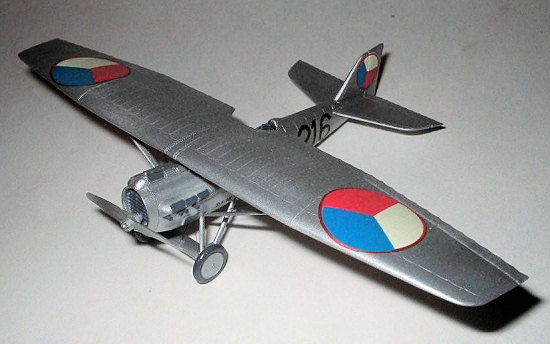 re
built. The D.1 differed from the French version in armament, since the French
airplane had four machine guns to the Czech’s two. The Skoda D.1 was in service
with the Czechoslovakian Air Force during the early thirties, but it never
totally replaced the biplane fighters in use by the Czechs. Some were later
used by the Ministry of Interior Security forces, or Security Air Forces, with
civil registrations. The survivors were retired from service and scrapped in
1939.
re
built. The D.1 differed from the French version in armament, since the French
airplane had four machine guns to the Czech’s two. The Skoda D.1 was in service
with the Czechoslovakian Air Force during the early thirties, but it never
totally replaced the biplane fighters in use by the Czechs. Some were later
used by the Ministry of Interior Security forces, or Security Air Forces, with
civil registrations. The survivors were retired from service and scrapped in
1939.
This is one of KP’s earlier offerings, and instructions are in Czech, German, and English. These consist of one large legal size paper, which folds into four pages. An extensive historical account relates the history and use of the type, along with the major technical details. An excellent 1/72 scale three view drawing is provided, along with color and marking details on the box, and there is also a contemporary photograph of the type. A good sprue diagram is included, along with interior and exterior color details. Although there is no text outlining the construction process, the exploded diagram clearly shows how the model is to be assembled. In short, the kit contains very useful instructions, and outside references should not be necessary.
The decals provide markings for a service version plus one of the Security Air Force versions. The decals are thin, and go on as well as most kit decals I’ve experienced.
| THE KIT |
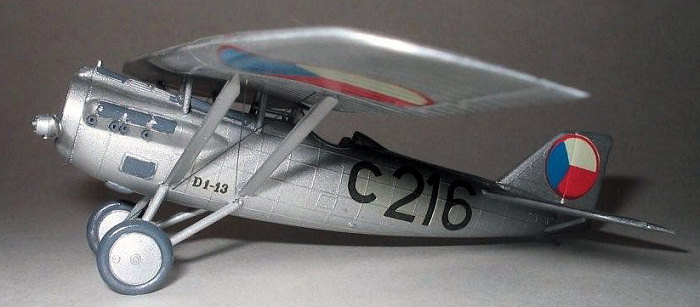
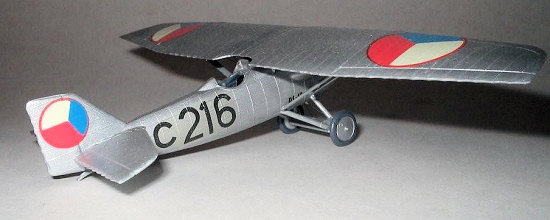
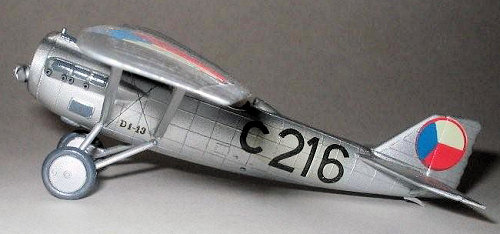
The kits consists of 33 styrene parts cast in light blue plastic, along with a clear windshield. The plastic is more brittle than some kits, such as Airfix, but the material is easily workable, and should present no problems for serious modelers. The outline appears to be accurate, and the detail is very good.
| CONSTRUCTION |
Obviously the first step is to
assemble and paint the cockpit interior parts, which include a floor, seat,
rudder pedals, control stick, and instrument panel. No seat belts are included,
but these can be made using masking tape. The exhaust stacks need to be
 inserted from the inside, and really should be drilled out, so it might be wise
to paint the exterior of the forward fuselage, as well as the stacks themselves,
before the fuselage halves are joined. Once the fuselage is complete, and the
seams are filled, attach the windshield and the machine guns, as you won’t be
able to get at these once the parasol wing is attached. I glued the cabane
struts to the fuselage, making sure that they were in position to receive the
wing. Once they were dry, I attached the wing. When the whole structure was
dry, I then attached the outer wing struts, and the airplane was then strong
enough to handle during final assembly. There is not enough room between the
fuselage and wing’s lower surface to attach the outer wing struts first and then
try to position the inside cabane struts. Obviously, painting is easier before
assembly. At this point, the tailplane and landing gear can be put in place.
The struts strengthening the horizontal stabilizers can then be installed
inserted from the inside, and really should be drilled out, so it might be wise
to paint the exterior of the forward fuselage, as well as the stacks themselves,
before the fuselage halves are joined. Once the fuselage is complete, and the
seams are filled, attach the windshield and the machine guns, as you won’t be
able to get at these once the parasol wing is attached. I glued the cabane
struts to the fuselage, making sure that they were in position to receive the
wing. Once they were dry, I attached the wing. When the whole structure was
dry, I then attached the outer wing struts, and the airplane was then strong
enough to handle during final assembly. There is not enough room between the
fuselage and wing’s lower surface to attach the outer wing struts first and then
try to position the inside cabane struts. Obviously, painting is easier before
assembly. At this point, the tailplane and landing gear can be put in place.
The struts strengthening the horizontal stabilizers can then be installed
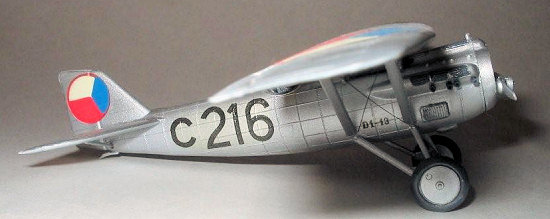
Finishing touches include the wheels and the propeller, which is mounted on the radiator face in the front of the fuselage. Also, the tailskid and radiator can be mounted beneath the fuselage. There are bracing wires between the parallel wing struts, alongside the cabanes, and in between the landing gear struts, and these should be installed last.
| COLORS & MARKINGS |
Since the model should be painted, either silver or pale green (almost RLM 02), only touch-up painting should be required. Decals are very easily applied, and will snuggle down nicely without undue effort.
| CONCLUSIONS |
 The Eastern Europeans have been
producing some excellent kits of some unusual subjects, and this kit is an
example of one of the better ones available. It could be converted to a French
fighter with a little effort, and there are several Czech versions that can be
done out of the box. Highly recommended.
The Eastern Europeans have been
producing some excellent kits of some unusual subjects, and this kit is an
example of one of the better ones available. It could be converted to a French
fighter with a little effort, and there are several Czech versions that can be
done out of the box. Highly recommended.
August 2007
Copyright ModelingMadness.com. All rights reserved. No reproduction in any form without express permission from the editor.
If you would like your product reviewed fairly and fairly quickly, please contact the editor or see other details in the Note to Contributors.
Back to the Review Index Page 2017