Kora 1/72 Ripon IIF
| KIT: | |
| KIT #: | 7248 |
| PRICE: | Approximately $51 at http://hobbyshop.cz |
| DECALS: | Four options |
| REVIEWER: | Carmel J. Attard |
| NOTES: | Resin multi-media kit |
| HISTORY |
Way back in the early 20th century, as aircraft gained power, carriage of a torpedo became feasible. Both British and German seaplanes carried a few successful torpedo attacks against merchant ships. The Commander-in-Chief of the flush-deck carrier HMS Argus, then Beatty, had an idea. If the German Navy refused to put to sea, then Beatty reasoned that a squadron of torpedo bombers could be sent to attack the enemy in his homeports.
Tactics were fairly primitive. At a speed rendered at 100 mph and a steady approach to a dropping position laid the bomber to open AA fire. However it was reasoned that since a battleship was visible to an aircraft a lot sooner than vice-versa, a surprise attack especially in presence of haze, might be successful. If a complete flight got into position, then AA fire would be divided and naval AA was usually inaccurate. Early aircraft used in developing the technique was the Cuckoo and Dart, which were both single seaters. On the 16th June 1924 specification 21/23 was issued to aircraft manufacturers for a 2-seat torpedo carrying shipboard aircraft for the Fleet Air Arm. The addition of a seat to the previously single seat was called for to act as self-defense in the event that attack is intercepted by a single seat enemy aircraft
 The requirement of a specification were that the selected
type would be able to operate from an aircraft carrier deck and have good
stability at low speed, be able to fly steadily for torpedo dropping and
precision bombing, having a good view for the pilot, would be maneuverable and
be capable for self defense.
The requirement of a specification were that the selected
type would be able to operate from an aircraft carrier deck and have good
stability at low speed, be able to fly steadily for torpedo dropping and
precision bombing, having a good view for the pilot, would be maneuverable and
be capable for self defense.
Three contenders emerged and of these Blackburn won the contract with the type being known as the Ripon. The Ripon first flew with a Lion V engine on the 17th of April 1926 and as a seaplane version on the 12th August 1926. Preliminary carrier trials were carried out in May 1926 and after catapult trials at Gosport, UK, the prototype returned to Brough. In due course the Lion V was replaced by a 570hp Lion XI and so the Ripon 2 came into being. In this form the Ripon was placed into production. It had very good handling characteristics but not quite as happy with the view directly ahead for the pilot. This was not surprising at all as any single engined aircraft landing on a carrier had nil forward visibility due to nose up angle of approach. Landing speed was excellent and the general performance was up to specification. The engine was designed to be removed as a complete unit but this operation was difficult as various nuts and bolts were difficult to reach and was judged that this would be no great advantage in service. It was also difficult to inspect some areas for corrosion.
With the 570hp Lion XIA engine the Ripon IIA was produced in some numbers. It was fitted with catapulting spools and could in place of a torpedo carry 1,100 lb smoke containers for laying smoke screens. The bomb load was three 550 lb or six 250 lb bombs. Ripons saw service on HMS Eagle, Glorious, Furious, and Courageous. Many of the Fleet Air Arm Ripons operated from shore bases. In the late 20s and early 30s the Ripons were a common sight flying in and out of Hal Far, Malta especially when one of the carriers enter the Grand Harbour in Valletta which was then a home port.
 One variant of the Ripon the Mk2F (TSD) saw service with the
Finnish Air Force. Fitted with a Jupiter VIII engine it served as a pattern for
production of 25 Ripons by Valtion Lentokonetehdas at Tampere. The engines
mounted on these also varied. Whereas RI-151 Ripon had Bristol Jupiter VIII,
RI-129 to RI-135 had Gnome Rhone Jupiter VIs and RI-136 to RI-143 Armstrong
Siddeley Panther IIs, with RI-150 to RI-159 using the Bristol Pegasus II Mk 3s.
The Finn Ripon 2s had a plywood rear fuselage but were not used as torpedo
bombers. When Russia invaded Finland there were still 21 Ripons in service in
October 1939. After losing an aircraft to Soviet fighters the Ripon was limited
to night missions. One of these survived till December 1944. This particular
one, RI-140, survived till this day and is preserved and on display in the
Paijat-Hame National Aviation Museum.
One variant of the Ripon the Mk2F (TSD) saw service with the
Finnish Air Force. Fitted with a Jupiter VIII engine it served as a pattern for
production of 25 Ripons by Valtion Lentokonetehdas at Tampere. The engines
mounted on these also varied. Whereas RI-151 Ripon had Bristol Jupiter VIII,
RI-129 to RI-135 had Gnome Rhone Jupiter VIs and RI-136 to RI-143 Armstrong
Siddeley Panther IIs, with RI-150 to RI-159 using the Bristol Pegasus II Mk 3s.
The Finn Ripon 2s had a plywood rear fuselage but were not used as torpedo
bombers. When Russia invaded Finland there were still 21 Ripons in service in
October 1939. After losing an aircraft to Soviet fighters the Ripon was limited
to night missions. One of these survived till December 1944. This particular
one, RI-140, survived till this day and is preserved and on display in the
Paijat-Hame National Aviation Museum.
Many of the surviving 94 Ripons built at Brough were, in due course of time, converted to Baffins. Some of these also found their way to New Zealand. In service the Ripon demonstrated great improvement over the Dart that it replaced. It also provided torpedo units with a valuable tool for the development of attack practices that were to bear fruit when war broke out.
| THE KIT |
 The scale
model of the Ripon 2 is a quality resin kit that comes in Finnish AF markings
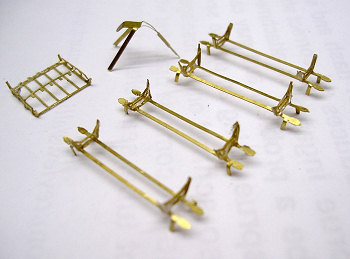
complete with brass etch detail parts. The kit has an adequate instruction
sheet, a multi view colour plans to assist with painting the model and plan view
of all tiny detail parts to help identify the kit parts from the extra parts
that should go with another version of the Ripon/ Baffin, apparently for future
release which most probably be the Fleet Air Arm version.
The scale
model of the Ripon 2 is a quality resin kit that comes in Finnish AF markings
complete with brass etch detail parts. The kit has an adequate instruction
sheet, a multi view colour plans to assist with painting the model and plan view
of all tiny detail parts to help identify the kit parts from the extra parts
that should go with another version of the Ripon/ Baffin, apparently for future
release which most probably be the Fleet Air Arm version.
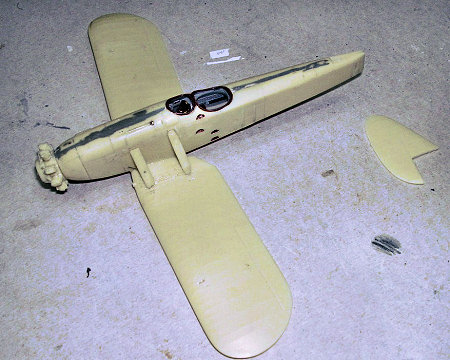
The resin parts are light tan in colour with well-reproduced fine surface detail. The only presence of fine porosity was located at the surface of the resin under fuselage fuel tank. This was filled with a tiny amount of putty followed by sanding. There was also a small amount of warping on one of the thin leading edge slats. This was made good by dipping the distorted portion in warm water, then gently reshaping it and then dipping the slat in cold water. In my case this needed two attempts to correct it. The Ripon is not a small aircraft and when built it comes into a reasonably large biplane that will demand all the rigging and connecting wires added to it. For a look at what is in the box, you can visit the preview.
| CONSTRUCTION |
The
first thing to start with was assembling the detail resin Bristol Jupiter VIII
engine. This is well reproduced having a radial central block and separate
detail cylinders. Which are fitted radially onto it. There are two separate
exhaust manifold, which required drilling the outlet using a 1.5 mm diameter
drill. There are two deck levels on the Ripons, the upper one, built around the
crew shoulder level and the lower one, which is the cockpit floor. The upper
deck and instrument panel is assembled in the initial
 stage. The lower deck,
which also has brass etch detail parts, is assembled as the next stage. Control
column and seat were added after the fuselage halves were glued together. Fixing
these items at an earlier stage could result that one or the other will come in
way of the upper frame to demand the necessary minor adjustment.
stage. The lower deck,
which also has brass etch detail parts, is assembled as the next stage. Control
column and seat were added after the fuselage halves were glued together. Fixing
these items at an earlier stage could result that one or the other will come in
way of the upper frame to demand the necessary minor adjustment.
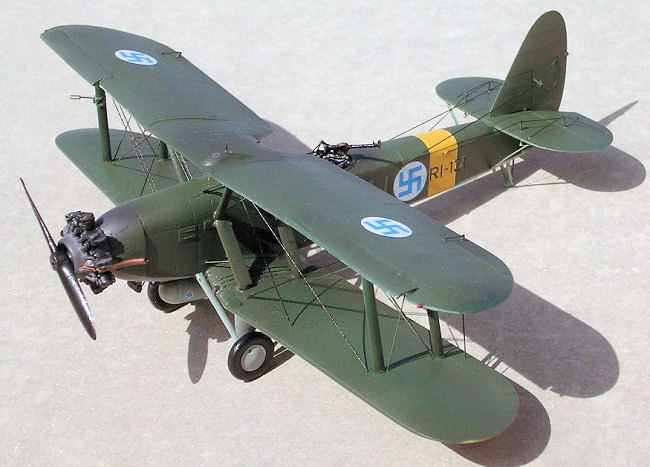
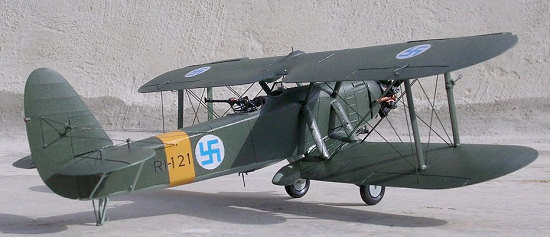
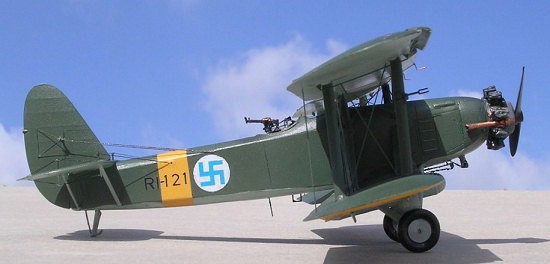
One important warning about this kit that is certainly worth mentioning at an early stage, possibly even before starting to assemble it is that you have to make sure the engine issued with the Kora model is the correct one to go with the particular aircraft serial number. The kit provides serial markings for RI-121, RI-152, RI-138 and RI-137. Only RI-121 could be made up using the Bristol Jupiter VIII engine given in the kit. Selecting any of the other serials requires a different engine. A Bristol Pegasus II M3 powered RI-152 while RI-138 and 137 had the Armstrong Siddeley Panther II engine installed. I also noticed that there was not sufficient sweep back of the wings unless the Finn AF Ripon differed from the FAA Ripon in this respect. This was 1.5 degrees less sweep when viewed in plan view.
The lower wings were butt jointed. Following that I worked out two distance pieces in balsa wood to give me the correct distance between the wings and act as jigs while I fixed the outer pair of struts correctly inclined between the wings. I have also replaced the resin struts with Contrail ones (from Roll Models), which were cut to same, size as the discarded ones. Once the wings were secure enough on top of each other’s struts, it was the turn of the middle struts to fix in place. I found that I had to remove 1/2mm from each end of the inner struts and fixed these with no effort at all. The assembly was allowed to set firmly.
I then
studied several pictures of the Ripon at my disposal and arrived to the amount
of rigging that it contained. I drilled rigging holes using a 0.4mm pin drill on
the forward and aft wings, and aft fuselage. At this stage I also added the
various brass etch control surfaces actuators, pitot tubes etc that comes with
the kit. I also added a compass to the starboard side inside the cockpit.
 I
found reference to copy of ‘Ripon Aeroplane Air Publication 1423 Volume 1 second
edition’ by C. Le Bullock issued by the Air Ministry by command of the Air
Council, very helpful to properly detail the kit. Incidentally this document
survived from 812B Flight HMS Glorious 1933 that the local Aviation Museum was
kind enough to present me with a copy. From this reference technical maintenance
book I could identify that several of the brass etch parts belong to the torpedo
carrying FAA version as well as the float plane version giving reason to believe
that Kora had near future plans for these versions as well.
I
found reference to copy of ‘Ripon Aeroplane Air Publication 1423 Volume 1 second
edition’ by C. Le Bullock issued by the Air Ministry by command of the Air
Council, very helpful to properly detail the kit. Incidentally this document
survived from 812B Flight HMS Glorious 1933 that the local Aviation Museum was
kind enough to present me with a copy. From this reference technical maintenance
book I could identify that several of the brass etch parts belong to the torpedo
carrying FAA version as well as the float plane version giving reason to believe
that Kora had near future plans for these versions as well.
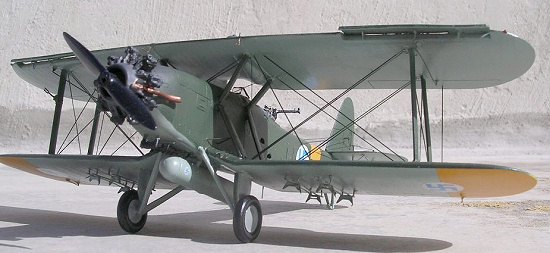
The Finnish AF Ripons were never built to carry a torpedo and the items mentioned were left for the Contrail kit I have plans for, including a long ladder that fits over the port float to fuselage. Other additional construction detail included the drilling of two, 1mm diameter holes at the joining point of the main wheel strut to make these more secure. The tail skid is accurate in shape but not in section, so I added plastic thin pieces to its support and this also gave it more strength. The under fuselage fuel tank is incorrectly shown on the instructions and should be fitted the other way round i.e. the pointed end should be towards the rear. After adding all the rigging using the familiar nylon thread method, I added the two sets of brass etch bomb racks that added detail to the wide chord rippled under wings. The kit was in the end sanded at areas of rigging attachments.
| COLORS & MARKINGS |
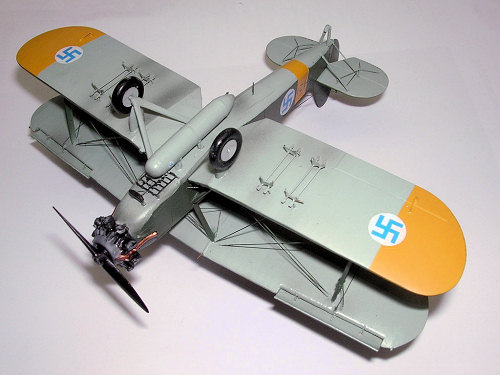 The
yellow ID areas were air brushed over mat white paint, these areas were then
masked and the rest given the upper olive and lower light blue grey scheme.
The
yellow ID areas were air brushed over mat white paint, these areas were then
masked and the rest given the upper olive and lower light blue grey scheme.
The decals were of good print including the white on the national markings, but be informed that in my sample these were very thin and therefore very brittle. Had I realized this earlier I would have given the decal sheet a coat of clear varnish to add strength to it.
| CONCLUSIONS |
This is a superb resin multi media kit that I enjoyed building and having built the Finn AF version, Kora will do a great job if it comes out with the FAA version of the Baffin and the Ripon float plane version in view of the variety of markings that these carried.
Copyright ModelingMadness.com. All rights reserved. No reproduction in any form without express permission from the editor.
If you would like your product reviewed fairly and quickly, please contact the editor or see other details in the Note to Contributors.