| KIT: | Airmodel 1/72 Do-11D "Bat" of the Bulgarian Air Force |
| KIT #: | ? |
| PRICE: | $12.99 |
| DECALS: | none provided |
| REVIEWER: | Carmel J. Attard |
| NOTES: | Conversion of Do-23 kit |
| HISTORY |
Way back in late 1920s and early 30s there was a world economic depression and most nations suffered severely because of the situation. Bulgaria was no exception and it was during this hard time that fresh links were established with Germany. In 1933 the new nazi government in Germany gave credits to Bulgaria following the collapse of her established trade with other European countries
In 1936 trade between the two countries increased substantially. That year Bulgaria imported no fewer than 42 aircraft of German origin comprising He51, Fw44, He72, He45 and Fw56 aircraft. It was in 1937 that Bulgaria received 12 of the largest aircraft ever to be used by her air force. These were the Dornier Do-11D.
The
saga of the Do-11 in Germany goes back to 1934 when it had planned 372 Dornier
Do-11for the Luftwaffe Air Force but delays and grossly unpleasant handling and
structural qualities led to the substitution first to a short span Do-11D and
then the Do-13 with 559 Kw BMW VI water cooled engines and fixed undercarriage
(often spatted) landing gear. At least 77 Do-11 were delivered, and it was from
this batch that some were passed on to ot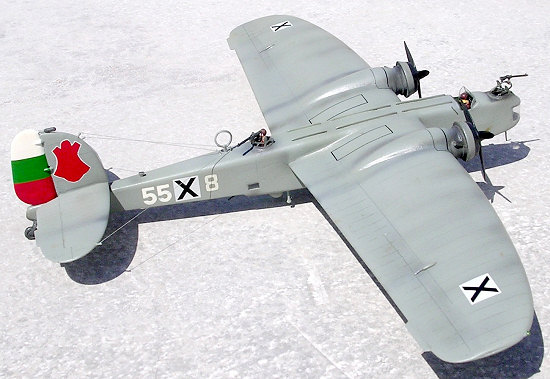 her then clandestine Air Forces
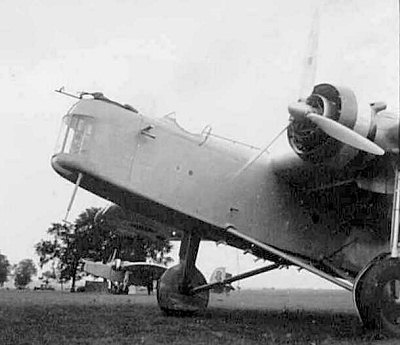
including that of Bulgaria. The Do-11 carried a crew of 4 and had a take off
weight of 9 tons. The Do-11 flew in from Germany on 14th February
1937, almost to the date 70 years ago. These carried civil registration e.g. D-AMIN. The Do-11Ds were large twin-engine bombers and at the
time were rendered as the first heavy bombers with a retractable undercarriage
to be developed in Europe.
her then clandestine Air Forces
including that of Bulgaria. The Do-11 carried a crew of 4 and had a take off
weight of 9 tons. The Do-11 flew in from Germany on 14th February
1937, almost to the date 70 years ago. These carried civil registration e.g. D-AMIN. The Do-11Ds were large twin-engine bombers and at the
time were rendered as the first heavy bombers with a retractable undercarriage
to be developed in Europe.
The Do-11 also had its share of hard luck and suffered a high accident rate. German pilots who flew the type dubbed it the “FLIEGENDE SARG” meaning the flying coffin. It all started with the production of the Do-11C. These were found to be inherently unsuitable. These shortcomings had given rise to shorten the wings and also have redesigned wing tips. So the “D” Series, the Dora machine evolved. This was still a difficult machine to fly. During the retracting of the main wheels, these induced heavy vibrations that led to occasional structural failures.
The Bulgarians has named the Do-11D, Prilep, which means “Bat” and these lumbered on in the Bulgarian Air Force service for the following three years until 1940 until these were replaced by 10 Do-17Ms (See kit Reviews under Do-17). Thus the long overdue for the slow and clumsy Do-11D was in effect. All the 12 Do-11Ds were attached to one squadron, Orliak No5, meaning air regiment No5. Their main function was that of a medium bomber and were based at Plovdiv.
The
Luftwaffe mission to Bulgaria had been established in Sofia before German Air
Force units had entered the country. This organization was the Bulgarian Air
Force and its first task was to bring the equipment, training and develop
operational techniques of the Bulgarians in line with those of Germany. Still
the Luftwaffe were in the beginning of their experience with twin engine large
aircraft and one would shred doubts on the popularity that the Do-11 had with
Luftwaffe pilots. The Do-1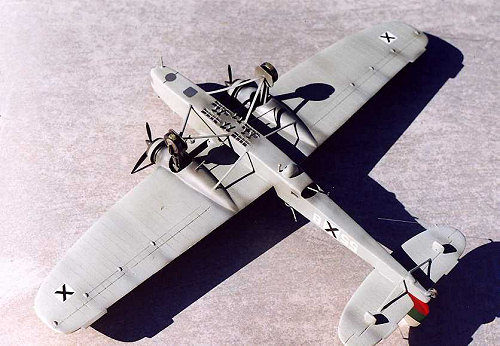 1
was not the size that could be thrown about in the air without fear of
structural failure. The nine cylinder radial engines were not yet fully
developed and as mentioned earlier the undercarriage was giving problems.
1
was not the size that could be thrown about in the air without fear of
structural failure. The nine cylinder radial engines were not yet fully
developed and as mentioned earlier the undercarriage was giving problems.
This situation involved so many problems and was somewhat confusing, so much so there then evolved the Do-23. This re-design of the Dornier bomber, although still very closely resembling the original Do-11, had rectified every fault with the final design. This consisted of redesigned and strengthened wing spars, flap function, in-line engines in place of the radial ones and best of all a sturdy fixed undercarriage. The Do-11s were hastily removed from German service. The serious problems were not so much evident at the time when they were delivered to Bulgaria in 1937. Even so the German pilots dreaded this bomber outright. It said, the experienced and apparently more able and willing Bulgarian pilots at the time, in spite of all the difficulties attached to this bomber, have managed to take out three years of active service on this machine.
Colour scheme and markings.
 The
Do-11 started life and remained so in overall RLM Grau 02 and the huge ru
The
Do-11 started life and remained so in overall RLM Grau 02 and the huge ru dder
beautifully painted in Bulgarian colours of red, green and white. Much of the
visible areas such as the cockpit, wheel wells and interior were also finished
in RLM grey. Both propellers were right hand type and the blade and spinners
were in Schwartzgrun 71. The undercarriage sliding parts, which were attached to
the vertical wheel well doors were finished in dull silvber 03 with matt
Schwartz wheels.
dder
beautifully painted in Bulgarian colours of red, green and white. Much of the
visible areas such as the cockpit, wheel wells and interior were also finished
in RLM grey. Both propellers were right hand type and the blade and spinners
were in Schwartzgrun 71. The undercarriage sliding parts, which were attached to
the vertical wheel well doors were finished in dull silvber 03 with matt
Schwartz wheels.
Upon
delivery the Do-11Ds carried German civil registered markings and soon replaced
with the Bulgarian Air Force white disc with a Maltese cross and two yellow
swords superimposed. The RLM 02 grey with a slight greenish tint was of dark
enough shade to permit white identification numbers to be carried on both sides
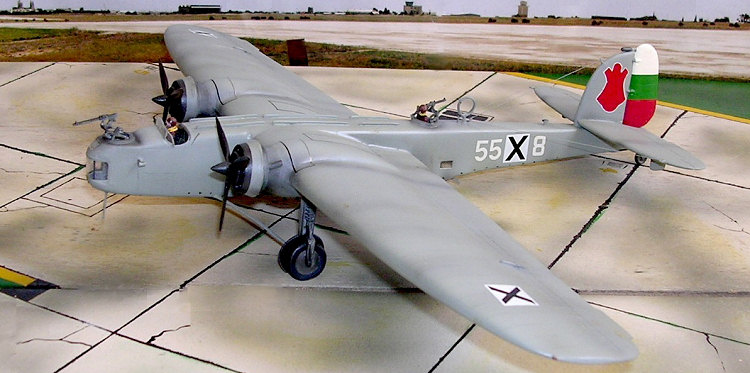
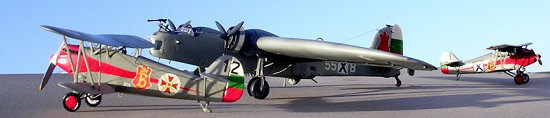
of the fuselage. Examples of these were 55-1, 55-8, 55-11, 55-12
![]() etc. A red
crest, which was outlined in white with a stylized letter “B” in yellow with a
yellow crown on top was carried on the fin. This was the cipher of King Boris
III. In due course the Bulgarian Air Force roundels were replaced with the new
style of markings consisting of a white square with the black “X” marking on it.
Very few of the Do-11Ds survived to adopt these markings. An example of these
was a Do-11 carrying ID numbers 55-12 and 55-8. The red crest on the tail fin
was painted overall red thus obscuring the cipher detail.
etc. A red
crest, which was outlined in white with a stylized letter “B” in yellow with a
yellow crown on top was carried on the fin. This was the cipher of King Boris
III. In due course the Bulgarian Air Force roundels were replaced with the new
style of markings consisting of a white square with the black “X” marking on it.
Very few of the Do-11Ds survived to adopt these markings. An example of these
was a Do-11 carrying ID numbers 55-12 and 55-8. The red crest on the tail fin
was painted overall red thus obscuring the cipher detail.
| THE KIT |
Till now I do not know of a kit that exists of the Do-11
though there were rumors that a kit was about to appear from one of the Czech
resin kit manufacturers. Having now built several vacform kits of different
brands and make, I turned to the Airmodel Do-23 1/72 scale kit which although
rather primitive by today’s standards, it still offered a good basis to plan the
conversion of the Do-23 into a Do-11D. The kit is still available from Airmodel
Products of Germany at a very r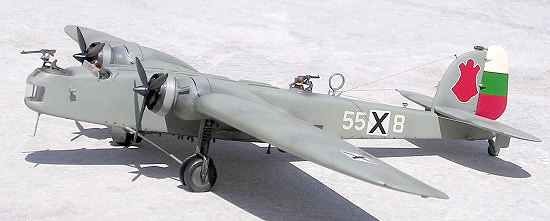 easonable price. However my opinion is that I
wish this kit was a Rareplanes product as this firm has set the standards by
which vacform kits are judged. Besides the detailing would have been a far
superior to what the kit offered, still it served as the means to start building
a Do-11D and in spite of all, it is good to have the Airmodel kit still
available. In brief all I can say is that this was to me among the strange
aircraft conversions that I have carried out because at a glance it might look
as a straight forward one but what you are about to see is the need for a major
surgery to the original kit wings with a combination of scratch built set of
engines and a rather complex retractable undercarriage.
easonable price. However my opinion is that I
wish this kit was a Rareplanes product as this firm has set the standards by
which vacform kits are judged. Besides the detailing would have been a far
superior to what the kit offered, still it served as the means to start building
a Do-11D and in spite of all, it is good to have the Airmodel kit still
available. In brief all I can say is that this was to me among the strange
aircraft conversions that I have carried out because at a glance it might look
as a straight forward one but what you are about to see is the need for a major
surgery to the original kit wings with a combination of scratch built set of
engines and a rather complex retractable undercarriage.
The Airmodel vacform kit of the Do-23 was one of the very early releases in its range and in some respects we are lucky to have the kit still around. It is not the sort of product for the novice vac form modeller. Having said that Airmodel kit manufacturers must be applauded when it comes to the vast range of vacform kits they produced since long ago. For example kits like the Buckeye, Cutlass, Crusader RF8E, C-130 versions, could all be made out of kits from Airmodel products long before Matchbox, Tamiya, Falcon and Italeri respectively released them. The kits I have mentioned were only a few of the long range of kits that are found in the Airmodel range and are still being produced.
| CONSTRUCTION |
Making
a Do-11 from a Do-23 involved a certain amount of work not only converting it
but also adding new parts to it and in the end detailing the model produced.
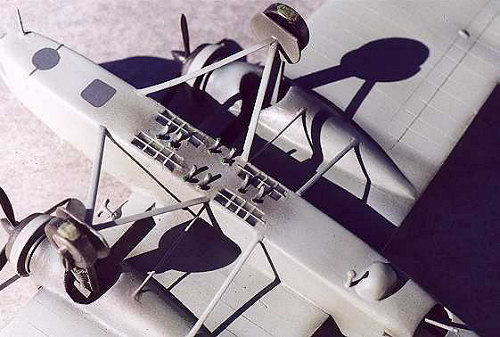
This involves provision of a new accurate set of wheels, scratch building
undercarriage assembly, radial engines, provision of a new set of propellers,
adding panel lines surface detailing, cockpit interior, correct repositioning of
fuselage windows, flaps actuators, antennae and defensive armament. Along with
this work one needs to overco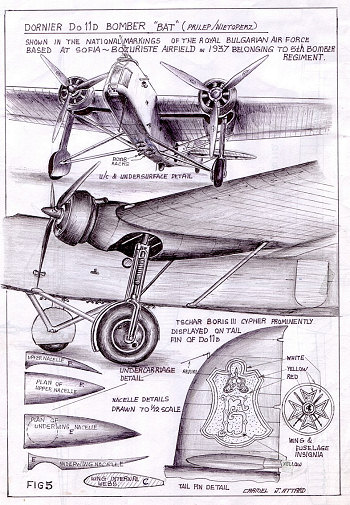 me certain deficiencies more
 often encountered with vacform kit construction. This means modifying inaccurate outlines, reinforcing
the normally fragile construction arising from thin sections at deep drawn
areas, find ways and means to secure the normally poor fitting of parts and best
of all the need to scratch build. The Airmodel kit No 124 is an early vacform
kit and all these requirements, which are mentioned above, could certainly
attribute to this kit conversion. The process demands a certain amount of
experience, above the level that we normally see in kit reviews of newly
released scale models of these days.
often encountered with vacform kit construction. This means modifying inaccurate outlines, reinforcing
the normally fragile construction arising from thin sections at deep drawn
areas, find ways and means to secure the normally poor fitting of parts and best
of all the need to scratch build. The Airmodel kit No 124 is an early vacform
kit and all these requirements, which are mentioned above, could certainly
attribute to this kit conversion. The process demands a certain amount of
experience, above the level that we normally see in kit reviews of newly
released scale models of these days.
In line with every kit project, I have first produced accurate 1:72 scale plans of the Do-11D. , Made a careful study and mock comparison of the Do-11D scale plans and the Do-23 plans issued with the kit. In doing so one detects the principal differences that lies between these two Dornier types. Having done that one put down note such as to the sequence and source one will use. Then I went over the planning of constructing and converting the kit.
The first step was to mark wi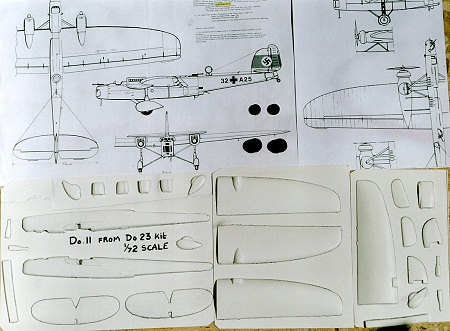 th a soft pencil around the
outline of the vacform kit moulded items. Only slight pressure is needed and
method is suitable for small and large parts. A sharp Xacto blade is then
followed over the length of the pencil marking. This is pushed to a partial
depth. The plastic component is then bent gently and snapped. The careful
cutting of the component from the backing sheet involves less than an odd hour.
It is a commitment and once experienced with successful resu
th a soft pencil around the
outline of the vacform kit moulded items. Only slight pressure is needed and
method is suitable for small and large parts. A sharp Xacto blade is then
followed over the length of the pencil marking. This is pushed to a partial
depth. The plastic component is then bent gently and snapped. The careful
cutting of the component from the backing sheet involves less than an odd hour.
It is a commitment and once experienced with successful resu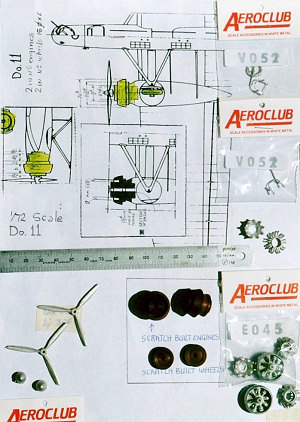 lts you may even be
hooked on vacform kits. In return this also means that you have wide opened new
horizons of gaining access and ability to increase the range of kits and
conversion parts within your reach to such products released over the years by
Esoteric, Aeroclub, Falcon, Rareplanes, Airmodel, Contrail, Aircraft in
Miniature, Hallam-Vac etc. I was reading the other day in a so to say modeling
magazine that vacform kits were a thing of the past. What as pitiful I thought
of the originator of this statement as my opinion is that I find more
fascination and rewards in building of not so common vacform type of kits with
lots of extra work to add to, than in making a kit made by state-of-the-Art
injection moulding technique of a Spitfire, or a Hornet kit readily found on the
market these days with all due respects.
lts you may even be
hooked on vacform kits. In return this also means that you have wide opened new
horizons of gaining access and ability to increase the range of kits and
conversion parts within your reach to such products released over the years by
Esoteric, Aeroclub, Falcon, Rareplanes, Airmodel, Contrail, Aircraft in
Miniature, Hallam-Vac etc. I was reading the other day in a so to say modeling
magazine that vacform kits were a thing of the past. What as pitiful I thought
of the originator of this statement as my opinion is that I find more
fascination and rewards in building of not so common vacform type of kits with
lots of extra work to add to, than in making a kit made by state-of-the-Art
injection moulding technique of a Spitfire, or a Hornet kit readily found on the
market these days with all due respects.
After removing the items from their backing, sanding them to
shape is the next stage. In reality the task is not all that difficult as it
sounds though it should be emphasized that at this stage there is no place for
mistake and careful sanding with continual checking with section templates is
recommended. The Do-23 is of fairly high quality kit in several respects and
normal care should bring good results. Two grades of sanding paper were used,
one was fairly coarse (280 grit) and the final one being smoother (400 grit).
The sanding strip of paper is permanently stuck with a double sided tape on a
half inch thick rectangular piece of plywood measuring 6” x 12”. The cut parts
are run up and down until the desired shape is obtained. Only practice and
frequent checking with template will provide the correct monitoring of the
operation and ensures that there was no over sanding of the parts. The correct
thinning of the trailing edge of wings and rudder parts with a straight or
curved scalpel has to be made gently in order to remove a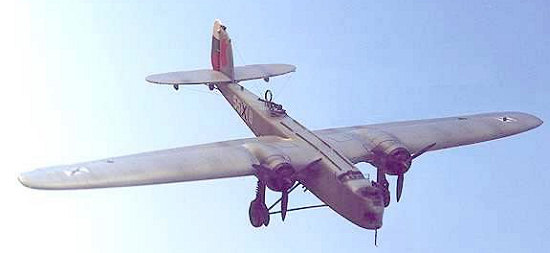 n
even amount of plastic as you go along. Constant checking of the fit of the
bottom surface of the wings is essential until the correct amount of excess
plastic has been removed. All that is needed is care, patience and perseverance
in order to arrive to making a model of the Do-11D.
n
even amount of plastic as you go along. Constant checking of the fit of the
bottom surface of the wings is essential until the correct amount of excess
plastic has been removed. All that is needed is care, patience and perseverance
in order to arrive to making a model of the Do-11D.
After removing the items from their backing, sanding them to shape is the next stage. In reality the task is not all that difficult as it sounds though it should be emphasized that at this stage there is no place for mistake and careful sanding with continual checking with section templates is recommended. The Do-23 is of fairly high quality kit in several respects and normal care should bring good results. Two grades of sanding paper were used, one was fairly coarse (280 grit) and the final one being smoother (400 grit). The sanding strip of paper is permanently stuck with a double sided tape on a half inch thick rectangular piece of plywood measuring 6” x 12”. The cut parts are run up and down until the desired shape is obtained. Only practice and frequent checking with template will provide the correct monitoring of the operation and ensures that there was no over sanding of the parts. The correct thinning of the trailing edge of wings and rudder parts with a straight or curved scalpel has to be made gently in order to remove an even amount of plastic as you go along. Constant checking of the fit of the bottom surface of the wings is essential until the correct amount of excess plastic has been removed. All that is needed is care, patience and perseverance in order to arrive to making a model of the Do-11D.
 The following is a brief sequence of how the required parts
are made up: -
The following is a brief sequence of how the required parts
are made up: -
1 1:72 scale plans necessary to refer to in order to produce two in number radial engines made out of solid plastic. White Tafnol or aluminium alloy rod of about 22mm in diameter may be used. These items as well as the main wheels were turned to sizes shown on a small lathe. Alternatively one can opt for Aeroclub parts. Careful study of scale plans for the Do-11D will show that there is an area of the under wing panel that needs to be cut to form the wheel well. The wheel well doors can also be produced from plastic card. The cowling exhaust pipe is made out of a bent stretched sprue. The defensive armament to nose and dorsal area were obtained from Aeroclub set No V052 .
2 The panel lines on the main planes and tail planes were marked with a tracing paper and carefully scratched over the surfaces. This operation was done before the wing halves were put together. The ailerons and elevators trim tabs were also produced with reference to scale drawings.
 3 The main planes trailing edges of the Do-11 differ from
those of the Do-23, hence alteration needs to be done. These are four in number
trailing edge extensions or flaps that are unlike to those on the Do-23 where
they are staggered. On the Do-11 these are at same level as the wings. Wing root
extensions were also added to form the Do-11 wings. The Do-11 wings did take the
form of bloated appearance, this is in fact characteristic to the type in view
of their huge size. Also as the vacform
3 The main planes trailing edges of the Do-11 differ from
those of the Do-23, hence alteration needs to be done. These are four in number
trailing edge extensions or flaps that are unlike to those on the Do-23 where
they are staggered. On the Do-11 these are at same level as the wings. Wing root
extensions were also added to form the Do-11 wings. The Do-11 wings did take the
form of bloated appearance, this is in fact characteristic to the type in view
of their huge size. Also as the vacform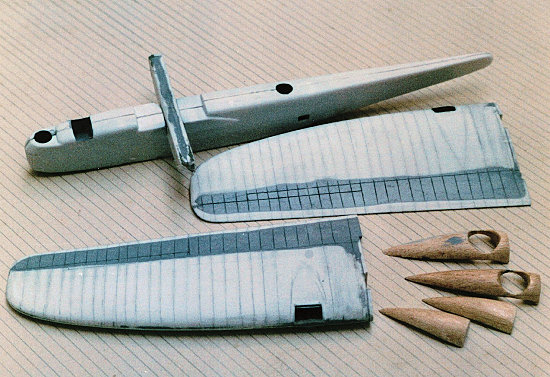 plastic is rather thin, internal web
stiffeners were cut and fitted to the inside. Four of these were added to each
of the main planes, port and starboard.
plastic is rather thin, internal web
stiffeners were cut and fitted to the inside. Four of these were added to each
of the main planes, port and starboard.
4 The upper and lower engine nacelles mounted on wing surfaces were made by carving out of balsa wood to produce the final shape shown in attached photos. This is a slow process and frequent checking with scale plans was a necessity to arrive to the desired correct shape. The surface of the balsa was sealed with sanding sealer made by mixing small quantity of talcum powder with Humbrol dope. This brought an excellent surface finish upon further sanding not unlike that of plastic.
 5 Balsa wood pieces were cut to fit inside places in the
fuselage space, away from crew and gunner open areas. These were to give
strength to the fuselage thin plastic. Note also the addition of cockpit floor
and dorsal turret floor and interior instruments seats, column etc. All engine
components were sub assembled, inserting nine cylinders to the front of radial
engine slotted area to complete the power units of the aircraft. The wooden
nacelles were secured at the front with a plastic ring and the engines were now
mounted to front of the ring forming a complete nacelle with engines.
5 Balsa wood pieces were cut to fit inside places in the
fuselage space, away from crew and gunner open areas. These were to give
strength to the fuselage thin plastic. Note also the addition of cockpit floor
and dorsal turret floor and interior instruments seats, column etc. All engine
components were sub assembled, inserting nine cylinders to the front of radial
engine slotted area to complete the power units of the aircraft. The wooden
nacelles were secured at the front with a plastic ring and the engines were now
mounted to front of the ring forming a complete nacelle with engines.
6 Bomb aimer windows and gun position, which were cut at an earlier stage, were now added detail to. Other tiny detail such aerials, flap actuators, loop antenna, ventral fuselage webs, tail wheel as well as the scratch built undercarriage parts and sliding door struts, nose parspex, windscreen, these were all added at a specific stage of final assembly.
| COLORS AND MARKINGS |
 7 As for the final colours
of the aircraft, there was no better finish than to represent my Do-11D in the
colours of one that served with the Royal Bulgarian Air Force flown by the brave
airmen of Bulgaria who were alas, victims of circumstances during two world
wars. The Bulgarian Maltese cross style of decals came from a Blue Rider’
decal sheet. The white numerals came from an old ‘Almark’ Luftwaffe
sheet. The ‘X’ style of insignia came from the Heller Taifun Me-108 kit sheet
that was an exact match.
7 As for the final colours
of the aircraft, there was no better finish than to represent my Do-11D in the
colours of one that served with the Royal Bulgarian Air Force flown by the brave
airmen of Bulgaria who were alas, victims of circumstances during two world
wars. The Bulgarian Maltese cross style of decals came from a Blue Rider’
decal sheet. The white numerals came from an old ‘Almark’ Luftwaffe
sheet. The ‘X’ style of insignia came from the Heller Taifun Me-108 kit sheet
that was an exact match.
| CONCLUSIONS |
I have to admit that this was a conversion not to be rushed with but it was also an enjoyable build and will go with my ever-expanding section of models that served with a lesser known Air Force of Bulgaria over the years.
January 2007
If you would like your product reviewed fairly and quickly by a site that has nearly 350,000 visitors a month, please contact me or see other details in the Note to Contributors.